Figuring out the best way to get paint off concrete really boils down to what you're up against. Generally, your best bets are chemical stripping for those really thick, stubborn layers, mechanical grinding when you have a big, flat area to clear, and pressure washing for paint that's already giving up and starting to flake.
For instance, a thick, glossy epoxy coating on a garage floor that’s been there for a decade will require a completely different approach than a thin layer of peeling latex paint on an outdoor patio. Each method has its own trade-offs in terms of speed, cost, and the amount of elbow grease required.
Finding the Right Paint Removal Method for Your Concrete
Before you jump in and start blasting away, it’s crucial to know that there's no magic bullet here. The technique that works perfectly on a lightly painted patio could be a total waste of time on an old, thick epoxy coating in a garage. Nailing this project comes down to correctly identifying what kind of problem you have and picking the right tool for that specific job.
You've basically got three main game plans for tackling painted concrete:
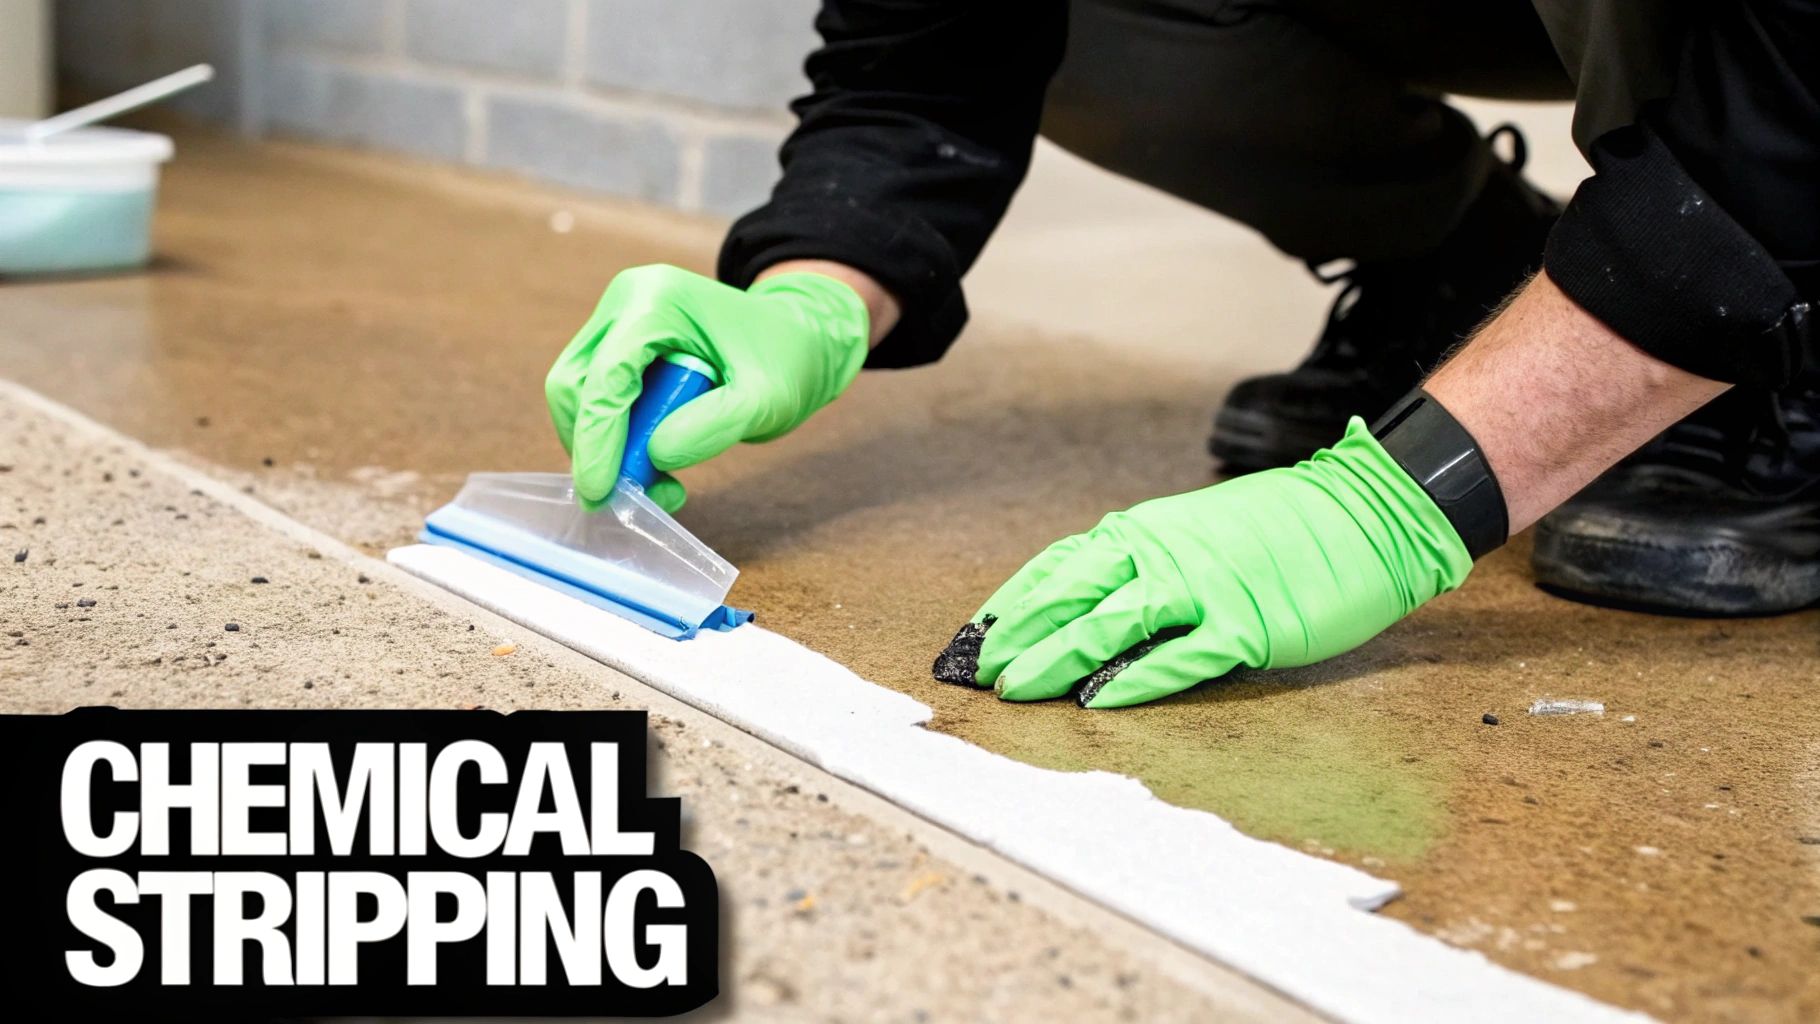
- Chemical Stripping: This method uses a powerful chemical solution to dissolve the paint's bond with the concrete. It turns the paint into a gooey sludge that you can scrape away. This is the go-to for really tough, built-up layers where other methods just can’t cut it, such as removing multiple layers of old paint from a basement floor.
- Mechanical Removal: Think of this as the brute-force option. You’re using tools like concrete grinders, sanders, or even shot blasters to physically grind the paint right off the surface. It's fast and effective, especially for large, open spaces like a warehouse or a big garage floor with a single, thin coat of paint.
- Pressure Washing: Here, you're using a high-pressure jet of water to literally blast off paint that's already peeling or flaking. It's a lot less aggressive than grinding and you get to skip the harsh chemicals. For example, this is perfect for a driveway where the paint is already lifting due to weather exposure.
Each approach shines in different scenarios. For example, if you're just trying to get a thin, peeling layer of latex paint off your basement floor, a pressure washer or even a long-handled scraper might be all you need. But if you're facing a heavy-duty industrial epoxy coating? You’ll need to bring out the big guns—a powerful concrete grinder fitted with a diamond cup wheel is really the only practical solution. It's all about matching the method to the mess.
Choosing Your Approach
Take a hard look at your project's details. Working indoors in a poorly ventilated basement? A low-VOC (Volatile Organic Compounds) chemical stripper is a much smarter choice than a grinder that will fill the air with hazardous dust. Is the paint on a decorative stamped concrete patio? Aggressive grinding could destroy that beautiful pattern forever, making a careful chemical application the safer route. As an example, a stamped concrete walkway painted with an acrylic sealer would be ruined by a grinder, but a gel-based stripper can be carefully applied to lift the coating without damaging the texture.
This handy flowchart can give you a great starting point for deciding which method to try first, based on how the paint looks right now.
As you can see, the paint's condition gives you a huge clue. Thick, heavy coats usually need a chemical stripper to break them down. Thin layers can often be ground off quickly. And if it's already flaking and peeling, a pressure washer will make short work of it. A quick assessment like this can save you a ton of time and frustration.
Concrete Paint Removal Methods at a Glance
To help you weigh the options, here's a quick comparison of the three main techniques. This table breaks down what each method is best for, along with the key pros and cons I've seen on the job.
| Method | Best For | Pros | Cons |
|---|---|---|---|
| Mechanical Removal | Large, flat surfaces with thin-to-medium paint layers (e.g., garage floors, warehouses). | Very fast and effective for big areas. No chemicals or water mess. | Creates a massive amount of dust. Can damage decorative or uneven concrete. Equipment can be expensive. |
| Chemical Stripping | Thick or multiple layers of stubborn paint (e.g., epoxy, acrylic). Great for detailed or uneven surfaces. | Extremely effective on tough coatings. Less dust and noise. Good for indoor use (with proper ventilation). | Can be slow and messy. Requires handling harsh chemicals and proper disposal. May need multiple applications. |
| Pressure Washing | Flaky, peeling, or thin layers of paint on outdoor surfaces (e.g., patios, driveways). | Fast and chemical-free. Great for prep work before repainting. Minimal dust. | Not effective on well-adhered paint. Can damage soft concrete or mortar joints. Introduces a lot of water. |
Ultimately, your decision will come down to a balance of cost, time, and labor. Renting a professional-grade grinder costs more upfront than a bucket of paint stripper, but it can clear an entire two-car garage in a single afternoon. For example, renting a grinder might cost $150 for a day, while a 5-gallon pail of chemical stripper could be $200 but require more time and manual scraping.
Key Takeaway: The "best" way to remove paint from concrete isn't about one specific tool. It's about taking the time to properly assess the paint, the concrete, and the environment you're working in.
By understanding the strengths and weaknesses of each method, you can put together a plan that’s not just effective, but also safe and efficient for your specific project. This little bit of planning upfront is the most important step toward getting a perfectly clean concrete surface, ready for whatever you have planned next.
Tackling Stubborn Paint with Chemical Strippers
When a grinder is just too aggressive for your surface and a pressure washer isn't making a dent, chemical paint strippers are your best bet. This is my go-to method for dealing with really thick, stubborn layers of paint—especially multiple coats or those heavy-duty industrial coatings like epoxy and urethane that have basically become one with the concrete.
Instead of trying to blast or chip the paint off, these products get to work on a molecular level. They break down the paint itself, turning it into a soft, gooey mess that you can simply scrape away. The real beauty of a chemical stripper is that it does the hard work for you. Forget hours of back-breaking grinding; here, you just apply the product, wait, and then scrape. It's an ideal solution for surfaces that aren’t perfectly flat, like stamped concrete patios or old, uneven garage floors where a grinder could do more harm than good.
Choosing the Right Stripper for the Job
Walk into any hardware store and you'll see a dizzying array of strippers. Picking the right one is critical for getting the job done right and, more importantly, safely. They typically fall into two camps.
- Caustic Strippers: These are the heavy hitters, often containing ingredients like sodium hydroxide (lye). They are highly alkaline and work by chemically breaking down the oils and polymers in the paint. They're fantastic for devouring thick layers of old oil-based or latex paint but demand very careful handling and require you to neutralize the surface afterward. An example of a caustic stripper is Lye-based "Peel Away 1."
- Solvent-Based Strippers: These use powerful organic solvents to dissolve the paint. In my experience, they tend to work faster than caustics and are effective on a much wider range of modern coatings, including tough ones like epoxy and polyurethane. Many newer formulas are also designed with lower VOCs (Volatile Organic Compounds), making them a much better choice for indoor jobs, assuming you have plenty of airflow. For example, products containing N-Methyl-2-pyrrolidone (NMP) are effective solvent strippers.
For most projects around the house, a good solvent-based stripper is usually the most versatile and user-friendly option. It's effective on the durable paints you'll find on most garage floors and patios.
Pro Tip: Don't skip the patch test! Always try your stripper on a small, hidden spot first. This tells you if it's actually going to work on your specific paint and gives you a realistic idea of how long it needs to sit—all without committing to the entire floor. For example, test a 2×2 foot square in a corner of the garage.
Prepping for a Safe and Clean Application
Let's be clear: working with chemical strippers requires a serious commitment to safety. These aren't gentle cleaners; they can cause nasty skin burns and respiratory issues if you're careless. Before you even think about popping the lid, get your workspace and your safety gear in order.
Here’s your non-negotiable safety checklist:
- Ventilation is Key: If you're indoors, open every window and door you can. I always set up a couple of box fans to create a strong cross-breeze. For a basement or a garage with poor airflow, a respirator with organic vapor cartridges is an absolute must.
- Gear Up (PPE): At a bare minimum, you need chemical-resistant gloves (your basic latex ones won't cut it), full-coverage safety goggles, and closed-toe shoes. I also recommend long sleeves and pants to protect your skin from any accidental splashes.
- Protect Your Surroundings: Use plastic sheeting and painter's tape to cover anything you don't want the stripper to touch. Think walls, baseboards, door trim, or, if you're outside, nearby plants and soil. For example, tape 4-mil plastic sheeting at least two feet up any adjacent drywall.
The Application: Be Generous and Patient
Once you're prepped and protected, the application itself is pretty simple. Grab a cheap, disposable paintbrush or a roller and slop on a thick, generous coat of the stripper. Don't "paint" it on thinly. You want to lay it on like you're frosting a cake. A thin coat will just dry out and stop working. A good rule of thumb is to apply it about 1/8 inch thick.
Now for the most important part: dwell time. This is how long you let the stripper sit and work its magic. It could be anywhere from 30 minutes to 24 hours, depending on the product, the type of paint, and how thick it is. You have to resist the temptation to start scraping too soon. Let the chemicals do their job. Some strippers even come with a plastic sheet to lay over the top, which is a great trick for keeping the product from evaporating so it stays active longer on really tough jobs.
The industry data backs this up. Studies on masonry paint removal show that the right chemical strippers can soften and lift 80–95% of common paint coatings in just one go, which is far more efficient than mechanical methods on multi-layered surfaces. After the stripper does its thing, a low-pressure rinse of around 300–500 psi is usually all that's needed to wash the residue away, leaving only minor spots to touch up.
Scraping, Cleaning, and Neutralizing
You’ll know it’s ready when the paint starts to look wrinkled and bubbled. Test a small section with a scraper. If the paint lifts off in thick, satisfying, gooey sheets, you're good to go. A long-handled floor scraper makes quick work of large areas, but a stiff putty knife is great for edges and corners.
Shovel all that gunk into a disposable container—a cardboard box lined with a heavy-duty trash bag works well. Remember, this waste is considered hazardous, so you can't just toss it in the regular trash. Check your local regulations for proper disposal procedures. For example, your county may have a specific hazardous waste drop-off day or facility.
After you've scraped up all the sludge, the final step is to clean and neutralize the concrete. For most solvent-based strippers, a wipe-down with mineral spirits does the trick. Caustic strippers, on the other hand, almost always require a specific neutralizing wash (usually a mild acid solution) followed by a really good rinse with plain water. Don't skip this last part! It gets rid of any lingering chemical residue and leaves your concrete perfectly prepped for whatever comes next, whether that's a new coat of paint or a protective sealer.
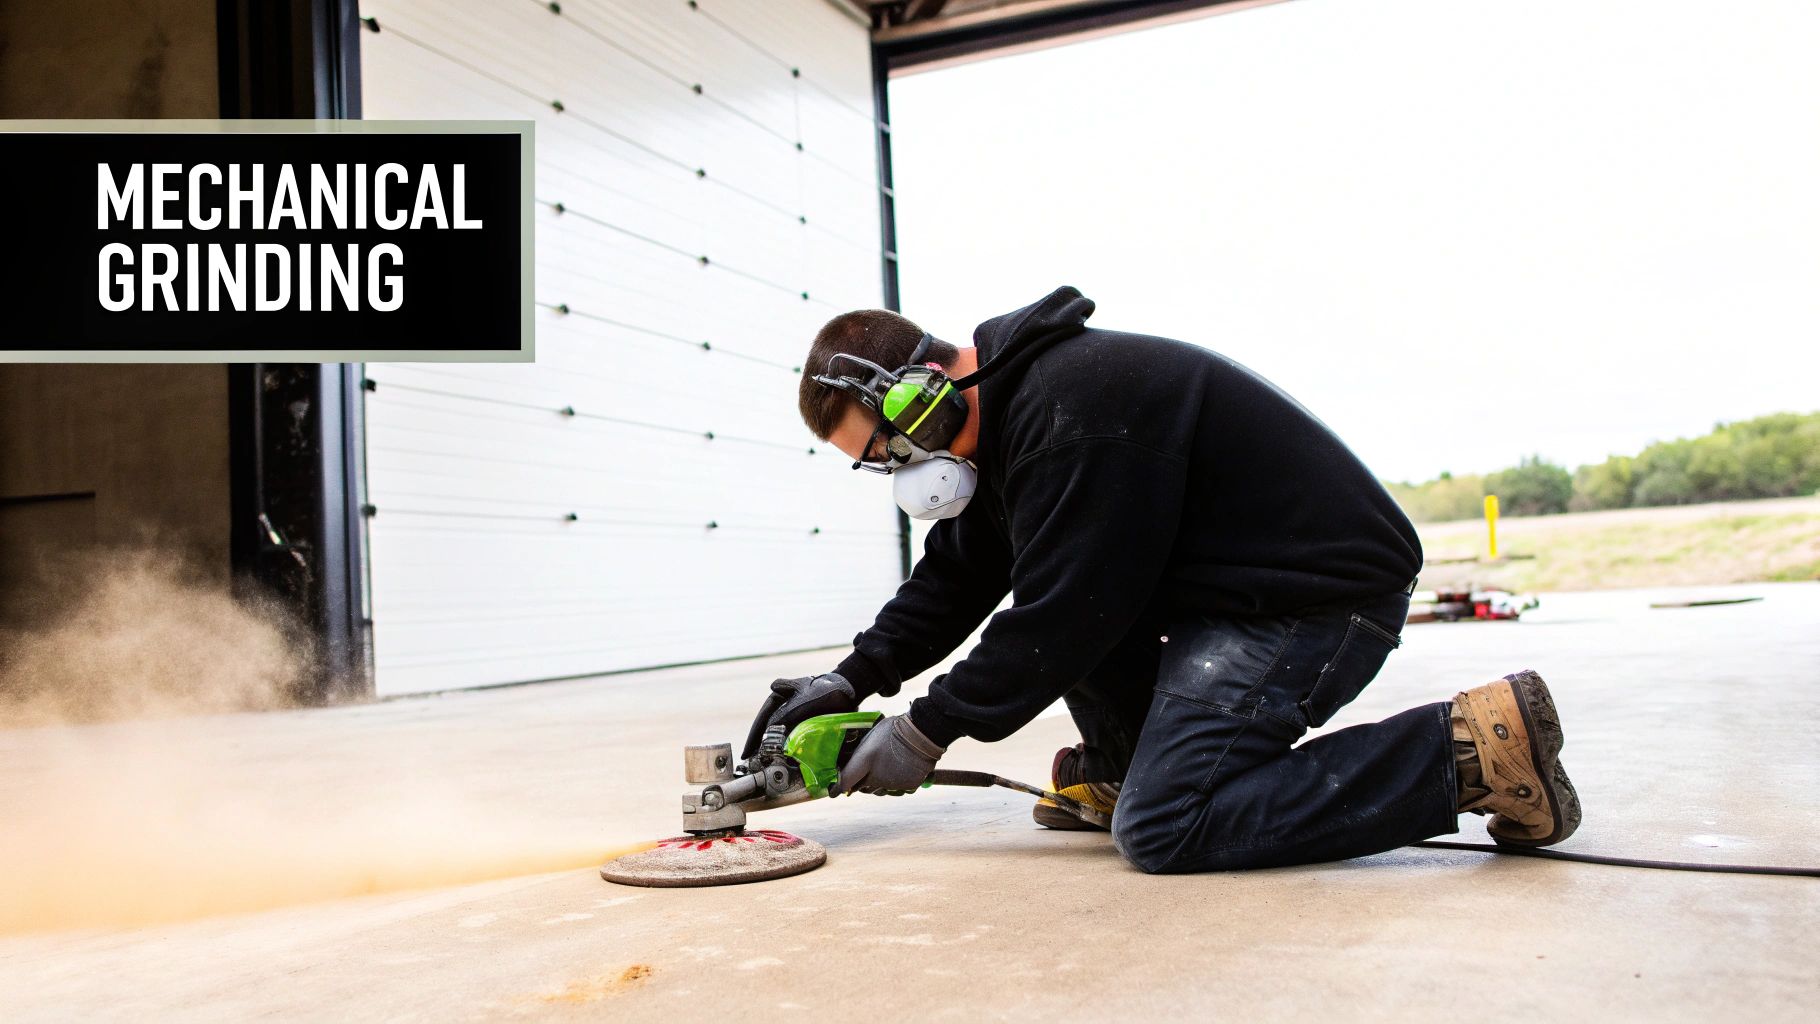
Mechanical Removal With Grinders and Sanders
Sometimes, you just need to bring out the big guns. When you're facing a huge, flat concrete area and chemical strippers just aren’t practical, mechanical removal is your most direct path to a clean slate. This is the brute-force approach—physically grinding or sanding the paint right off the surface.
Think of it like taking a power sander to an old piece of furniture. You're not dissolving the finish; you're abrading it away until you get back to the bare material underneath. This makes it the best way to remove paint from concrete when you're tackling a large garage floor, a sprawling basement, or any wide-open space where efficiency is the name of the game.
But all that power comes with a price: dust. And lots of it. Grinding concrete and paint creates a massive amount of airborne particulate that’s a real pain to clean up and can be hazardous if you’re not prepared. For example, grinding a 400 sq. ft. garage can produce over 50 pounds of fine, hazardous dust.
Matching the Tool to the Task
Using the right tool isn’t just a suggestion—it's everything. Go too small, and you'll be there for days. Go too aggressive, and you risk permanently scarring your concrete.
-
Concrete Grinders: For big jobs, these are your workhorses. A walk-behind floor grinder is perfect for clearing out a two-car garage. For most DIY projects, a handheld angle grinder paired with a diamond cup wheel is the sweet spot, offering a great mix of power and control. Those diamond segments just chew through old paint.
-
Sanders: If you’re only dealing with a very thin layer of paint, a floor sander or a belt sander armed with some seriously coarse-grit sandpaper (think 40-grit or lower) can get the job done. It's a much gentler option, often better for a final smoothing pass than for heavy-duty removal.
-
Wire Wheels and Brushes: Pop one of these onto your angle grinder or drill, and you've got a fantastic tool for detail work. A knotted wire cup brush is a lifesaver for getting into corners, cleaning paint from the edges along a wall, or stripping textured concrete where a flat grinder can't make good contact.
On a recent garage floor project, for example, I used a 7-inch angle grinder with a diamond cup wheel for the main area. Then, I switched over to a smaller 4.5-inch grinder with a wire wheel to carefully work around the foundation wall and the garage door tracks without damaging anything.
The Non-Negotiable Rules of Safety
Let's be blunt: this is a loud, messy, and potentially dangerous job without the right gear. The dust isn't just an annoyance; it contains fine silica particles from the concrete, which are seriously harmful to your lungs.
Safety First: Don't even think about starting without a high-quality respirator—and I don't mean a flimsy paper mask. You need one rated for silica dust, like an N95 or P100. Full-seal safety goggles are also a must to keep debris out of your eyes, along with some heavy-duty hearing protection.
The single best thing you can do is connect your grinder to a dust shroud attached to an industrial vacuum. This setup captures most of the dust right at the source, saving you hours of cleanup and, more importantly, protecting your health. For example, a HEPA-rated vacuum connected to the grinder's dust port can capture over 99% of airborne particles.
Achieving a Smooth and Even Finish
The biggest rookie mistake with mechanical removal is gouging the concrete. If you apply too much pressure or tilt the grinder, you'll leave behind ugly swirl marks and divots that are a real headache to fix.
The key is to keep the grinding wheel completely flat against the surface. Use smooth, consistent, overlapping passes, a lot like mowing your lawn. Let the tool's weight do the work for you; don't try to force it. A steady hand and a little patience will give you a clean, uniform surface that’s perfectly prepped for a new coating.
That slightly roughed-up texture you create is actually a good thing! It gives new paints, epoxies, or sealers something to really bite into. After a thorough vacuuming, the floor is an ideal canvas. This level of preparation is the crucial first step for high-end finishes like those you see in beautiful and durable residential polished concrete floors. Getting the old stuff off the right way is what makes the final result possible.
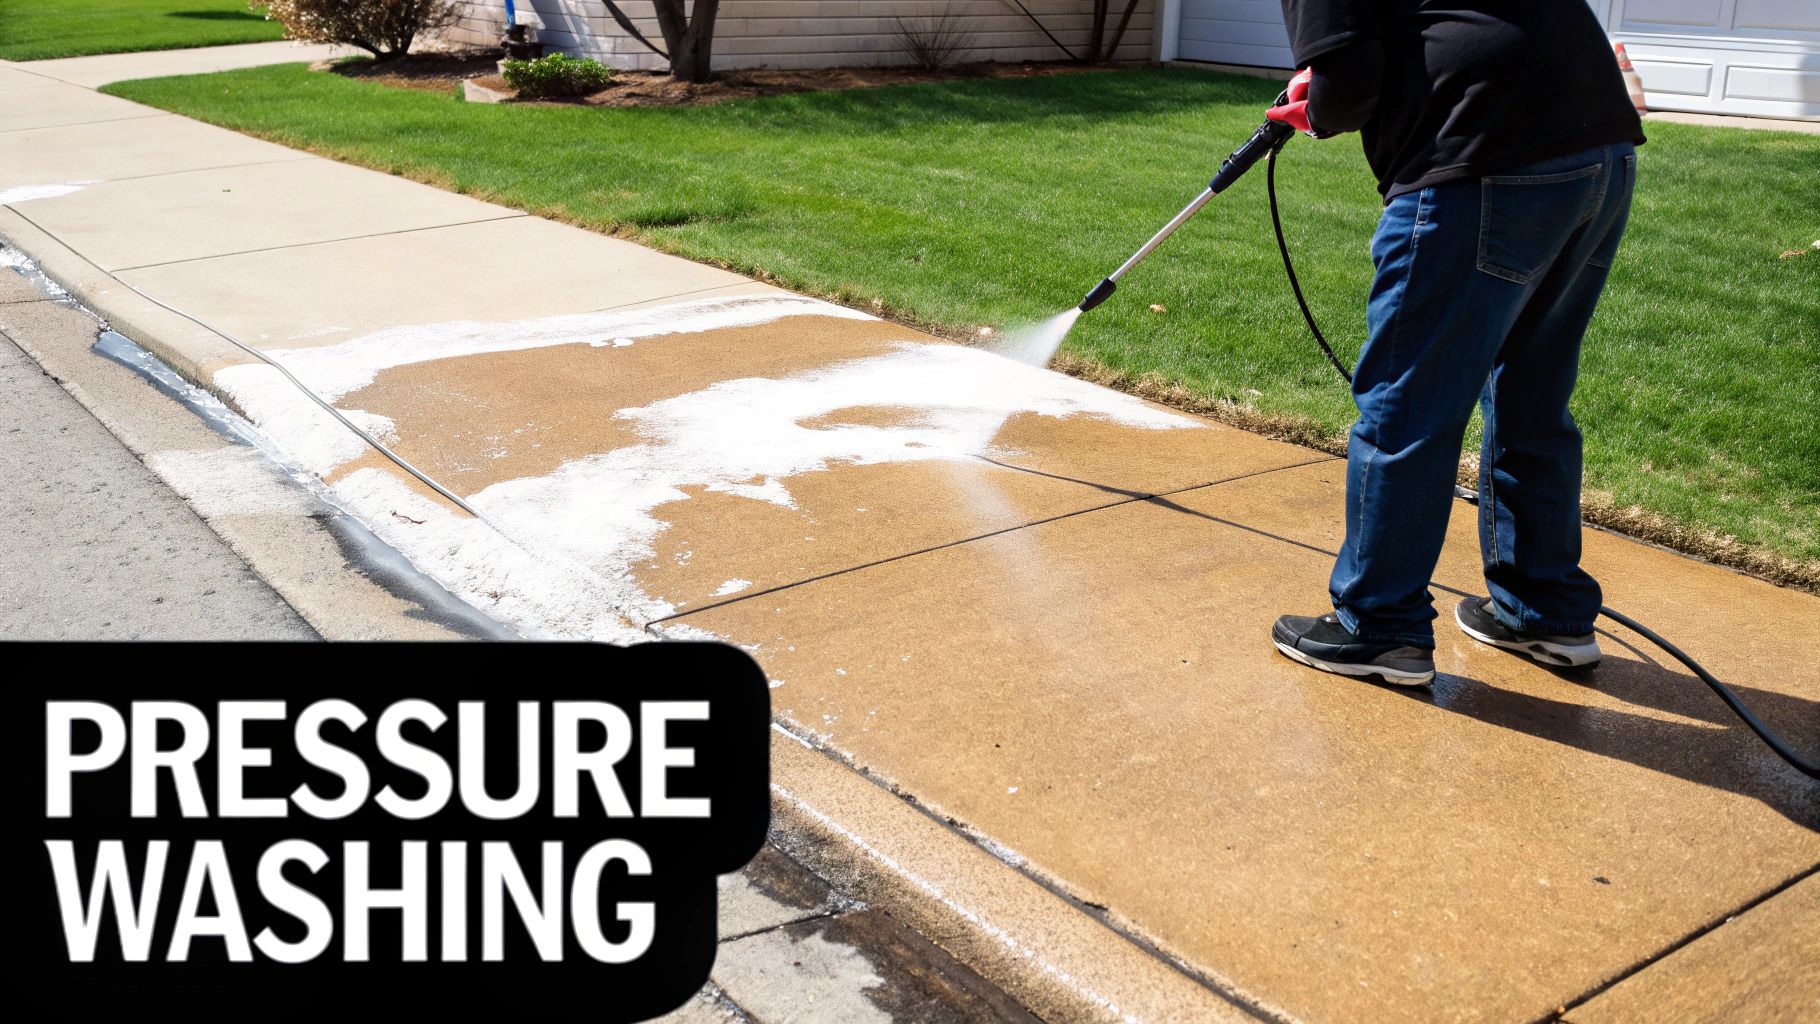
How to Pressure Wash Paint From Concrete Surfaces
When the paint on your driveway or patio is already giving up the ghost—cracking, flaking, and generally looking tired—a pressure washer can be your best friend. It’s a great, chemical-free way to strip failing paint, using nothing but the force of water to blast it away. This approach is perfect for outdoor surfaces where you don't have to worry about water runoff.
Think of it less like a chemical stripper that dissolves paint and more like a high-powered, water-based scraper. The jet of water gets right under the edges of that loose paint and peels it off the concrete. I’ve found it works especially well on old, sun-beaten latex or acrylic paints that have lost their grip over the years, making it a solid first step for any resurfacing project.
Choosing the Right Machine and Pressure
Not all pressure washers are built the same, and picking the right one is the difference between a clean surface and a damaged one. The number one thing to look at is PSI (pounds per square inch). To effectively strip paint, you need a machine that can deliver at least 3,000 PSI.
You’ll generally run into two types of machines:
- Standard Cold-Water Washers: These are the most common and will get the job done for most residential paint-stripping projects. They rely purely on pressure.
- Hot-Water Units: These are more of a commercial-grade beast. The hot water helps soften stubborn coatings, speeding things up, but they're usually overkill for typical peeling paint on a patio.
My advice? Head to a rental shop and grab a gas-powered model. They have the muscle (pressure and flow rate) to strip paint efficiently, which is something most electric models you’d buy at a big-box store just can’t match. For example, a typical electric washer might only produce 1,800 PSI, which will clean dirt but won't effectively strip paint.
Why the Nozzle Is Everything
The small nozzle at the end of the wand has a massive impact on your results. Choose one that's too aggressive, and you can easily scar the concrete with permanent marks. Nozzles are color-coded for a reason—each one delivers a different spray pattern.
- Yellow (15-degree): This one shoots a narrow, concentrated jet. It’s a workhorse for stripping tough paint, but you have to be careful not to get too close.
- Green (25-degree): This is usually my starting point. The wider spray is much more forgiving and less likely to damage the concrete, but it’s still strong enough to lift peeling paint.
- Red (0-degree): Never use this nozzle for stripping paint. It creates a single, pencil-thin jet that can literally carve lines into your concrete. Just don't do it.
- Turbo Nozzle: This is a special attachment that spins a zero-degree stream in a circle. It gives you the power of the red nozzle but covers more ground. It’s fantastic for really stubborn areas, but you absolutely must keep it moving.
I always start with the green 25-degree nozzle on a test patch. If the paint isn’t moving, I’ll cautiously switch to the yellow 15-degree nozzle, but I’ll make sure to hold it further back from the surface to account for the extra power.
It's All in the Technique
Great results come from consistency. The whole point is to lift the paint without leaving ugly streaks or gouges behind. How you move the wand is just as important as the machine itself.
Keep the wand at a steady 45-degree angle to the surface and maintain a distance of about 12-18 inches. Use a smooth, sweeping motion, overlapping each pass by roughly 30-50%, almost like you’re spray painting. This is how you avoid those "zebra stripes" that scream DIY-gone-wrong.
If you come across a coating that absolutely refuses to budge, some pressure washers can be equipped with a sandblasting kit. This pulls an abrasive like sand into the water stream, basically wet-blasting the paint off. It’s an incredibly aggressive technique and should be your absolute last resort for something like an old industrial epoxy, as it will definitely change the texture of your concrete.
Prepping and Sealing Your Concrete After Paint Removal
Getting that old, flaky paint off your concrete feels like a major victory, but don't break out the celebratory drinks just yet. The job isn’t quite finished. What you do next is absolutely critical for protecting all that hard work and making sure the surface looks great for years to come.
Think of it this way: you’ve just created a blank canvas. The final touches—cleaning, surface prep, and sealing—are what turn that canvas into a masterpiece. Skipping these steps is a surefire way to see your new finish fail down the road.
The All-Important Final Cleanup
Whether you just spent hours grinding, scraping chemical goo, or blasting with a pressure washer, your concrete is now covered in residue. You'll have fine dust from grinding, a filmy residue from chemical strippers, or stray paint chips everywhere. Leaving any of this behind will ruin the adhesion of whatever you apply next.
First things first, get it clean. A shop vac is your best friend for sucking up the dry dust and debris left from mechanical methods. If you went the chemical or pressure washer route, give the whole area a final, thorough rinse with a garden hose and a good scrub with a stiff-bristled broom to wash away any remaining gunk. The goal here is a spotless surface.
To Etch or Not to Etch?
Now that the surface is clean, you have to consider its porosity. Concrete is basically a hard sponge with tons of microscopic pores. For a new coating or sealer to really grab on and last, it needs to penetrate those pores. If your concrete is super smooth and dense, the new finish will just sit on top, waiting to peel off.
This is where etching comes into play. Concrete etching involves washing the surface with a mild acid—typically muriatic or phosphoric acid. This solution gently dissolves the very top layer of cement paste, opening up the pores and giving the surface a texture similar to medium-grit sandpaper. It creates the perfect profile for a new coating to bond to.
Not sure if you need to etch? Try a simple water test. Splash a bit of water onto the dry concrete.
- If it soaks in within a minute or two, your concrete is probably porous enough.
- If the water beads up and just sits there, you absolutely need to etch.
Pro Tip: Etching is the secret to avoiding peeling paint. It creates a powerful mechanical bond between the concrete and your sealer, which dramatically boosts the durability and lifespan of your new finish.
Picking the Right Concrete Sealer
Sealing the concrete is the final, non-negotiable step. A good sealer is your concrete’s armor against moisture, oil stains, de-icing salts, and general wear and tear. It also makes cleaning a breeze. But with so many options, how do you choose?
Sealers basically come in two flavors:
- Penetrating Sealers: These soak deep into the concrete to form a protective barrier from within. They're invisible, so they won’t change the look or feel of the surface. Think of them as a hidden shield. Silane and siloxane are the common types here. These are excellent for driveways and sidewalks where you want to maintain the natural concrete look while protecting against salt damage in winter.
- Topical Sealers (Film-Forming): These create a protective layer on top of the concrete, like a clear coat. They come in finishes from matte to high-gloss and are great for enhancing appearance. Acrylics are popular for a good balance of looks and protection, while epoxies and urethanes offer maximum-duty protection for high-traffic spots like garage floors. For example, a two-part epoxy topical sealer is the standard for a durable, chemical-resistant garage floor finish.
Your choice really depends on the job. For a natural-looking patio or driveway, a penetrating sealer is ideal. For that glossy, easy-to-clean garage floor, a topical acrylic or epoxy is the way to go. If the paint removal uncovered deeper issues like major cracks or spalling, you may need to consider a professional residential concrete and masonry repair before you even think about sealing.
When It's Time to Call in the Pros
Look, I'm all for rolling up your sleeves and tackling a project yourself. Many paint removal jobs are perfect for a weekend warrior. But I've also seen enough DIY disasters to know when it's time to put down the tools and pick up the phone. Sometimes, the smartest move is letting a professional handle it.
The biggest red flag? Lead-based paint. If your home was built before 1978, you have to assume the paint contains lead. Don't even think about sanding or grinding it. You'll create toxic dust that’s incredibly dangerous to your family. A pro knows the strict containment and safety protocols required to manage this hazard.
Another clear sign is when you're up against an industrial-grade coating. We're talking about those tough two-part epoxies or heavy-duty urethanes you see in garages and commercial spaces. Your rental grinder from the local big-box store just isn't going to cut it, and you could do more harm than good trying. For example, attempting to grind a polyurethane coating with a standard diamond cup wheel can cause the coating to melt and gum up the wheel, rendering it useless and potentially damaging the grinder.
Situations That Demand a Professional Touch
Beyond dangerous materials, think about the sheer scope of the job. It's one thing to strip a small porch, but another entirely to tackle a whole basement. If the job feels overwhelming, remember that professional concrete contractors are out there for a reason.
You should seriously consider hiring a pro if you're dealing with:
- Massive Surface Areas: A two-car garage or a commercial floor can take a DIYer weeks of back-breaking work, often resulting in a patchy, uneven finish.
- Sensitive or Historic Surfaces: Got decorative stamped concrete or a historic walkway? One wrong move with a grinder can cause permanent, ugly damage. Professionals have the right touch for these delicate jobs.
- Mystery Coatings: If you have no idea what kind of paint or coating you're dealing with, you could waste a ton of time and money guessing with different strippers and methods.
A professional crew doesn't just show up with better equipment—like powerful, dust-controlled grinders—they bring years of experience. They can identify a coating on sight and know the fastest, safest way to get it off.
This kind of expertise is what prevents costly mistakes, like gouging your slab or choosing a chemical that etches the surface too deeply. If any of this sounds like your project, exploring the services of a local concrete specialist isn't just a convenience—it's an investment in getting the job done right the first time.
Got Questions? We've Got Answers
When it comes to stripping paint from concrete, a few questions pop up time and time again. Here are some quick, no-nonsense answers based on what we see in the field.
Is a Heat Gun a Good Idea for Concrete?
Honestly, probably not. While a heat gun works wonders on wood, concrete is a different beast entirely. It's so dense that the heat just can't penetrate deep enough to be effective.
You'll spend ages trying to soften a tiny patch, only to find it's barely made a dent. Save yourself the headache and stick to chemical strippers or mechanical methods for any area larger than a small splatter. For example, you might spend 15 minutes with a heat gun to soften a 6×6 inch area that a chemical stripper could have tackled in the same time over a much larger space.
How Can I Tell if I'm Dealing With Lead Paint?
This is a big one, and you have to get it right. If your house was built before 1978, you should automatically suspect the paint might contain lead. Don't guess.
The safest and quickest way to know for sure is to grab a lead paint test kit from any hardware store. These kits, such as the 3M LeadCheck swabs, provide instant results. If that test comes back positive, stop right there. Do not scrape, grind, or sand it. Creating lead dust is a serious health hazard. This is a job for a certified professional, period.
What's the Best Way to Get Rid of Spray Paint?
For fresh graffiti or overspray, you might get lucky. A powerful pressure washer and a good concrete cleaner can often blast it right off.
But if that spray paint has been there for a while, it's a different story. It’s had time to really bond with the concrete. In that case, you'll need to step up your game with a targeted graffiti remover or a heavy-duty chemical stripper to break it down. For example, products specifically formulated as "graffiti removers" are often more effective than general paint strippers for this task.
For those tough, stubborn jobs that need a professional touch, the team at Atlanta Concrete Solutions has the equipment and experience to get it done right. Get your free quote today!