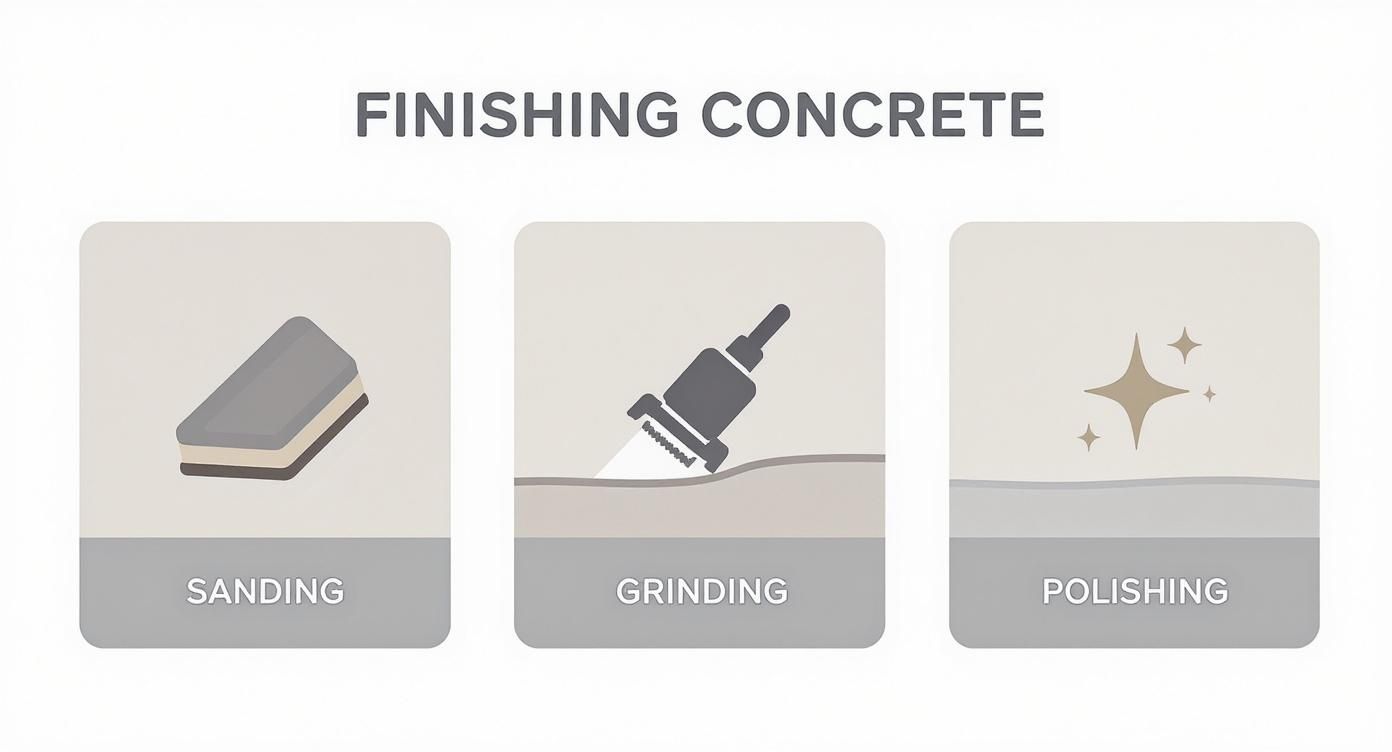
So, can you actually sand concrete? The short answer is yes, but it’s probably not what you’re picturing. When we talk about sanding wood, we think of smoothing a surface with sandpaper. Trying that same approach on concrete is like trying to chop down an oak tree with a nail file—it's just not the right tool for the job. For example, using a standard orbital sander on a concrete patio would shred the sandpaper in seconds and barely scratch the surface, all while creating a cloud of hazardous dust.
In the world of professional concrete finishing, the terms we use are grinding and polishing. These processes are far more aggressive and effective, delivering the smooth, durable finishes you see in showrooms, garages, and modern homes.
Concrete Sanding vs. Grinding vs. Polishing: What's the Real Difference?
Thinking about your concrete floor like a piece of rough-sawn lumber can help. You wouldn't jump straight to fine-grit sandpaper; you'd start with a power planer to flatten it out first. Concrete grinding is like that power planer. It’s a heavy-duty process that uses powerful machines with diamond-embedded abrasive discs to literally grind down the top layer of the concrete. This is how we level uneven spots, remove old coatings like paint or epoxy, and erase imperfections.
Polishing comes next. Once the surface is flat and uniform from grinding, we switch to progressively finer diamond grits. This isn't about removing a lot of material anymore. It's about honing and refining the surface until it becomes incredibly smooth, dense, and even reflective. For instance, a garage floor might be ground to remove oil stains and then polished to a satin finish that's easy to clean, while a retail store might be polished to a high gloss to create a more luxurious feel.
Why Using the Right Words Matters
Knowing the difference between these terms is more than just industry jargon—it’s key to getting your project done right. If you walk into a tool rental shop and ask for a "concrete sander," you might end up with a simple floor buffer that’s only good for light cleaning. It won’t do a thing to an uneven garage floor. A classic example is a homeowner trying to smooth out a lumpy basement floor with a floor buffer; they'll spend hours making a lot of noise and dust, but the high and low spots will remain.
But if you ask for a concrete grinder with the right diamond tooling, they'll know exactly what you need: a machine with the muscle to truly transform the surface.
The real distinction is in the goal. Sanding wood is about refining a surface that's already relatively soft and workable. Grinding concrete is about reshaping a tough, composite material with controlled force before you can even think about refining it.
To make things even clearer, let's break down how these techniques stack up against each other. Each one has a specific purpose, requires different equipment, and delivers a completely different result.
Sanding vs. Grinding vs. Polishing At a Glance
This table quickly shows the main differences, helping you understand which approach is right for your goals.
| Technique | Primary Goal | Tools Used | Typical Finish |
|---|---|---|---|
| Sanding | Light surface cleaning or scuffing (often ineffective) | Hand sanders, floor buffers | Minimal change, slightly cleaner |
| Grinding | Aggressive leveling, coating removal, major repairs | Walk-behind grinders, angle grinders with diamond cup wheels | Uniform, flat, matte surface ready for coatings or polishing |
| Polishing | Creating a smooth, dense, and reflective surface | High-speed burnishers with resin-bond diamond pads | Satin to high-gloss, durable, low-maintenance sheen |
Ultimately, choosing the right method all comes down to what you want the final product to look like. For example, if you just want to apply a fresh coat of paint to a basement floor, a light grinding might be all you need. But if you want a mirror-like finish for your living room, you'll need the full grinding and multi-step polishing process.
Choosing Your Finish: Sanding, Grinding, or Polishing?
Getting the right finish for your concrete floor means picking the right tool for the job. People often ask, "Can you sand concrete?" and while you can, the term is a bit of a catch-all. In the world of professional concrete work, we really talk about two main processes: grinding and polishing.
Think about it like finishing a piece of rough lumber. You wouldn't jump straight to fine-grit sandpaper on a raw, splintered plank. You'd grab a power planer first to do the heavy-duty flattening. That’s exactly what grinding is for concrete—it's the power tool that sets the foundation.
What Is Concrete Grinding?
Grinding is the aggressive first step we take to fix major issues with a concrete slab. It’s all about function over finesse. We use heavy-duty machines armed with coarse, metal-bonded diamond segments to literally chew through the top layer of the concrete. This isn't a gentle process; it's designed to level high spots, remove old coatings, and get rid of stubborn stains.
Imagine a garage floor that’s seen better days, covered in old paint and oil spots. Before we can even think about applying a new epoxy coating, that surface has to be perfectly clean and profiled. Grinding is how we get there. It creates an ideal, porous surface that allows the new coating to grab on and form a permanent bond. A perfect real-world example is an old warehouse floor being prepped for a new forklift-rated coating; grinding removes years of grime and creates the necessary surface profile for the new material to adhere properly.
The Refinement of Polishing
Once the heavy lifting of grinding is over, we can move on to polishing. This is where the artistry comes in. Polishing isn't about removing a lot of material; it's about refining the surface that grinding has prepared, making it progressively smoother, denser, and more beautiful.
We switch from the aggressive metal-bond diamonds to finer, resin-bond diamond pads. It’s the same concept as working your way up through finer and finer grits of sandpaper on a woodworking project. With each pass, the concrete gets smoother until it starts to develop a natural, light-reflecting sheen. For instance, to achieve a satin sheen, we might stop at a 400-grit resin pad. For a high-gloss, mirror-like finish, we would continue all the way up to a 1500- or 3000-grit pad.
This infographic breaks down how these different terms fit together to create a finished concrete surface.
As you can see, grinding is the corrective workhorse, while polishing is all about creating that final, beautiful aesthetic.
The Unsung Hero: Chemical Densifiers
Now, there's a crucial step between grinding and polishing that makes all the difference: applying a chemical densifier. This liquid hardener penetrates the concrete and sparks a chemical reaction with the free lime inside, creating a much denser and stronger surface from within.
A densifier is the secret sauce for a great polish. It fills the microscopic pores in the concrete, making the surface harder and more resistant to stains and wear. More importantly, it gives the polishing pads a solid foundation to work on, allowing us to achieve a much higher level of shine that actually lasts.
Trying to polish concrete without a densifier is like trying to polish a sponge. The surface is just too soft and porous to hold a sheen. By hardening it first, we create a surface that can be honed to a true, mirror-like finish. For example, a typical residential concrete slab might have a compressive strength of 3,000 PSI, but after applying a densifier, its surface hardness can be significantly increased, making it much more suitable for polishing.
The Tools You'll Need for Concrete Grinding and Polishing

Turning a rough, bumpy slab of concrete into a beautifully smooth surface is all about having the right gear. This isn't a job for your garage-variety orbital sander. Trying to cut corners with the wrong equipment will only lead to frustration and a subpar result. For a professional finish that lasts, you need specialized tools.
The main player for any sizable floor, like a garage or basement, is a walk-behind concrete grinder. These are heavy-duty machines that use rotating discs armed with diamond abrasives. They have the weight and power to systematically shave down the top layer of concrete, creating a perfectly flat and even surface. Popular professional models from brands like Husqvarna or Lavina weigh hundreds of pounds, which is necessary to keep the diamond tooling engaged with the hard concrete.
But what about the tricky spots? Those big grinders can't get into corners or tight against walls. That's where a powerful handheld angle grinder comes in, fitted with a special diamond cup wheel. It's the detailer's tool, allowing you to finish the edges and tight spaces with the same precision as the open floor.
It’s All About the Diamonds
The magic behind the grinding and polishing process lies in the abrasives—a series of specialized, diamond-embedded discs. Think of them as industrial-strength sandpaper for concrete. You always start with a coarse grit to do the heavy lifting and progressively work your way up to finer grits for a smooth finish.
There are two main types you'll work with:
- Metal-Bond Diamonds: These are the aggressive workhorses for the initial grinding stages. The diamonds are held in a hard metal matrix, which lets them power through tough concrete, chew off old coatings, and level out imperfections.
- Resin-Bond Pads: Once the heavy grinding is done, you switch to these. The diamonds are held in a softer, resin-based pad, which is perfect for honing the surface and bringing out that beautiful, smooth polish.
The whole process is a careful progression, starting with a low-grit metal-bond disc (like 30/40 grit) to remove a thick layer of old glue, and methodically moving up to a high-grit resin-bond pad (which can go as high as 3000 grit) to achieve that glass-like sheen.
More Than Just Grinding
Mechanical grinding is only half the battle. To get a truly durable, high-quality polish, chemical treatments are absolutely essential. They aren't just an optional add-on; they're a core part of the process.
The most critical chemical is a concrete densifier. This liquid hardener penetrates the surface and sparks a chemical reaction that makes the concrete itself denser and less porous. Without it, most concrete is too soft to hold a high-gloss polish, resulting in a dull finish that won't last.
After densifying and polishing, a high-quality sealer is the final touch. This creates a protective barrier on the surface, guarding against stains, moisture, and wear. For instance, a penetrating sealer on a polished kitchen floor will help prevent spills like wine or oil from soaking in and leaving a permanent stain. It locks in that beautiful shine and makes the floor much easier to clean and maintain.
It’s this combination of mechanical grinding and chemical treatments that elevates a concrete floor from a simple slab to a finished surface. Exploring the full range of available concrete services shows just how these different elements work together on a professional job.
The growing demand for these materials tells the story. The market for concrete densification and polishing chemicals is projected to balloon from USD 436.4 billion in 2025 to USD 745.4 billion by 2035. This incredible growth highlights just how vital these products are in the construction and design world.
Projects That Require Concrete Grinding and Polishing
It’s one thing to know how to grind and polish concrete, but understanding why really brings the process to life. This isn't just for massive warehouses anymore. These techniques solve real-world problems and create stunning surfaces in all sorts of places, from homes to businesses.
Think about prepping a surface for a new coating. That old garage floor with oil stains and peeling paint? You can't just slap a new layer of epoxy on top and hope for the best. You have to grind it first to get rid of the old mess and create a clean, porous surface. This "profile" gives the new coating something to bite into, ensuring it sticks for good and doesn't peel up in a year. For example, a professional will grind the surface to achieve a specific Concrete Surface Profile (CSP) of 2 or 3, which is the industry standard for optimal epoxy adhesion.
Leveling a floor is another classic use case. If you've ever tried to lay tile or vinyl on an uneven basement slab, you know the frustration. Grinding is the only way to knock down those high spots and create a perfectly flat canvas for whatever flooring you plan to install. A floor that's out of level by more than 1/4 inch over 10 feet can cause tiles to crack and planks to separate.
Creating High-End Finishes
Beyond simple prep work, grinding and polishing are the tools we use to create beautiful, finished floors. This is where the real magic happens. Polished concrete has become a go-to for modern lofts, trendy retail shops, and sleek, open-concept homes.
The process is a gradual refinement. We start by grinding the slab flat, then treat it with a chemical densifier to harden the surface from the inside out. From there, it's all about polishing with progressively finer diamond grits until we get the exact look you want.
You have a few options for the final sheen:
- Satin or Matte Finish: This gives you a subtle, low-gloss look that’s incredibly stylish and does a great job of hiding minor scuffs and imperfections. This is a popular choice for busy family homes.
- Semi-Gloss Finish: Here, you get a noticeable sheen that bounces light around the room, making any space feel bigger and brighter. Retail stores often choose this to create a clean, inviting atmosphere.
- High-Gloss Finish: This is the showstopper—a mirror-like reflection that creates a dramatic, high-end look perfect for showrooms or luxury homes.
This versatility is a key reason for its popularity. You're not just smoothing a surface; you're transforming a structural element into a primary design feature of the building itself.
And it’s not just for new construction. In fact, a huge chunk of the market—over 45% back in 2018—comes from renovating existing buildings. That’s a testament to how effective these methods are for breathing new life into older properties.
For a homeowner, this could mean turning a dusty, forgotten basement into a modern entertainment space with a durable, satin-finish floor. Or it could mean getting a tough, easy-to-clean floor for a busy kitchen. To see what’s possible in your own home, you can explore the options for residential polished concrete and discover just how versatile this finish can be.
Safety First: What to Know Before You Grind Concrete
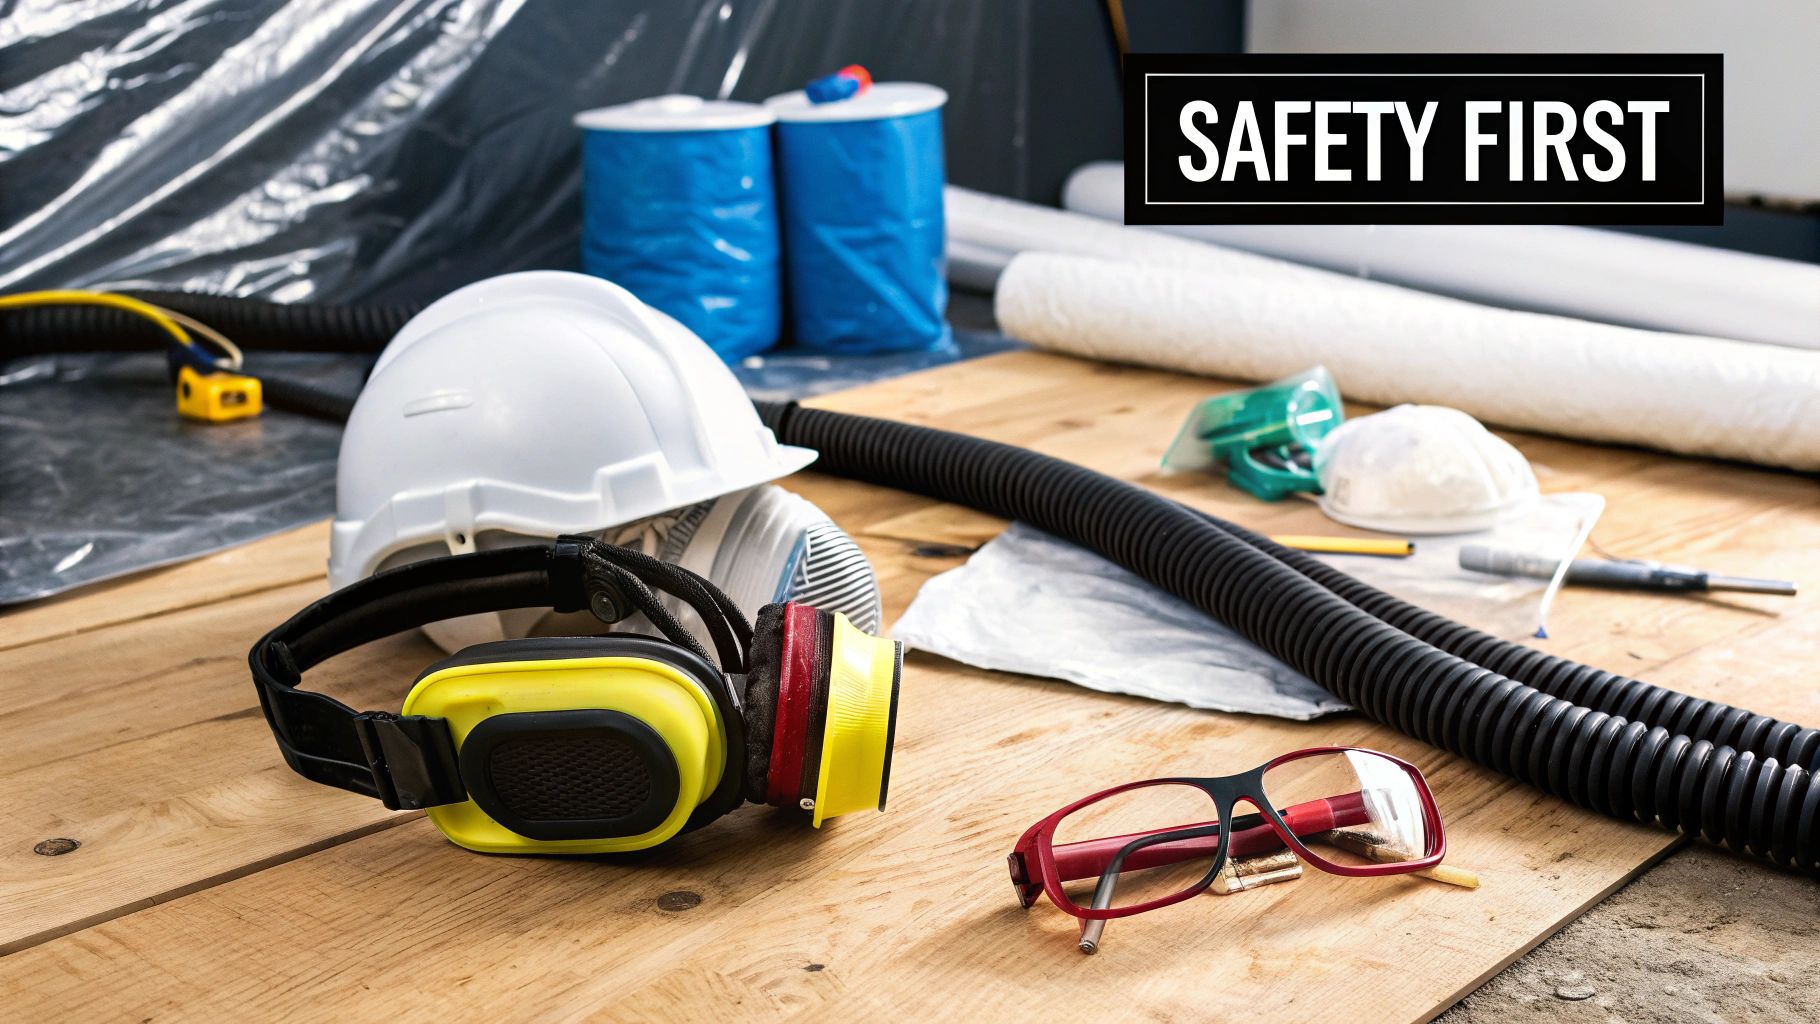
So, you're wondering if you can sand concrete. The real question you should be asking is, "How can I do it safely?" Let's be clear: this isn't a casual Saturday afternoon project. Grinding concrete kicks up an incredible amount of fine dust, and that dust contains something nasty called crystalline silica.
Breathing in silica is no joke. It's a serious health hazard that can lead to permanent lung damage over time, a condition known as silicosis. That's why putting safety first isn't just a suggestion—it's absolutely mandatory. Before you even think about plugging in a grinder, you need to get your gear in order.
Your PPE: The Non-Negotiables
Your Personal Protective Equipment (PPE) is your first line of defense. Think of it as your personal armor against the hazards of the job. Don't even consider starting without these essentials.
- A Real Respirator: Forget those flimsy paper masks. You need a respirator with an N95 rating or higher. A half-mask respirator with P100 cartridges is an even better choice for prolonged exposure.
- Eye Protection: You need to shield your eyes from flying bits of concrete and a constant cloud of dust. Get a good pair of safety glasses, or even better, sealed goggles that leave no gaps.
- Hearing Protection: Concrete grinders are loud—often exceeding 100 decibels, loud enough to cause permanent hearing damage in a short time. A solid pair of earmuffs or earplugs is a must.
- Heavy-Duty Gloves: Grinding is tough on the hands. A good pair of anti-vibration gloves will protect you from scrapes and absorb some of the machine's fatiguing vibration.
Setting Up a Safe Work Zone
Protecting yourself is half the battle; the other half is controlling the environment. The main goal here is to contain every last bit of dust and stop it from coating every single surface in your home. You need to treat your work area like a quarantine zone.
The best safety plan is a two-part system: protect yourself with PPE and protect the space with containment. A mask keeps the dust out of your lungs, but a sealed room keeps the dust out of your life.
First, clear everything out of the room. Everything. Then, get to work with heavy plastic sheeting (at least 4-mil thick) and painter's tape to seal off every door, window, vent, and crack. A practical tip is to create a double-door entry with overlapping plastic sheets to minimize dust escaping when you enter or leave the area.
Finally, an industrial vacuum with a HEPA filter isn't a luxury; it's a necessity. It should be hooked directly to the grinder’s dust shroud to suck up the dust the second it’s created. This combination of personal gear and a sealed, vacuum-assisted workspace is what separates a pro job from a dangerous mess.
Choosing Between DIY and Hiring a Professional
So, you're at a crossroads: should you tackle this concrete sanding project yourself, or is it time to call in the pros? This is a huge decision, and it really comes down to balancing your budget against the quality of the final result.
Going the DIY route can definitely seem like a money-saver at first. You cut out the labor costs, right? But the hidden expenses can really bite you. Renting a professional-grade grinder, buying the right diamond pads for each step, and getting all the safety gear adds up fast. For example, a weekend rental can cost over $500 once you factor in the machine, vacuum, and the various diamond grits you'll need to purchase. Plus, this work is tough on the body, and there’s a steep learning curve. One wrong move doesn’t just look bad—it can gouge or permanently scar your concrete slab.
Hiring a professional has a higher upfront cost, no doubt about it. What you're really paying for, though, is their high-end equipment and, more importantly, their experience. A seasoned pro can "read" the concrete, knowing exactly which diamond grits to use and when to apply chemical hardeners. This expertise is the secret to a flawless, long-lasting surface. They can identify if the concrete is too soft and needs a different approach, a skill that only comes with years of practice.
When to Hire a Professional
Some jobs are just better left to the experts. You should seriously consider hiring a pro if:
- The stakes are high: If this is a main living area, a retail showroom, or any other highly visible floor, you want it to be perfect. There's no room for error.
- The concrete is in bad shape: Dealing with major cracks, spalling (flaking), or a very uneven surface requires a level of repair and prep work that's beyond most DIYers. For example, a pro knows how to properly fill cracks with a polyurea filler and grind it flush before polishing.
- You're aiming for a high-gloss polish: That beautiful, mirror-like finish isn't easy to achieve. It takes a very specific multi-step process with specialized equipment that’s hard to master on your own.
This kind of specialized skill is precisely why polished concrete has become so popular. The market was valued at an impressive US$2.52 billion in 2023 and is expected to climb to US$3.66 billion by 2030. That growth shows just how many people want the durable, stunning floors that only a professional can reliably deliver.
Hiring an expert is an investment in certainty. You're not just paying for labor; you're paying for a guaranteed outcome, efficiency, and the peace of mind that the job will be done right the first time.
If you’re in the Atlanta area, the best first step is to talk to a specialist. An expert can come out, take a look at your slab, and walk you through the options. They can give you a clear-eyed comparison of the costs and results for your specific project, much like the ones we detail in our guide to commercial polished concrete. That way, you can make a truly informed decision for your space.
Got Questions About Sanding Concrete? We've Got Answers.
As we wrap up, let's tackle a few of the most common questions we hear from homeowners and business owners alike. Think of this as a quick-reference guide to clear up any lingering doubts you might have.
Key Questions and Answers
Can I use my wood sander on concrete?
In a word: no. Trying to use a standard orbital or belt sander on concrete is a recipe for frustration and failure. The motor is simply not built for the job, and the sandpaper will be shredded in seconds. For example, a 120-grit wood sandpaper sheet might last for hours on oak, but it would be worn smooth and useless in less than a minute on concrete.
More importantly, it’s a major safety risk. Wood sanders have no system to control the dangerous silica dust that concrete work kicks up, which is a serious health hazard.
What does it cost to rent a concrete grinder?
If you're looking to rent a walk-behind concrete grinder for a DIY project, you can generally expect to pay somewhere between $150 and $300 for a single day from a rental center like Home Depot or Sunbelt. Just remember to factor in the cost of the diamond grinding pads. These are almost always a separate, and significant, expense, often costing $50 to $100 per disc, and you may need several.
Is every concrete slab a good candidate for polishing?
Unfortunately, not all concrete can be polished to that beautiful, glossy finish. The final result hinges entirely on the quality and hardness of the original slab.
Concrete that's soft, cracked, or was poorly mixed and poured just doesn't have the integrity to hold a high-quality polish. For example, a slab with a low PSI (pounds per square inch) rating, say below 2500 PSI, will likely be too soft and porous. An experienced professional can test the hardness of the concrete (using a MOHS hardness test kit) to determine its suitability.
The success of any concrete finishing project starts with a realistic assessment of the slab. An expert can quickly determine if the concrete is a good candidate for polishing or if another solution is needed.
Don't leave the quality of your project to chance. For a professional assessment and a flawless finish that lasts, trust the experts at Atlanta Concrete Solutions. Get your free, no-obligation quote today.