Ever noticed those straight, deliberate lines cutting across sidewalks, driveways, and warehouse floors? They aren't just for looks. They’re called saw-cut joints, and they’re one of the most important features of a long-lasting concrete slab. Their job is simple but critical: to control where the concrete cracks.
Why Your Concrete Needs Saw Cut Joints
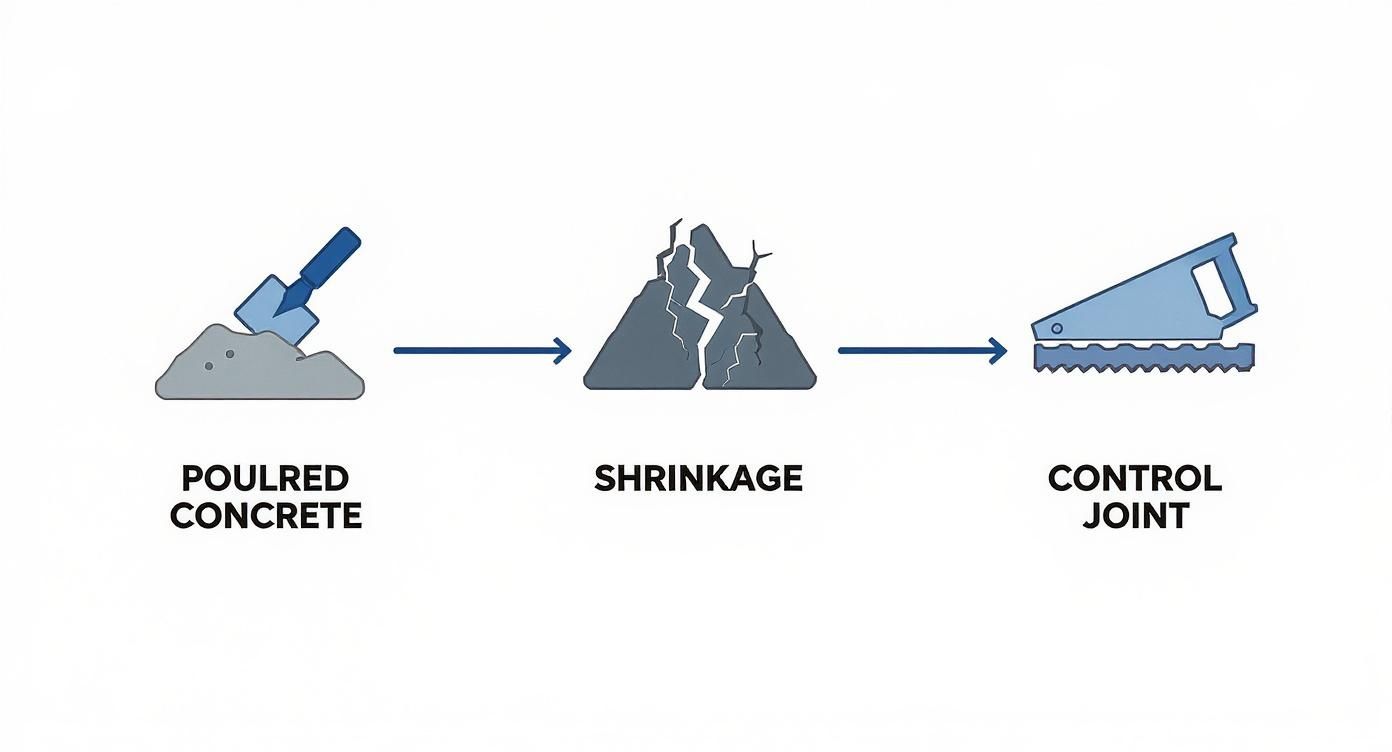
Fresh concrete is a bit like a massive sheet of cookie dough. As it dries and hardens—a process known as curing—it naturally shrinks. For example, a 20-foot long slab can shrink as much as 1/8 of an inch. This shrinkage pulls the slab inward, creating tremendous tension across the surface. If that tension doesn't have a planned escape route, it will find its own, creating ugly, spidery cracks that can ruin the look and integrity of your new driveway or patio.
That’s where saw-cut joints come into play.
The Science of Controlled Cracking
Think of a saw-cut joint as being like the perforated line on a cracker. By cutting a shallow groove into the concrete, we create a weakened, pre-determined line. We're essentially telling the concrete, "If you're going to crack, crack right here."
As the internal stress builds up, the slab does exactly that. A single, straight crack forms at the bottom of the saw-cut groove, hidden neatly from view. On the surface, all you see is a clean, intentional line, not a chaotic mess of random fissures. For instance, without a joint, a new patio slab might develop a jagged crack running diagonally from a corner. With a joint, that same stress is relieved by a crack forming harmlessly at the bottom of the nearest saw cut.
This simple technique is the bedrock of modern concrete installation. It’s so fundamental that the global concrete cutting market was valued at $5.9 billion and continues to expand with new construction. You can explore more data on the concrete cutting industry growth to see just how essential this work is worldwide.
To put it simply, here are the core ideas behind saw-cut control joints:
Quick Overview of Saw Cut Joint Fundamentals
| Concept | Purpose | Result |
|---|---|---|
| Shrinkage | Concrete shrinks as it cures, creating internal tension. | Inevitable stress builds up across the entire slab. |
| Weakened Plane | A shallow cut is made on the surface. | The joint becomes the weakest point in the slab. |
| Stress Relief | The built-up tension seeks the easiest path to release. | The crack forms predictably at the bottom of the cut. |
| Controlled Crack | A straight crack forms within the joint, hidden from view. | The surface remains clean and structurally sound. |
This table shows how a basic understanding of concrete's natural behavior allows us to guide it, preventing damage before it even starts.
A saw cut joint doesn't prevent cracking—it controls it. By predetermining the crack's location, you protect the slab's surface and ensure its long-term durability and visual appeal.
Ultimately, these joints are the difference between a professional, durable surface and one that fails years ahead of its time. By working with the nature of concrete instead of against it, we ensure that driveways, sidewalks, and patios here in Atlanta can stand up to the weather, traffic, and the test of time. A well-placed saw cut is a small bit of foresight that prevents big, costly headaches later on.
The Critical Window for Cutting Concrete
When it comes to creating effective concrete saw cut joints, timing isn't just important—it's everything. There's a perfect "Goldilocks" window to make the cut. You can't be too early, and you absolutely can't be too late. Miss that window, and all the effort is for nothing.
Think about trying to slice a cake right out of the oven. If you go in too soon, the knife just drags and tears the soft crumb, leaving a messy gouge instead of a clean cut. It's the same idea with fresh concrete. If the saw hits the slab while it's still too "green," the blade will just rip out the aggregate (the rocks and sand), creating a weak, ragged joint. This common mistake is known as raveling, and it looks like a chipped, crumbling line.
The Dangers of Waiting Too Long
On the flip side, waiting too long is just as bad, if not worse. As concrete hardens and cures, it shrinks, building up a tremendous amount of internal stress. If you put off cutting, the concrete will take matters into its own hands and relieve that tension by cracking wherever it wants.
Once a random, jagged crack appears, cutting a control joint next to it is useless. For example, if you pour a new driveway on Monday and a crack appears on Tuesday morning, cutting joints on Tuesday afternoon won't fix it. The damage is done. The saw cut becomes a sad, cosmetic line on an already failed slab, and the driveway or patio's integrity is shot.
The whole point of a saw cut is to create a planned, straight line of weakness before the concrete decides to crack on its own. It's not just a best practice; it's the core principle that makes the whole process work.
This visual timeline perfectly illustrates how a control joint steps in to manage the natural cracking process.
As the infographic shows, the saw cut gives that inevitable shrinkage crack a neat, predetermined path to follow, keeping it straight, controlled, and hidden within the joint.
Identifying the Perfect Saw-Cutting Window
So, what’s the magic number? As a rule of thumb, we aim to cut joints within 4 to 12 hours after the final finishing touches are put on the concrete. But that's just a starting point. The real art is adjusting that timeline based on what's happening on the ground. Several factors can dramatically shrink or expand this critical window:
- Ambient Temperature: A hot, sunny day speeds up the curing process, shortening your window. A cool, overcast day buys you more time. For example, a slab poured on an 85°F day might be ready to cut in 4 hours, while on a 55°F day, it might need 10 hours.
- Concrete Mix Design: Different concrete mixes cure at different rates. For instance, a mix with accelerators or less water will set up much faster. High-early-strength concrete used for quick repairs might be ready to cut in just a couple of hours.
- Humidity: In Atlanta's humid summers, the slab's surface dries slower, giving us a bit more leeway. On a dry, windy day, the surface can skin over quickly, demanding faster action.
For homeowners, seeing how these factors come together is crucial for understanding what a quality installation involves. You can learn more about our hands-on approach to residential poured concrete in Atlanta, where we navigate these exact variables on every single job.
Here in Georgia, a sweltering July day can shrink the cutting window down to as little as 2 to 4 hours. This is where experience really counts. A professional crew has to be on standby, ready to move the second the concrete is hard enough to walk on without leaving marks but before those invisible internal stresses build to the breaking point. This judgment call is what separates a long-lasting, beautiful slab from one that's doomed to crack.
Nailing the Depth and Spacing of Your Saw Cuts
Knowing when to cut your concrete is just half the equation. The other half—getting the depth and spacing right—is every bit as important. If you mess up these dimensions, you might as well not have cut at all. A cut that's too shallow, for example, is just a decorative scratch that the crack will ignore.
Luckily, you don't have to guess. There are some straightforward, time-tested rules that professionals live by to make sure every cut performs exactly as it should.
How Deep Should You Go? The One-Quarter Rule
Think of a saw cut as a strategic suggestion to the concrete. You’re telling it, "Hey, if you're going to crack, please crack right here." But if that cut is just a shallow scratch on the surface, the concrete will completely ignore it and crack wherever it feels like it.
To get the concrete's attention, we follow the golden rule of jointing: the one-quarter rule.
Your saw cut needs to be at least one-quarter of the slab's total thickness. This creates a plane of weakness just deep enough to control the crack without compromising the slab's strength.
Applying this is simple. For a typical 4-inch thick residential driveway, your cut must be at least 1 inch deep (4 inches / 4 = 1 inch). No less.
If you’re working with a beefier 6-inch slab for a commercial lot or an area that needs to support heavy trucks, that minimum depth bumps up to 1.5 inches (6 inches / 4). This rule is non-negotiable if you want joints that actually work.
How Far Apart Should Joints Be?
Once you have the depth figured out, the next step is spacing. How far apart should you make the cuts? This determines the size of the individual concrete panels. If the panels are too big, the internal stress will build up and cause a random crack somewhere in the middle before it ever reaches a joint.
The rule of thumb here is just as simple: the maximum joint spacing in feet should be 2 to 3 times the slab's thickness in inches.
Let’s go back to that standard 4-inch driveway slab:
- Minimum Spacing: 4 inches x 2 = 8 feet
- Maximum Spacing: 4 inches x 3 = 12 feet
So, for a 4-inch thick slab, you need to cut your joints every 8 to 12 feet. Pushing it to 15 or 20 feet is asking for trouble—the panels become too large to handle their own stress. For example, a 24-foot long driveway with a 4-inch slab should have at least one joint cut across its middle, creating two 12-foot sections.
Why the Shape of the Panel Matters
It's not just about the distance between cuts; the geometry of the panels you create is also critical. The goal should always be to create panels that are as close to square as possible. Long, skinny rectangles are incredibly unstable.
Imagine a section of driveway that’s 5 feet wide but 15 feet long. That’s a recipe for an ugly crack right across the middle.
As a rule, the aspect ratio of any panel should not exceed 1.5 to 1. This just means the long side of a panel shouldn't be more than one-and-a-half times the length of the short side. Sticking to squarish shapes helps distribute the stress evenly across the panel, guiding it right to your saw cuts.
To make it even easier, here’s a quick reference table for the most common slab thicknesses we see here in Atlanta.
Recommended Saw Cut Depth and Spacing
This table provides a handy cheat sheet for planning your joint layout based on how thick your concrete slab is.
| Slab Thickness (Inches) | Minimum Cut Depth (Inches) | Recommended Joint Spacing (Feet) |
|---|---|---|
| 4" (Standard Driveway) | 1.0" | 8' – 12' |
| 5" (Heavy-Duty Patio) | 1.25" | 10' – 15' |
| 6" (Commercial Slab) | 1.5" | 12' – 18' |
By keeping these guidelines for depth, spacing, and shape in mind, you can ensure every concrete saw cut joint does its job perfectly, protecting your investment for years to come.
Choosing the Right Saw Cutting Technique
When it's time to cut joints into fresh concrete, contractors have two main tools in their belt. Each approach uses different gear and works on a different clock, making one better than the other depending on the job. Knowing the difference between the old-school wet-cutting method and the newer early-entry technique helps you see the craftsmanship that goes into a truly professional job.
You could think of it like the difference between a powerful lumberjack's axe and a surgeon's scalpel. Both cut, but they go about it with completely different strategies and for different reasons.
The Classic Approach: Traditional Wet Cutting
The method most people picture is conventional wet-sawing. This involves a heavy, walk-behind saw that’s pushed along the surface, much like a robust lawnmower. It gets its name from the constant stream of water that sprays the diamond blade, which serves two key purposes: it keeps the blade cool and it turns the concrete dust into a manageable slurry.
This is a powerful, time-tested technique. But that power comes with a lot of weight. The saw is so heavy that you can’t roll it out until the concrete is hard enough to support both the machine and the operator without leaving marks. This often pushes the job to the later end of that critical 4-to-12-hour window.
While it gets the job done, wet-cutting has its own set of challenges:
- The Slurry Mess: That mix of water and concrete dust creates a gray sludge. If it's not cleaned up quickly and carefully, it can easily stain the new slab and anything nearby. Imagine this gray liquid seeping into your lawn or staining a new brick walkway.
- The Waiting Game: Having to wait for the concrete to gain strength is a gamble. On a hot, sunny day in Atlanta, the slab might decide to crack on its own before the saw ever gets there.
- Risk of Chipping: Even with hardened concrete, the powerful downward force of the blade can sometimes chip the edges of the joint, a problem known as "spalling."
This traditional method is still a heavyweight in the industry. Walk-behind saws make up over 50% of the revenue share in the global concrete saw market, a testament to their raw power and versatility. You can learn more about the growth drivers in the concrete saw market.
The Modern Solution: Early-Entry Dry Cutting
A newer, more surgical approach uses early-entry saws, most famously known by the brand name Soff-Cut®. These are lightweight, purpose-built machines designed to get onto "green"—or freshly finished—concrete within just the first 1 to 2 hours.
The magic of early-entry sawing is all about timing. By cutting the joints before the concrete has a chance to build up serious internal stress, you give it the perfect path to relieve that pressure, preventing random cracks from ever forming.
These saws operate in a totally different way. They cut dry and use a special blade that spins in an up-cut rotation. Instead of pushing down, it pulls up through the concrete, which stops it from snagging and pulling out bits of aggregate. A skid plate glides along the surface, supporting the concrete on both sides of the cut and ensuring a crisp, clean line without any chipping, even on the soft surface.
Key Benefits of Early-Entry Dry Cutting:
- Unbeatable Crack Control: Getting those joints in almost immediately provides stress relief right when and where it's needed most. This is ideal for projects on hot days where the concrete cures rapidly.
- Clean and Tidy: Because it's a dry process, there's no slurry to clean up. It's a much faster and more efficient operation from start to finish.
- Fine, Shallow Lines: These systems create very shallow grooves that are just deep enough to control cracking, offering a cleaner, more subtle look that many homeowners prefer.
Comparing the Two Saw Cutting Methods
So, which one is better? Honestly, it’s not about better or worse—it’s about the right tool for the right situation. The choice depends on the project's schedule, the weather, and the desired finish. For example, on a large commercial warehouse floor poured in sections, traditional wet-cutting is often efficient. For a decorative stamped patio where aesthetics are key, the clean lines of early-entry are often preferred.
Here’s a quick side-by-side look:
| Feature | Conventional Wet-Cutting | Early-Entry Dry-Cutting |
|---|---|---|
| Timing | 4-12 hours after finishing | 1-2 hours after finishing |
| Mess | Creates a wet slurry | Minimal dust, no slurry |
| Chipping Risk | Moderate | Very Low |
| Crack Control | Good | Excellent |
| Equipment | Heavy, powerful | Lightweight, specialized |
In the end, both techniques produce excellent concrete saw cut joints when they’re in the hands of a true professional. An experienced crew like ours at Atlanta Concrete Solutions knows exactly which method to use, weighing the pros and cons to guarantee a beautiful, durable surface that will last for years.
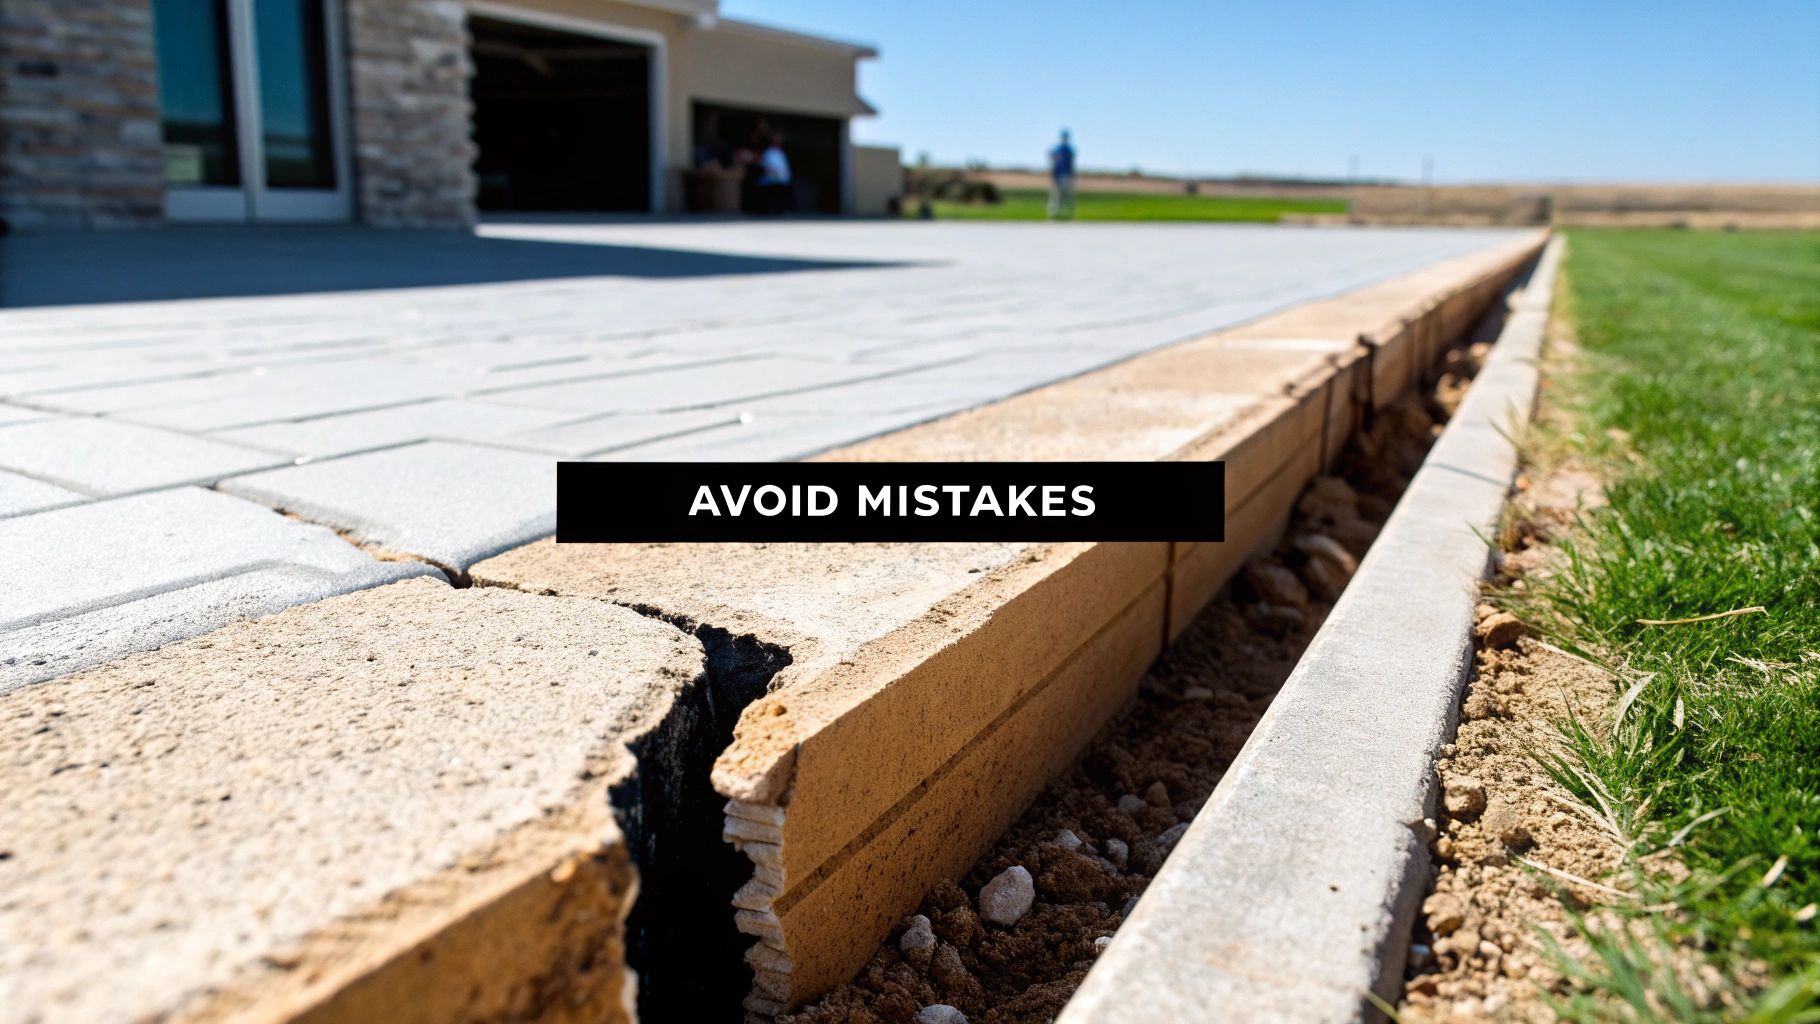
Common Saw Cutting Mistakes and How to Avoid Them
Even with the best concrete mix and a solid plan, a few simple mistakes during the sawing process can ruin the entire job. It's frustrating, but these common errors can turn a beautiful, brand-new slab into a cracked-up mess, leaving you with a costly repair bill. Knowing what to watch out for is the best way to make sure your project gets done right the first time.
The two biggest culprits? Cutting too late and not cutting deep enough. As we've discussed, concrete starts shrinking almost immediately. If you wait too long to cut, ugly random cracks will have already formed, making your control joints completely useless. And if the cut is too shallow, it’s not a weak enough plane to guide the crack. The concrete will just ignore it and break wherever it wants to.
But those aren't the only ways things can go wrong. A truly professional job requires attention to detail from start to finish.
Mistake 1: Poor Joint Layout and Planning
Stress in a concrete slab isn’t uniform; it loves to concentrate in certain spots. A poorly planned joint layout completely ignores this fact, leaving the most vulnerable areas totally unprotected.
- L-Shaped Corners: Any time you have an "L" shape in your concrete—say, where a walkway meets a patio—that inside corner becomes a major stress point. If you don't have a joint running right off that corner, a re-entrant crack is practically guaranteed.
- Around Columns and Drains: Anything sticking through the slab, like a support post for a deck or a floor drain, creates an obstacle. The concrete shrinks and pulls away from it, causing cracks to radiate outwards like spokes on a wheel. Joints need to be laid out in a diamond or square pattern to isolate these spots and give the stress a place to go.
Mistake 2: Using the Wrong Equipment
You can't just grab any saw and blade and expect good results. Using the wrong tool, or a tool that's in bad shape, will give you a messy, ineffective cut that might actually do more harm than good.
A classic mistake is using a blade that can’t handle the aggregate (the rock) in the concrete mix. For example, trying to cut a slab with hard Georgia granite using a blade designed for soft limestone is a recipe for disaster. The blade will wear out in no time, and the cut will be slow and ragged.
The blade is the business end of the operation. A dull, worn, or incorrect blade won't create a clean groove. Instead, it will labor through the concrete, increasing the risk of chipping the edges of the joint, a problem known as spalling.
Another common issue is just plain sloppy saw work. Pushing the saw too fast or letting it wander off the chalk line gives you a crooked, ugly joint that might not even be deep enough in spots to work correctly. A proper control joint should be ruler-straight and perfectly uniform.
How to Prevent These Costly Errors
The good news is that these mistakes are entirely avoidable with proper planning and an experienced crew. As a homeowner, you should feel confident asking your contractor a few key questions about their process.
Here’s what to look out for:
- Verify the Plan: Before any concrete is poured, look at the joint layout plan. Ask them, "How are you going to handle this inside corner?" or "What's the plan for the joints around those support posts?" A good contractor will have a clear answer.
- Check the Depth: Make sure your contractor is sticking to the "one-quarter" depth rule. For a typical 4-inch driveway slab, that means every cut needs to be at least 1-inch deep. No exceptions.
- Confirm the Timing: Talk about their cutting schedule. On a hot Atlanta summer day, that crew should be ready to cut within a few hours of the pour, not "sometime tomorrow."
If you see random cracks showing up on your new slab just days after it was poured, it's a huge red flag that something went wrong with the jointing. Catching these problems early is crucial. For help figuring out what went wrong and how to fix it, our team is experienced in residential concrete and masonry repair.
Ultimately, hiring a professional who understands these details and avoids these common pitfalls is the best way to ensure your concrete looks great and lasts for decades.
Atlanta Concrete Considerations for Lasting Results
Pouring and cutting concrete is never a one-size-fits-all job. Local conditions are a huge factor, and right here in the greater Atlanta area, our unique climate and soil throw some serious curveballs. If you want concrete saw cut joints that last, you need to work with our Georgia environment, not against it.
The biggest player is our famous heat and humidity. High heat kicks the concrete curing process into overdrive, which means that critical window for saw cutting gets a lot smaller. What might be an eight-hour window in a milder climate can shrink to just two or three hours on a scorching July afternoon. That demands a crew that’s on the ball and ready to move fast.
Navigating Georgia's Unique Soil and Weather
It’s not just the heat. Our region is known for its classic red clay soil. The thing about this soil is that it’s highly expansive—it swells up when it gets wet and shrinks down when it dries out. All that movement puts a ton of stress on any concrete slab sitting on top of it.
That's why a smart control joint plan is non-negotiable here. It gives the slab a place to breathe and move with the soil, preventing it from being torn apart from below. On top of that, Atlanta gets its share of freeze-thaw cycles in the winter. Any water that gets into unsealed or badly cut joints will freeze, expand, and absolutely wreck the concrete, leading to spalling and bigger cracks down the line. A prime example is when water seeps into a joint, freezes, and pops off a small chip of concrete at the edge—a process that repeats and worsens over time.
An experienced local contractor knows that a concrete slab in Marietta or Alpharetta has to be built differently than one in a cooler, drier part of the country. The mix design, the joint layout, and the cutting strategy all have to be dialed in for Georgia’s specific environmental pressures.
These local quirks impact every single part of the project:
- Concrete Mix Design: We might need to tweak the mix to slow down the cure time in intense heat, for example, by using a retarding admixture.
- Joint Spacing: It's often wise to use tighter joint spacing (e.g., 8-foot squares instead of 10-foot) to better manage the stress from our expansive clay.
- Cutting Timing: Our crews have to be ready for a much shorter cutting window during the summer months.
Getting this right is a big deal, and the industry knows it. The global market for concrete joint saws was valued at $1.2 billion and is projected to nearly double by 2033. This growth is fueled by massive infrastructure projects that, just like your driveway, rely on precision for a long life. You can check out more details on the concrete joint saw market projections on MarketIntelo.
Understanding these regional nuances is what separates a professional job from a problem waiting to happen. It's how we make sure your investment can handle everything from a summer heatwave to a winter frost. For a closer look at how we tailor our work to local conditions, you can learn more about our expert approach to Atlanta concrete services. This is the kind of local expertise that delivers a driveway or patio that stays strong and beautiful for decades.
Frequently Asked Questions About Saw Cut Joints
Even after getting the rundown on concrete saw cut joints, most homeowners still have a few questions pop up. It’s completely normal. Let's walk through some of the most common things we get asked, so you can feel totally confident about your project.
Joint Maintenance and Long-Term Performance
A lot of questions circle back to what happens after the cuts are made. How do you take care of them, and what should you expect to see?
Do I need to fill the saw cut joints?
Absolutely. Filling those joints with a flexible, self-leveling sealant isn't just for looks—it's a critical maintenance step. Think of the sealant as a barrier. It stops water from sneaking under the slab, which is a huge deal here in Atlanta. Preventing water intrusion helps stop soil erosion and protects against damage from our occasional freeze-thaw cycles in winter.
As a bonus, it also keeps dirt, debris, and annoying weeds from taking root in the joints. For example, without sealant, you might see grass or small weeds sprouting from the lines in your driveway every spring. The result is a much cleaner, more professional-looking driveway or patio for years to come.
Will I still see cracks with control joints?
If the job is done right, you shouldn't see any unplanned cracks. The whole point of a saw cut is to create a weakened plane that tells the concrete exactly where to crack—neatly and invisibly at the bottom of the groove.
From the surface, all you should ever see is the clean, straight line of the joint itself. If you start seeing random, jagged cracks spiderwebbing across the slab, that’s a red flag. It almost always means the joints weren’t cut soon enough, deep enough, or spaced correctly.
A perfectly executed saw cut makes the inevitable crack invisible. The joint is what you see, not the crack it's hiding deep within the concrete.
Understanding that difference is the key to knowing if your project was a success.
Addressing Old Concrete and Common Misconceptions
Another common point of confusion is whether saw cuts can be used to fix problems in concrete that's been around for a while.
Can saw cut joints be added to old concrete?
I wish I could say yes, but unfortunately, it's a no. Saw cut joints are a preventative measure, not a retroactive repair. Their magic only works when they're cut into fresh, or "green," concrete before it has a chance to form its own network of random cracks.
Cutting joints into an old slab that's already cracked is like closing the barn door after the horse has bolted. The internal stresses have already found their escape routes. At that point, any new cuts are purely cosmetic and do nothing to improve the slab's structural integrity or control future cracking. A good example is cutting a straight line next to an existing meandering crack; the original crack will continue to be the weak point and may even widen over time.
Ready to make sure your new driveway or patio is poured and cut to last a lifetime? The crew at Atlanta Concrete Solutions brings the local know-how and hands-on experience to get your project done right the first time.