So, you’re thinking about tackling a stamped concrete project yourself. It’s one of those jobs that can leave you with an incredible sense of accomplishment—transforming a boring gray slab into something that looks like it cost a fortune. But before you start looking at stamp rentals, let's have a frank chat about what you’re getting into.
This isn't just about mixing some concrete and pouring it out. It's a race against the clock that combines brute force with a delicate, artistic touch. For example, on an 85°F day, you may only have a 45-minute window to pour, level, and stamp a small patio section before the concrete becomes unworkable.
The appeal is obvious. You get the high-end look of natural stone, classic brick, or even rustic wood, but with the rock-solid durability of concrete. It's a trend that has exploded in popularity. In fact, the global market for decorative concrete—where stamped concrete is king—grew from USD 15.4 billion in 2020 and was projected to hit nearly USD 20 billion by 2025. You can dig into more data on this market growth in recent industry reports, but the bottom line is clear: homeowners love it.
The Deciding Factors: Skill and Scale
Whether you can pull this off really boils down to two things: the size of your project and how comfortable you are working with concrete from start to finish.
-
Project Size: A small 8×10 foot patio? That’s a fantastic first project. It’s manageable, requiring about 1.0 cubic yard of concrete (around 40-45 80lb bags). A 600-square-foot driveway, on the other hand, is a whole different beast. That’s a job that requires a crew, a ton of material (about 7.4 cubic yards), and perfect timing.
-
Physical Demands: Let's be real—concrete work is hard on the body. You’ll be slinging 80-pound bags of mix, wrestling a wheelbarrow that feels like it weighs a ton (a full wheelbarrow of concrete can top 400 pounds), and spending a lot of time on your knees.
-
Time Sensitivity: This is the make-or-break factor for most DIYers. The second that water hits the cement powder, a timer starts, and you can't pause it. For instance, in cool, overcast weather, your working window might be a few hours, but in direct sun and heat, it can shrink to under an hour. You have a very small window to pour, level, trowel, color, and stamp everything before the concrete gets too hard to work with.
The real test isn't just knowing the steps; it's executing them perfectly under pressure. A slight delay or a simple mistake during the critical curing phase can be difficult, if not impossible, to correct later on. For example, leaving a trowel mark during finishing will be permanently highlighted by the stamping process.
Key Challenges You'll Face
Unlike painting a room where you can just sand down a mistake and start over, concrete is pretty permanent. The single biggest hurdle is getting that professional-looking finish.
This means you have to get the surface perfectly smooth and level, apply your color and release agents without any blotches, and press the stamps down with just the right amount of even pressure. Hesitate for a moment or apply too much force in one spot, and you'll see it in the final product. A common example is a "double stamp," where a mat slips slightly during tamping, creating a blurred, unprofessional-looking line.
Before you commit, ask yourself if you’re truly ready for the intense, fast-paced workflow that a flawless stamped concrete job demands.
Planning Your Project and Preparing the Site
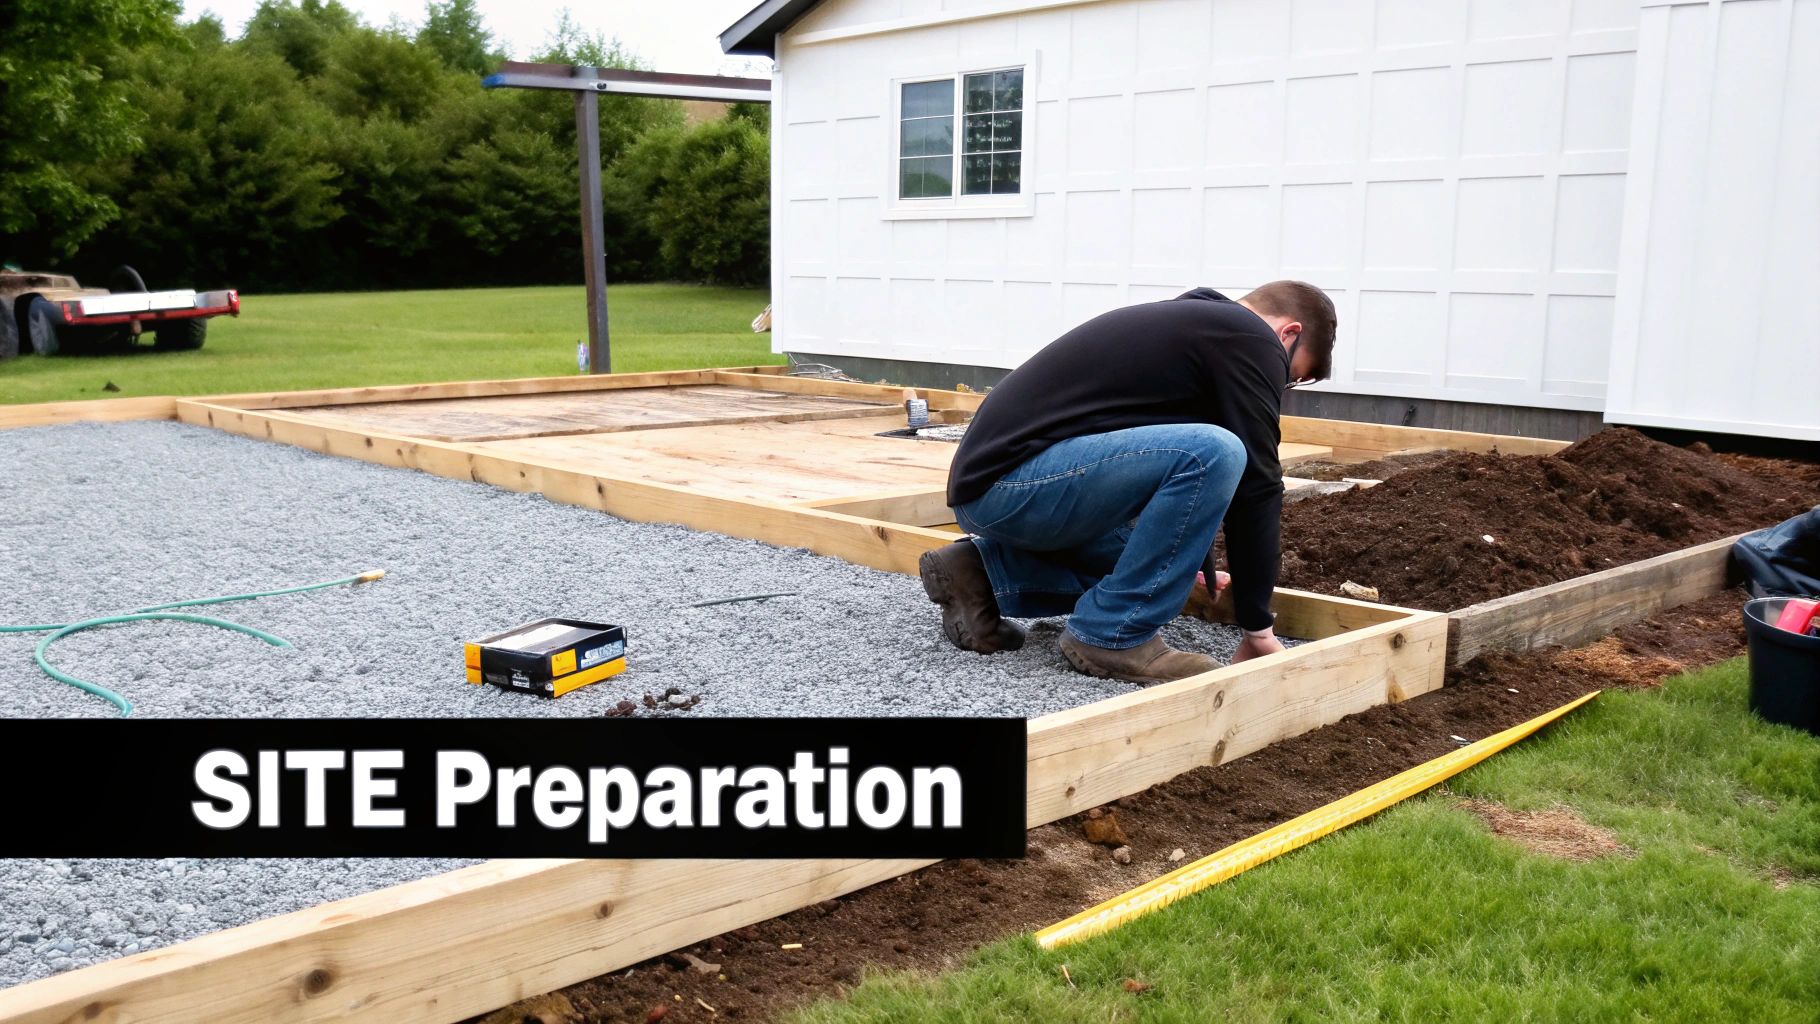
Every great-looking stamped concrete job starts long before the mixer starts churning. It all begins with solid planning and groundwork. This is where you lay the foundation—literally—for a surface that’s not just beautiful but also built to last. I've seen it time and time again: rushing this stage is the number one mistake DIYers make, and it often leads to cracks, an uneven finish, or a look that just doesn't hit the mark.
Think of site prep as the unsung hero of your project. It’s the critical work that dictates how your concrete settles, cures, and holds up to the elements for years. If you want a professional-grade outcome, this is a part of the job you simply can't skimp on.
Designing Your Space and Choosing a Pattern
Before you grab a shovel, take a moment to really visualize the finished product. Where exactly will the patio or walkway go? You need to consider things like sun exposure, where water will run off, and how the new concrete will flow with your house and the rest of your yard. For instance, a patio on the west side of a house will get intense afternoon sun, which can affect color choice and curing time.
With a location mapped out, the fun part begins: picking a stamp pattern. This choice really defines the whole vibe of the space.
- Classic Cobblestone: This is your go-to for that charming, old-world feel. It's perfect for winding garden paths or a cozy little patio. An example would be using a European Fan pattern to create a focal point.
- Ashlar Slate: If you're after a clean, more structured look, this pattern mimics cut slate tiles and works well with both modern and traditional homes. A popular variation is the "Grand Ashlar," which uses larger tile patterns.
- Realistic Wood Plank: This one's a game-changer for pool decks or patios. You get the warm aesthetic of wood without any of the splinters or constant maintenance. You can find stamps in various widths, from 6-inch to 12-inch planks.
- Seamless Textures: For something more subtle and organic, seamless skins create a continuous stone-like texture without any hard pattern lines. An example is a "Roman Slate" texture, which gives a gentle, wavy stone look.
There's a reason these options are booming in popularity. The stamped concrete market is massive, valued at around USD 13.3 billion in 2024, and it's only getting bigger. People are realizing it's an incredibly smart investment because it stands up so well to traffic, weather, and UV rays.
Excavation and Building a Solid Sub-Base
Once the design is locked in, it's time to break ground. The first real step is to excavate the area for your slab. You need to dig down deep enough for the concrete itself (usually 4 inches for a patio or walkway) plus a sturdy sub-base underneath. So, for a 4-inch slab with a 4-inch sub-base, you'll be excavating a total of 8 inches deep.
The sub-base is just a layer of compacted gravel, but its importance is impossible to overstate.
A properly compacted gravel sub-base is your best defense against cracking and heaving. It provides a stable, uniform foundation and allows for proper drainage, preventing water from pooling underneath the slab and causing issues during freeze-thaw cycles.
For most projects, aim for a 4- to 6-inch layer of compacted aggregate. After you’ve spread the gravel out, you have to compact it down tight with a plate compactor (you can rent one for a day). A good rule of thumb is to compact the gravel in 2-inch layers for the best results. The goal is a rock-solid, unyielding surface to pour your concrete on.
Constructing and Leveling the Forms
Forms are the temporary wooden frames that hold the wet concrete and give your slab its final shape. Usually built from 2x4s or 2x6s, your forms have to be sturdy, straight, and perfectly level.
Drive stakes into the ground on the outside of the form boards to hold them in place, typically every 2-3 feet. I always recommend using screws instead of nails—it makes taking the forms off later so much easier. Grab a long level and check that the tops of the forms are even and have the right slope for drainage. A gentle grade of about 1/4 inch per foot sloping away from your house is the standard. For a 10-foot patio, this means the outer edge should be 2.5 inches lower than the edge against the house.
Before you even think about mixing, you need to know exactly how much concrete to order or buy. Take the time to learn about accurately calculating concrete volume for your specific project. It’ll save you from either having a wasteful surplus or making a frantic, last-minute run to the store. Nailing your sub-base and forms is what separates a true DIY success from a project you'll regret.
Getting the Concrete Mixed, Poured, and Finished
Alright, your site is prepped and the forms are locked in place. Now for the main event—the part where all your planning turns into a real, solid surface. This is where timing is everything. From mixing the concrete to the final touches, you're officially on the clock.
Nailing the Concrete Mix
You can't get crisp, professional-looking stamp patterns without the right concrete consistency. We measure this with something called "slump," which is basically how much a cone of fresh concrete sags under its own weight.
If the mix is too wet (a 6-inch slump, for example), your stamps will just sink and make a soupy mess. Too dry (a 2-inch slump), and you'll fight to get any impression at all. For stamped concrete, the sweet spot is a slump of about 4 inches. It might be tempting to add extra water to make the concrete easier to spread, but don't do it. A wetter mix results in weaker concrete, so stick to the manufacturer's instructions on the bag to the letter.
The Pour and Initial Leveling
Once that mixer starts churning, it's go-time. This is absolutely a two-person job, so make sure you have a helper ready. Start dumping the concrete from your wheelbarrow in the furthest corner of your forms. You want to work your way backward toward your mixing area so you don't paint yourself into a corner.
Use a concrete rake or a sturdy shovel to spread it out, making sure to overfill the forms just a little bit. You'll need that extra material for the next step.
Now, grab a long, straight 2×4 to use as a screed board.
- The Screeding Motion: Lay the board across the top edges of your forms. With a helper on the other end, use a back-and-forth sawing motion as you pull the board toward you. This scrapes off the excess concrete, leaving a flat, level surface behind.
- Filling Low Spots: You'll probably see some dips or voids as you go. Just toss a shovel-full of concrete into those spots and make another pass with the screed. For example, if you see an area where the coarse aggregate (the gravel) is visible and the surface is low, that's a spot that needs filling.
Don't rush this. A slab that isn't perfectly level will stick out like a sore thumb once it's stamped and finished. Get it right now.
Floating the Surface to Prepare for Stamping
After screeding, the surface will look pretty rough, with bits of gravel visible. The goal now is to push that heavy aggregate down and bring the smooth cement paste (we call it "cream") to the top. For this, you'll need a bull float for large areas or a smaller magnesium hand float.
The technique is to push the float away from you with the front edge tilted up slightly, then pull it back toward you with the back edge lifted. This smooths out any lines left from screeding and gives you a perfect canvas for your stamps. A word of caution: it's easy to overdo it here. Overworking the concrete can weaken the surface layer, so make just enough passes to get it smooth and then stop. An example of overworking is floating until the surface looks dark and watery again.
Here's the key visual cue you're waiting for: all the "bleed water"—that layer of water that rises to the top—needs to evaporate completely. The surface will go from a wet sheen to a dull, matte finish. When you see that, you're getting close to stamping time.
Wrestling with wet concrete is a skill that comes with experience. For bigger jobs like a full driveway or a large patio, managing a massive pour can be a real handful. Knowing the ins and outs of residential poured concrete helps you gauge whether the project is truly DIY-friendly or if it's smarter to bring in a professional crew with the right manpower and equipment.
The Waiting Game and Final Edging
After floating, it's a waiting game. The concrete needs to harden just enough to support your weight on knee boards without you sinking in more than about 1/4 inch. This is the make-or-break window for applying your color hardener and release agent, which we'll get into next.
But before it gets too firm, grab an edging tool. Run it along the inside of your forms to create a clean, rounded edge. This isn't just for looks; that simple rounded edge makes the slab far more resistant to chipping and damage over the years. A common example is using a 1/2-inch radius edger for a soft, professional look. It’s a small detail that pays off big time in the final quality of your work.
Mastering the Stamping and Coloring Technique
This is where the magic happens. Your plain gray slab is about to become a piece of art, and it all comes down to timing, technique, and a bit of finesse. Get this part right, and you’ll create that rich, multi-toned look that makes stamped concrete a showstopper.
The whole process revolves around two key players: a color hardener and a release agent. The color hardener is a powder you'll broadcast across the fresh concrete, giving it the primary color (like a Terracotta red) and creating a super-dense, durable surface. Then comes the release agent, which adds a secondary, contrasting color (like a Charcoal gray) while also doing the crucial job of keeping your heavy stamps from sticking.
Applying Color and Release Agents
Wait until all the bleed water has evaporated and the concrete's surface has lost its glossy sheen. Once it looks dull and matte, it’s go-time.
Grab your color hardener and start broadcasting it evenly. The best way to do this is with a low, sweeping throw, almost like you’re skipping a stone. This helps the powder spread out in a nice, thin layer.
- On your first pass, aim to apply about two-thirds of the total hardener needed. For example, if the instructions call for 60 lbs per 100 sq ft, you'd apply 40 lbs first.
- Use a magnesium float to work that powder into the surface. Keep floating until it’s all absorbed and the concrete looks wet again.
- Now, immediately broadcast the last one-third, but this time, throw it in a direction perpendicular to your first pass. This ensures you don't miss any spots.
- Float this second layer in just like the first. This two-pass method is the secret to avoiding a splotchy, uneven color.
Once the color hardener is fully worked in and that surface sheen has disappeared again, it’s time for the release agent. This is another colored powder, and you’ll apply it the same way—just much more lightly. You’re just looking for a thin, complete dusting to cover the entire slab.
You can also use liquid concrete colorants mixed directly into the concrete for integral color, which gives a different, through-and-through hue.
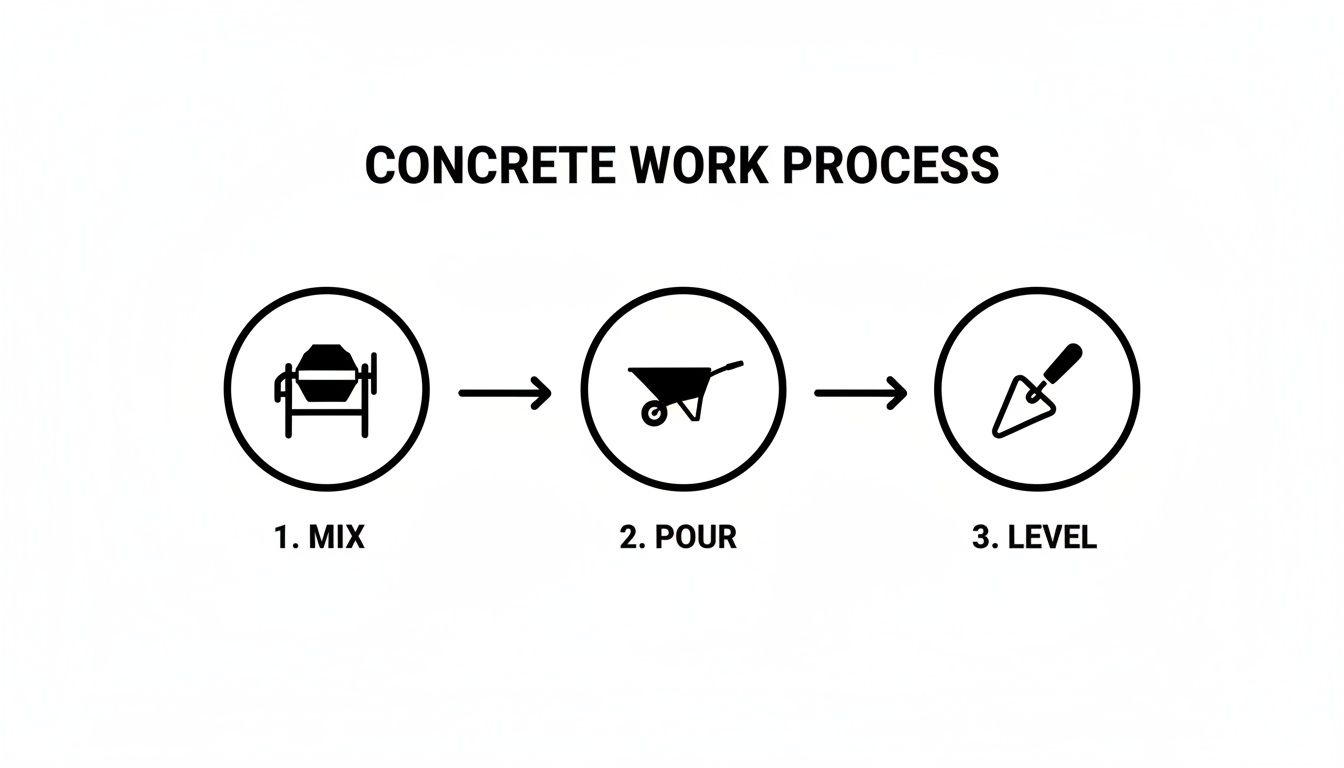
This workflow—mix, pour, level—is the foundation for any good concrete job. Nailing these basics is non-negotiable before you even think about colors and stamps.
Knowing the Perfect Moment to Stamp
I can't stress this enough: the most critical moment in any concrete stamping diy project is knowing when to lay that first stamp. If you jump the gun, the stamps will sink, and you’ll get a mushy, undefined mess. Wait too long, and you’ll be fighting to make any impression at all.
This is where the classic "thumb test" comes into play. It's old-school, but it works.
Gently press your thumb into the concrete near an edge. If you can make a clean impression about 1/4-inch deep and your thumb comes away clean—with no wet cement sticking to it—you're ready.
That's your signal. Don't second-guess it. The window for stamping can close fast, especially on a hot or windy Atlanta day. For example, a 15-minute delay could be the difference between a perfect impression and one that's barely visible.
The Art of Placing and Aligning Stamps
Let’s imagine you're using a popular pattern like Ashlar Slate, which uses a few different mats (often labeled A, B, and C) to look like random, natural stone. You always want to start in a corner and work your way across the slab.
Start by carefully laying your first stamp mat down, making sure it’s aligned with your forms. Walk onto the stamp, using your body weight to press it in evenly. For consistent depth, a tamper tool is your best friend—it really helps press the edges and corners of the mat uniformly.
Next, place the second stamp. These mats are designed to interlock, so fit it snugly against the first one. You want a tight fit with no big gaps or overlaps. After tamping the second stamp, carefully lift the first one straight up to check your work. If the pattern is crisp and detailed, you’re golden.
Most pros keep at least three rigid mats for the main field and one flexible "floppy" mat for the tricky spots. Keeping the pattern aligned is what sells the illusion.
Handling Edges, Corners, and Curves
The details are what separate an amateur job from a professional one. Edges, corners, and any curves in your design require extra care because those big, rigid stamps just won't fit.
This is where that flexible mat earns its keep. You can bend it into tight corners or press it along a curved edge. For the finest details, you might even need to use smaller texturing skins or a touch-up chisel to manually recreate the pattern where the main stamps couldn't reach. For example, if a stamp can't get right up against a wall, you'd use the floppy mat and a chisel to hand-tool the grout lines and stone texture.
The goal is a continuous, unbroken pattern, even in the awkward spots. Take your time here. These finishing touches truly elevate the final look, turning a simple slab into a high-end feature. If you're planning something complex, it’s worth looking at professionally installed https://www.atlantaconcretesolutions.com/residential-decorative-concrete just to see what’s possible.
Curing, Sealing, and Long-Term Maintenance
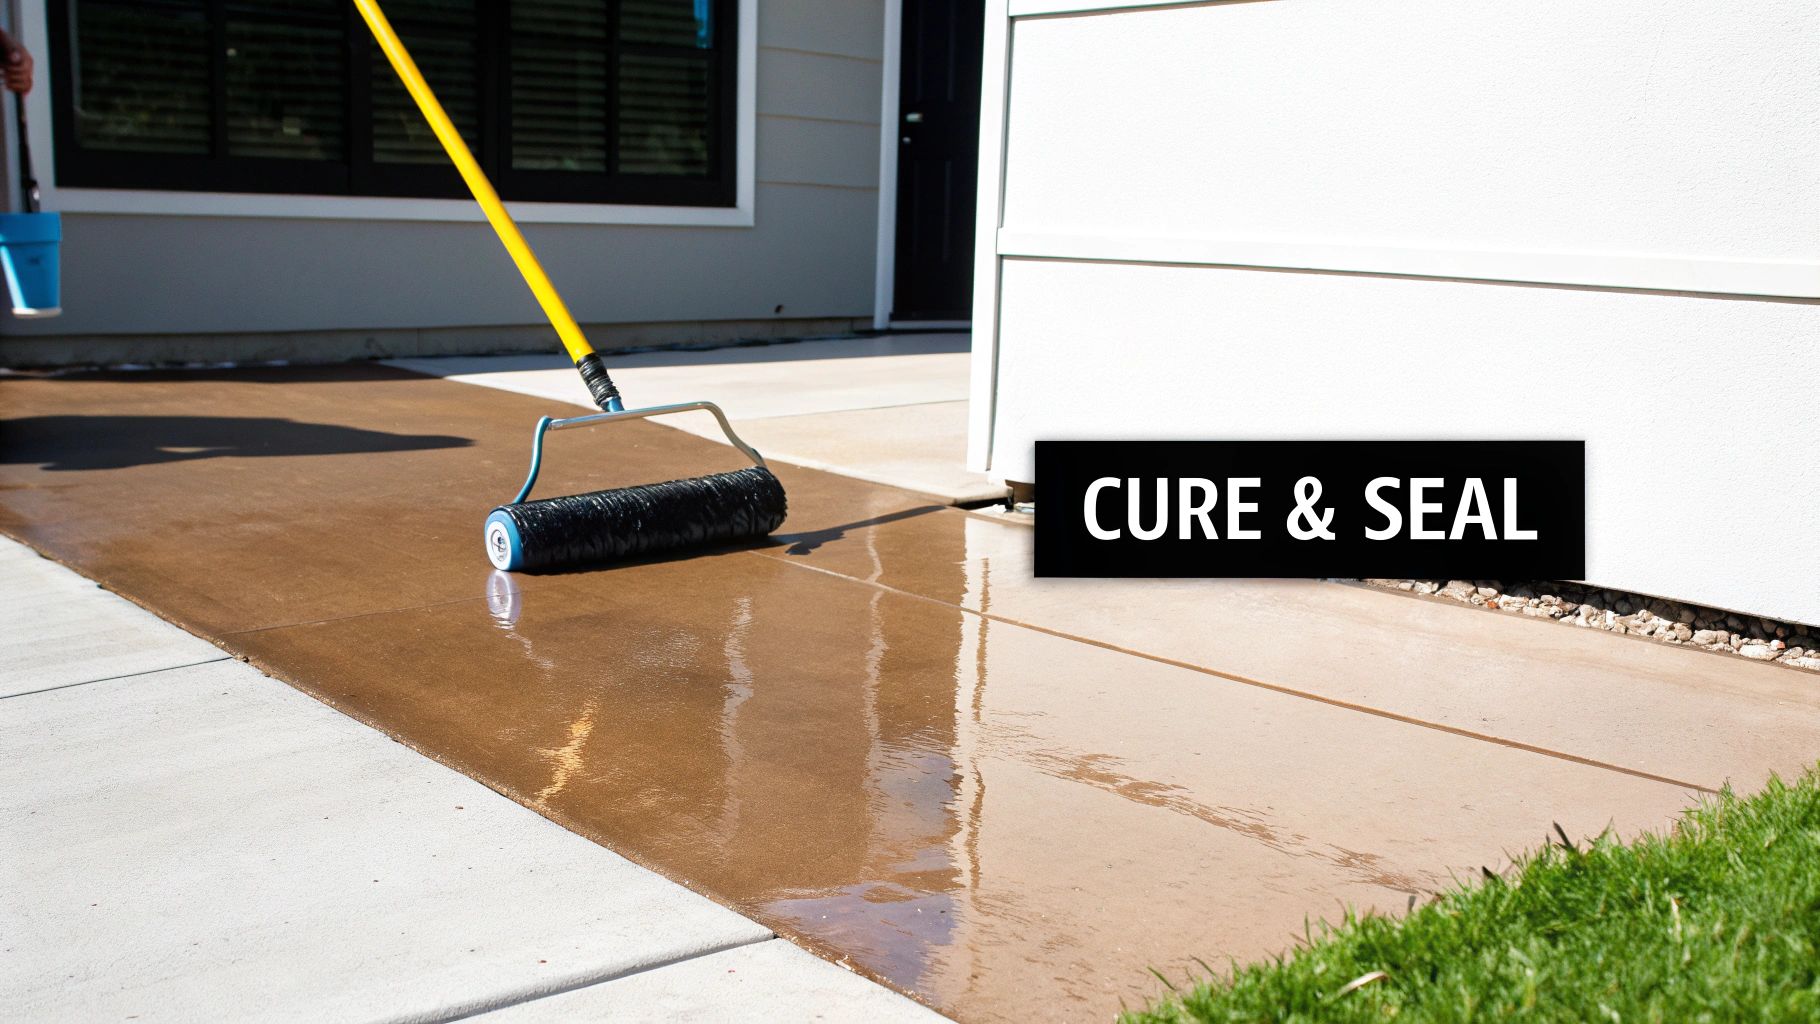
You’ve tamped the last stamp and cleaned the concrete off your boots, but don't crack open a cold one just yet. The next few weeks are just as critical as the pour itself. This is where you lock in all your hard work, transforming that fresh slab into a durable, beautiful surface that will last for decades.
Proper curing is all about managing hydration. Concrete doesn't "dry" to get hard; it undergoes a chemical reaction that requires water. If the surface dries out too fast, the concrete never reaches its full strength potential. You end up with a weak, dusty surface that’s prone to cracking.
The Curing Process: Slow and Steady Wins the Race
Your main job now is to slow down evaporation. This is probably the most overlooked step in any concrete stamping DIY project, but skipping it is a recipe for disappointment down the road. Luckily, the methods are simple.
The easiest approach is to gently mist the surface with a garden hose a few times a day for about a week. You want it to stay damp, not flooded. This is especially vital on hot, windy Atlanta days when moisture gets pulled from the slab in a hurry. For example, mist in the morning, at midday, and in the early evening.
Another fantastic, low-effort option is to cover the whole thing with plastic sheeting. Give it an initial misting, then lay the plastic down, weighing the edges with some 2x4s or bricks. This creates a little humid tent for your slab, trapping moisture and letting the concrete cure slowly and evenly.
Your stamped concrete will gain about 70% of its final strength in the first week. By managing the curing process, you're directly influencing its long-term durability and resistance to cracking.
Be patient with it. Wait at least 24 hours before walking on it, and give it a full week before you start setting out patio furniture. If this is a driveway, don't even think about parking a car on it for a full 28 days. Trust me, the wait is worth it.
Choosing the Right Sealer for Protection and Pop
After about a month of curing, it’s time for the final touch: sealer. This is what gives your stamped concrete that rich, vibrant color and protects it from the elements. A quality sealer will fend off oil stains, prevent UV rays from fading the color, and make future clean-ups a cakewalk.
You’re generally looking at two main types of sealers:
- Solvent-Based Acrylics: These are the go-to for most stamped concrete pros. They do an amazing job of enhancing the color, giving it that slight gloss or "wet look" that makes the texture really stand out. An example is a sealer with 25% solids content, which provides a durable, glossy finish.
- Water-Based Acrylics: A more eco-friendly choice with much less odor during application. They usually provide a more subtle satin or matte finish but still deliver solid protection against the elements. These are great for indoor applications or areas where strong fumes are a concern.
For most outdoor projects like patios and walkways, a solvent-based acrylic sealer mixed with a non-slip additive is the industry standard. This additive is just a fine powder you mix in before rolling it on, but it provides essential grip so your beautiful new surface doesn't become a slip-n-slide when it rains.
Application and Long-Term Care
Applying sealer isn't hard, but doing it right matters. Always start with a perfectly clean and dry surface. Hit it with a leaf blower to get rid of any dust or leaves, and if you see any stubborn dirt, a gentle pressure wash a day or two beforehand should do the trick.
The best tool for the job is a specialized 3/8-inch nap roller made to handle solvents. Work in smaller, manageable sections (e.g., 5×5 foot squares) and apply a thin, even coat. Whatever you do, don't let it puddle. Two thin coats are always better than one thick one. A thick coat can trap moisture and leave you with a cloudy, blotchy finish. Wait for the first coat to be tack-free (usually a few hours) before applying the second.
To keep your masterpiece looking brand new:
- Clean It Regularly: Sweep it often. A couple of times a year, wash it down with a hose and some mild detergent.
- Reseal Every 2-3 Years: The sealer is a sacrificial layer that wears down over time. Reapplying a fresh coat every few years will bring the color right back to life and restore that protective barrier.
A little bit of maintenance goes a long way. Stick to this simple schedule, and your stamped concrete will look as good as the day you finished it for years to come.
Common DIY Mistakes and When to Call a Pro
Even with the best plan in the world, a DIY stamped concrete project can go sideways. You’re working against the clock with a material that doesn't forgive mistakes, so little slip-ups can easily become permanent. Knowing what can go wrong is your best defense, but just as important is knowing when you’re in over your head.
The number one thing that trips people up is timing. I’ve seen it dozens of times. If you start stamping too early, the concrete is still soupy, and the heavy stamps will sink, leaving deep, ugly depressions instead of a crisp pattern. But if you wait too long, the surface will be too hard to take an impression, and you’ll be putting all your weight on the stamps just to get a faint, disappointing texture. It’s a delicate balance.
Troubleshooting Common Stamping Errors
Mistakes happen. It’s a part of any DIY project. But if you can spot the problem and act fast, not every error has to be a complete disaster.
Here are a few common issues I see and how you might be able to salvage the job:
- Blotchy, Uneven Color: This usually means the color hardener wasn't broadcast and worked into the surface consistently. If you catch it early, sometimes a second, lighter toss at a 90-degree angle to your first can help even things out. Honestly, though, this is one where prevention is the real cure. A real-world example is seeing dark patches where the powder was thrown too heavily and light spots where it was spread too thin.
- Spiderweb Cracks on the Surface: Seeing a network of tiny, web-like cracks? Those are called craze cracks, and they happen when the very top layer of the concrete dries out way too fast. It’s a classic sign of improper curing. This is why keeping that slab damp for the first week is absolutely critical.
- "Birdbaths" or Low Spots: If you find shallow puddles on your patio after it rains, you've got low spots. This goes all the way back to the screeding step. For minor dips, you can try a concrete patching compound, but getting the texture and color to match perfectly is a real challenge.
Knowing how to fix a minor flaw is a great skill. But the most important part of DIY is having the wisdom to know when a problem has gone beyond a simple fix.
When to Put Down the Tools and Call a Professional
You have to be honest with yourself. A small, simple patio on perfectly flat ground can be a fantastic weekend project. But certain factors can ramp up the difficulty—and the risk—exponentially. Calling in a professional isn't giving up; it's a smart business decision to protect your home's value and get a result you'll actually be happy with.
You should seriously think about hiring a contractor if your project involves any of these:
- Large Surface Areas: Anything over 200 square feet is a whole different ballgame for a small crew. A professional team has the manpower and equipment to pour, finish, and stamp that much concrete before it starts to get hard on them.
- Significant Slopes or Grades: Getting water to drain properly is tricky enough on level ground. When you're working on a slope, you need advanced forming skills and a real feel for how concrete flows and settles. One mistake here can lead to major drainage headaches later. For example, a driveway with a 10% grade requires a much stiffer concrete mix.
- Intricate or Custom Patterns: If you’re dreaming of a complex ashlar slate pattern, a detailed medallion, or multiple colors, that’s where experience really shines. A pro knows all the little tricks to line up the stamps perfectly and blend colors for a seamless, artistic finish.
- Structural Slabs: If this slab is for a driveway that needs to hold a car or a foundation for a shed, you've got to worry about structural integrity and building codes. This isn't just about looks; it's about safety and longevity. For instance, a driveway slab may require rebar reinforcement and specific control joints that a DIYer might overlook.
In the end, what you want is a beautiful, durable patio or walkway you can enjoy for decades. If you’re staring down a complex job or a big mistake, looking into professional concrete services is the smartest move you can make. An expert can turn a potential DIY disaster into a stunning success.
Ready to transform your property without the DIY stress? The experienced team at Atlanta Concrete Solutions delivers flawless stamped concrete patios, driveways, and walkways across the Atlanta area. Contact us today for a free, no-obligation quote and let our professionals bring your vision to life with precision and artistry. Visit us at https://atlantaconcretesolutions.com to learn more.