So, you're ready to turn that boring gray concrete slab into something special? Good. This guide is your complete roadmap for a do it yourself stained concrete project. We'll walk through the entire process, providing information and examples to show you exactly why so many homeowners are choosing this high-impact, low-cost upgrade for their patios, driveways, and basements.
Your Guide to a Professional DIY Concrete Finish
Turning a dull concrete slab into a genuinely beautiful surface is one of the most satisfying projects you can do yourself. The magic of concrete stain is that it’s not like paint, which just sits on top and can peel away. Stain actually soaks into the concrete’s pores, creating a deep, rich, and permanent color. For example, a simple gray basement floor can be transformed to look like rich, mottled leather or a sleek, modern slate surface.
Think of this guide as your personal project plan. It's packed with the kind of real-world tips and information you need to get a stunning, durable finish that seriously elevates your home's look. We'll cover it all, from picking the perfect stain for your vision to rolling on that final, protective coat of sealer.
Why Homeowners Choose DIY Stained Concrete
The draw of stained concrete is simple: it’s a unique mix of beauty, toughness, and affordability. You get a high-end look without the matching price tag, making it a brilliant option if you're watching your budget. Before you dive in, it’s worth getting a feel for the pros and cons of concrete residential flooring in general.
Here’s why it’s become such a popular choice, with examples:
- Custom Aesthetics: You can create nearly any look you want. For instance, an acid stain can produce a marbled, natural stone vibe for a patio, while a water-based stain can create a solid, vibrant blue for a child's playroom floor. The creative freedom is huge.
- Cost-Effective Upgrade: Staining is a fraction of the cost of installing tile, pavers, or even professional epoxy coatings. A typical DIY project might cost around $1-$2 per square foot, whereas tile installation often starts at $5-$10 per square foot.
- Long-Lasting Durability: Since the stain becomes one with the concrete, it won’t chip or peel off like paint. Once it’s properly sealed, it stands up to foot traffic, weather, and spills. Think of a garage floor that resists hot tire pickup or a kitchen floor that won't get damaged by a dropped pan.
- Low Maintenance: A sealed stained concrete surface is a breeze to clean. For indoor floors, a quick sweep and an occasional mop with a pH-neutral cleaner is all you’ll ever need.
This isn't just a niche hobby, either. The global market for concrete stains hit about USD 1.47 billion in 2024, and DIY projects are a huge part of that growth. Homeowners are catching on that stained concrete can slash long-term maintenance costs by up to 40% compared to other flooring and can even boost property value by 5-10%.
Key Takeaway: Do it yourself stained concrete isn't just a color change. It’s about adding lasting character and real value to your home with a finish that’s as tough as it is beautiful.
This guide will give you a complete overview, kicking things off with the two main choices you'll face: acid-based and water-based stains. Understanding how they differ is the crucial first step toward getting the professional results you’re after. It's always a good idea to check out examples of finished residential decorative concrete to get some inspiration flowing.
Choosing Your Stain: Acid-Based vs. Water-Based
Before you even think about picking up a sprayer or a roller, you have to make the single most important decision for your project: acid stain or water-based stain? This choice will dictate everything from the final look and color to how you'll spend your weekend applying it. It's a bit like choosing between watercolor and oil paint—both can produce incredible results, but the process and the feel are completely different.
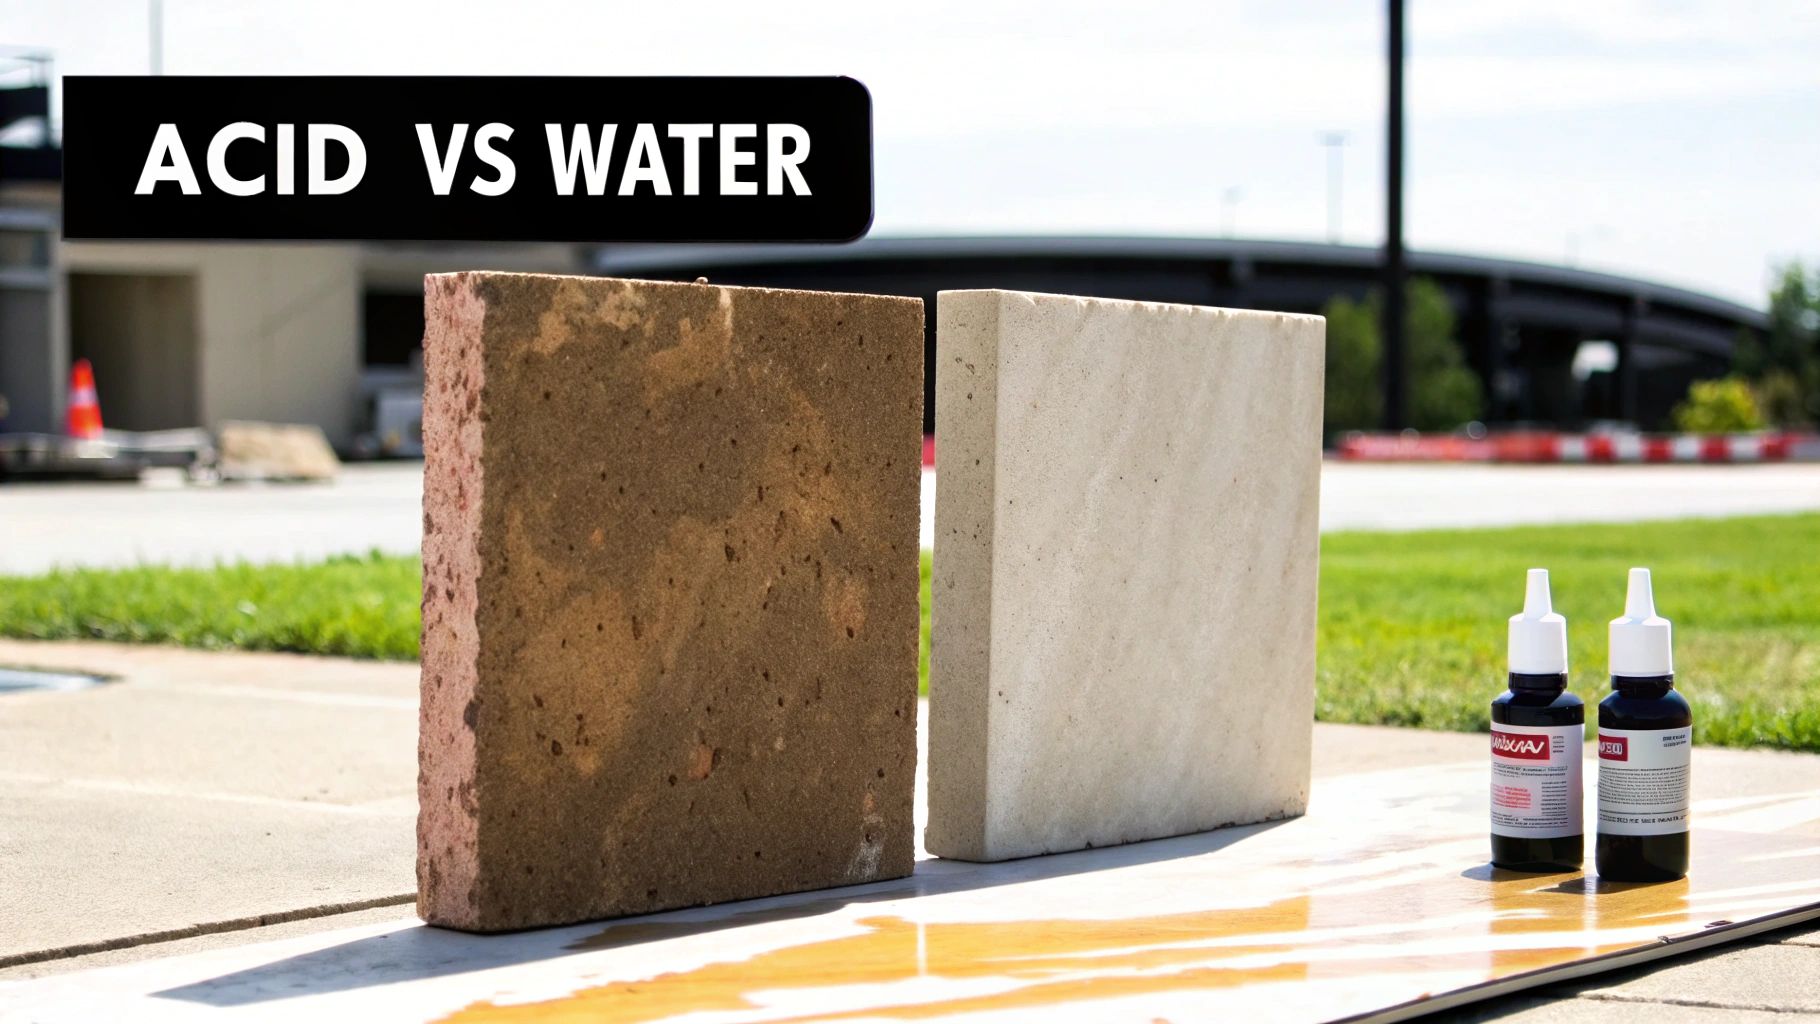
So, what's the real difference? An acid stain doesn't just sit on top of the concrete. It triggers a chemical reaction with the minerals and lime already present in your slab. This is what creates those rich, marbled, and translucent tones that look like they've been there forever. Every single floor comes out unique.
If you’re after an organic, earthy vibe with tons of character, this is your go-to. Think of a patio with warm, amber hues that look like natural stone, or a basement floor with subtle, mottled browns. Acid stains deliver a depth and a near three-dimensional quality that you just can't get from paint.
The Classic Choice: Acid-Based Stains
Acid stains are the old-school, tried-and-true method for a reason. They create a stunning, permanent color that becomes part of the concrete itself. The metallic salts in the acidic solution literally etch into the surface, which means the color won't chip or peel away. It's incredibly durable.
But this classic approach does come with a few things you need to know. First, the color palette is pretty much limited to earth tones—think rich browns, deep tans, terra cottas, and some soft blue-greens. More importantly, the final result has an element of surprise. For example, a stain labeled "walnut" might appear deep and dark on one slab but much lighter with reddish undertones on another, all due to differences in the concrete's age and composition.
Here are a few examples where an acid stain really shines:
- A Rustic Outdoor Kitchen: Give your concrete countertops or patio floor a weathered, Tuscan-inspired look that pairs beautifully with natural stone and wood.
- An Elegant Walkway: The natural marbling can mimic expensive flagstone or travertine, giving you serious curb appeal for a fraction of the cost.
- A Basement Bar Area: Those rich, deep tones create a warm, inviting atmosphere that feels completely custom and high-end.
Just be prepared for a more involved process. You’ll be working with a mild acid and will need to follow up with a crucial neutralization step to halt the chemical reaction. This isn't something you can rush—it requires patience, attention to detail, and the right safety gear.
The Modern Alternative: Water-Based Stains
Water-based stains, on the other hand, are a whole different ballgame. Think of them more like a high-tech dye. They’re non-reactive and work by soaking into the concrete's pores to deposit super-fine pigments. The result? A much more uniform, consistent, and predictable color.
This is where you get to have fun with color. The variety is immense, with everything from bold charcoals and deep blues to vibrant reds and even crisp whites. If you have a specific color scheme in mind, want to create patterns using stencils, or just need a solid, reliable finish, a water-based stain is your best bet.
Their user-friendliness is a huge draw for DIYers. Water-based stains now command 55% of the market, largely because they've made home projects safer and more forgiving. I've seen firsthand how they can cut prep time by 50% and reduce common application mistakes by 40%. While the original acid stains of the 1990s could increase a floor's value by 300% over plain concrete, today's water-based options offer reliability without the guesswork. For a deeper dive, you can check out the latest stained concrete market insights.
Key Insight: Go with an acid stain for a unique, earthy, marbled look when you're okay with a little unpredictability. Choose a water-based stain when you need a specific color, a consistent finish, and a more straightforward, forgiving process.
A sleek, modern garage floor, for instance, would look incredible with a solid charcoal gray water-based stain. You could also transform a contemporary basement with a clean white or a bold accent color to match your decor. The low odor and easy cleanup make them especially great for indoor projects.
Acid Stain vs. Water-Based Stain At a Glance
Still on the fence? This table breaks down the key differences with examples to help you pick the right product for your project, your skill level, and your vision.
| Feature | Acid-Based Stain | Water-Based Stain |
|---|---|---|
| Appearance | Variegated, marbled, translucent, earthy tones. Example: A floor that mimics aged leather. | Uniform, opaque color. Wide range of colors. Example: A solid, slate gray garage floor. |
| Color Palette | Limited to earth tones (browns, tans, terra cotta, some greens/blues). | Virtually unlimited. Can be mixed to create custom shades. |
| Application | More complex. Requires a neutralization step. The outcome is less predictable. | Simpler and more forgiving. No neutralization needed. Predictable and consistent results. |
| Durability | Extremely durable. Color is chemically bonded with the concrete. Won't chip or peel. | Very durable. Penetrates the concrete, but the finish depends heavily on the sealer. |
| Safety | Requires safety gear (gloves, goggles, respirator). Contains mild acids. | Low VOCs and low odor. Generally safer and easier to handle, especially indoors. |
| Best For… | Patios, walkways, basements, and any area where a natural, rustic look is desired. | Garages, interior floors, logos, patterns, and projects requiring a specific color match. |
Ultimately, the best stain is the one that aligns with the look you want to achieve and the amount of effort you're willing to put in. Both can give you a professional-looking floor you’ll be proud of for years to come.
Gathering Your Gear and Prepping the Concrete
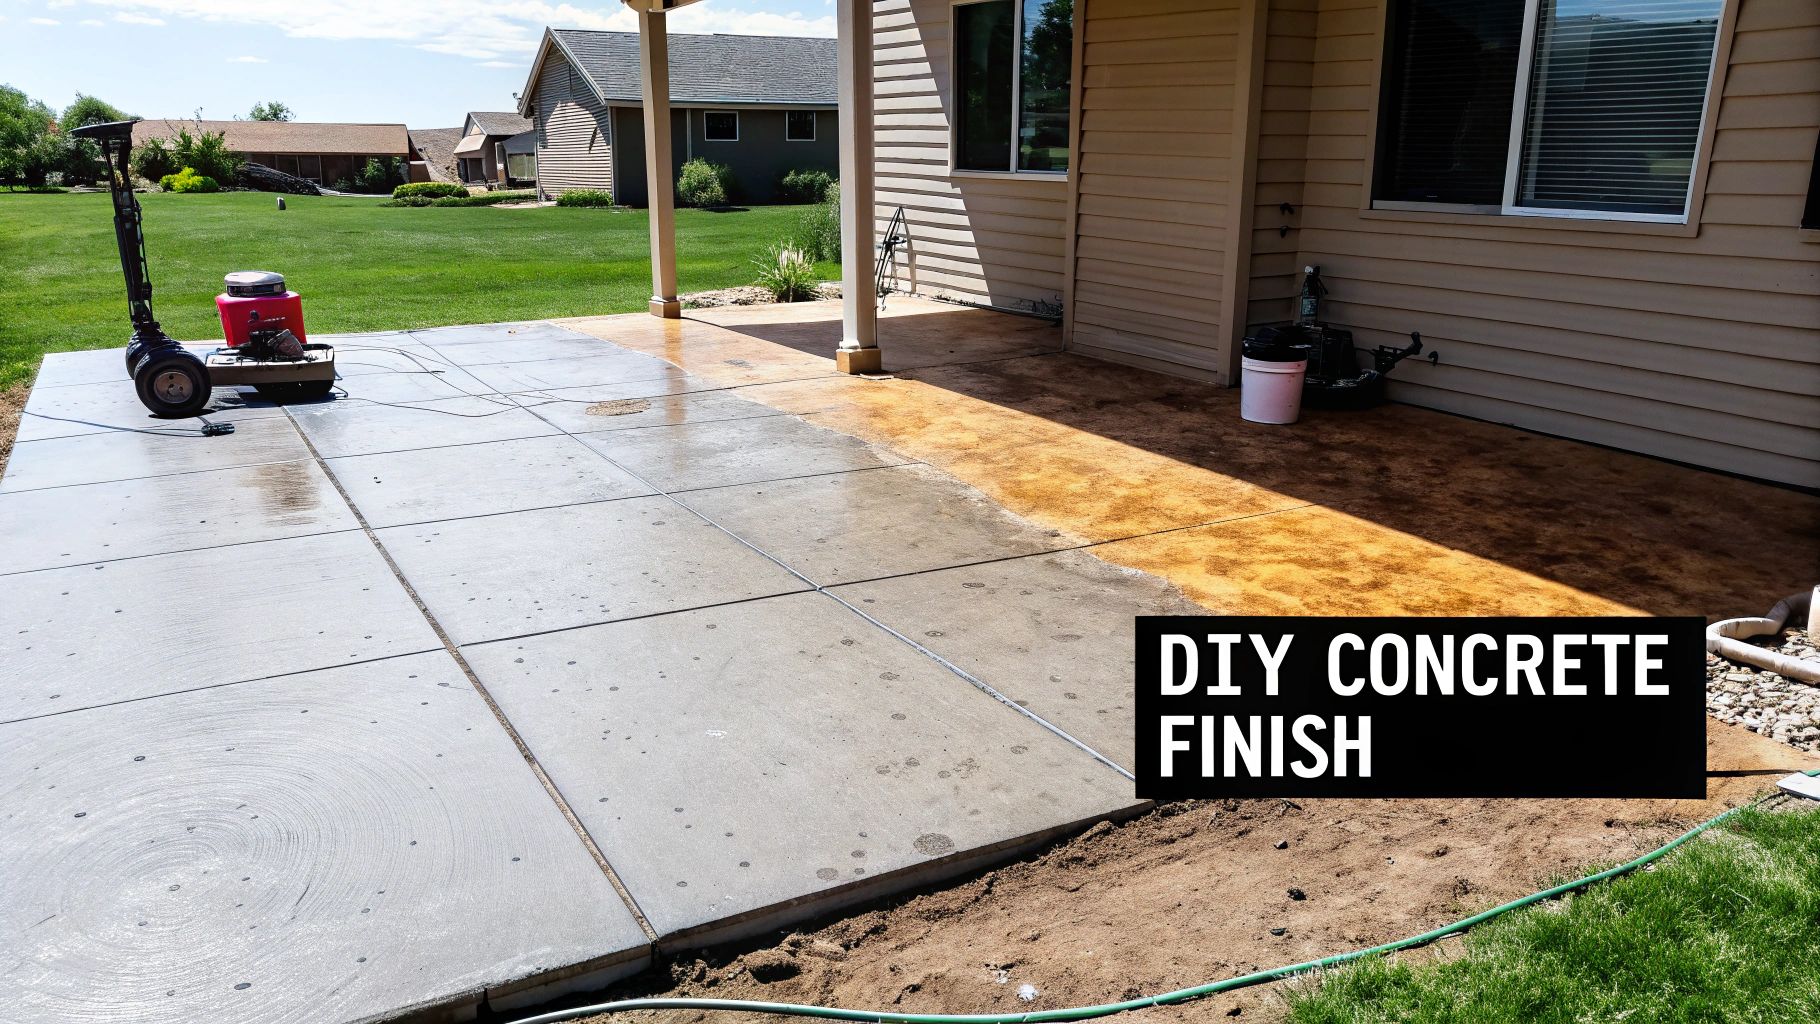
I can't stress this enough: a stunning stained concrete floor is all about the prep work. This is where most DIY projects go wrong. Rushing this stage is a one-way ticket to a blotchy, uneven finish that just won't last.
Think of it like this: your concrete slab is a canvas. You wouldn't start a painting on a dirty, cracked surface, right? The same principle applies here. We need to create the perfect conditions for that stain to sink in deep and even.
Your Must-Have Tool and Material Checklist
Getting a professional-looking result means having the right tools for the job—it's non-negotiable. Before you even think about opening a can of stain, make sure you have everything you need lined up and ready to go. Here is a more detailed list with information:
- Pressure Washer: Don't even try this without one. You need it to blast away deep-seated grime. A model with at least 2,500 PSI has the power to really open up the concrete's pores.
- Concrete Degreaser or Cleaner: Get a cleaner specifically made for concrete. For example, if you're tackling an old garage floor with oil spots, you’ll need a heavy-duty alkaline degreaser to pull that gunk out. For simple dirt, a pH-neutral cleaner might suffice.
- Stiff-Bristled Deck Brush: This is your best friend for scrubbing. It gets into the texture of the concrete and dislodges stubborn dirt the pressure washer might otherwise just skim over.
- Plastic Pump Sprayer: You'll use this for applying the stain and the neutralizer (if you're using an acid-based product). The key here is plastic—make sure it has no metal parts, because acid will eat right through them and ruin your stain.
- Wet/Dry Vacuum: Absolutely invaluable. It’s perfect for sucking up the dirty slurry after scrubbing, making the final rinse much cleaner.
- Painter's Tape & Plastic Sheeting: Stain splashes everywhere. Trust me. Take the time to meticulously tape off walls, door frames, and anything else you don't want to get color on.
- Concrete Patching Compound: You'll need this for any cracks or pits. I recommend a quality sandable epoxy or a polymer-modified cement filler for the smoothest, most durable repairs.
- Protective Gear: This isn't optional. At a minimum, you need safety glasses and chemical-resistant gloves. If you're working with acid stain, a respirator with acid gas cartridges is a must.
For applying the stain or sealer, an airless sprayer like the Impact 540 Airless Paint Sprayer can be a game-changer. It atomizes the product into a fine mist, which helps you avoid the ugly lap lines and splotches that are so common with rollers or pump sprayers.
Deep Cleaning: Creating a Blank Slate
First things first, let's get that surface aggressively clean. The mission is to remove every speck of dirt, oil, mildew, or any old sealer that might be lingering. Anything left behind will act as a barrier, preventing the stain from penetrating properly.
Start by sweeping away all the loose junk. Next, mix up your concrete cleaner according to the directions and slop it on liberally. Give it a good 15-20 minutes to soak in and do its job, then start scrubbing with that stiff-bristled brush. Really put some muscle into it. If you're working on a shady Atlanta patio that's prone to green mildew, grab a cleaner that has a mildewcide in it.
Once you’ve scrubbed every inch, fire up the pressure washer and blast it all clean. I like to work in sections, making overlapping passes to make sure I don't miss a single spot. A truly clean surface is the cornerstone of a great do it yourself stained concrete project.
Repairing Flaws for a Smooth Finish
Once the concrete is squeaky clean and dry, every little crack and chip will be on full display. Now's the time to deal with them. While a few tiny hairline cracks can sometimes add a bit of character, anything bigger is just going to look like a major flaw once the stain hits it.
Use a good concrete patching compound, overfilling the cracks just a little bit since most products tend to shrink as they cure. After it's fully hardened (check the label for cure times), sand it down so it's perfectly level with the concrete around it.
One thing to remember: the patched spots will almost always take the stain differently than the rest of the concrete. They might end up lighter or darker. For example, a gray patch on a light concrete slab may appear as a noticeable dark spot after staining. It’s a really smart idea to dab a little stain on a patched area to see how it reacts before you commit to the whole floor. If you're looking at a ton of damage, you may want to look into professional residential concrete and masonry repair options.
Pro Tip: When you're patching, try to mimic the texture of the original concrete. After you've applied the patch but before it's rock hard, you can lightly stipple it with a damp sponge. This breaks up the super-smooth finish and helps it blend in much better.
The Water Test: Is Your Concrete Thirsty?
This last little prep step is probably the most critical of all: checking for porosity. If your concrete can't absorb water, it's not going to absorb stain. It's that simple. Often, old cure-and-seal products or invisible sealers are the culprits.
The test couldn't be easier. Just sprinkle a few drops of water on a few different spots of your clean, dry slab.
- Good to go: If the water quickly soaks in and darkens the concrete within a minute or two, your slab is porous and ready for stain.
- Problem: If the water just beads up and sits on the surface, you've got a sealer on there. The stain has nowhere to go and will just sit on top, eventually flaking right off.
If your concrete fails the water test, you have more work to do. You’ll have to either mechanically grind the surface or use a chemical stripper to remove that old sealer. Nail these prep stages, and you're well on your way to a beautiful, professional-looking finish that will last for years.
The Staining and Sealing Application Process
Alright, all that cleaning, patching, and prep work is behind you. This is the moment where your vision for the space starts to become a reality. With a perfectly prepared slab, you’re set up for success.
Getting the stain and sealer down correctly is the final piece of the puzzle. It’s less about muscle and more about method. Think steady hands and consistent movements. If you work patiently and understand how your chosen stain behaves, you’re going to love the result.
This is why we spent so much time on the prep work you just finished. It's the foundation for everything that comes next.
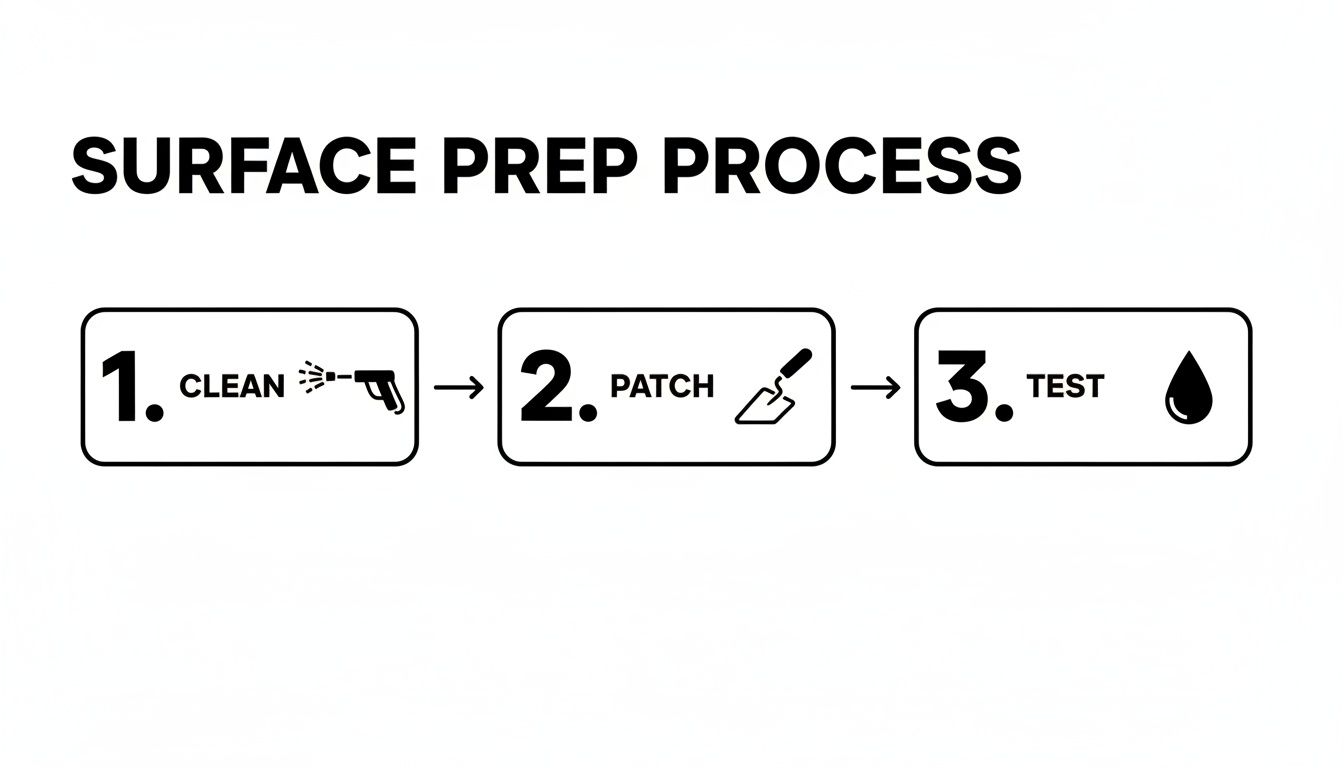
Nailing these three steps—a deep clean, solid patching, and a quick moisture test—is what lets the concrete drink in the stain evenly.
Applying Your Concrete Stain Like a Pro
First things first: cover everything you don't want stained. I mean everything. Use painter's tape and plastic sheeting to mask off walls, baseboards, door frames, and nearby landscaping. Stain is watery and loves to splatter, so don't even think about skipping this part.
Your best friend for this job is a plastic pump sprayer. Don't use one with metal parts, especially with acid stain. The acid will eat right through the metal, ruining your sprayer and contaminating the stain.
For Water-Based Stains:
- Before you start, lightly mist the concrete with a bit of water. This little trick helps the stain glide on smoothly and keeps it from drying out too fast, which is a major cause of ugly lap marks.
- Always start in the furthest corner and work your way toward your exit so you don't paint yourself into a corner—literally. For example, in a rectangular basement, start in the corner opposite the stairs.
- Keep the sprayer wand about 18-24 inches from the floor. Apply the stain using overlapping circular or figure-8 motions. This technique is the secret to getting that beautiful, mottled look without harsh lines.
- Want a richer color? No problem. Just let the first coat dry to the touch (a few hours should do it) and apply a second.
For Acid Stains:
The application technique is pretty much the same—those overlapping, circular motions are still the way to go. But there’s one extra step with acid stains that is absolutely critical. It works by creating a chemical reaction with the lime in the concrete, and you have to know when to stop that reaction.
Crucial Step: Neutralization
After letting the acid stain react for the manufacturer's recommended time (usually 4-12 hours), you have to neutralize it. This stops the chemical burn and cleans off any residue. Mix up a solution of baking soda and water (about one cup per gallon) or grab a commercial neutralizer. Scrub it over the entire floor, then rinse with clean water until it runs clear. Let it dry completely before you even think about sealing.
Choosing and Applying the Protective Sealer
The stain gives you the color, but the sealer is what gives you the durability. A quality sealer acts like armor for your new floor, protecting it from moisture, scuffs, UV rays, and spills. Skimping here will ruin all your hard work.
The right sealer really depends on the location and the look you’re going for. Here are some examples:
- Acrylic Sealers: These are the go-to for most DIYers. They're affordable, easy to roll on, and available in both solvent-based (for a high-gloss, "wet look" on an outdoor patio) and water-based (for a lower-odor, satin finish in a basement) versions.
- Epoxy Sealers: If you're tackling a high-traffic area like a garage or basement, epoxy is your heavyweight champion. It creates an incredibly tough, chemical-resistant surface that can withstand dropped tools and car fluids.
- Polyurethane Sealers: Think of this as the ultimate topcoat. Often applied over epoxy, polyurethanes offer the best scratch and UV resistance out there. They're perfect for a south-facing patio that gets blasted by direct sunlight.
The decorative concrete market is now valued at a whopping USD 19.5 billion in 2024, and it's easy to see why. A beautiful DIY stained finish can cost up to 50% less than having hardwood or tile installed. Much of this growth is driven by water-based stains, which have 30% lower VOC emissions and are much more user-friendly. For homeowners, especially in a place like Atlanta, this means you get a UV-resistant floor that can last 15-20 years and slash future repair costs by as much as 35%. You can dig deeper into the decorative concrete market trends here.
Once your sealer is chosen, the application is straightforward. Get a short-nap roller and an extension handle. Roll on thin, even coats, working in small sections while keeping a wet edge to prevent roller marks. Two thin coats are almost always better than one thick one. For another durable and impressive option, take a look at our guide on residential polished concrete.
Weather and Timing Considerations
Pay close attention to the clock and the forecast, especially if you're working outside. Never, ever stain or seal in direct, hot sunlight. The heat will bake the product on way too fast, leaving you with streaks, bubbles, and a sealer that just won't stick.
The sweet spot for application is an overcast day or during the cooler parts of the morning or late afternoon. You want the concrete itself to be cool to the touch. The ideal air temperature for most products is between 50°F and 85°F. Always check the forecast to make sure you have a dry 24-48 hour window for everything to cure properly without a surprise rain shower.
Even with the best-laid plans, a DIY concrete staining project can throw you a curveball. The key is not to panic. Almost every common hiccup is fixable if you know what you’re up against.
Think of this as your troubleshooting field guide, full of the kind of advice you'd get from a pro to get your project back on track. We'll diagnose the most frequent headaches and give you clear, actionable ways to fix them.
Why Is My Stain Color Blotchy or Uneven?
This is probably the number one frustration for first-timers. You envisioned a beautifully consistent color, but what you got looks more like a patchwork of dark and light spots. Take a breath—this is usually an easy fix, and it almost always comes down to one of two things.
- Lingering Contaminants: If any grease, oil, old sealer, or even just deep-seated grime was left on the concrete, it created a shield. For example, a faint oil spot you missed will prevent stain from penetrating, leaving a lighter area.
- Inconsistent Application: Holding the sprayer too close to the surface or moving too slowly in some areas can drench the concrete, creating those dark blotches. This is especially true with the thinner consistency of water-based stains.
How you fix it depends on how quickly you spot it. If the stain is still wet, grab a stiff-bristled brush and get to work scrubbing the dark areas. This can help you redistribute the excess stain into the lighter spots for a more even look. If it's already dry, your best move is applying a light second coat, focusing on blending the lighter areas to better match the darker ones.
Fixing Lap Marks and Sprayer Lines
Seeing distinct lines where your sprayer passes overlap can be maddening. It totally disrupts the seamless finish you were going for, but it's another issue that’s all about technique and timing.
Lap marks pop up when the wet edge of your last pass starts to dry before you overlap it with the next one. That partially dried stain won't melt into the fresh stain, leaving a visible line. This is a huge risk when you're working in direct sun or on a hot Atlanta afternoon, as the heat drastically speeds up the drying time.
Pro Tip: The secret to avoiding lap marks is to always maintain a "wet edge." Work in smaller, more manageable sections and apply the stain using a gentle circular or figure-eight motion. Ditch the rigid back-and-forth lines. This technique naturally feathers the edges of each pass, helping them blend together without a trace.
If the lap marks are already there, you can often camouflage them. Try applying a second, very light coat using that same circular motion. It helps break up the hard lines and creates a more organic, mottled finish that looks intentional.
When the Sealer Turns Cloudy or Hazy
You’re at the finish line, and the color is perfect. But after applying the sealer, a milky, cloudy film starts to appear. This is almost always caused by one thing: trapped moisture.
This problem strikes if you apply the sealer before the concrete and stain are 100% bone dry. It can also happen when humidity is sky-high, or if you lay the sealer on too thick, which prevents the solvents from evaporating properly. For example, sealing a basement floor on a humid summer day without a dehumidifier running is a common cause.
For most solvent-based acrylic sealers, you can often salvage the job by lightly rolling on a thin coat of xylene. This powerful solvent re-liquefies the sealer, allowing the trapped moisture to finally escape. Once the cloudiness is gone and the xylene has evaporated, the sealer should cure crystal clear.
Just be sure to test this in a small, hidden area first! If that doesn't do the trick, you may unfortunately have to strip the sealer and start that step over.
Navigating these issues is part of the DIY journey. To make it even easier, here’s a quick-reference table with more examples to help you diagnose and solve problems on the fly.
DIY Stained Concrete Troubleshooting Guide
| Problem | Likely Cause | How to Fix It |
|---|---|---|
| Color is too light | Not enough stain applied; concrete is very dense. | Apply a second coat of stain. For dense, hard-troweled concrete (like a garage floor), you may need to open the pores with a light etch first. |
| White, powdery residue | Efflorescence (salts migrating from the concrete). | Clean with a stiff brush and an efflorescence remover. Ensure the source of moisture (e.g., a leaky pipe) is addressed before sealing. |
| Stain won't absorb | Old sealer or curing agent is still on the surface. | The surface must be stripped or mechanically ground. A water test (beading water) will confirm if a sealer is present. |
| Sealer is peeling/flaking | Poor surface prep (dirt, dust); incompatible sealer; moisture. | Scrape or strip the peeling areas, clean thoroughly, let it dry completely, and re-apply a thin coat of the same sealer. |
| Bubbles in the sealer | Applying in direct sun; sealer applied too thick; outgassing from porous concrete. | Wait for a cooler part of the day. If bubbles appear, you can sometimes pop them by lightly back-rolling while wet. If dry, sand the area and re-apply a thin coat. |
Remember, patience is your best tool. Most "disasters" are just opportunities to learn the material better and refine your technique. Don't be afraid to stop, assess, and make a correction before moving forward.
Common Questions About DIY Concrete Staining
Even the best-laid plans can leave you with a few lingering questions. Let's tackle some of the most common ones we hear from homeowners gearing up for their own concrete staining project. Getting these details sorted out beforehand can make all the difference.
How Long Does DIY Stained Concrete Last?
The durability of your stained concrete really boils down to three things: solid prep work, a quality sealer, and basic maintenance. When you nail all three, an exterior stained surface—like a patio here in Atlanta—can easily look great for 5-10 years before you'll need to think about a new top coat of sealer. Interior floors? They're protected from the elements and often last much longer.
The stain itself chemically reacts with the concrete, so it's more or less permanent. It's the sealer on top that takes the beating from foot traffic, UV rays, and moisture. For example, a walkway will show wear faster than a basement floor.
The real secret to making your work last is simple upkeep. A good cleaning and a fresh, thin coat of sealer every few years will keep the color from fading and protect the concrete from damage.
This small step is your best defense against wear and tear, ensuring that protective layer doesn't wear thin and leave your beautiful stain exposed.
What Is the Total Cost for a DIY Stained Concrete Project?
Saving money is one of the biggest motivators for DIY-ing this project, and the savings are significant. Going it alone is dramatically cheaper than bringing in a pro.
For a standard 500-square-foot patio or basement floor, your materials will likely run you between $200 and $600. This estimate typically covers everything you'll need:
- The concrete stain (either acid or water-based)
- A proper concrete cleaner or degreaser
- A good-quality sealer
- An all-plastic pump sprayer
- Basic safety gear like gloves and glasses
Your final cost will mostly depend on the grade of stain and sealer you choose. Professional-grade products will push you toward the higher end of that budget, but they often pay off with a more durable, longer-lasting finish. When you consider that hiring a contractor for the same job could easily cost $2,000 or more, the DIY route is a clear winner for your wallet.
Can I Stain Concrete That Is Old or Previously Painted?
Yes, you absolutely can. Staining is an incredible way to bring old, tired-looking concrete back to life, provided the slab itself is in good shape. But here's the catch: your success depends entirely on the prep work.
If the concrete is covered with paint, an old epoxy coating, or a failing sealer, it all has to come off. No exceptions. Stains need to penetrate the concrete, and any existing layer on the surface will act as a barrier. For example, you cannot stain over a painted garage floor; the paint must be completely removed first.
You'll probably need to use a chemical stripper or rent a floor grinder to get the slab back to bare, porous concrete. It's a bit of work, but it's non-negotiable. Once you're down to the original surface and it can absorb a few drops of water, you can clean it and proceed with staining just like you would with fresh concrete.
Ready to transform your concrete but feeling a bit overwhelmed? For projects in the Atlanta area, the team at Atlanta Concrete Solutions has the expertise to deliver a flawless, professional finish. Contact us today for a free quote.