When you're trying to get oil stains out of concrete, the most important thing to figure out is how old the spill is. If it's a fresh spill, you need to soak it up immediately with something absorbent like clay kitty litter. For example, a spill from yesterday's oil change requires a different approach than a mystery stain that's been on the garage floor for five years. For older, set-in stains that have had time to penetrate, you'll need to bring out the big guns—a powerful chemical degreaser or even a poultice that can pull the embedded oil out.
Acting fast is always your best bet to prevent a permanent eyesore.
Why Oil Stains Are So Stubborn on Concrete
That dark, greasy splotch on your driveway isn't just ugly; it's a testament to how frustrating concrete can be. The root of the problem is the material itself. It’s better to think of concrete not as a solid slab, but as a rigid sponge, full of microscopic pores and channels.
The moment oil hits the surface, that porous network starts wicking it up, pulling the liquid deep inside where a simple surface scrub won't ever reach. This is exactly why a stain you thought you cleaned can mysteriously "reappear" a day later—you only got the top layer. For instance, you might scrub a stain until it vanishes, only to find a faint shadow in its place the next morning as oil from deep within the concrete wicks back up to the surface.
The Science of a Stubborn Stain
It's a two-front battle. First, the oil seeps into the concrete's pores. Then, a chemical reaction begins. The natural alkalinity of concrete and the composition of petroleum-based oils create a surprisingly strong bond, making removal tough. Fresh spills are much easier to handle because the oil is still liquid and hasn't traveled far, so absorbent materials can effectively draw it back out.
Once the lighter parts of the oil evaporate, though, you're left with the heavy, gummy components. These effectively glue themselves to the concrete's internal structure. At that point, you have to switch from simple absorption to a chemical approach that can dissolve those stubborn bonds.
This isn't just a homeowner's problem. In commercial parking garages, oil stains impact over 70% of concrete surfaces within the first five years. Concrete can absorb up to 10% of its weight in contaminants if it's not sealed, which shows just how vulnerable it is. For a deeper dive, you can review a full study on petroleum stain removal techniques on GSA.gov.
This simple guide illustrates how to pick the right method based on the stain's age.
As you can see, the first step is always to figure out if you're dealing with a fresh or set-in stain. That single piece of information tells you whether to start by absorbing or degreasing.
Choosing Your Battle Plan
Knowing your enemy—in this case, your stain—is the key to victory. A quick diagnosis will save you a ton of time, money, and elbow grease by making sure you use the right tool for the job right from the start.
The biggest mistake I see homeowners make is treating all oil stains the same. Trying to use a degreaser on a fresh spill can just spread it around, while pouring kitty litter on a ten-year-old stain is a complete waste of time. Always match your method to the stain's age.
To help you choose, here’s a quick comparison of the most common methods for tackling oil stains.
Oil Stain Removal Methods at a Glance
| Method | Best For | Effort Level | Typical Cost |
|---|---|---|---|
| Absorbent | Fresh spills (less than 24 hours old) | Low | $5 – $15 |
| Degreaser | Set-in stains (weeks to months old) | Medium | $15 – $40 |
| Poultice | Very old, deep stains | High | $20 – $50 |
This table should give you a clear starting point. Now that you've got the basics down, you can confidently pick the right approach to get your concrete looking clean again, which we'll cover step-by-step in the next sections.
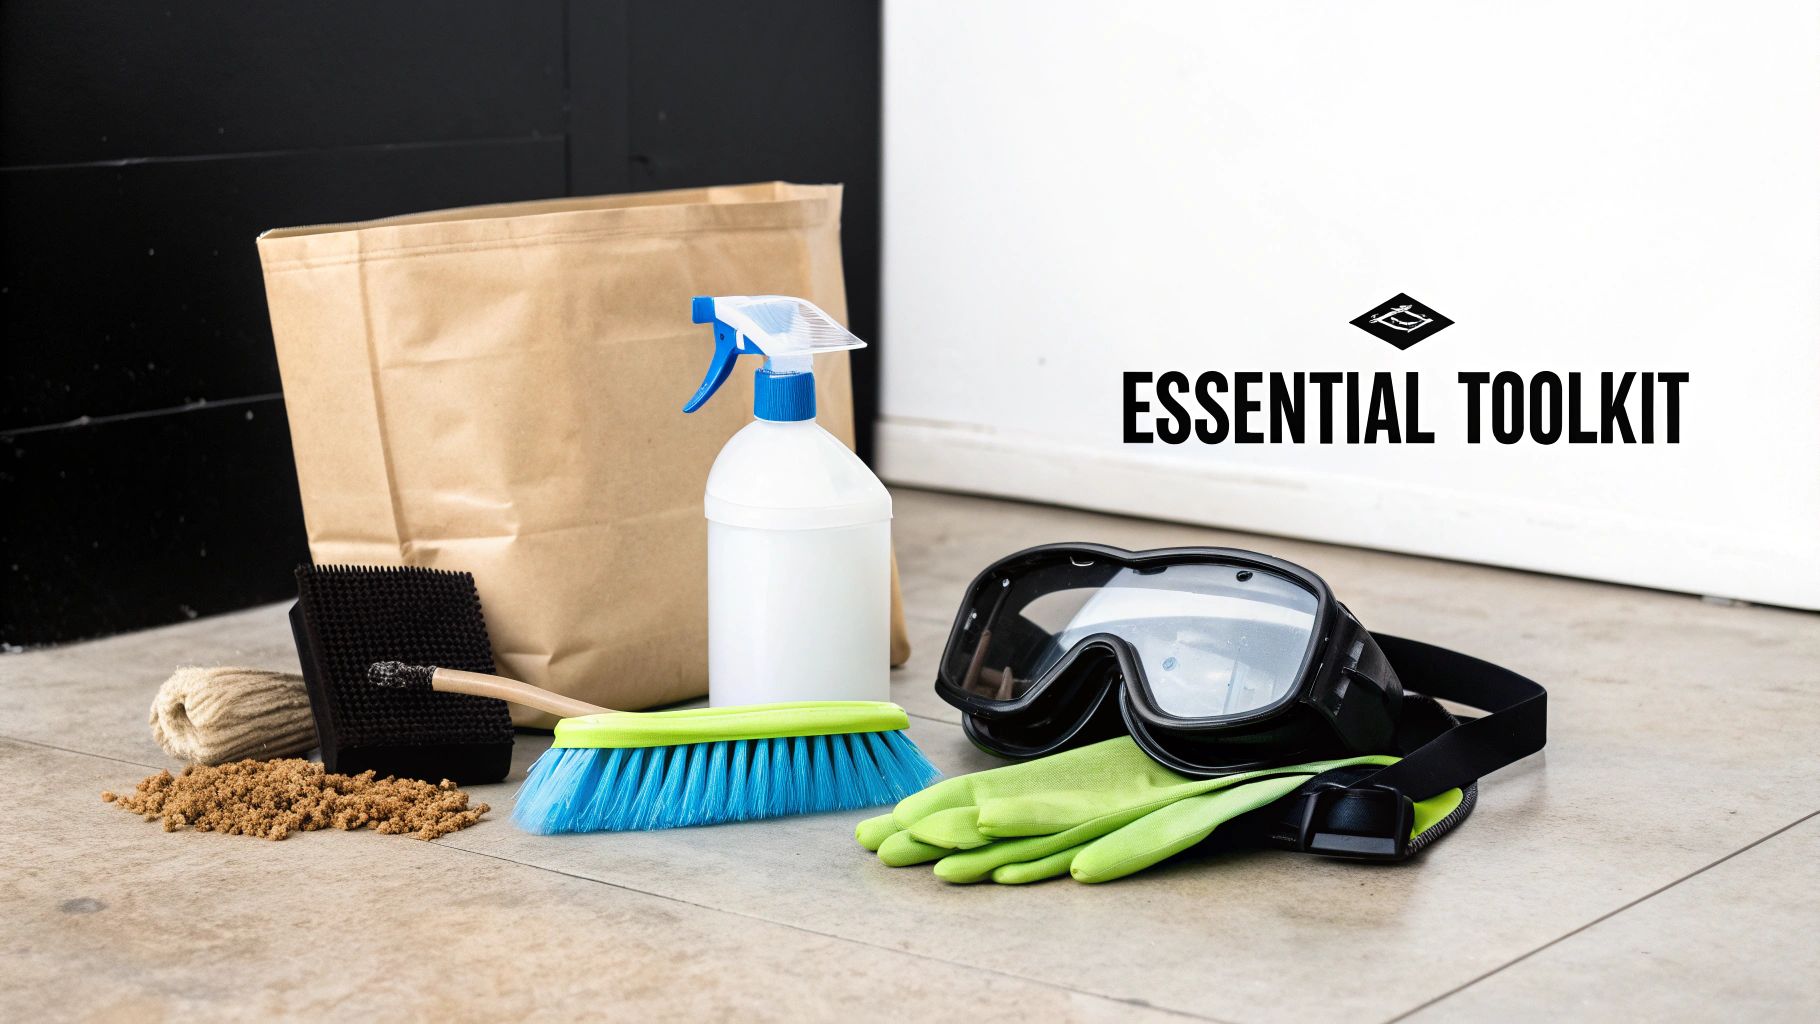
What You’ll Need to Get the Job Done Right
Before you even think about tackling that oil stain, you've got to get your gear in order. Trust me, trying to do this on the fly without the right supplies is a recipe for frustration. It makes the job ten times harder and can leave you with an even bigger, more spread-out mess.
Think of it this way: you wouldn't start a painting project without brushes and a drop cloth. This is no different. A little prep work goes a long way.
First Things First: Protect Yourself
Let's be clear: the most important tools aren't for the concrete, they're for you. Many of the best concrete cleaners are no joke—they're powerful chemicals designed to break down stubborn oil and grease. Don't skip the Personal Protective Equipment (PPE).
- Alkali-Resistant Gloves: Forget those flimsy kitchen gloves. You need heavy-duty rubber gloves that won't disintegrate when they come into contact with a strong degreaser. This is about preventing nasty chemical burns. For example, nitrile or butyl rubber gloves offer excellent protection.
- Safety Goggles or Glasses: It only takes one stray splash from a scrubbing brush or pressure washer to cause serious eye damage. It’s a simple precaution that’s non-negotiable.
- Closed-Toe Shoes: You’ll be working with liquids and potentially heavy equipment. A sturdy pair of work boots is your best bet to protect your feet from spills.
Once you’re suited up, you can start gathering the rest of your arsenal. What you’ll need depends on whether you’re dealing with a fresh spill or a stain that’s been there since last winter, but this list will get you through most situations.
Your Cleaning Arsenal
Having the right equipment on hand is what separates a quick, successful job from a long, disappointing one. And please, step away from the wire brush. It’s a common mistake that will leave permanent, ugly scratches all over your concrete.
A stiff-bristled nylon brush is your secret weapon. It’s tough enough to work the cleaner deep into the concrete's pores but won’t gouge the surface like a wire brush will.
Here’s a full checklist of what to have ready:
- Something Absorbent: If the spill is fresh, your first move is to soak up the excess. Clay kitty litter is the old-school, go-to solution for a reason—it works. But in a pinch, sawdust, cornstarch, or even baking soda will do the trick.
- Stiff Nylon Brush: As I mentioned, this is for the real scrubbing. A long-handled one will save you from crawling around on your hands and knees.
- A Good Concrete Degreaser: For those older, set-in stains, a household cleaner won't cut it. You need a commercial-grade product specifically made for concrete, like Zep Heavy-Duty Concrete Degreaser or Oil Eater, to effectively break down those oil molecules.
- Bucket and Hose: You’ll need a sturdy bucket for mixing solutions and a reliable water source for rinsing everything down when you're done.
- Pressure Washer (Optional but Recommended): While you can get by without one, a pressure washer is a game-changer. It makes rinsing away the lifted oil and leftover cleaner incredibly effective. Just be sure to use a fan tip and keep the pressure under 1500 PSI—any higher and you risk etching the concrete itself.
Finally, think about the cleanup before you even start. You can't just toss oil-soaked kitty litter or rags into your regular trash bin. This is considered hazardous waste. Grab a heavy-duty trash bag or a bucket with a lid, and be prepared to dispose of it properly. A quick call to your local waste management facility will tell you exactly what you need to do to stay on the right side of environmental regulations.
Tackling Fresh Oil Spills Before They Set In
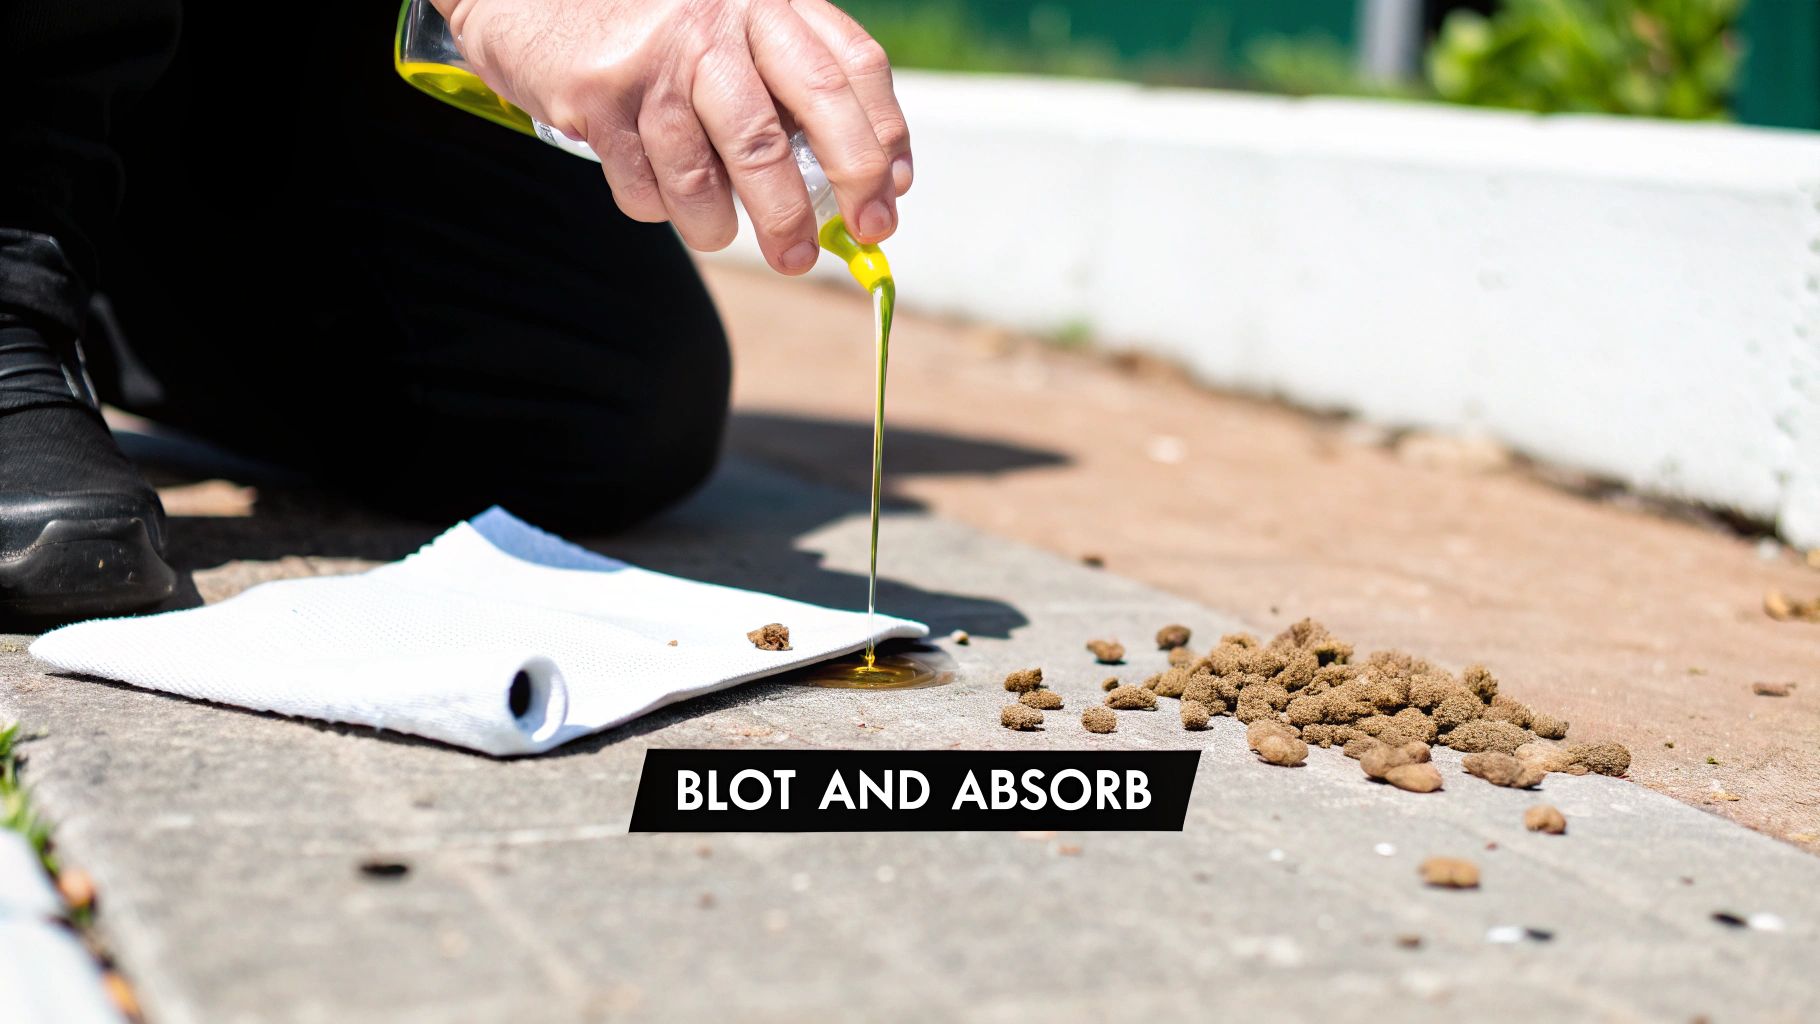
When you catch an oil spill the moment it happens, you've got the upper hand. Time is everything. A fresh spill is just sitting on the surface, and it hasn't had the chance to work its way deep into the concrete's pores. Your mission is simple: get it up before it soaks in.
This is a job for an absorbent, not a scrubber. The whole idea is to pull the liquid oil out of the concrete before it cures, bonds, and becomes a permanent eyesore on your driveway or garage floor. If you can get to it within the first few hours, you're in great shape.
Stop the Spread and Start Absorbing
Whatever you do, do not rub it. The first instinct is often to grab a rag and start wiping, but that’s a classic mistake. All you’ll do is smear the oil over a wider area and push it deeper into the concrete. You want to contain and absorb.
Start by gently blotting any puddles of oil with old rags or paper towels. Just lay them down, let them soak up the excess, and lift them straight up. This takes care of the bulk of the mess without making it worse.
Next, it’s time to cover the stain with something absorbent. And don't be shy about it—pile it on. You want a thick layer, at least half an inch deep, completely covering the spot. This ensures you have enough material to draw the oil out effectively.
The key here is patience. The absorbent needs time to act like a sponge, wicking the oil up and out of the concrete. People often rush this step, which is why they end up with a faint, frustrating shadow of a stain.
Let’s say you just pulled out of the garage and noticed a fresh spot of motor oil. Don’t reach for the hose. Just blot the wettest part, then pour a thick mound of kitty litter over the entire stain, making sure to go about an inch past the edges.
Choosing Your Absorbent Material
You probably have something that will work sitting in your house right now. The best options are dry, powdery, or granular materials that are great at wicking up liquids.
Here are a few of the most common and effective choices:
- Clay Kitty Litter: This is the old-school, go-to solution for a reason. The clay is fantastic at pulling out petroleum-based liquids. Make sure to use a basic, non-clumping clay variety.
- Cornstarch: Don’t underestimate this kitchen staple. Its incredibly fine particles have a huge surface area, making it surprisingly good at drawing oil out of concrete.
- Baking Soda: Works much like cornstarch. As a bonus, it also helps deodorize the area.
- Sawdust: If you have it on hand from a recent project, sawdust is another excellent absorbent that works just like kitty litter.
Pro Tip: Want to supercharge your kitty litter? Crush it up first. Pour some into a heavy-duty bag and step on it or roll something heavy over it to break the granules into a finer powder. This maximizes the surface area, letting it suck up more oil, much faster.
The Waiting Game and Final Cleanup
Once your absorbent is down, the hard part begins: waiting. You need to give it at least 24 hours to work its magic. Over that time, the material will slowly pull the oil from the concrete’s tiny pores. You’ll probably see it darken as it gets saturated.
After a full day has passed, sweep everything up and get ready to dispose of it properly. That absorbent is now considered hazardous waste. Shovel it into a sealed, heavy-duty plastic bag or another secure container, and check with your local Atlanta-area waste management for their rules on disposal.
Finally, give the spot a quick scrub. A stiff nylon brush with a simple mix of warm water and dish soap (like Dawn, which is excellent at cutting grease) will remove any light, greasy film left behind. Rinse it well with a hose. In most cases, if you acted quickly, your concrete will look like the spill never even happened. You'll have saved yourself from needing a tougher lesson on how to clean oil stains from concrete.
Tackling Old and Deeply Set Oil Stains
Once an oil stain has been sitting for weeks, months, or even years, it’s no longer just a surface mess. It’s become part of the concrete's story, seeping deep into the porous structure and bonding with the material itself. At this point, simply trying to soak it up won't do much. You've got to bring out the big guns—solutions designed to chemically break down and lift out those stubborn, heavy petroleum compounds.
This is where you shift from basic cleanup to a more serious restoration project. It takes more potent chemicals and a bit more elbow grease, but the payoff is worth it. For these ancient blemishes, we turn to two proven workhorses: commercial degreasers and a classic technique known as a poultice.
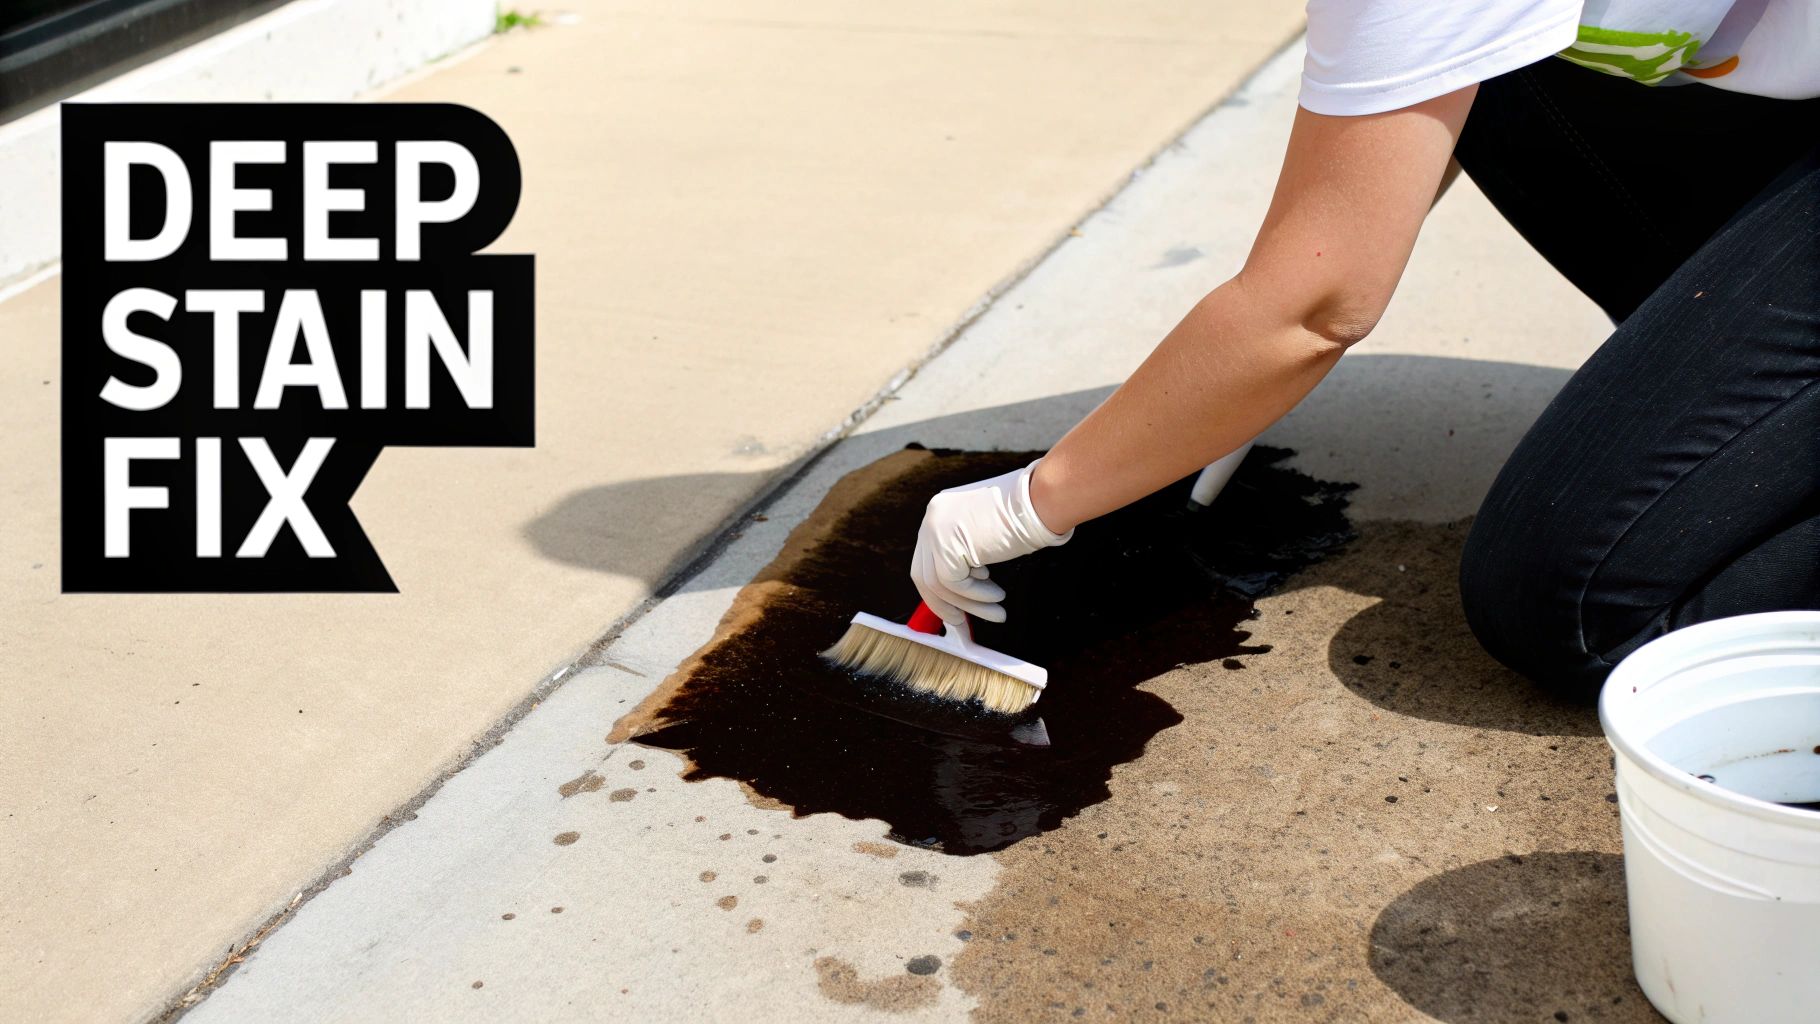
Harnessing the Power of Commercial Degreasers
For most stubborn, set-in stains, a good commercial concrete degreaser is your best bet. These aren't your average all-purpose cleaners. They are specifically formulated with powerful alkaline agents that do one thing exceptionally well: shatter the chemical bonds of petroleum oil. They work by emulsifying the grease, turning the hardened oil back into a liquid state so it can finally be pulled out and washed away.
The science is pretty simple. The alkaline solution reacts with the oil, turning the greasy mass into a soapy substance that can be suspended in water. This is the magic step. Once the oil is emulsified, it loses its death grip on the concrete's pores, allowing you to flush it out for good.
Commercial degreasers have been a game-changer for cleaning concrete driveways. Research has shown that strong alkaline cleaners (with a pH over 7) can emulsify up to 95% of motor oil residue in under 30 minutes. Let’s take a product like PROSOCO Cleaner/Degreaser. The process is straightforward: apply it, scrub it in with a stiff brush for 10-15 minutes, and then hit it with a pressure washer set between 1500-2000 PSI. Be careful not to go over 3000 PSI, as that kind of pressure can easily etch or damage the concrete itself. A study in a Houston industrial park using this exact method restored 88% of heavily stained concrete pads to nearly their original look. You can read more about powerful oil removers for concrete to see just how effective they can be.
Using Degreasers the Right Way
Application is everything. Just dumping degreaser on a stain and hoping for the best isn't a strategy. For real results, you need a methodical approach.
- Prep the Area: First, sweep the stain and the surrounding area clean of any dirt or debris. You want the cleaner to make direct contact with the oil, not a layer of grime.
- Apply Generously: Pour the degreaser directly onto the dry stain. Make sure you completely saturate it, and don't be shy about covering the edges, too.
- Work It In: This is the crucial part. Grab a stiff nylon brush and scrub the degreaser deep into the concrete. You need to spend a good 10-15 minutes agitating the area to really help the chemicals penetrate and start breaking down the oil.
- Let It Dwell: Now, be patient. Let the degreaser sit on the stain for at least 20-30 minutes. This "dwell time" is when the emulsification process is actively working.
- Rinse Thoroughly: A pressure washer is your best friend for this step. It has the power to blast away the emulsified gunk and any leftover cleaner. If you don't have one, a hose with a strong jet nozzle and more scrubbing can work, but it’ll take more effort.
If you happen to notice that the concrete around the stain is cracking or spalling, the oil might have caused deeper structural damage over time. When you're dealing with a compromised surface, it’s smart to look into professional options for residential concrete and masonry repair to ensure the slab itself is sound.
The Poultice Method for the Toughest Stains
So, what happens when even a powerful degreaser doesn't cut it? For the absolute oldest, darkest, most deeply set stains, it's time to try a poultice. This is a thick, absorbent paste that you spread over the stain, cover, and leave for an extended time. It works by slowly and steadily drawing the stain out.
Think of it as a deep-cleaning facial mask for your driveway. The solvent in the paste dissolves the oil trapped deep inside the concrete, and the absorbent material in the paste then wicks that dissolved oil up and out of the pores. It’s a slow process, but it's incredibly effective for those stains that seem like they're there for good.
A poultice is the secret weapon of professional concrete cleaners. It's the go-to solution for those "ghost" stains that remain after multiple rounds of cleaning with degreasers. The slow-acting nature of the poultice allows it to pull contaminants from deeper within the concrete than any other method.
You can buy pre-made poultice powders, but it's also easy enough to make your own. A homemade poultice is just a simple mix of an absorbent material and a strong solvent.
Common Poultice Ingredients:
- Absorbents: Kitty litter (ground into a fine powder), diatomaceous earth, or talc powder.
- Solvents: Acetone, mineral spirits, or even a strong liquid degreaser.
To make your own, mix your absorbent and solvent together until you get a paste with the consistency of peanut butter—thick enough not to run, but still wet. Spread a quarter-inch thick layer over the stain, going about an inch past the edges. Cover it with plastic wrap and tape the edges down to keep the solvent from evaporating. Let it sit for 24 to 48 hours, then come back, scrape off the dried paste, and rinse the area clean. You’ll likely be shocked at the results.
Eco-Friendly Ways to Tackle Concrete Stains
If the thought of pouring harsh chemicals all over your driveway makes you cringe, you're in the right place. Many of us are looking for greener ways to get rid of oil stains that don't come at the expense of our lawns or local waterways. Fortunately, you don’t have to choose between a clean driveway and a clear conscience.
There are some seriously effective, environmentally-friendly solutions out there that can outperform traditional degreasers. We're talking about smart, sustainable approaches that solve the problem of how to clean oil stains from concrete without all the manual labor and environmental risk.
Let Microbes Do the Dirty Work with Bioremediation
One of the most impressive green innovations for concrete cleaning is bioremediation. It sounds high-tech, but the concept is beautifully simple. Instead of using chemicals to dissolve oil, these cleaners use naturally occurring microbes that actually eat the oil.
You just apply the product, and these microscopic powerhouses get to work. They seep deep into the concrete's pores and digest the hydrocarbons in the oil, breaking them down into harmless water and carbon dioxide. There's virtually no scrubbing involved, and the entire process is completely safe for pets, plants, and groundwater. It’s a game-changer.
These aren't just hypotheticals, either. Products like EXIMO have been shown to remove up to 98% of oil stains in commercial parking garages without any water runoff—a huge deal, since contaminated runoff from pressure washing can lead to hefty EPA fines. In one case, a microbial formula made a two-year-old stain disappear in just 72 hours. As a bonus, it leaves beneficial microbes behind to help prevent future stains. You can read more about the benefits of bioremediation in concrete cleaning and see the results for yourself.
Blast Stains Away with High-Powered Steam
Another fantastic chemical-free option is steam cleaning. A professional-grade steam cleaner uses a potent combination of high heat and pressure to lift oil right out of the concrete. The superheated steam essentially melts the grease and grime, forcing it out of the pores so you can just wipe it away.
This method is a beast, especially on old, stubborn stains that have been baking in the Georgia sun for years. Since it only uses superheated water, you aren't introducing any new chemicals into the environment. Think of it like a deep-cleaning facial for your driveway—it opens up the pores and flushes out all the gunk. A typical commercial steam cleaner can reach temperatures of over 300°F (150°C), which is hot enough to liquefy even the most stubborn, hardened grease.
The real magic of steam is how deep it gets. The intense heat makes the oil thin and runny, which allows the pressure to push the stain out from below the surface. A simple scrub brush just can't compete with that.
Picking the Right Green Cleaning Method
So, which path should you take? It really boils down to the stain you're dealing with and what you value most.
- Want a "set it and forget it" solution? Bioremediation is your best bet. It’s perfect if you want a powerful, no-scrub treatment that works its magic over a few days.
- Need immediate, chemical-free results? A steam cleaner delivers that instant gratification. If you have the equipment or can rent it, you can have that stain gone by this afternoon.
Both are powerful, responsible alternatives to old-school degreasers, proving you can have a spotless driveway without compromising on safety or sustainability.
How to Prevent Future Oil Stains on Your Concrete
After all that scrubbing, the last thing you want is to see a fresh oil spot bloom across your clean concrete. The good news? A little preventative maintenance goes a long way in keeping your driveway or garage floor looking its best. It's always easier—and cheaper—to stop a stain before it starts.
The single best thing you can do is apply a high-quality concrete sealer. Think of unsealed concrete as a giant, rigid sponge just waiting to soak up anything you spill on it. A good sealer creates an invisible shield, blocking oil and other liquids from penetrating the surface. This buys you a crucial window of time to wipe up a mess before it sets in and becomes a permanent problem.
Choosing the Right Concrete Sealer
Not all sealers are the same, and what works for a garage floor might not be the best pick for a long driveway. For those of us here in Atlanta, you'll want something that can handle our humid, hot summers and the occasional winter freeze.
Here’s a quick rundown of what you’ll find on the shelf:
- Silicate Sealers: These are a fantastic choice for driveways. They don't just sit on top; they actually soak into the concrete and create a chemical reaction that densifies and hardens the surface from the inside out. They're incredibly durable, breathable, and won't change the look of your concrete.
- Acrylic Sealers: These are probably the most common DIY option. They form a thin, protective film over the surface and come in both solvent- and water-based formulas. Acrylics are affordable, easy to apply, and can give your concrete a nice satin or wet look. The trade-off is that they usually need to be reapplied every 2-3 years.
- Epoxy Coatings: If you want bulletproof protection for a garage floor, epoxy is your answer. It creates a thick, super-durable, and non-porous surface that laughs at oil, chemicals, and hot tire pickup. It's an investment, but the glossy, professional finish is tough to beat.
If you have a classic car or an older work truck that tends to weep a little oil, an epoxy coating in the garage is a no-brainer. For most driveways, though, a quality penetrating silicate or a film-forming acrylic sealer provides the perfect balance of protection and cost.
A properly sealed driveway can keep an oil spill beaded up on the surface for hours, turning a potential disaster into a simple cleanup. Spending $200-$500 to seal a typical two-car driveway is a smart move that saves you from costly deep-cleaning efforts down the road.
Simple Habits for a Spotless Driveway
Sealing is your primary line of defense, but a few good habits can pretty much guarantee a stain-free surface.
Got a vehicle that's known for marking its territory? Slide a drip pan or even just a large, flattened cardboard box under the engine when you park. It’s a simple, old-school trick that is 100% effective.
The other key is to act fast. Get in the habit of dealing with small spills as soon as you spot them. A quick blot with a shop towel and a spritz of degreaser right away is infinitely easier than trying to lift a set-in stain a month from now.
Keeping your driveway in top shape is a huge part of your home's curb appeal. For more professional tips on everything from installation to long-term care, check out our guide to residential driveway concrete, written specifically for Atlanta-area homeowners.
Common Questions About Concrete Oil Stains
Even with the best game plan, questions always pop up when you're staring down an oil stain on your concrete. This is where things can go sideways fast, with internet myths and bad advice wasting your time or, even worse, making the stain permanent.
Let's cut through the noise. I've pulled together the most common questions and hang-ups people run into when tackling these stubborn spots. Getting straight answers is the key to getting it done right the first time.
Can I Use WD-40 or Coca-Cola on an Oil Stain?
You’ll see these "hacks" all over the internet, but from my experience, they're not a good bet. WD-40 is a light oil itself. While it might thin out a super-fresh spill for a moment, it usually just spreads the stain and leaves its own oily film behind.
And Coca-Cola? The phosphoric acid in it is so mild it won’t do much to break down motor oil that's soaked into the concrete. You're more likely to slightly etch the surface of your concrete than you are to remove the stain. For example, leaving a puddle of cola on concrete can lighten the surface, creating a new, different-colored blemish. It's always better to stick with what actually works: a good absorbent for new spills and a real concrete degreaser for set-in stains.
How Can I Tell If an Oil Stain Is Old or New?
Figuring out the age of the stain tells you exactly which cleaning method to use. It's pretty simple to spot the difference.
A fresh stain—one that’s less than a week old—will look dark, wet, and have crisp, defined edges. You can clearly see where the spill started and stopped. It might even feel slightly tacky or slick to the touch (wear gloves!).
An old stain, on the other hand, is a whole different animal. It will be much lighter, often faded to a faint gray or tan color. The edges will be soft and blurry, almost like a feather, showing how the oil has slowly seeped deeper and wider into the concrete over time. It will also be completely dry to the touch.
What Should I Do If a Dark Spot Remains After Cleaning?
It's incredibly common to go through the whole cleaning process and be left with a faint, shadowy "ghost" of the original stain. Don't get discouraged! This just means some oil is still trapped deep down in the pores of the concrete.
The first step is simply to repeat the cleaning process. Give it another round with your degreaser and a stiff brush.
If a second attempt doesn't get rid of that shadow, it's time to bring out the big guns: the poultice method. A poultice is designed to work slowly, pulling deeply embedded oil out of the concrete over 24 to 48 hours. It’s hands-down the most effective fix for those lingering ghost stains.
For stains that have caused more significant damage, or if you're ready to protect your concrete for the long haul, looking into professional concrete repair and sealing services is a great next step.
Sometimes, a stain has just been there too long or is too deep for any DIY method to work. If you’re in the Atlanta area and need a professional to get your concrete looking new again, the experts at Atlanta Concrete Solutions are ready to help. Contact us today for a free quote on restoring your concrete surfaces.