Before you even think about leveling a concrete floor, you have to play detective and figure out exactly what’s wrong with it. This means pinpointing every high and low spot, checking for moisture, and taking a hard look at any cracks to decide on the best plan of attack. For example, a small dip might only need a thin layer of patching compound, while a floor that slopes half an inch from one side of the room to the other will require a full flood of self-leveling compound. Getting this initial assessment right is the most important part of the whole job. A good diagnosis leads to a lasting fix.
Assessing Your Concrete Floor for Unevenness
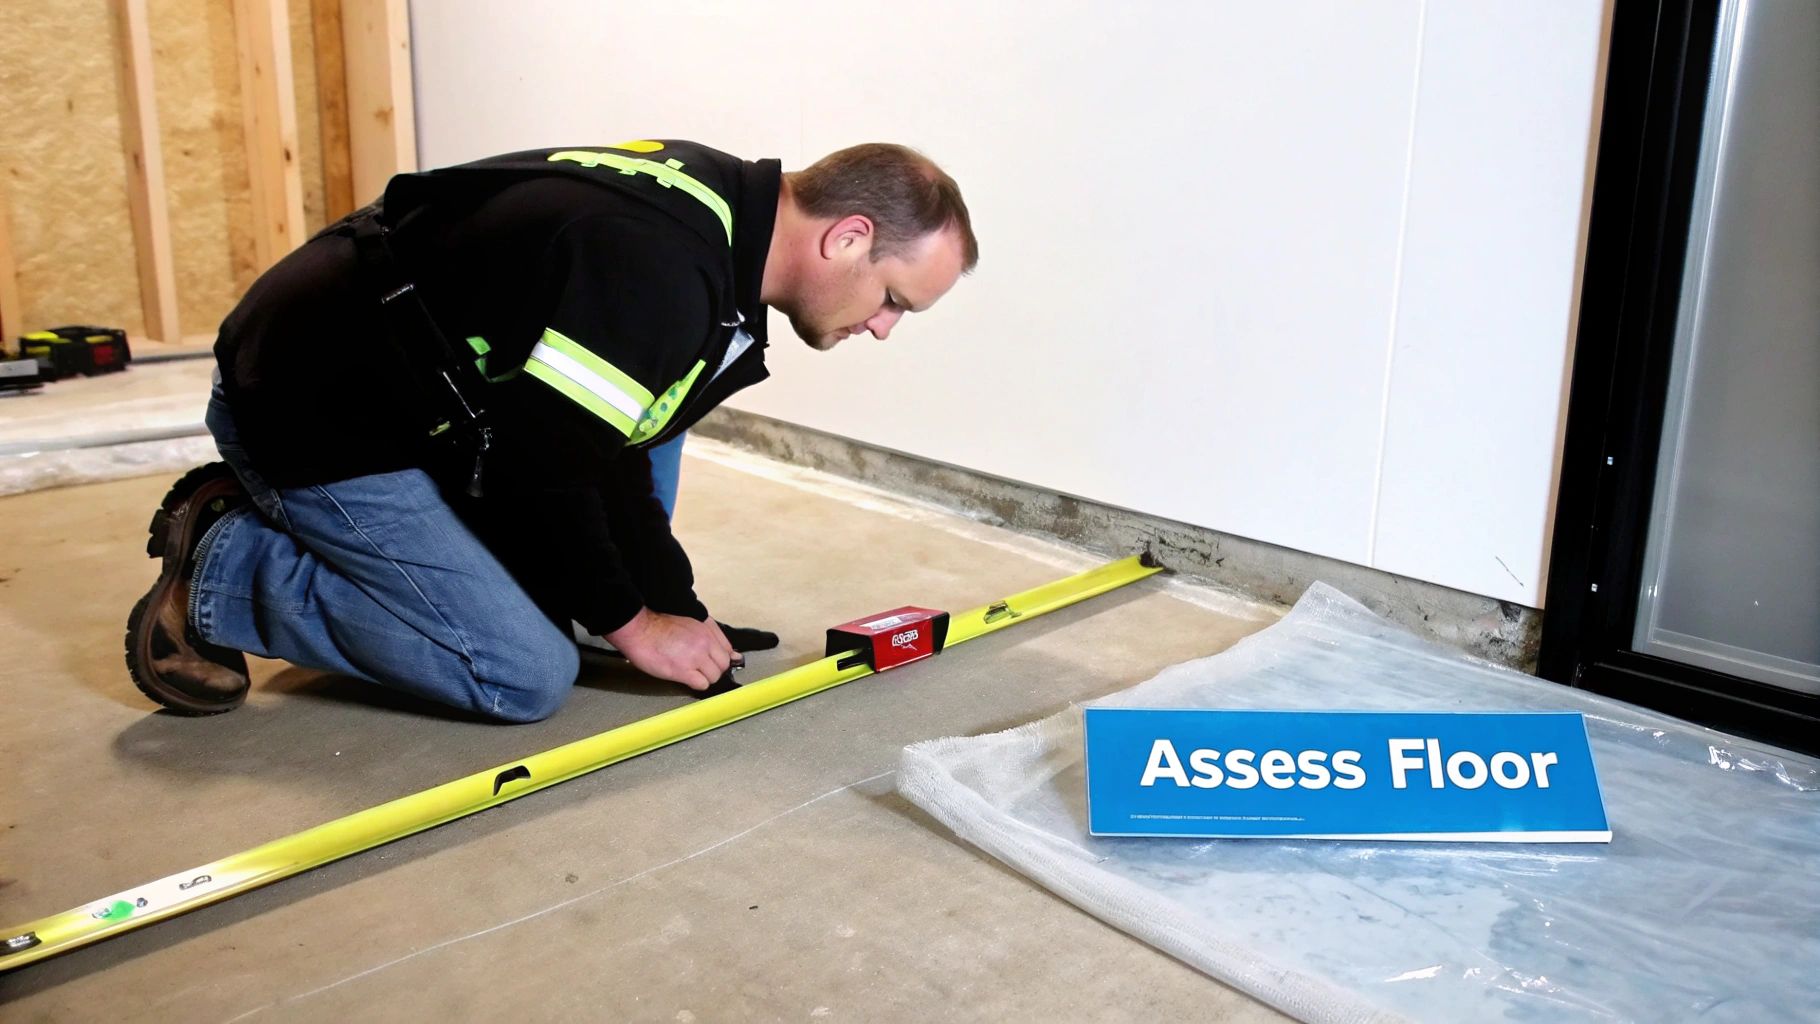
Don't just rush out to buy leveling compound or rent a grinder. Your first real job is to understand the "why" behind the problem. A solid leveling project always starts with a thorough assessment of the slab. This tells you not just where the floor is uneven, but why, and that information is critical for choosing the right repair method.
Jumping into a fix without this knowledge is a recipe for disaster. For example, pouring self-leveler over a slab with an active moisture problem will likely result in the leveler failing to bond, creating a crumbly, detached layer. The goal here is to create a detailed map of your floor's topography. This prevents you from wasting time and materials on a solution that doesn't work, leaving you with a floor that's just as bad as when you started. A tiny dip might just need a small patch, but a major slope could require a full flood of self-leveler or even professional help.
Finding High and Low Spots
The simplest way to spot imperfections is with a long, perfectly straight edge. Grab a 6- or 8-foot-long 2×4 (make sure it's dead straight) or an aluminum screed. Lay it across different parts of the floor and shine a flashlight along the edge. Any light that peeks through is a low spot.
To get an idea of the depth, just slide a tape measure or a shim into the gap at its lowest point. This tells you exactly how much you need to fill. For instance, if you can slide a quarter under the straightedge, that's a gap of about 1/16th of an inch. Mark these low areas right on the floor with a crayon or chalk, and jot down the depth so you don't forget.
If you want a more precise, high-tech approach, a rotary laser level is the gold standard. Set it up in the middle of the room, then use the detector on a measuring rod to take readings every few feet. This method creates a perfect grid of elevation points, giving you an exact picture of the entire floor.
Identifying the Type of Unevenness
Not all uneven floors are created equal. You need to figure out which of these common issues you're dealing with:
- Localized Dips or Humps: These are just isolated low spots (we call them "birdbaths") or high spots in an otherwise flat floor. They're common and usually the easiest to fix. Think of a shallow depression right in the middle of a garage floor where an engine block was once dropped—that can often be filled without touching the rest of the space.
- General Sloping: This is when the whole slab tilts in one direction. You might discover that the floor is consistently a half-inch lower along one wall compared to the opposite side. This kind of problem often demands a much larger amount of self-leveling compound to get right.
- Widespread Heaving or Settling: This points to a much bigger problem where entire sections of the slab have shifted up or down. This can be caused by anything from soil erosion and poor compaction during construction to invasive tree roots pushing the slab upward.
Key Takeaway: Understanding the difference between a small dip and a general slope is crucial for your budget. A dip might only take five bags of self-leveler, but a half-inch slope across a 20-foot room could easily eat up 20 bags or more. Calculating this upfront saves you from making a half-dozen trips to the hardware store.
Checking for Moisture and Structural Issues
Once you've mapped out the high and low spots, your last diagnostic step is to look for underlying causes. Too much moisture coming through the slab can cause leveling compounds to fail spectacularly, and real structural problems need more than just a cosmetic fix.
You can do a simple moisture test yourself. Just tape a 2×2 foot square of clear plastic sheeting to the concrete, making sure to seal all four edges with duct tape. Leave it for 24-48 hours, then check for condensation under the plastic. If you see moisture, you’ve got a vapor barrier issue that has to be addressed before you pour anything on top.
Finally, give all the cracks a close look. Hairline surface cracks are usually nothing to worry about. But wider, "active" cracks—the ones where one side is higher than the other—are a red flag for slab movement. For example, if you find a crack that has widened over time and one edge is 1/4-inch higher than the other, this indicates an ongoing structural problem. These bigger problems may require professional attention, and it's worth exploring solutions for extensive slab and masonry repair to understand when it's time to call in an expert.
Choosing the Right Concrete Leveling Method
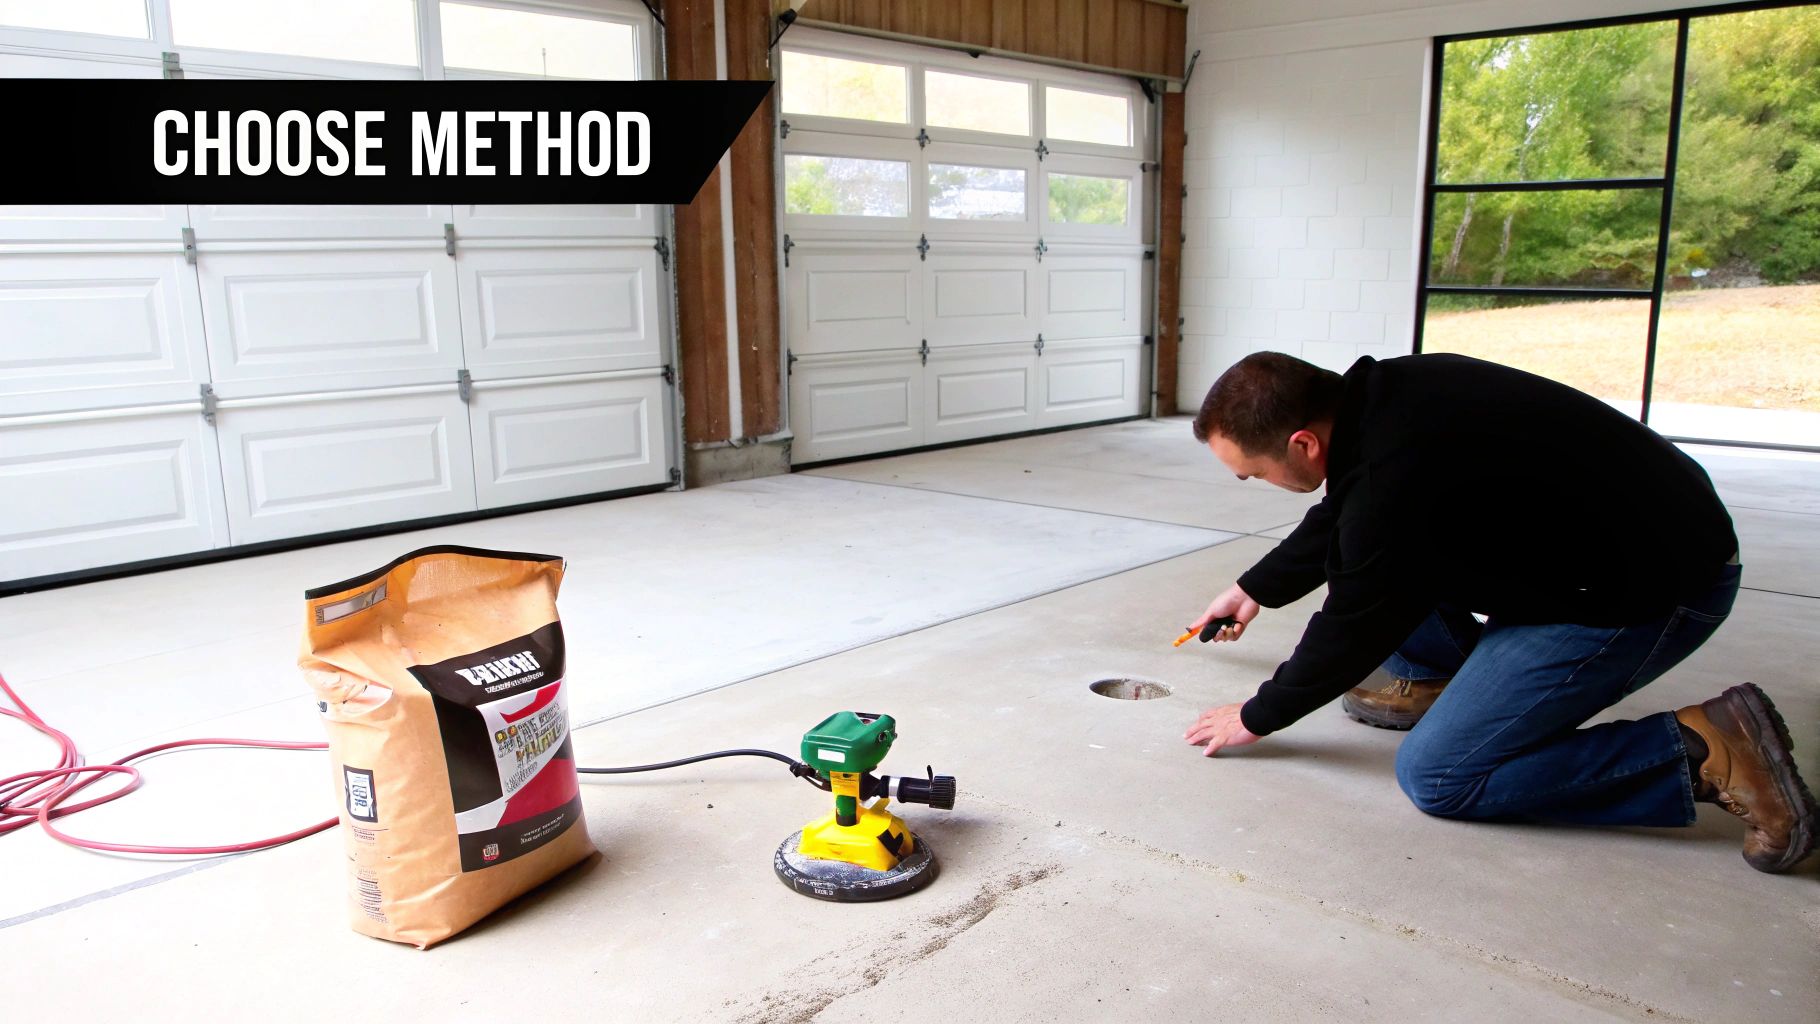
Alright, you've mapped out the high and low spots on your floor. Now comes the critical part: picking the right tool for the job. Not every uneven floor needs the same fix, and grabbing the wrong solution is a surefire way to waste time, money, and a lot of effort.
Think of it this way: you wouldn't use a sledgehammer to hang a picture frame. The same logic applies here. A small dip doesn't require raising the entire slab, and a grinder won't fix a sunken foundation. Each leveling method is designed for a specific problem.
Let's walk through the most common approaches, from simple DIY fixes you can tackle over a weekend to the heavy-duty solutions that call for a pro.
Self-Leveling Compound for Low Spots
For most interior projects, a self-leveling compound is your best friend. It’s a polymer-modified cement that pours like a thick liquid, automatically spreading out to fill dips and low areas. It's fantastic for basements, laundry rooms, or anywhere you have shallow depressions that need to be smoothed over before installing new flooring.
This method is perfect for filling areas from 1/8 inch up to about 1.5 inches deep in one go.
Let's say your basement floor has a few annoying "birdbaths" where water always seems to pool. You'd clean and prime the spots, mix up the compound according to the bag's instructions (for example, 5 quarts of water for a 50 lb bag), and pour it right in. It does the hard work for you, creating a perfectly flat surface ready for tile, vinyl, or carpet.
Its ease of use isn't just a homeowner's secret; it's a massive part of the construction industry. The global market for self-leveling concrete was already valued at $4.93 billion back in 2017 and was expected to hit $6.22 billion by 2022. That kind of growth shows just how effective this stuff is. You can read more about the self-leveling concrete market's growth to see its industry impact.
Grinding Down Concrete High Spots
But what if your problem is the opposite? Instead of a dip, you have a bump or a stubborn ridge. For that, you need a concrete grinder. These machines, fitted with aggressive diamond-segmented wheels, literally shave down the high points of the slab.
This is a dusty, physically demanding job, but it’s the only real way to flatten out high spots or remove old, thick adhesives.
A common scenario: You're prepping your garage for a sleek epoxy coating, but a noticeable hump runs down the middle where the two sides of the slab meet. Renting a walk-behind concrete grinder from a local tool rental shop lets you knock down that high spot and simultaneously profiles the concrete, giving the epoxy a porous surface to grip onto for a lasting bond.
Comparing Concrete Floor Leveling Methods
To make things clearer, let's put these methods side-by-side. The right choice often comes down to the scale of your problem and your comfort level with the work involved.
| Method | Best For | DIY Friendliness | Typical Cost per Sq. Ft. |
|---|---|---|---|
| Self-Leveling Compound | Filling interior low spots and depressions (up to 1.5") | High | $1.50 – $5.00 |
| Concrete Grinding | Removing high spots, bumps, ridges, and old coatings | Medium | $1.00 – $4.00 |
| Mudjacking | Lifting sunken exterior slabs (driveways, patios) | Low (Pro Only) | $3.00 – $6.00 |
| Polyurethane Foam | Precisely lifting interior/exterior slabs; less invasive option | Low (Pro Only) | $5.00 – $25.00 |
This table gives you a quick snapshot, but remember that costs can vary based on your location and the specific conditions of your project. For example, a grinding job on a small, open basement floor will be cheaper per square foot than one in a cramped, cluttered room with many corners.
Structural Fixes: Mudjacking and Foam Lifting
When your slab has sunk by more than a couple of inches, you're no longer dealing with a surface issue. This is a structural problem, and pouring a bag of self-leveler over it won't do a thing. For serious sinking, you need to bring in the big guns: mudjacking or polyurethane foam injection.
Both methods work by drilling strategic holes (typically 1-2 inches in diameter) in the slab and pumping a material underneath to lift it back to its original position. Mudjacking uses a heavy slurry of cement and soil, while foam lifting uses a lightweight, expanding polyurethane foam.
These are absolutely not DIY jobs. They require specialized hydraulic pumps, a deep understanding of soil mechanics, and the experience to lift a multi-ton slab without cracking it. A poor injection pattern, for instance, could over-lift one area and crack the slab in half.
If your driveway, patio, or a section of your basement has noticeably dropped, this is the territory you're in. Your best bet is to explore professional concrete repair services available and get an expert on-site to tell you exactly what's going on.
Prepping the Concrete for a Perfect Bond
Let's be clear: even the best leveling compound on the market is worthless if it doesn't stick. Think of it like trying to paint a greasy wall—without the right prep, that new coat will peel right off. The bond between your old concrete slab and the new leveling layer is everything, which makes this preparation stage the most critical part of the entire project.
If you rush this part, you're setting yourself up for failure. Any leftover dust, oil, or old adhesive creates a weak spot. For example, failing to remove old carpet glue can create a barrier that prevents the self-leveler from bonding, leading to a hollow-sounding, delaminated section. This isn’t just about a quick sweep; it’s about creating a clean, porous surface that will grip the new layer for a permanent fix.
Deep Cleaning the Concrete Surface
Your first goal is to get the slab surgically clean. I mean everything has to go—any contaminant that could get between the old concrete and the new compound needs to be removed. You need to get down to the raw, porous concrete.
Start by scraping off the obvious stuff: old paint, stubborn carpet glue, or bits of drywall mud. A long-handled floor scraper will save your back here. Once the bigger chunks are gone, it's time to deal with any grease or oil stains. If you're working on a garage floor that’s seen years of fluid leaks, a heavy-duty concrete degreaser is your best friend. Follow the directions—pour it on, scrub it deep into the concrete with a stiff-bristled brush, and let it work its magic.
After the degreaser has done its job, a power washer is the best way to blast away decades of grime and any leftover chemical residue. Work methodically from one side to the other, making sure you rinse everything away completely. A good test is to splash a little water on the floor; if it soaks in quickly, the surface is clean and porous. If it beads up, you still have contaminants to remove.
Repairing Cracks and Holes
Once the floor is clean, every flaw will be on full display. It’s tempting to think the self-leveler will just fill everything in, but that’s a rookie mistake. Pouring over an existing crack without fixing it first often leads to reflective cracking, where the old crack eventually telegraphs right through your new, perfectly smooth surface.
For tiny, non-structural hairline cracks, you don't need to worry too much. But for any crack wider than a credit card or any noticeable holes, you have to fill them first.
- Epoxy Crack Fillers: These two-part products are incredibly strong. They create a rigid repair that stabilizes the crack and prevents it from moving. They are ideal for structural cracks that need to be locked in place.
- Cementitious Patching Compounds: These are a better choice for filling larger holes or spalled areas where a chunk of concrete has broken off. They create a patch that has a similar texture to the concrete around it.
Imagine you have a 1/4-inch wide crack running across your basement. You’d start by cleaning it out with a wire brush and a shop vacuum to get rid of any loose junk. Then, you'd mix and apply a two-part epoxy filler, smoothing it flush with the floor. This permanently seals the weak spot.
Pro Tip: For any holes deeper than an inch, fill them in stages. If you dump too much patching compound in at once, it can shrink and crack as it cures. Apply a half-inch layer, let it set up, then add the next.
Creating the Right Surface Profile
A perfectly smooth, slick floor might seem like a great starting point, but it's actually the enemy of a strong bond. Leveling compounds need a bit of texture to grab onto, a quality we call a surface profile. The ideal texture feels something like medium-grit sandpaper, often referred to in the industry as a Concrete Surface Profile (CSP) of 2 or 3.
This roughness, or "tooth," creates a huge amount of surface area for the new material to adhere to, which is what gives you that powerful mechanical bond. You've got a couple of options here:
- Mechanical Grinding: This is the professional’s choice for a reason. Using a concrete grinder with a diamond abrasive disc is the most reliable way to get the job done. It not only removes old coatings but also opens up the concrete's pores to create the perfect profile.
- Acid Etching: For a clean, unsealed slab, a muriatic acid solution can be used to roughen the surface. While it works, you're dealing with some pretty harsh chemicals and a lot of rinsing and neutralizing. For most people, grinding is safer and gives more consistent results.
Applying the Essential Primer
The final, non-negotiable step before you even think about mixing your leveler is to apply a primer. Primer is the bridge between the old slab and the new layer, ensuring they fuse together permanently.
It serves two critical functions:
- It seals the porous concrete. This prevents the slab from sucking water out of your self-leveling mix too fast, which can weaken the compound and mess up the curing process.
- It creates a tacky, high-grip surface that the leveling compound can lock onto, maximizing the bond.
After grinding a garage floor, for example, there's always a fine layer of dust, even after vacuuming. Rolling on the manufacturer-recommended epoxy primer locks that dust down and preps the slab. The difference in bond strength is night and day, turning a potential failure into a durable, long-lasting surface. For homeowners looking for that high-end look, proper prep is what makes a perfect finish possible, as you can see in these beautiful residential polished concrete floors.
Laying It Down: How to Pour and Spread Self-Leveling Compound
Okay, all that prep work is done. Your slab is clean, patched up, and primed. Now for the fun part—the part where you see all that effort pay off and a perfectly flat floor starts to take shape.
Applying self-leveling compound is all about speed and confidence. Once you mix it, the clock is ticking, as most products have a "pot life" of only 15-20 minutes. The trick is to have absolutely everything you need within arm's reach before a single drop of water hits that powder. Get organized now, and you'll get a pro-level finish.
This is the basic flow. If you've done these three things right, the compound will do its job beautifully.
A clean, filled, and primed surface is non-negotiable. It’s what ensures the leveler actually sticks and stays put for the long haul.
Nailing the Mix
Getting the consistency right is everything. If it's lumpy or too thick, it won't flow properly. Too thin, and it won't have any strength. The only way to do this efficiently is with a heavy-duty, low-speed drill (around 650 RPM) and a paddle mixer attachment. Mixing by hand is a recipe for disaster.
First, pour the exact amount of cool, clean water the bag calls for into a clean 5-gallon bucket. For example, a popular brand might specify exactly 4.75 quarts of water per 50 lb bag. Always water first, then powder—it prevents dry clumps from getting stuck at the bottom.
With the drill spinning, slowly add the entire bag of leveling compound. Keep that paddle moving for a solid two minutes, making sure you scrape the bottom and sides to get every last bit of powder incorporated. You're looking for a smooth, lump-free mix that has the consistency of a thick pancake batter. It needs to be pourable, but it shouldn't look like water.
A Word of Warning: Fight the urge to add extra water. It might seem like it makes the compound easier to spread, but you're actually destroying its structural integrity. Too much water results in a weak, chalky surface that will crack and crumble under your new floor. Stick to the manufacturer's ratio. No exceptions.
Setting Up Dams to Contain the Flow
Self-leveling compound behaves like water; it will find every nook, cranny, and gap to escape through. Before you even think about pouring, you have to block off any areas where you don't want it to go.
Spray foam insulation is a fantastic, cheap solution for this. Just run a bead of it across doorways, around floor drains, or along any edge you need to contain. For a simpler dam, you can use weather stripping or even strips of wood secured with silicone caulk. Once it hardens, you have a solid, waterproof barrier. When the leveler is dry, the foam is easy to trim away with a utility knife.
The Pour and Spread
Time to get the material on the floor. You need a game plan here. Always start pouring in the corner furthest from your exit so you don't paint yourself into a corner—literally.
Work in batches. Mix one bag, pour it, and spread it. Then mix the next. This gives you control. Pour the compound in long, parallel ribbons across the floor, slightly overlapping each one to maintain a wet edge, which is crucial for a seamless finish.
As soon as it's poured, grab your gauge rake. This tool is your best friend for getting a uniform thickness. You set the pins to the depth you need (e.g., 1/4 inch), and it spreads the material perfectly. Right after the gauge rake, go over the area with a smoother. It looks like a trowel on a stick and helps break the surface tension, pop any air bubbles, and blend the edges of each pour together for a seamless finish.
This method has become so reliable that its use is exploding. The global self-leveling concrete market is expected to jump from USD 1.96 billion in 2024 to USD 6.07 billion by 2035. If you're interested in the commercial side of things, you can dive into the numbers in this detailed industry forecast.
Letting It Cure
Once the floor is covered and smooth, your work is done. Now, you have to let chemistry do its thing. Curing isn't just about drying; it's a chemical reaction. Don't try to rush it with fans or heaters—a slow, natural cure creates the hardest surface. Close doors and windows to prevent drafts from drying the surface too quickly, which can cause cracking.
Here’s a typical timeline:
- Ready for Foot Traffic: Most products are walkable in 4 to 6 hours. This is just for light foot traffic so you can grab your tools.
- Ready for Flooring: This depends on what you're installing. For tile or a floating floor, 24 hours is often enough. But if you’re putting down moisture-sensitive flooring like hardwood, you really need to wait 48 to 72 hours to be safe.
When to Skip DIY and Call a Professional
Knowing when to put down the tools is the smartest move any DIYer can make. It’s one thing to tackle a slightly uneven floor with a bag of self-leveler, but it's another thing entirely to misdiagnose a serious structural problem. Pushing ahead when you're in over your head can turn a fixable issue into an expensive, foundational nightmare.
A DIY disaster isn't just about a lumpy finish; it can genuinely compromise the integrity of your home. Learning to spot the red flags protects your investment and ensures the job gets done right the first time.
Signs of Serious Structural Problems
The first thing you need to figure out is whether you're dealing with a simple surface imperfection or a symptom of a much bigger issue. If you spot signs that the problem lies with the ground underneath your slab, it's time to call in a pro.
Here’s what to look for:
- Significant Sinking: If one side of your garage or basement has dropped by two or more inches, self-leveler isn't the answer. This is a classic sign of major soil settlement or erosion that requires a structural solution like mudjacking or foam jacking to lift the slab back into place.
- Wide, Active Cracks: Pay close attention to cracks wider than a quarter-inch, especially if one side is higher than the other. This "heaving" means the slab is still moving. A professional needs to stabilize it before any leveling can even be considered.
- Water Intrusion: Constantly finding water seeping up through the concrete? Seeing that white, powdery residue (efflorescence)? You have an underlying moisture problem that an expert needs to solve first. Pouring leveler over it will only trap the moisture and lead to bigger headaches later.
A homeowner I know almost made this mistake. Their basement floor sloped heavily toward a corner, and they were all set to pour self-leveler. On a whim, they called for a second opinion. A foundation specialist quickly found that a broken downspout was washing away soil outside the foundation wall. The real fix wasn't leveling at all—it was foundation piering and gutter repair, a job far beyond a simple DIY pour.
When the Scope Exceeds DIY Capabilities
Even if there are no major structural alarms, the sheer scale of the job can put it firmly in professional territory. DIY products are fantastic for shallow fills over small areas, but they have their limits.
If your floor needs more than 1.5 inches of correction across a large room, you're looking at a pro-level job. For example, leveling a 400-square-foot room by an average of 2 inches would require over 1.5 tons of compound. This requires specialized equipment like large-batch mixers and pumps to mix and pour everything before it starts to cure.
Professionals also have other tools at their disposal. For deep voids or major settling, they might use polyurethane foam injection (foam jacking) to lift the entire slab from below—a far more efficient and effective solution.
The demand for these solutions is booming, with the global market for self-leveling concrete projected to hit nearly 30.01 million cubic meters by 2030. This growth means pros have access to more advanced products and techniques than ever before. You can read more about these trends in self-leveling concrete usage.
Finding and Vetting a Contractor
Spotted one of the red flags? Your next step is finding a reputable concrete or foundation contractor. A quick search for local specialists is a good start, but be sure to check their reviews on Google and the Better Business Bureau.
When you start making calls, have a few key questions ready:
- Are you licensed and fully insured in Georgia?
- Can you provide a few references from recent projects similar to mine?
- What method do you recommend for my floor, and why is it the best option?
- Will you give me a detailed, itemized quote breaking down all the labor and material costs?
A good contractor won't just give you a price. They'll walk you through their diagnosis, explain the proposed solution clearly, and answer your questions without hesitation. A thorough on-site inspection should always come before any final quote.
Answering Your Top Questions About Leveling Concrete Floors
Even the best-laid plans can hit a snag. When you're in the thick of a project like leveling a concrete floor, questions are bound to pop up. Getting straight, practical answers can be the difference between a job well done and a costly do-over. Here are a few of the most common questions I get asked, along with some field-tested advice.
How Much Should I Budget for Leveling My Concrete Floor?
This is the big one, and the honest answer is: it depends. The cost to level a concrete floor can swing wildly based on the method you choose and whether you're rolling up your sleeves or calling in a pro. It's not just about the bags of leveler; you have to factor in tools, prep materials, and your time.
If you're going the DIY route with a self-leveling compound, the material itself will be your main expense. You can expect to pay somewhere between $1.50 and $5.00 per square foot. A standard 50-pound bag usually runs about $30-$40 and will cover roughly 50 square feet at a 1/8-inch thickness. For a 200 sq. ft. room needing a 1/4-inch fill, you might need eight bags, costing around $280, plus primer and tools.
When you bring in the professionals, the numbers get bigger and the services more specialized:
- Concrete Grinding: To take down high spots or strip old coatings, pros typically charge between $2.00 to $7.00 per square foot.
- Mudjacking or Polyurethane Foam Lifting: For raising a sunken slab, you're looking at a more significant investment. This can range from $5.00 to over $15.00 per square foot, depending on how big the void is underneath.
Can I Just Pour Self-Leveling Compound Over a Painted Floor?
I get this question all the time, and the answer is a hard no. You absolutely cannot pour self-leveling compound directly over paint, old glue, sealers, or any other coating. These materials act as a bond-breaker, preventing the new compound from gripping the actual concrete slab.
Think of it this way: you're trying to stick a new layer of concrete to a layer of paint. The bond is only as strong as the paint's bond to the floor, which is never good enough. The leveler will eventually delaminate—peeling up from the floor—and you'll be left with a cracked, failed surface.
To get a permanent bond, you have to get back to the raw, porous concrete. That means grinding or shot-blasting the surface to remove every trace of the old coating before you even think about priming and pouring.
How Long Does Self-Leveling Compound Really Take to Dry?
This is where a lot of people get tripped up. There’s a huge difference between being "walkable" and being fully "cured" and ready for flooring. Rushing this step is a recipe for disaster.
Most modern self-levelers set up fast. You can usually walk on them (gently!) in about 4 to 6 hours. This is just enough time to get your tools out of the room without leaving footprints.
But the floor is nowhere near ready for what's next. You have to give it time to cure properly before covering it up.
- For things like ceramic tile or a floating vinyl plank floor, give it at least 24 hours.
- For moisture-sensitive flooring—think hardwood, engineered wood, or laminate—you need to be much more patient. Wait a minimum of 48 to 72 hours, sometimes even longer, for all that moisture to evaporate.
A Pro's Word of Caution: If you install a wood floor too soon, you're trapping moisture underneath it. That moisture will cause the wood to warp, buckle, or even grow mold. Always, always read the manufacturer's instructions on the bag, as drying times vary based on thickness, temperature, and humidity.
What's the Thickest I Can Pour Self-Leveling Compound?
Self-leveling compounds are amazing, but they aren't magic—they have their limits, especially when it comes to depth. Pouring the material too thick in one go can lead to cracking or improper curing.
For most standard self-leveling compounds, the maximum you can pour at one time is about 1 to 1.5 inches. If you have a low spot that’s deeper than that, you'll need to adjust your approach. Some products allow you to pour in multiple "lifts," but you have to let each layer cure completely before adding the next.
For really deep fills (over 1.5 inches), you'll need to look for a specialty product. Some compounds are designed to be mixed with a specific-sized pea gravel, which adds bulk and makes it more economical to fill deep voids. For example, you might mix a 50 lb bag of leveler with 50 lbs of aggregate to fill a 3-inch deep hole. Your best bet is to always check the product’s technical data sheet to confirm its maximum pour depth before you start mixing.
When your concrete issues are bigger than a simple DIY fix, it's time to call in the experts. Atlanta Concrete Solutions has spent over a decade tackling everything from sunken residential slabs to perfectly polished commercial floors. For a professional on-site assessment and a free, no-obligation quote, visit us online today.