Pouring a new concrete driveway boils down to three distinct stages: meticulous planning, thorough site preparation, and finally, the precise execution of the pour itself. A lot of folks focus on the final pour, but the real secret to a long-lasting driveway is getting the foundation and mix right from the very beginning. Get those right, and you’ll have a durable surface that genuinely boosts your home's curb appeal and value for decades.
The Blueprint for a Flawless Concrete Driveway
I’ve seen it time and time again: a successful concrete project is 90% preparation and only 10% execution. Before a single shovel hits the ground, your most valuable tool is a rock-solid plan. This initial blueprint phase is what ensures every step that follows—from digging out the old driveway to the final curing process—is done correctly.
Skipping or rushing this stage is a recipe for disaster, leading to costly mistakes that are quite literally set in stone. For instance, failing to plan for proper drainage can result in water pooling against your garage door, leading to rot and foundation issues. Think premature cracking, water pooling against your foundation, or a surface that crumbles under the weight of your truck.
This guide is your complete roadmap, starting right here at the planning table. We’ll walk through everything from navigating local Atlanta-area building codes and pulling permits to understanding why a well-compacted subgrade is non-negotiable. Proper planning prevents future headaches. For example, a classic rookie mistake is forgetting about the slope; you need a bare minimum of a ¼-inch drop per foot to ensure rainwater drains away from your house, not toward it. So, for a 12-foot wide driveway, the edge furthest from your home should be at least 3 inches lower than the edge by the garage.
Defining Your Project Scope
First things first, you need to pin down exactly what you're trying to accomplish. This is about more than just length and width.
Ask yourself a few key questions:
- What will it hold? Is this driveway just for a couple of sedans, or does it need to support the weight of an RV or a heavy work truck? The answer directly determines the required slab thickness and the strength of the concrete mix (PSI) you'll need. For example, a standard car driveway can be 4 inches thick, but for an RV, you'll need at least 5 to 6 inches of reinforced concrete.
- What should it look like? Are you happy with a standard, functional broom finish, or are you envisioning something more decorative like stamped or colored concrete? Those beautiful finishes, like a stamped pattern that mimics cobblestone, require specialized techniques and materials right from the start.
- How does it fit in? Think about how the new driveway will flow with your existing walkways, the garage entrance, and your overall landscaping. For instance, will you need a curved edge to match a garden bed, or a flared entrance at the street for easier access? Getting this right creates that seamless, professionally finished look.
A great way to visualize the entire job is to break it down into its core phases.
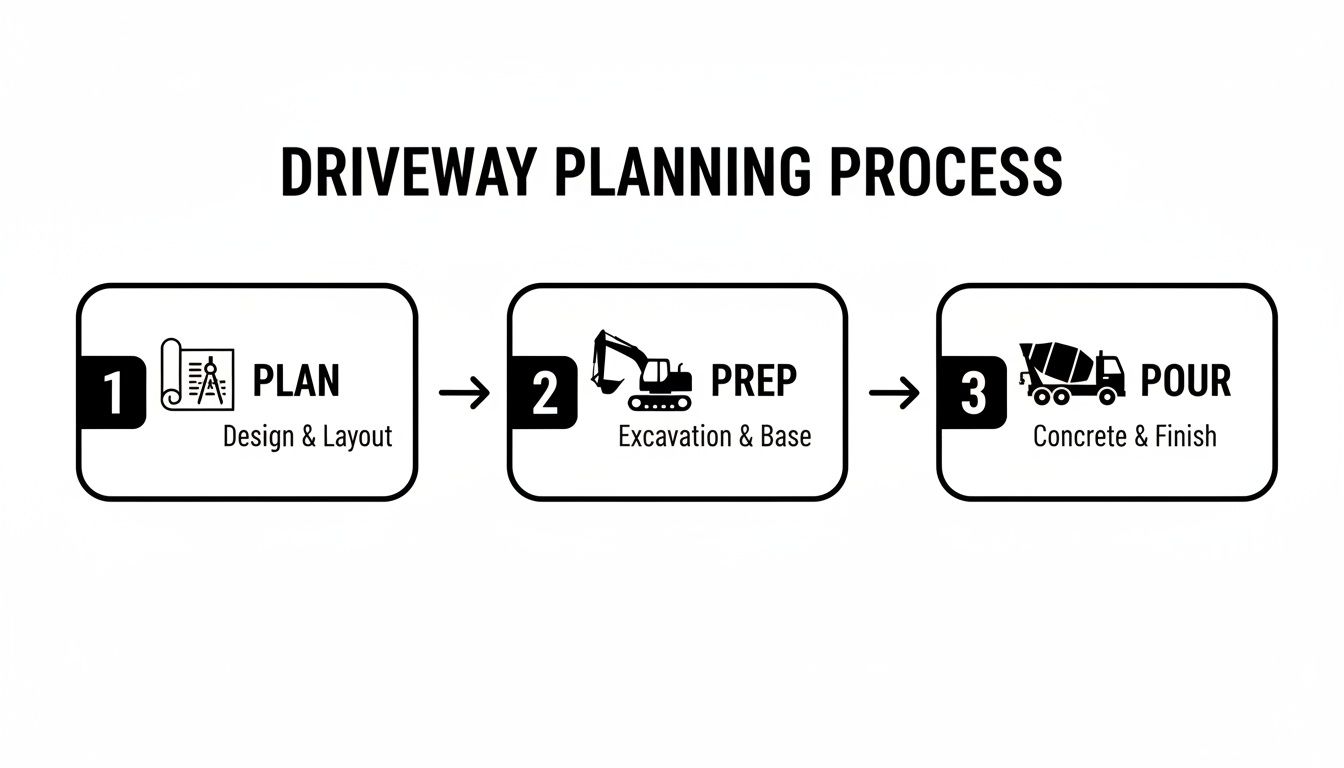
As you can see, the actual pour is the grand finale of a process that leans heavily on what you do before the concrete truck ever shows up.
To give you a clearer picture of the journey ahead, here’s a breakdown of the key project stages.
Concrete Driveway Project Stages
| Phase | Key Activities | Primary Goal |
|---|---|---|
| 1. Planning & Design | Measure dimensions, check local codes, get permits, define slope and drainage, choose finish. | Create a detailed, actionable plan that meets all structural and legal requirements. |
| 2. Site Preparation | Excavate old material, level and compact the subgrade, install a gravel base. | Establish a stable, uniform foundation to prevent sinking and cracking. |
| 3. Forming & Reinforcement | Set up wooden forms, lay down rebar or wire mesh. | Create the driveway's shape and add tensile strength to the concrete slab. |
| 4. Pouring & Finishing | Pour concrete, screed and float the surface, apply desired finish (e.g., broom). | Place and shape the wet concrete into a smooth, properly graded surface. |
| 5. Curing & Joints | Protect the slab from drying too fast, cut control joints. | Ensure the concrete hardens correctly for maximum strength and durability. |
Each of these stages is critical; a shortcut in one phase will almost certainly cause problems in another. For example, poor compaction in Phase 2 will lead to cracks that show up months after Phase 5 is complete.
Of course, a big part of your project blueprint is figuring out the financials. A well-managed budget is just as important as a well-compacted base. For a deeper dive into the numbers, check out this excellent guide on planning a realistic landscape installation budget.
Building a Rock-Solid Foundation
A driveway is only as strong as what lies beneath it. The real work—the part that prevents those ugly cracks and premature failure—happens long before a concrete truck ever shows up. It all comes down to preparing the ground meticulously to create a stable base that will support thousands of pounds for decades.
This process starts with taking a good, hard look at your site. Here in the Atlanta area, that almost always means dealing with our infamous red clay. This soil is what we call "expansive," meaning it swells up when it's wet and shrinks when it dries out. That movement creates immense pressure that can easily fracture a poorly supported slab of concrete. Your job is to get that unstable topsoil out of there and build back a solid, engineered foundation.
Excavating and Compacting the Subgrade
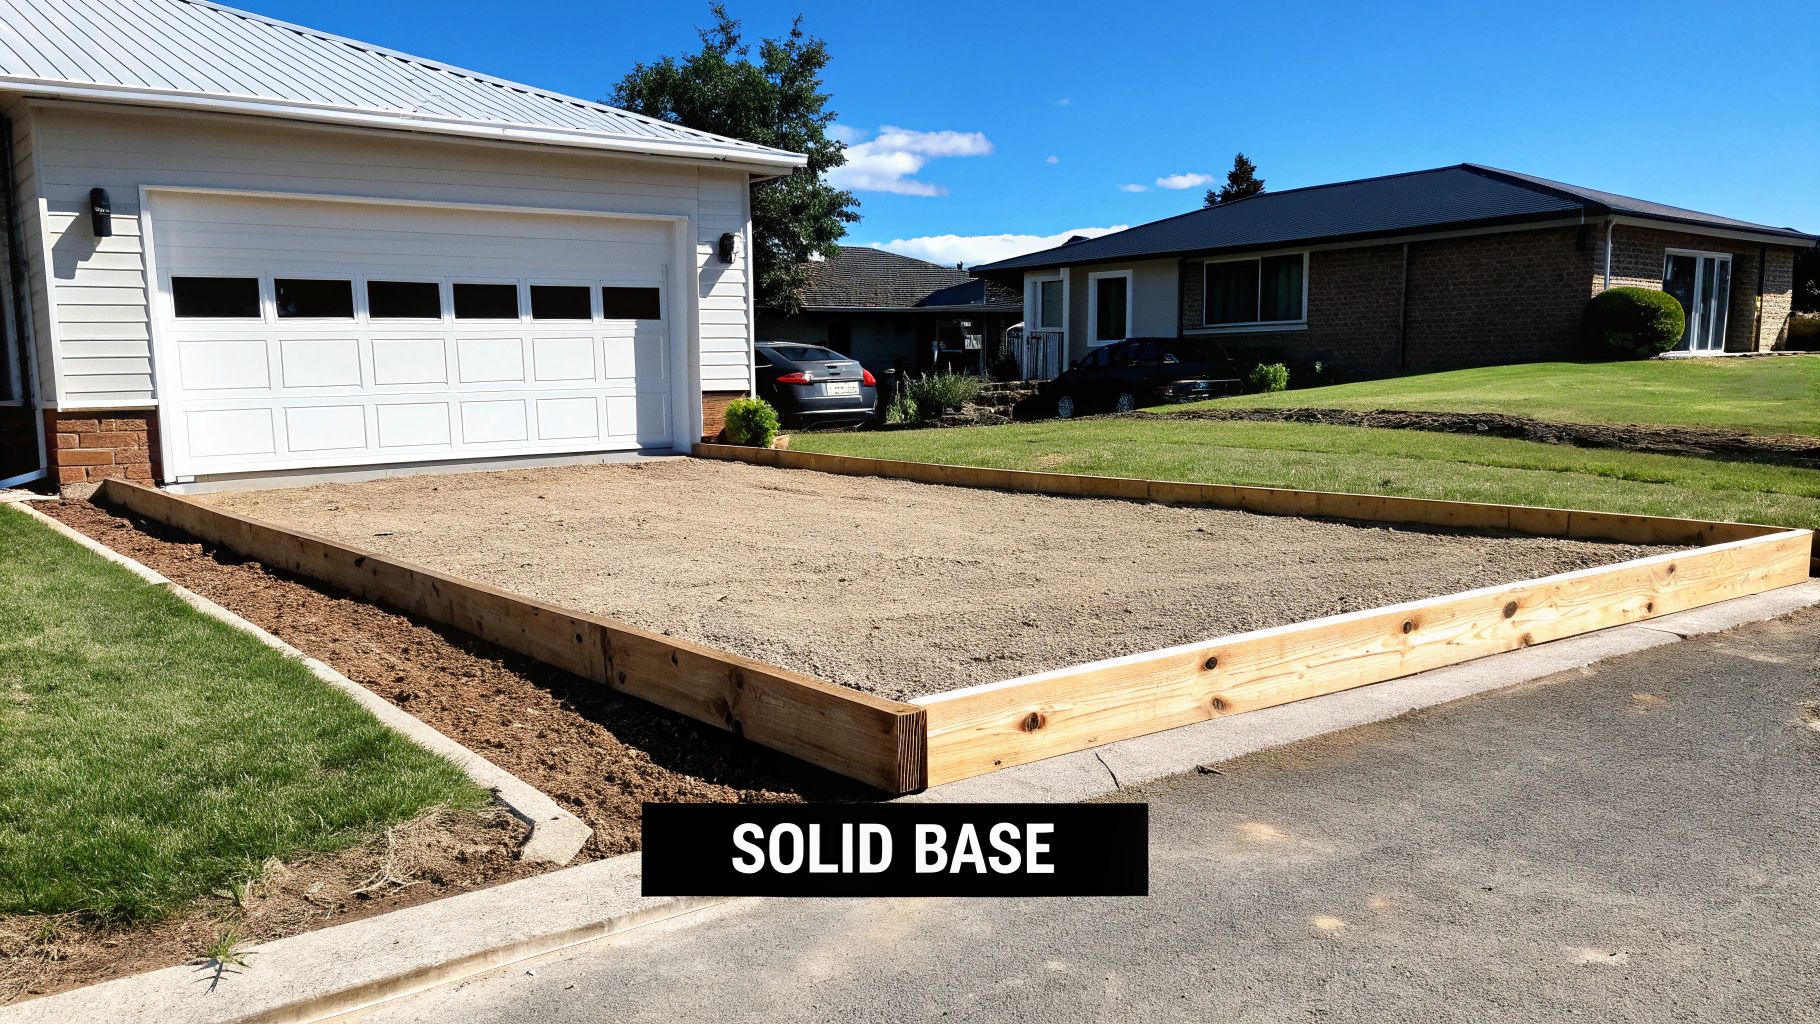
Your first big move is excavation. You need to dig down deep enough to make room for both your new concrete slab and a critical sub-base layer. For a typical residential driveway, that means digging down a total of 8 to 10 inches. This gives you space for a standard 4-inch concrete slab with a sturdy 4 to 6-inch gravel base underneath.
Once you've cleared out the dirt, the exposed soil—what we call the subgrade—has to be compacted. This is a non-negotiable step. Get your hands on a plate compactor—a machine you can rent for about $80 a day—and methodically go over the entire area until the ground is firm and doesn't give. A properly compacted subgrade is what prevents the driveway from settling and sinking over the years.
A common mistake I see is people just leveling the dirt and calling it a day. An uncompacted subgrade, especially with Georgia's clay, is the number one reason driveways fail within the first five years. Proper compaction ensures your investment is built on solid ground, not shifting soil.
Installing the Sub-Base and Formwork
With a firm subgrade ready, it's time for the sub-base. This is usually a 4-inch layer of crushed gravel; #57 stone is the go-to choice. This gravel layer does two crucial things:
- Drainage: It gives water that seeps under the slab a place to go, preventing it from pooling and causing havoc during freeze-thaw cycles or fueling soil expansion.
- Stability: It creates a solid, load-bearing surface that won't shift, providing unwavering support for the heavy concrete slab.
Spread the gravel evenly, then get that plate compactor out again. You need to compact this layer, too, creating a firm, level bed for the concrete.
Finally, you can build the formwork. Using 2×4 or 2×6 lumber, build a solid frame around the entire perimeter of your driveway. This frame is what will hold the wet concrete and define its final shape. Make sure you stake the forms securely every few feet so they don't bow out from the immense pressure. Most importantly, you need to set the forms with a slight slope—a ¼-inch drop for every foot of width is the standard. This ensures rainwater runs away from your garage and foundation, not toward it.
With your base prepped and solid, it's time to turn your attention to the star of the show: the concrete itself. The long-term durability of your driveway really comes down to choosing the right concrete mix and the right kind of reinforcement. This isn't just about raw strength; it's about engineering a surface that can handle everything from the weight of your vehicles to Atlanta's unique climate.
Think of concrete strength in terms of pounds per square inch (PSI). This number tells you how much pressure the slab can take before it cracks. For a typical residential driveway that will see daily use from cars and SUVs, a mix rated between 3,000 to 4,000 PSI is the sweet spot. It's more than enough to handle everyday traffic and the stresses from our local weather.
Why Reinforcement is a Non-Negotiable
Here’s a fundamental truth about concrete: it's incredibly strong when you push down on it (compression), but it's surprisingly weak when you try to pull it apart or bend it (tension). That's precisely where reinforcement steps in. It gives the concrete the tensile strength it needs to hold itself together as the ground shifts and the slab expands and contracts with temperature changes.
You have a couple of primary options here:
- Welded Wire Mesh: This is a grid of steel wires that you unroll across the gravel base before the pour. It’s pretty good for managing small shrinkage cracks that can pop up while the concrete is curing.
- Steel Rebar: Short for "reinforcing bar," rebar is much thicker and stronger. Using #4 rebar (which is a half-inch thick) laid out in a grid gives you far superior structural strength, especially against heavy loads or unstable soil.
For most driveways here in Georgia, I almost always recommend a grid of #4 rebar for maximum longevity. A classic rookie mistake is just laying the rebar or mesh directly on the gravel. For it to do its job, the steel must be suspended in the middle third of the slab's thickness. We use small plastic or concrete supports, called "chairs," to hold it in the perfect position during the pour. For a 4-inch slab, this means the rebar should be held about 2 inches off the gravel.
Given Georgia's humidity and clay-rich soil, your technique matters. I recommend a minimum slab thickness of 4 inches for standard vehicles, using that 3,000-4,000 PSI mix and reinforcing it with #4 rebar spaced every 18 inches. This combination is your best defense against cracking from freeze-thaw cycles, which industry studies have shown can impact over 20% of unsealed driveways within just five years. For a broader look at trends in the concrete industry, you can check out insights on ConstructionBriefing.com.
Additives: The Secret to a Tougher Slab
Beyond the standard mix, you can ask your concrete supplier to include a few additives that seriously boost performance.
One of my favorites is fiber mesh, which mixes tiny synthetic fibers directly into the concrete. It acts as a secondary reinforcement system, doing a fantastic job of preventing those tiny, spiderweb-like surface cracks. For example, it helps control cracking at sharp inside corners where stress concentrates.
Another crucial additive for our climate is air-entrainment. This process introduces microscopic air bubbles into the mix. When water inevitably gets into the concrete and freezes, these tiny pockets give the ice a place to expand without blowing your driveway apart. It dramatically improves freeze-thaw resistance.
Choosing the right materials from the start is what separates a driveway that lasts a decade from one that lasts a lifetime. The small additional cost for a higher PSI mix or rebar over wire mesh pays for itself many times over by preventing costly future repairs.
If you're still weighing your options and considering alternatives to poured cement, this guide on driveway paver installation offers a detailed look at another durable and attractive choice.
Mastering the Pour and Finish
All that hard prep work comes down to this moment. When the ready-mix truck backs up to your site, things start moving fast. This is where good timing and solid technique really make or break the project. Getting the pour right is all about a sequence of coordinated steps, each one building on the last.
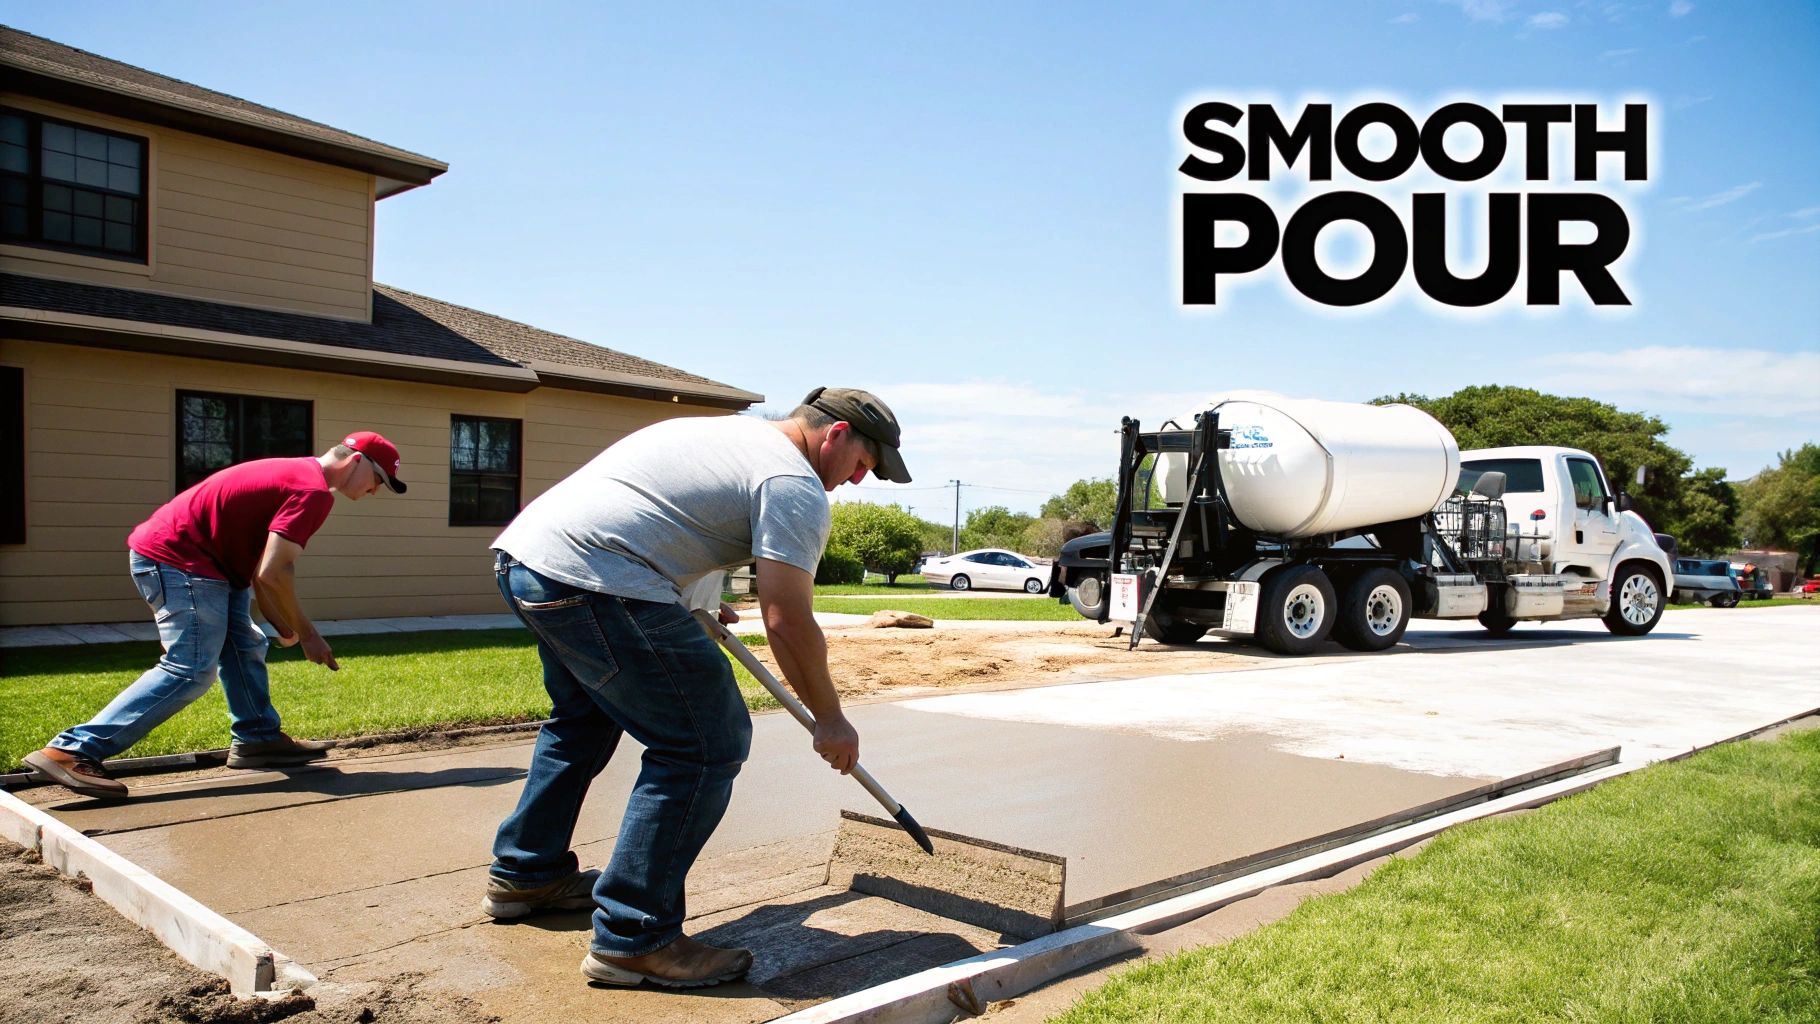
As the concrete starts to flow from the chute, your job is to guide it into place. You’ll want to start at the furthest point from the truck and methodically work your way back. For example, begin at the garage door and work your way toward the street. Using a concrete rake (sometimes called a come-along), you'll pull and push the wet mix, making sure it fills every corner and settles completely around your rebar grid. The idea is to get it distributed evenly, leaving it just a little bit higher than the top of your forms for now.
The Finishing Sequence is Everything
Once the concrete is in the forms, the clock is officially ticking. You have to move deliberately through the finishing stages before the concrete starts to set up, or "go off."
The first move is screeding. This is a two-person job. Grab a long, straight 2×4 (your screed board), lay it across the top of the forms, and use a back-and-forth sawing motion as you pull it toward you. This action strikes off the excess concrete and establishes a flat, level plane. If you see any low spots, toss a shovel of fresh concrete in them and screed over the area again.
Right after screeding, it's time to float the surface with a bull float. This long-handled tool is brilliant—it pushes the heavier stones (aggregate) down while coaxing the "cream," a rich mix of cement and sand, up to the top. This simple step smooths out the marks left by the screed and gets the slab ready for its final texture.
Timing is easily the trickiest part of finishing. If you wait too long, the concrete gets too hard to work. But if you start too early—especially with the bull float—you can trap "bleed water" on the surface, which leads to a weak, flaky top layer down the road.
Creating Durable Edges and a Safe Surface
You'll know it's time for the final touches when the bleed water on the surface has evaporated and the concrete has firmed up just enough that you can't easily press a finger into it.
- Edging: Grab a concrete edger and run it along the inside perimeter of your forms. This handy tool creates a nice, rounded edge that's far less likely to chip and break than a sharp 90-degree corner. It gives the driveway a clean, professional look.
- Jointing: Next, use a groover tool and a straightedge to cut control joints into the slab. These are pre-planned lines of weakness that give the concrete a designated place to crack as it shrinks and settles—which it absolutely will. Space these joints every 8 to 12 feet. For example, a 30-foot-long driveway should have at least two control joints cut across its width.
- Broom Finish: For the final step, lightly drag a stiff-bristled concrete broom across the surface. This creates a non-slip texture, which is a must-have for safety, especially with Atlanta's wet weather. The key is to pull the broom in one continuous motion from edge to edge for a uniform appearance.
For a driveway that truly stands out, a professional touch can create some stunning results beyond a simple broom finish. You can explore a whole world of different looks by checking out options for residential decorative concrete.
Here in Georgia, best practices point toward using a fiber-reinforced, 4,000 PSI concrete mix, poured in panels with control joints to manage those inevitable shrinkage cracks. One of the biggest mistakes we see is adding too much water on-site to make the concrete easier to work with; this can weaken the final slab by up to 25%. It's a critical error that a pro will never make.
The Curing Process and Final Touches
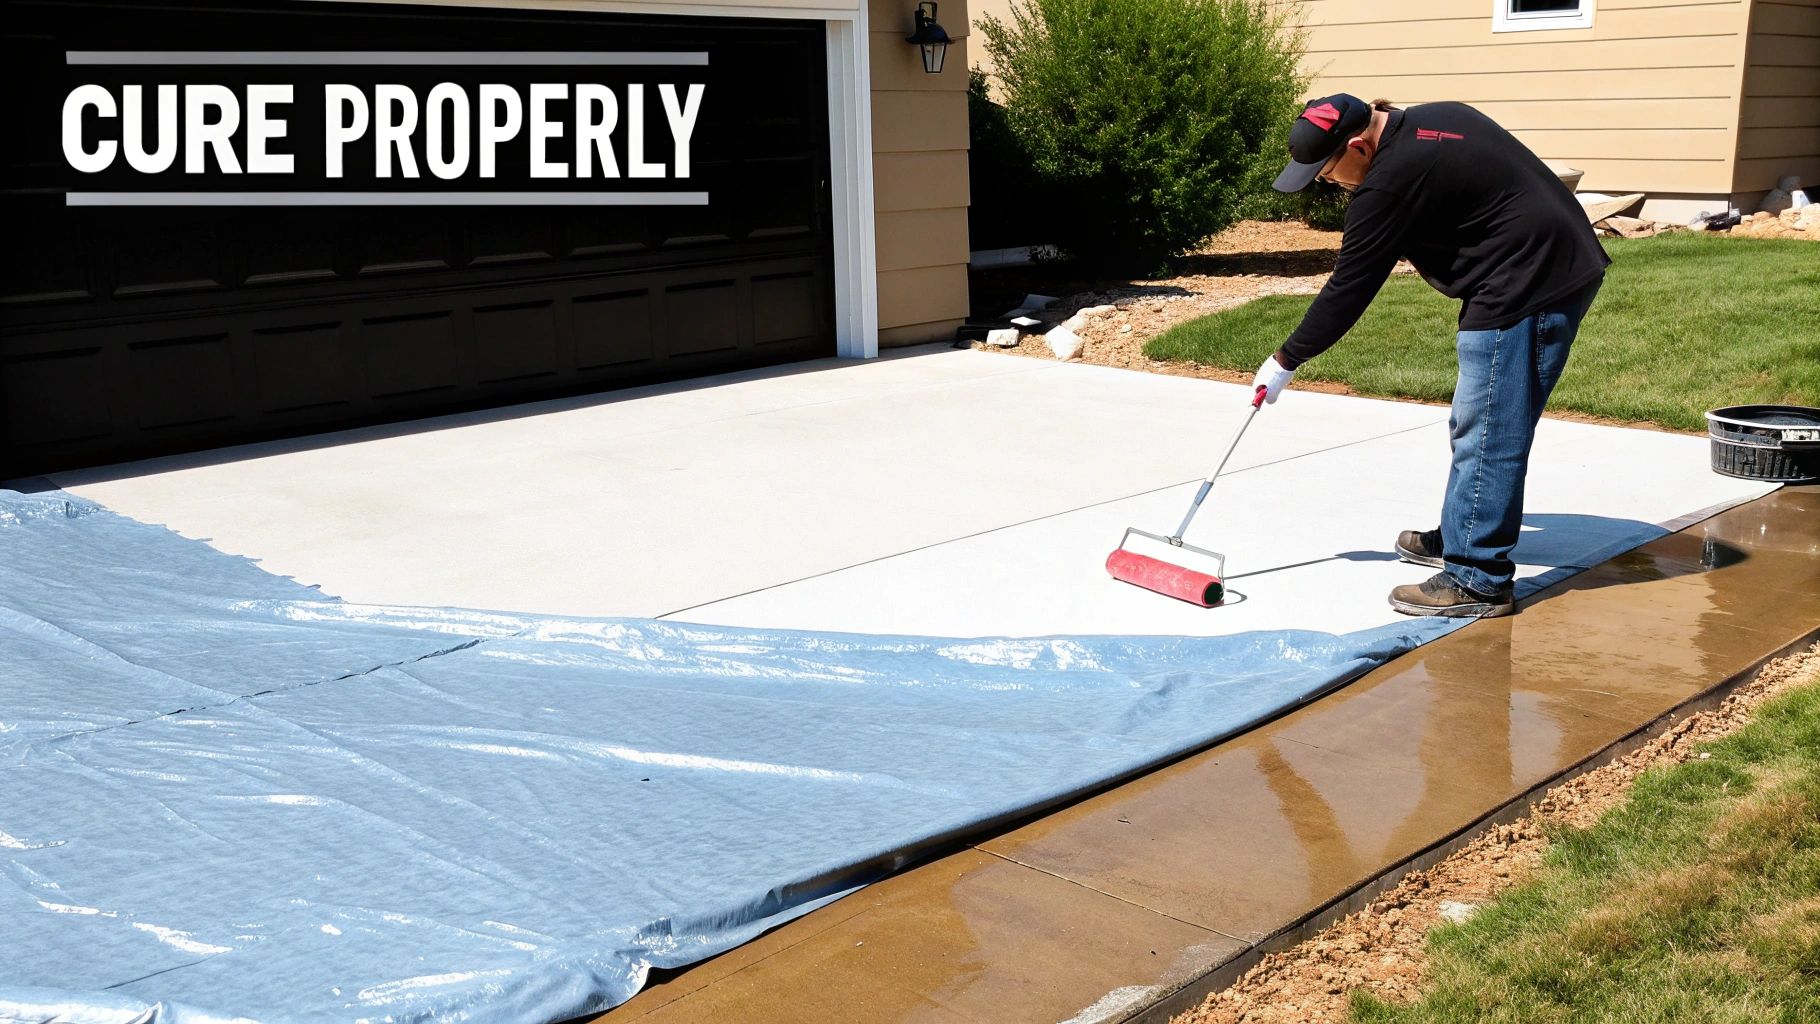
After all the hard work of pouring and finishing your new driveway, it’s tempting to think the job is done. But what comes next is arguably the most critical phase for guaranteeing a strong, durable surface that will last for decades. This final step is called curing, and it’s all about chemistry, not just drying.
You see, concrete doesn't "dry" like paint. It hardens through a chemical reaction called hydration. For this reaction to happen correctly, the slab needs to hold onto its moisture. If the surface water evaporates too quickly—especially in the Georgia heat—hydration stops. The result is a weak, dusty surface that’s prone to cracking and flaking down the road.
Effective Curing Methods for Maximum Strength
Proper curing is your driveway's best defense. Keeping the slab consistently moist for at least seven days can boost its final compressive strength by over 50%. This is a non-negotiable step if you want a slab that truly lasts.
Here are a few of the most practical and effective ways to get a thorough cure:
- Water Curing: This is the old-school method of gently misting the driveway with a fine spray of water multiple times a day. For example, you might set a timer to remind yourself to spray it every 2-3 hours during the day. It works great, but you have to stay on top of it; the surface can never fully dry out.
- Covering: A much more hands-off approach is to lay down plastic sheeting or special curing blankets. These trap the moisture from the initial pour, creating a humid microclimate that lets hydration continue uninterrupted. Make sure the plastic is weighted down so it doesn't blow away and create dry spots.
- Curing Compounds: These are liquid, membrane-forming compounds you spray or roll right onto the fresh concrete. They form a thin film that seals the surface, locking in moisture and preventing it from evaporating too fast. This is often the easiest method for DIY projects.
The goal is simple: keep the concrete damp. A slow, controlled cure is what develops the dense, interlocking crystal structure that gives concrete its legendary strength. Rushing this step is a rookie mistake that will permanently compromise your new driveway.
Final Steps and Protecting Your Investment
Once the initial curing period is over, there are just a couple of final touches. You can usually remove the wooden forms after about 24 to 48 hours. Grab a pry bar and gently pull the stakes and boards away from the slab, taking care not to chip the fresh edges.
Now for the hardest part: patience. While you can typically walk on the new driveway in a day or two, you must wait at least 7 to 10 days before parking a car on it. If you have heavier vehicles like a work truck or an RV, it’s best to wait the full 28 days for the concrete to reach its designed strength.
Putting weight on it too soon can cause small imperfections that turn into big problems later. Our team sees this all the time. To see how professionals address these preventable issues, you can learn more about our residential concrete and masonry repair services. Protecting your new investment during this final hardening phase is the key to ensuring it serves you well for years to come.
Knowing When to Hire a Professional
Let's be honest, there's a huge sense of accomplishment that comes from tackling a big DIY project. But pouring a concrete driveway isn't the same as painting a room or building a deck. This is one of those jobs where mistakes are, quite literally, set in stone. The first step is having a realistic conversation with yourself about the complexity and risks involved.
The whole process is a race against the clock that involves back-breaking labor, very specific tools, and a ton of know-how. One small mistake in compacting the ground beneath the slab can lead to a sunken mess in just a few years. A little slip-up during the finishing stage? You could end up with a brittle, flaky surface that looks awful and won't last.
A botched concrete pour is one of the most expensive DIY mistakes a homeowner can make. The cost to demolish and haul away thousands of pounds of failed concrete, then re-prep and pour it all over again, can easily be double the original project budget.
Where DIY Driveways Go Wrong
Even with the best of intentions and a lot of YouTube tutorials, a DIY driveway can go sideways fast. The physical work is no joke, but it's the technical details where most people get tripped up.
Here are a few of the most common pitfalls I've seen over the years:
- Bad Foundation Prep: If you don't get the subgrade to at least 95% compaction or you skimp on the gravel base, you're pretty much guaranteeing future sinking and cracking. For example, a low spot in the gravel will create a weak point in the slab above it, which is where the first cracks will appear.
- Wrong Concrete Mix: Ordering the wrong PSI strength is a classic mistake. So is not knowing you need additives like air-entrainment, which is critical for a slab to survive Atlanta's freeze-thaw cycles.
- Finishing Nightmares: If you start finishing the concrete too early, you trap "bleed water" and create a weak surface. But if you wait too long, it becomes an unworkable rock, and you'll never get that smooth, durable finish.
- Missing the Right Gear: You can't fake it. Without a heavy-duty plate compactor, a proper bull float, and the right edging tools, getting a professional-grade result is next to impossible. For instance, trying to level a driveway with just a hand trowel will leave an uneven, puddled surface.
These aren't just little cosmetic oopsies; they're the kind of mistakes that lead to total structural failure.
The Real Value of Bringing in the Pros
When you hire an experienced team like Atlanta Concrete Solutions, you're not just paying for a few extra sets of hands. You're buying peace of mind, expertise, and efficiency.
A professional crew rolls up with the heavy machinery needed to excavate and compact the site properly, making sure that foundation is perfect from the start. They have long-standing relationships with local ready-mix suppliers, which means the right high-quality mix shows up exactly when it's needed.
Most importantly, an experienced crew works like a well-oiled machine during that critical pour. Every minute counts, and they know exactly what to do and when.
For homeowners in places like Alpharetta and Marietta, a pro also knows the local building codes and what the inspectors are looking for, so your new driveway won't just look great—it will be fully compliant. Ultimately, hiring an expert is an investment in a properly graded, reinforced, and finished driveway that adds real, lasting value to your home. To see what a professional team brings to the table, check out our full range of concrete services.
Answering Your Top Driveway Questions
Even the best-laid plans come with a few questions. When it comes to a project this big, it's smart to get all the answers you need before the concrete truck shows up. Here are the things we get asked most often by homeowners just like you.
How Long Until I Can Drive on My New Driveway?
This is always the first question, and for good reason! The answer, however, is all about patience. You absolutely need to wait a minimum of 7 to 10 days before parking a regular passenger car on your new concrete.
I know, it looks ready. The surface will likely be hard enough to walk on in a day or two, but that’s deceiving. Underneath, it's still gaining the critical compressive strength it needs to handle thousands of pounds. Park on it too soon, and you risk leaving permanent tire marks or, even worse, creating tiny cracks that will cause major headaches down the road.
If you have a heavier vehicle, like an RV or a loaded work truck, you really should give it the full 28 days. That's the industry standard for concrete to reach its fully cured, designed strength.
What’s the Best Time of Year to Pour Concrete in Atlanta?
In Atlanta, timing is everything. You're fighting heat in the summer and potential freezes in the winter. For the best results, you should aim for spring or fall.
The sweet spot for pouring concrete is when temperatures are holding steady between 50°F and 80°F. This Goldilocks zone lets the concrete cure gradually, which is the secret to getting a strong, durable slab that lasts for decades.
Trying to pour in the middle of a blazing Georgia summer is a gamble. The intense sun bakes the surface, evaporating water far too quickly. This can stop the curing process in its tracks and cause ugly shrinkage cracks. On the flip side, a winter pour risks a freeze, which can permanently damage fresh concrete before it ever has a chance to get strong. For example, if the temperature drops below freezing overnight, the water inside the concrete can freeze, expand, and shatter the internal structure.
How Much Does a New Concrete Driveway Cost?
The final price tag on a new driveway can swing quite a bit, but here in the Atlanta area, you can generally expect a range of $8 to $18 per square foot.
What pushes the price to one end of that spectrum or the other? It usually comes down to a few key things:
- The Basics: A bigger, thicker driveway simply costs more in materials and labor. That’s the most straightforward factor. A 600 sq. ft. driveway will naturally cost more than a 400 sq. ft. one.
- Site Prep: Is the area hard to get to? If we need to use a special pump truck to get the concrete there, that adds to the cost. Tearing out and hauling away an old asphalt driveway is also a separate line item.
- The Finish: A standard, non-slip broom finish is your most cost-effective option. If you want something more decorative, like a stamped pattern or colored concrete, you’ll be looking at the higher end of that price range. For example, a complex stamped pattern can add $4-$6 per square foot to the total cost.
Does My New Concrete Driveway Need to Be Sealed?
Yes. 100%. Sealing your driveway is the single most important thing you can do to protect your investment. We recommend applying the first coat of a high-quality sealer about 30 days after the pour.
Think of it as a clear coat for your concrete. It creates a protective barrier against moisture, oil stains, de-icing salts, and UV rays that can break down the surface over time. To keep it looking great and extend its life, just plan on giving it a good cleaning and a fresh coat of sealer every two to three years. This simple maintenance task can add more than a decade to your driveway's lifespan.
Feeling like this is a bit more than you bargained for? You're not wrong—a DIY driveway is a massive job. For a guaranteed professional result without the stress and heavy lifting, trust the experts at Atlanta Concrete Solutions. Request your free, no-obligation quote today!