Before you can even think about patching up a crack in your concrete patio, you've got to play detective. The real secret to a lasting repair isn't in the filler you use, but in correctly figuring out why the crack appeared in the first place. For example, a crack caused by a tree root pushing up the slab needs a different approach than one caused by simple shrinkage.
Getting this diagnosis right from the start is everything. It determines the tools you'll need, the materials that will actually work, and whether this is a simple DIY job or something more serious. After all, you want to fix the problem for good, not just slap a temporary bandage on it that will fail next season.
First Steps in Diagnosing Patio Cracks
Not all cracks are created equal. A tiny, hairline fissure is a world away from a wide, jagged crack where one side is higher than the other. Treating them the same way—for example, using a flexible sealant on a structural crack—is a recipe for a failed repair and a lot of wasted effort down the road.
The 'why' behind the crack tells you the real story. A small surface crack might be a simple cosmetic issue, but a big one could be a red flag for major problems with the ground underneath your patio, such as poor water drainage from a nearby downspout.
Reading the Signs Your Patio Is Giving You
Get down on your hands and knees and take a close look. What’s the crack's width, length, and depth? Is it a single, meandering line, or does it look more like a spiderweb of crazing cracks? A useful tip is to place a coin next to the crack for scale when taking a photo; a dime can help you track hairline cracks, while a quarter is good for showing the width of larger ones.
The biggest warning sign is displacement—when one side of the crack is higher than the other, creating a trip hazard. That almost always signals that the ground is settling or eroding, meaning the concrete slab isn't getting the even support it needs.
To help you get started, here's a quick guide to what you might be seeing on your patio.
Common Concrete Patio Crack Types and Causes
This table breaks down the usual suspects when it comes to patio cracks, helping you identify what you're dealing with.
| Crack Type | Appearance | Common Cause | Severity Level |
|---|---|---|---|
| Hairline Cracks | Very narrow, spiderweb-like lines, often less than 1/8 inch wide. | Concrete drying too quickly during the initial curing phase, perhaps on a very hot, windy day. | Low (Cosmetic) |
| Shrinkage Cracks | Slightly wider than hairline, but still narrow. A normal result of the curing process. | Natural concrete shrinkage as water evaporates over the first few months. | Low (Cosmetic) |
| Settlement Cracks | Wider than 1/4 inch, often with vertical displacement (one side is higher). | Poorly compacted soil, water erosion from a leaky sprinkler, or soil settling beneath the slab. | High (Structural) |
| Structural Cracks | Wide, deep cracks that may run the entire depth of the slab; can be long and branching. | Heavy loads (like a parked vehicle), aggressive freeze-thaw cycles, or significant ground movement from tree roots. | High (Structural) |
This should give you a good idea of whether you're looking at a simple fix or a more complex problem that might need a professional's touch.
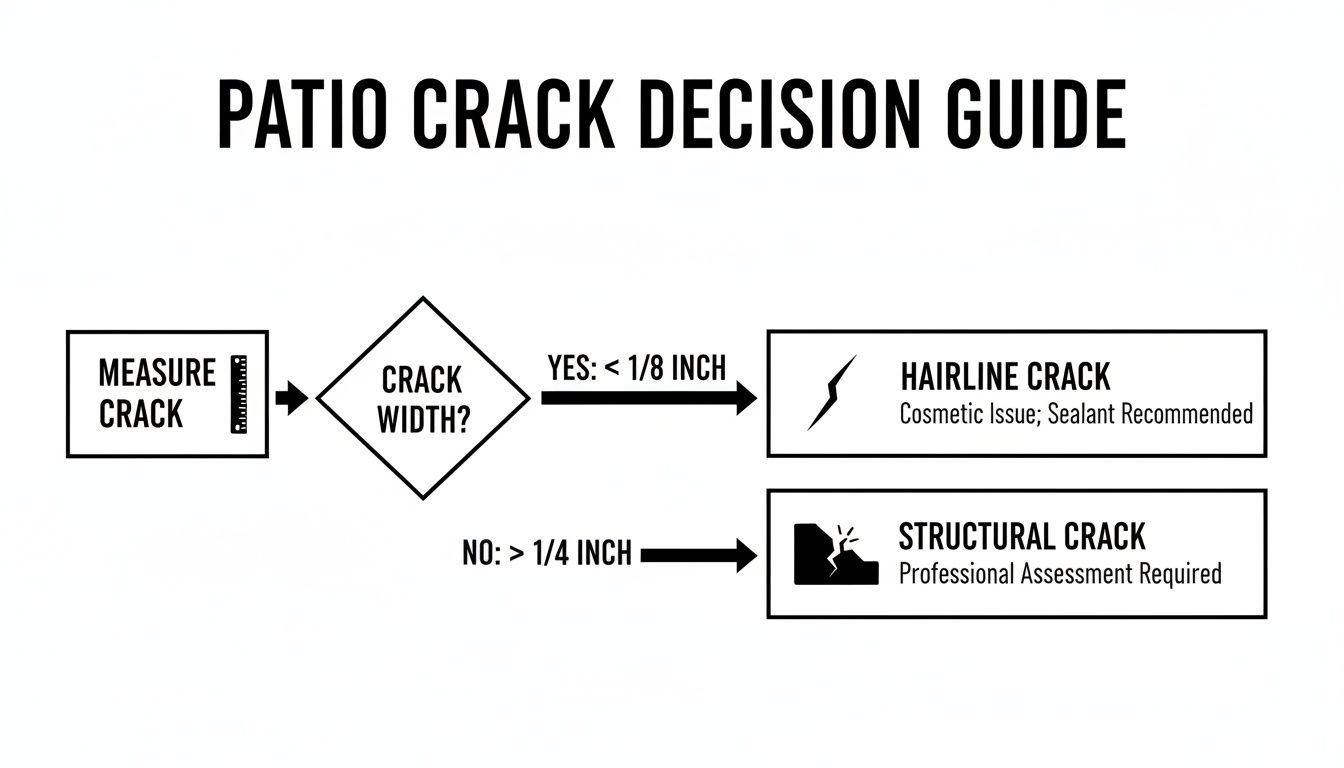
As you can see, the width of the crack is your first and most important clue.
Why This Matters for Your Home
Leaving concrete cracks alone, especially here in Atlanta with our weather swings, is just asking for trouble. Water gets in, and when it freezes, it expands with about 9% more volume. This freeze-thaw cycle acts like a tiny jackhammer, forcing the crack wider and breaking down the concrete from the inside.
This isn't just a patio problem; it's a challenge for all aging concrete. The global concrete restoration market was valued at USD 18.70 billion for a reason—infrastructure everywhere needs attention. If you're seeing extensive cracking or shifting, it could be tied to the foundation of your residential poured concrete slab itself.
Pro Tip: Here’s a simple trick I always recommend. Take a pencil and mark both ends of the crack, then write down the date. Come back in a month or two. If the crack has grown, you've got an "active" crack. For example, if your pencil mark is now half an inch away from the crack's end, that tells you there's ongoing movement, and you'll likely need a more flexible repair or a professional opinion.
Getting Your Tools and Materials in Order
Having the right gear on hand is what separates a frustrating Saturday afternoon from a successful, long-lasting repair. Nothing's worse than walking into the hardware store unprepared and getting lost in the aisles. Think of this as your battle plan—we'll cut through the noise and make sure you grab exactly what you need.
It's a lot like prepping to cook a good meal. If you're missing an ingredient or grab the wrong one, the whole dish can be a letdown. For instance, using a regular household vacuum instead of a powerful shop-vac won't remove the fine silica dust that prevents a good bond. This is a core principle in any home improvement project, and it's why I always recommend people look over general DIY repair tips from other disciplines. The fundamentals of good prep and tool selection are universal.
Essentials for Safety and Prep
First things first: safety. Don't even think about skipping this part. Concrete dust and flying chips are no joke. Once you're protected, you'll need a few tools to get the crack perfectly clean and ready for the new material to bond.
- Safety Glasses: A non-negotiable. You need to protect your eyes from debris when you're chiseling or grinding.
- Heavy-Duty Gloves: Leather or rubber-coated gloves will save your hands from getting chewed up by sharp concrete edges and caustic repair products.
- Wire Brush: A good, stiff-bristled brush is your best friend for scrubbing out loose bits, dirt, and even moss from inside the crack.
- Hammer and Cold Chisel: This classic combo is for widening the crack into a "V-groove." This simple step gives the filler much more surface area to grab onto, creating a stronger repair.
- Shop Vacuum: The secret weapon. This is the only way to get the crack completely free of the fine dust that will ruin your repair's adhesion.
A Pro's Perspective
I can't stress this enough: a clean surface is everything. I've seen countless repairs fail just because someone didn't spend five extra minutes with a shop vac. For example, a customer once showed me a repair that had peeled out perfectly, with the shape of the dust and pebbles imprinted on the bottom of the failed filler. Any dust you leave behind acts as a bond-breaker, and your brand-new filler will pop right out.
Picking the Right Concrete Crack Filler
This is where most people get hung up. You’re standing in front of a wall of tubes, tubs, and bags, and they all claim to be the magic solution. The reality is, they're designed for very different jobs. The key to a fix that actually lasts is matching the product to the type of crack you're dealing with.
The market for these products is massive for a reason. The global concrete repair mortars market was valued at USD 3.07 billion and is on track to more than double. The most common application method—good old-fashioned hand and trowel—held over 54% of the market share. That's great news for us, because it's perfect for most patio jobs. You can find more insights on this growing market over at forconstructionpros.com.
Let's break down the main players so you can choose with confidence.
Comparing Your Repair Material Options
Here’s a quick rundown of the three main products you'll find on the shelf and what they're good for.
| Repair Material | Best For | Key Characteristic | Example Use Case |
|---|---|---|---|
| Polyurethane Sealant | Active or expansion joints | Flexible: Stretches and compresses with temperature changes so it won't re-crack. | A hairline crack that runs along a control joint or one that might widen in the summer heat. You want this to move with the slab. |
| Two-Part Epoxy Filler | Structural cracks, deep gaps | Rigid & Strong: Essentially "glues" the concrete together, restoring structural integrity. | A settlement crack where you need to lock the two sides of the slab together so they can't move. This is a structural weld. |
| Cementitious Patch | Wide, non-structural gaps | Thick & Trowelable: Fills large voids and can be textured to blend in with your patio. | A big chip on the corner of a step or a wide, stable shrinkage crack that just needs to be filled and smoothed over cosmetically. |
For the vast majority of small, non-moving hairline or shrinkage cracks on a typical patio, a quality polyurethane sealant in a caulk gun is your best bet. It’s a breeze to work with, it stays flexible, and it does a fantastic job of sealing out water. If you're dealing with anything wider than a quarter-inch or a crack that's clearly moving, stepping up to an epoxy or a cement-based patch is the right call.
Why Surface Prep Is a Non-Negotiable Step
Here’s a little secret from the pros: a lasting concrete repair is 80% preparation. This is, without a doubt, the most important part of the process, yet it's the one most people rush through. It's exactly why so many DIY fixes fail within a year, peeling right out of the crack and leaving you right back where you started.
Think of it like painting a wall. If you just slap a new coat over dust and grime, it’s going to bubble and flake off. The same exact principle applies to concrete; the filler needs a perfectly clean, solid surface to grab onto. For example, any lingering moisture or algae in the crack will prevent the new material from bonding chemically.
This prep work is what creates a permanent bond that can actually handle Atlanta’s weather, from our blazing hot summers to the occasional winter freeze.
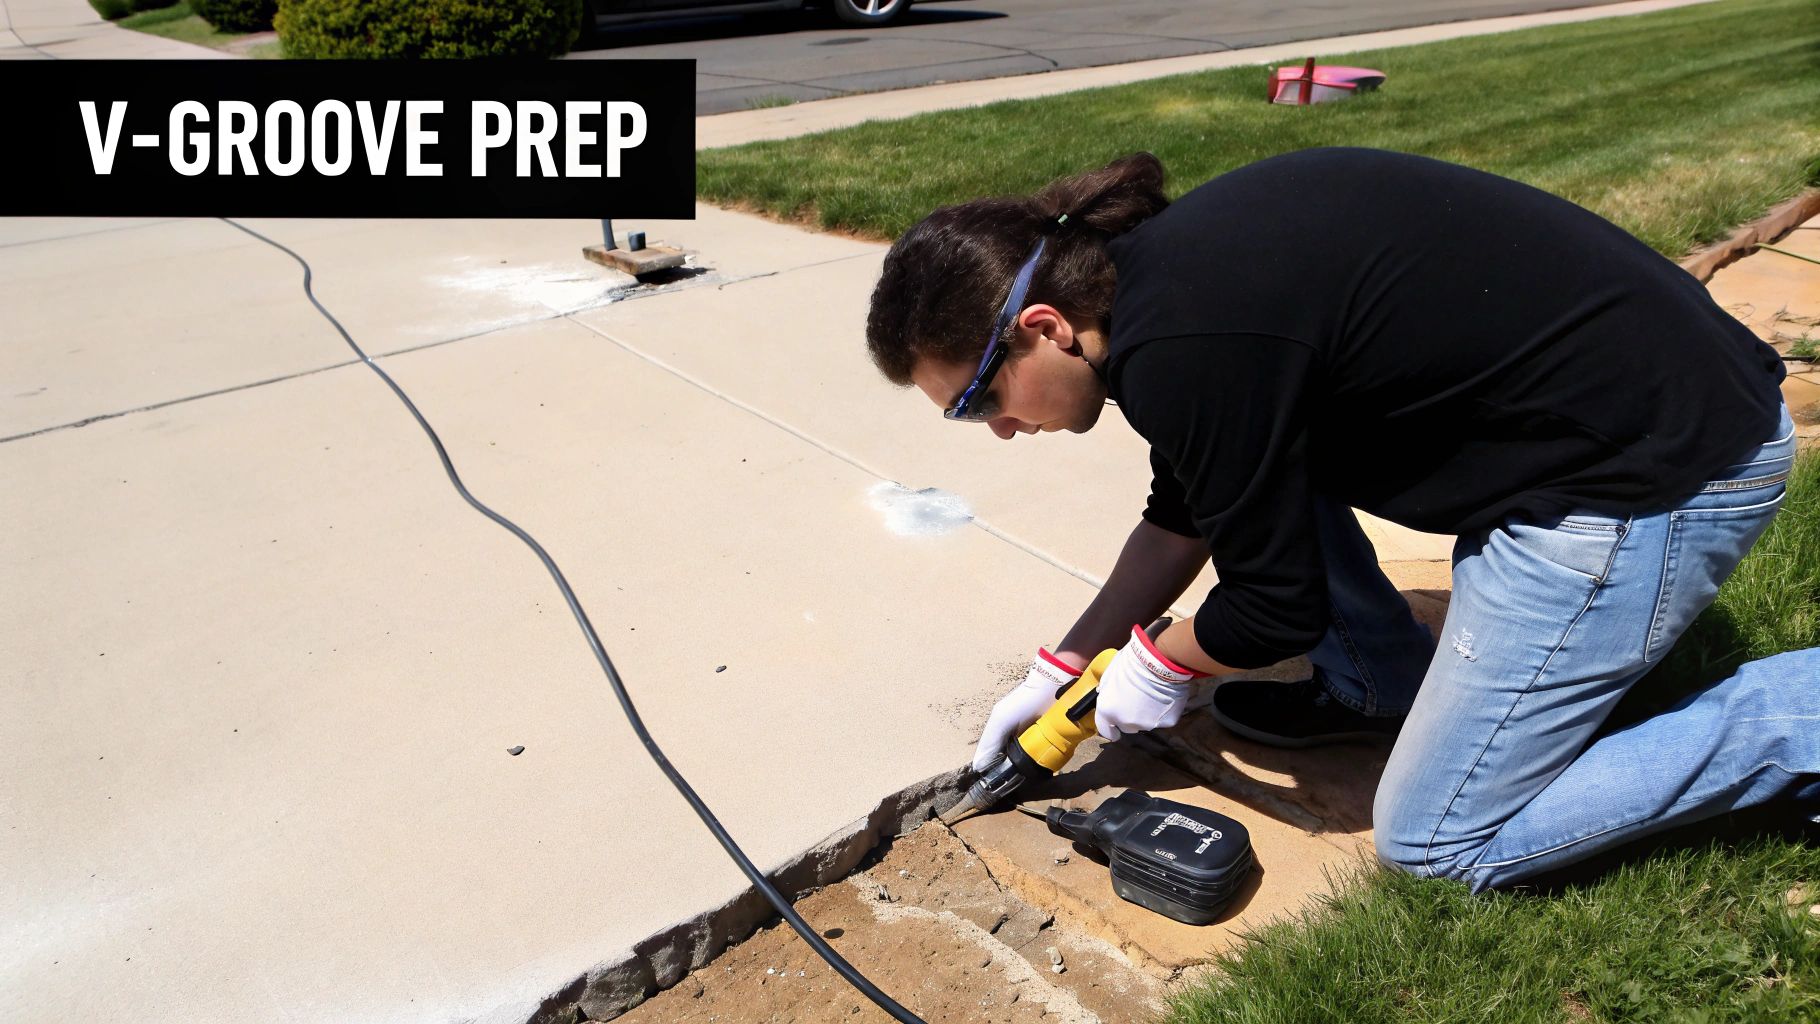
Creating the V-Groove for Maximum Grip
One of the most effective pro techniques for a strong repair is to create a V-groove. This just means using a hammer and cold chisel (or an angle grinder if you have one) to widen the top of the crack, so it’s broader at the surface than at the bottom. The ideal V-groove is about a quarter-inch wide and deep.
I know what you're thinking—why would I make the crack bigger? The logic is sound: you're dramatically increasing the surface area for the repair material to bond with. More importantly, you're getting rid of any weak, crumbly concrete along the edges. This "V" shape essentially locks the filler into place, preventing it from getting squeezed out as the patio expands and contracts with temperature changes.
Expert Takeaway
A straight, narrow crack gives the repair material almost nothing to hold onto. By creating a V-groove, you’re giving the filler a mechanical anchor in addition to its chemical bond. Imagine trying to pull a nail straight out versus trying to pull out a screw; the V-groove acts like the threads on a screw, locking the repair in place. It's a small step that makes a world of difference in how long your repair lasts.
The Importance of a Spotless Crack
After you’ve shaped the crack, the next mission is getting it clean. And I don't mean just brushing away a few loose bits. It needs to be surgically clean. Any dust, dirt, or leftover debris acts as a "bond breaker," creating a weak spot where the filler won't stick.
Here’s the cleaning process we follow on every job to guarantee a perfect bond:
- Scrub with a Wire Brush: First, get in there and vigorously scrub the inside of the V-groove with a stiff wire brush. The goal is to knock loose every last particle, old piece of sealant, and bit of grime.
- Blast with a Shop Vac: This is the non-negotiable final move. Use a shop vacuum with a narrow crevice tool and suck out every single speck of fine dust. Don't just blow it out with a leaf blower—that only moves the problem around. A vacuum removes it for good.
- Final Inspection: Run your finger along the inside of the crack. If it comes out dusty, you’re not done. It needs to be completely clean to the touch.
This intense cleaning is what allows the repair material to seep into the concrete's pores and form a waterproof bond that will hold up for years. For problems that go beyond simple cracks, understanding the scope of professional residential concrete and masonry repair helps explain why we're so obsessive about this level of detail. Taking the time to do the prep work right now saves you from having to do the whole job over again next season.
Alright, you've done the hard part—all that cleaning and prep work is behind you. Now comes the satisfying part: actually filling that crack and making it disappear. This is where your efforts really start to show.
The right way to apply the filler depends entirely on what you're working with. A flexible sealant for a hairline crack is a totally different ballgame than a structural epoxy for a serious fracture or a cement patch for a wide gap. Let's walk through how to handle each one.
Applying Polyurethane Sealant for Flexible Cracks
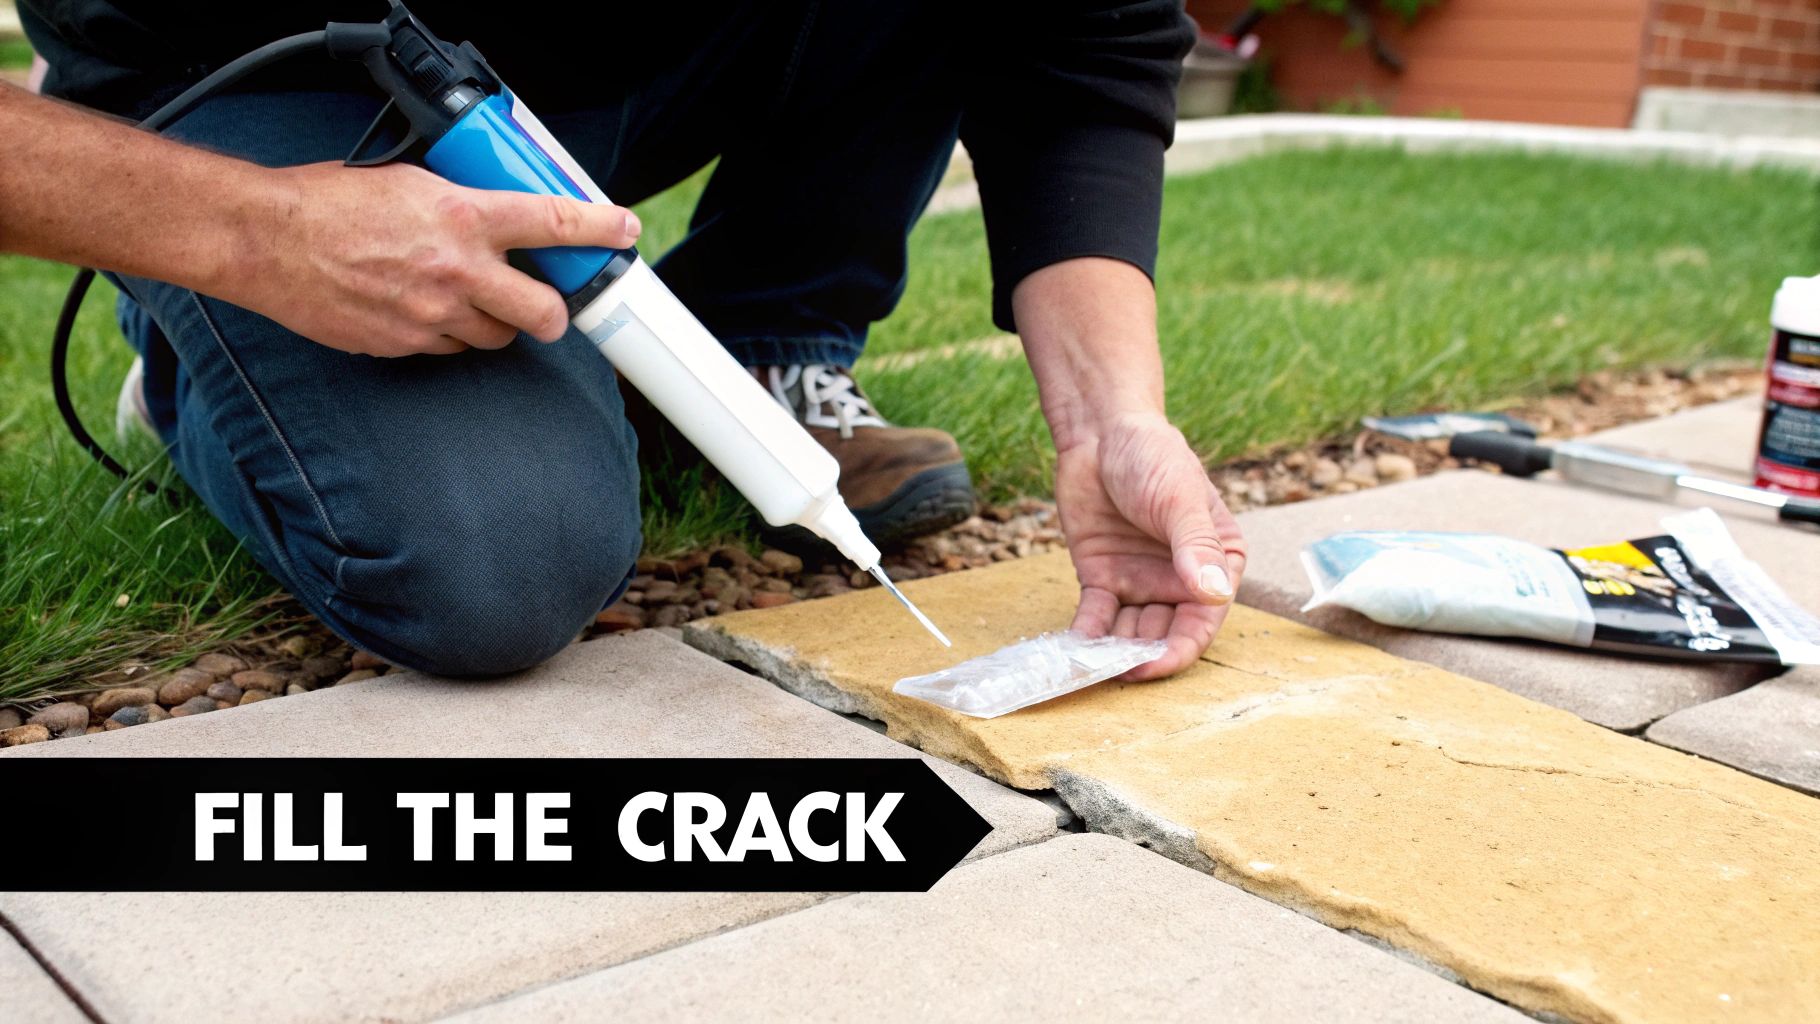
When you're tackling those hairline cracks or filling a control joint that needs to move, a polyurethane sealant in a caulk gun is your best friend. It gives you great control and keeps things tidy.
Start by snipping the tip of the caulk tube at a 45-degree angle. A good rule of thumb is to make the opening just a hair smaller than the crack itself—this prevents you from globbing on way too much filler.
Pop the tube into your caulk gun and lay a steady, consistent bead deep into the crack. You want to fill it from the bottom up. If you just skim the top, you'll trap air and moisture, and the repair won't last. For example, move the caulk gun at a speed of about one foot every five seconds to ensure a deep, even fill.
My Two Cents: I always overfill the crack just slightly, so the sealant sits a little proud of the surface. Most of these products shrink a bit as they cure, so that extra bit ensures the final repair ends up perfectly flush instead of creating a new divot.
Once it's filled, grab a putty knife and tool the sealant, pressing it firmly into the joint and scraping off the excess. If you want razor-sharp edges, lay down some painter's tape on either side of the crack before you even pick up the caulk gun.
Using Two-Part Epoxy for Structural Bonding
Got a structural crack that needs to be welded back together? This is a job for two-part epoxy. It creates a rock-solid, rigid bond that makes the concrete whole again.
These epoxies usually come in a dual-cartridge setup that mixes the resin and hardener for you in the nozzle. Before you squeeze the trigger, make sure that nozzle is pushed deep into the crack.
Work slowly and carefully, injecting the epoxy until the crack is completely full. This stuff is not as forgiving as a sealant, so patience is key. For a deep crack, you may need to apply it in two passes, letting the first layer settle before topping it off.
Epoxy doesn't really shrink, so aim to fill the crack right up to the level of the surrounding patio. Smooth the surface with a putty knife, but try not to smear it all over the place.
Troweling a Cementitious Patch for Wide Gaps
For bigger, non-structural gaps or large chips, a cement-based patching compound is what you need. You'll mix it yourself to a consistency that resembles smooth peanut butter. If it's too watery, it will be weak; if it's too dry, it will be hard to work with and won't bond well.
Before you start packing it in, give the inside of the crack a quick spritz with a spray bottle of water. This stops the dry concrete from sucking the moisture out of your patch too fast, which can lead to a weak, crumbly repair.
Now, use a pointed trowel to press the patching mix firmly into the gap. Do it in layers, making sure you don't leave any air pockets at the bottom.
Achieving a Seamless Finish and Texture
With the patch in place, smooth the surface with a flat trowel and feather the edges to blend it in. But here's the secret to an invisible repair: texture. A perfectly smooth patch on a textured patio sticks out like a sore thumb.
Here are a few tricks I use to match the original finish:
- Broom Finish: Lightly drag a stiff-bristled broom over the wet patch. Make sure you pull it in the same direction as the original broom marks on your patio.
- Sand Sprinkle: For a grittier texture, sprinkle a little fine sand over the wet patch and gently press it in with your trowel.
- Stippling: Gently dab the surface with a stiff brush or even a sponge. This creates a slightly uneven, stippled look that blends in well with older, weathered concrete.
While we're focused on concrete here, the basic principles of cleaning and filling apply to other materials, too. For example, you can see similar ideas at play in learning how to repair cracked marble. A clean surface and the right filler are universal.
To make things easier, here's a quick cheat sheet matching the repair method to the type of crack you're dealing with.
Repair Method by Crack Type
| Crack Type | Recommended Material | Application Technique | Best For |
|---|---|---|---|
| Hairline/Shrinkage | Polyurethane Sealant | Apply with a caulk gun and smooth with a putty knife. | Sealing narrow, non-structural cracks that may see minor movement. |
| Settlement/Structural | Two-Part Epoxy | Inject deep into the crack using a dual-cartridge gun. | Bonding concrete together to restore its structural strength. |
| Wide Gaps/Chips | Cementitious Patch | Mix and trowel into the void, then texture to match. | Filling large, stable voids that don't require structural bonding. |
This table should help you quickly pinpoint the right product and approach for your specific patio problem.
Curing, Sealing, and Preventing Cracks for Good
Alright, you've filled the crack. Don't be tempted to call the job done and grab a cold drink just yet. What happens next is what separates a temporary fix from a lasting repair. This is where we talk about curing and sealing—the steps that lock in your hard work and keep your patio looking great for years.
Think of that new patch like wet paint; it's vulnerable. It needs time to properly harden and build its full strength. We call this curing, and it’s a chemical process, not just a matter of drying out.
The Curing Game: Why Patience Is Your Best Tool
Every repair product is a little different, so the manufacturer's instructions on the package are your best friend. But as a solid rule of thumb, you’ll want to give the patch at least 24 to 72 hours of peace before anyone walks on it or you put furniture back. If you rush it, you’ll end up with a weak spot that will fail in no time.
Your job during this waiting period is to play bodyguard for the repair.
- Keep it Out of Direct Sun: Scorching sun is your enemy. It pulls moisture out of the repair material way too fast, causing it to shrink and form new little cracks. If you can’t avoid the sun, just prop up a piece of plywood to create some shade.
- Protect it From Rain: A sudden downpour can wash away your material or mess with its chemistry, leaving you with a soft, useless patch. If rain is coming, cover the area with a plastic sheet and weigh down the edges with a few bricks.
A Pro Tip for Hot Weather
When I’m working with cement-based patches on a hot, dry day, I always recommend "moist curing." It sounds counterintuitive, but gently misting the repair with a little water a few times a day for the first 48 hours works wonders. For example, a light spray in the morning and evening is usually enough. It slows the chemical reaction down, letting the cement form stronger bonds and making the patch incredibly durable.
Lock It Down With a Quality Concrete Sealer
Once the patch is fully cured, it’s time to seal the deal—literally. Sealing the entire patio is the single best thing you can do for long-term protection. A good sealer is like a raincoat and sunscreen for your concrete, creating an invisible shield over the whole surface.
In a place like Atlanta, where we get heavy rain and the occasional winter freeze, this step is non-negotiable. Water seeps into porous concrete, and when it freezes, it expands. This freeze-thaw cycle acts like a tiny, powerful jackhammer, creating new cracks from the inside out. A sealer stops that process cold.
You’ve got two main options for sealers:
- Penetrating Sealers: These are my go-to for most patios. They soak right into the concrete and create a barrier from within. The best part is they don’t change the look or feel of the surface, so you don't have to worry about it becoming slippery.
- Topical Sealers (Film-Forming): These create a protective film on the surface. They can add anything from a satin sheen to a high-gloss, "wet look" and make cleaning up spills from a BBQ, for example, a breeze.
For most homeowners, a quality penetrating silane/siloxane sealer is the perfect choice. Plan on reapplying it every 3 to 5 years; it’s a small investment that pays off big time in preventing future headaches.
Simple Habits for a Crack-Free Future
Beyond sealing, a little smart maintenance can make all the difference. The idea is to manage the things that cause cracks in the first place.
Make sure water is draining away from your patio. Gutters and downspouts should be clear and aimed several feet away from the edge of the slab. For example, adding a simple downspout extender from the hardware store can solve many drainage-related settlement issues. Also, take a look around at your landscaping. Are there any large trees nearby? Their roots can be surprisingly powerful, pushing up from underneath and cracking the slab over time. Staying on top of these simple things is the key to keeping your patio in one piece.
Knowing When to Call an Atlanta Concrete Pro
There's a great feeling that comes with a well-done DIY project. I get it. But with concrete, knowing when to step back and call in a specialist is often the smartest move you can make. Some problems run deeper than what you see on the surface, and a tube of sealant just isn't going to cut it.
Recognizing the red flags is key to protecting your home's value. This isn't about giving up; it's about being strategic. You want to bring in an expert before a simple fix snowballs into a massive, expensive failure. For homeowners here in the Atlanta area, this is especially true given our clay soil and weather patterns.
Signs You Need Professional Concrete Repair
Certain cracks are more than just ugly—they’re clear signals that the ground supporting your patio is failing. If you spot any of these, it’s time to put down the DIY tools and pick up the phone.
- Significant Vertical Displacement: If one side of a crack is a quarter-inch or more higher than the other, creating a trip hazard, you're looking at a classic sign of settlement. The soil underneath is shifting, and no amount of filler can fix that core instability.
- Cracks Wider Than a Half-Inch: A really wide crack means the forces pulling your patio apart are powerful and probably ongoing. This usually points to a serious issue with the soil, drainage, or even how the slab was poured in the first place.
- Recurring Cracks: Did you patch a crack last year, only to find it has returned? For instance, if you used a rigid filler and the same crack reappeared right beside it, that means the slab is still moving, and it will keep breaking any patch you apply.
These aren't just cosmetic flaws. They are structural warnings.
It’s a global issue. The Asia Pacific region accounts for over 35% of the entire concrete repair market, mostly because of rapid urbanization and the need to make structures more resilient. This just goes to show that concrete maintenance is a critical investment everywhere, not just a local problem. For us here in Atlanta, it’s a good reminder that putting off professional repairs only leads to faster decay and much bigger bills down the road.
Advanced Solutions Pros Bring to the Table
When you hire a professional, you're not just getting an extra set of hands. You're gaining access to specialized equipment, years of experience, and techniques that are well beyond a typical weekend project. A real pro can diagnose the why behind the crack and provide a permanent solution.
For instance, an expert might find that water has washed away the soil under your patio, creating empty pockets (voids) that are causing the slab to sink and crack. They have ways to fix this without tearing everything out and starting over.
Two of the most common professional methods are:
- Mudjacking (Slabjacking): This is a tried-and-true method. We drill small, strategically placed holes into the sunken slab and pump a grout slurry underneath. This mix fills the voids and uses hydraulic pressure to lift the concrete right back where it belongs, making it stable again.
- Polyurethane Foam Injection: This is a more modern, high-tech approach. We inject a two-part, high-density polyurethane foam that expands rapidly. It fills every void, lifts the slab precisely, and cures into a strong, light, and waterproof base that won't wash away.
Getting a professional assessment is a proactive step. If you're seeing any of these warning signs on your Atlanta patio, it’s time to get an expert opinion. You can easily schedule a professional consultation to figure out exactly what’s going on and what your options are.