Repairing a cracked concrete driveway really comes down to three things: cleaning the crack, filling it with the right material, and sealing the surface. The real secret, though, is knowing how to match your repair method to the type of crack you're dealing with. For example, a hairline fissure needs a completely different touch than a wide, deep gap where you can fit a quarter.
Your First Look at Driveway Crack Repair
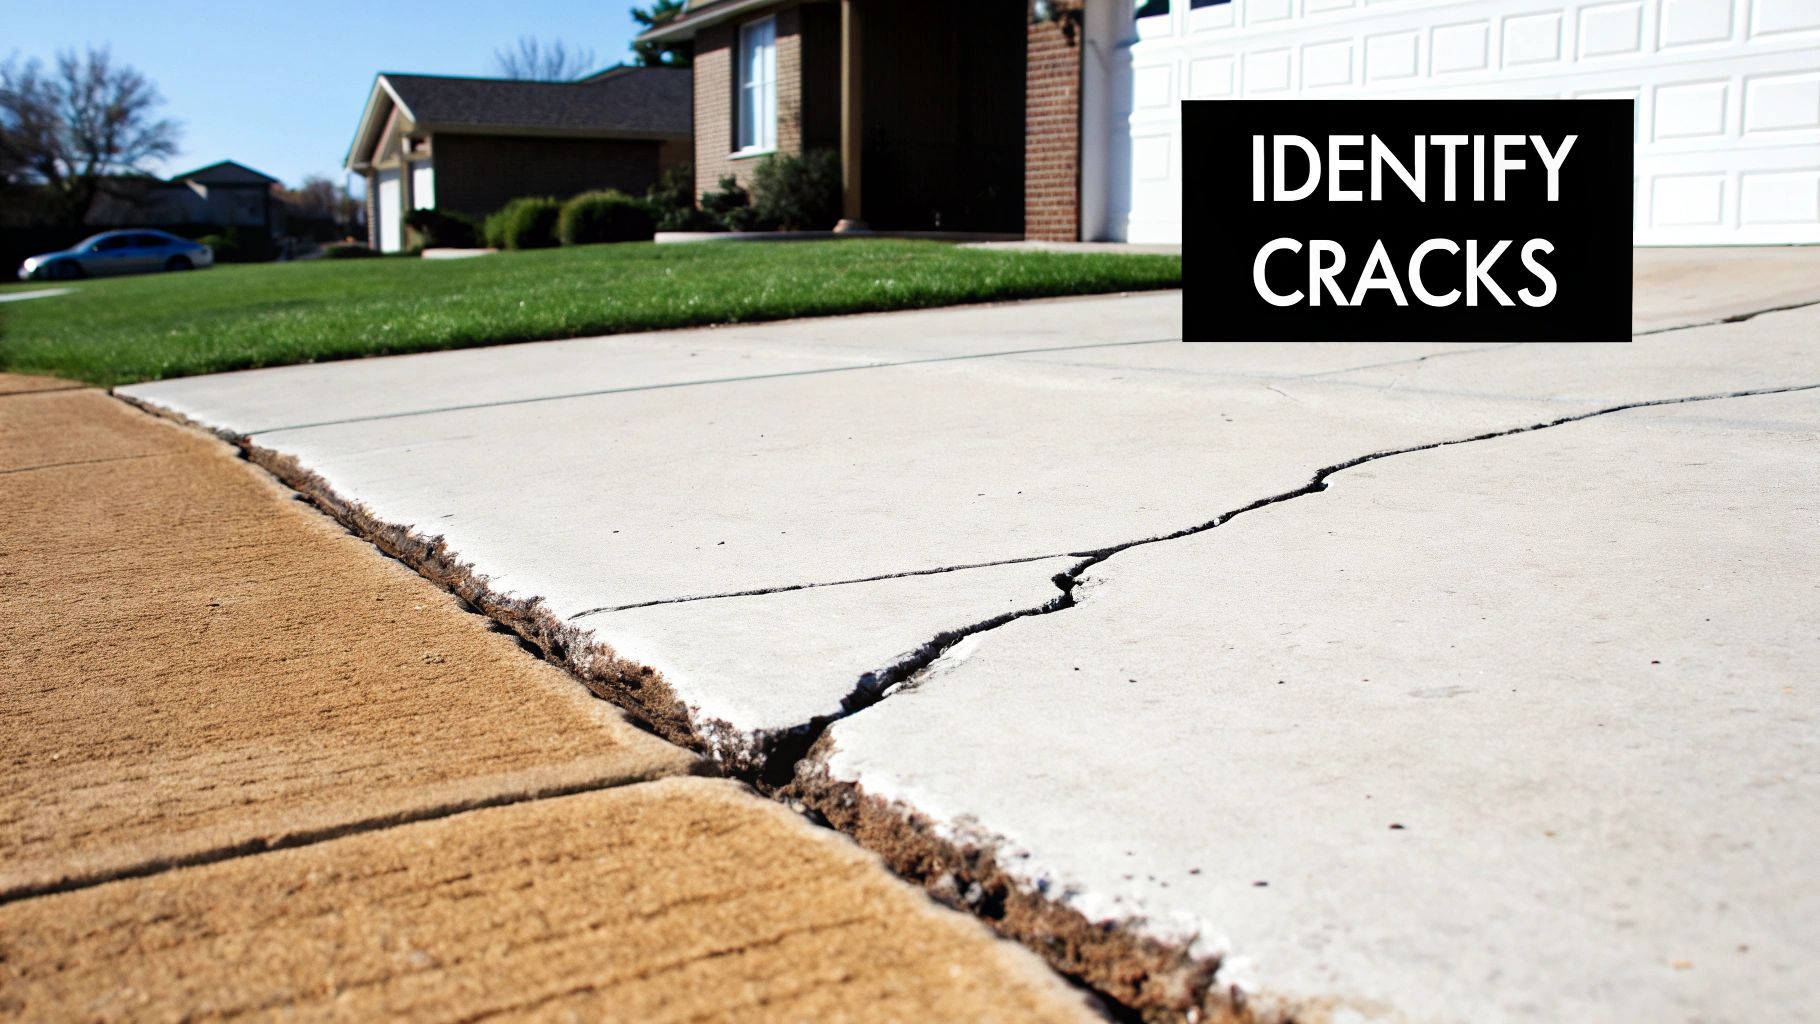
A cracked driveway is more than just an eyesore that hurts your home's curb appeal. Think of it as a warning sign from your concrete. Ignoring those little cracks lets water, ice, and dirt work their way deep into the slab. That's what leads to bigger cracks, sinking sections, and eventually, a full-blown replacement that's far more expensive. For instance, a simple DIY crack repair might cost under $50, while a full driveway replacement can easily cost several thousand dollars.
The good news? Most common driveway cracks are totally fixable for a DIYer who has the right game plan.
This guide will give you the confidence to handle this project yourself. We'll cover everything from figuring out what kind of damage you have to picking the best materials for a repair that actually lasts. After all, understanding why a crack appeared—for example, was it from a heavy moving truck or just normal settling?—is just as important as knowing how to fill it.
Why Driveway Cracks Happen
Most of the time, concrete problems trace back to just a few usual suspects. Pinpointing the cause helps you not only fix the damage you see now but also stop it from happening again.
- Shrinkage During Curing: As brand-new concrete cures, it loses moisture and shrinks. This process can create a web of fine, shallow cracks right on the surface. It’s a normal part of the process, but you still have to seal them. A common example is seeing a map-like pattern of tiny cracks appear within the first month after a new pour.
- Soil Settlement: The ground under your driveway isn't static. It can shift, sink, or swell, especially from water erosion or poor compaction. For instance, a leaking sprinkler head next to the driveway can slowly wash away the soil base, causing the slab above to sink and crack.
- Freeze-Thaw Cycles: This is a big one. Water gets into tiny pores and cracks, then freezes. When water turns to ice, it expands with incredible force—about 9% in volume—acting like a tiny wedge that pries the crack wider and wider all winter long.
- Heavy Loads: Your driveway is tough, but it has its limits. Parking an RV, a moving truck, or even a large dumpster on it—especially near the edges—can push the concrete past its breaking point. A classic example is a V-shaped crack pointing from the edge where a heavy vehicle's tire repeatedly drove off the pavement.
The single most important thing you can do is correctly diagnose the crack. Slapping some surface filler into a crack caused by an unstable base won't fix anything. Likewise, using heavy-duty epoxy on a tiny hairline crack is just a waste of time and money.
The need for good concrete repair is a universal problem for homeowners. The global market for concrete repair mortars—the very stuff you'll be using—was valued at roughly USD 2.75 billion back in 2022 and is only expected to grow. This just shows how common and necessary these repairs are for keeping properties in good shape. You can read up on the demand for these materials from various industry research reports online.
Before you get started, it can be really helpful to see what a professional-grade repair looks like. Take a look at some of our examples of completed driveway projects to get a feel for what’s possible and to inspire your own work.
Now, let's figure out what you're up against. The table below will help you match the cracks you see on your driveway to the right repair strategy.
Matching Crack Types to Repair Methods
| Crack Type | Recommended Repair Method | DIY Difficulty Level |
|---|---|---|
| Hairline Cracks | Concrete Sealant or Elastomeric Filler | Easy |
| Shrinkage Cracks | Epoxy Injection or Flexible Sealant | Easy to Moderate |
| Partial-Depth Cracks | Polymer-Modified Concrete Patch | Moderate |
| Full-Depth Cracks | Epoxy Mortar or Concrete Patching Compound | Advanced |
Once you've identified your crack type, you're ready to gather your tools and get to work. Don't worry, we'll walk through each of these methods step-by-step.
Getting to the Root of Your Driveway Cracks
Before you grab a single tool or buy any filler, you need to play detective. Every crack in your driveway is telling a story about what’s going on underneath, and if you don’t listen, you'll end up making the same repair over and over again. Trust me, slapping a patch on a deep structural problem is a waste of a Saturday afternoon.
Taking a few minutes to figure out why the concrete is cracking is the most important step. It ensures you pick the right materials and the right method from the get-go, saving you a ton of headaches later.
Decoding Hairline and Shrinkage Cracks
The most common cracks you'll see are hairline cracks. They're super thin—usually less than 1/8th of an inch wide—and can look like a spiderweb spreading across the surface. These are almost always caused by "plastic shrinkage," which is just a technical way of saying the concrete dried too fast right after it was poured.
Think back to when the driveway was installed. If it was a hot, breezy day, the surface likely lost moisture too quickly, causing these tiny fissures. While they aren't a sign of a failing foundation, they are open doors for water to seep in. For example, you might only see them when the concrete is wet, as the dark lines of moisture retention become visible.
Key Takeaway: Think of hairline cracks as a skin-deep issue. They won't compromise your driveway's strength, but you absolutely have to seal them. Left alone, they'll let water in, which can freeze, expand, and turn a tiny crack into a major problem.
Then you have shrinkage cracks. They're a bit bigger than hairlines and are also a perfectly normal part of the concrete curing process as it loses volume. You'll often spot them running through the middle of a slab or near the control joints that were cut into the surface.
This kind of maintenance is a constant need. On a massive scale, the concrete restoration market was valued at an estimated USD 17.33 billion in 2023, driven by aging infrastructure everywhere. When you hear that over 45,000 bridges in the U.S. are rated structurally deficient, it puts into perspective how crucial proper concrete repair is. You can learn more about the scale of concrete repair challenges and their market drivers.
Identifying More Serious Structural Cracks
This is where your detective work really counts. A structural crack is a red flag that points to a much bigger issue, like the ground shifting or sinking beneath the concrete.
Here’s what to look for:
- Serious Width: These cracks are typically wider than a quarter of an inch. A practical test is to see if you can easily slip a car key into the gap.
- Goes All the Way Through: You can often see that the crack runs through the entire thickness of the concrete slab.
- Uneven Surface: This is the dead giveaway. If one side of the crack is higher than the other, you've got vertical displacement. It’s not just ugly; it’s a trip hazard. For example, if you lay a level across the crack, you'll see a noticeable gap under one side.
A classic example is a wide crack running across a whole driveway panel where one side has clearly sunk. This almost always means the soil underneath has settled, either because it wasn't compacted properly in the first place, or because water has slowly eroded the base material away. Sometimes, even aggressive tree roots from a nearby oak or maple tree are the culprit, physically lifting the slab.
The Cause Dictates the Cure
Once you know the why, the how becomes clear. A spiderweb of tiny surface cracks tells a completely different story than a large, uneven chasm.
- For Curing Issues (Hairline & Shrinkage Cracks): The fix is relatively simple. A flexible, high-quality sealant or a concrete resurfacer is all you need to keep moisture out and make the surface look uniform again.
- For Soil Settlement (Structural Cracks): This demands a more serious approach. Just filling the crack is pointless because the ground will continue to move. This is where you need to consider professional solutions like slab jacking or other foundation repairs. For example, a pro might inject polyurethane foam beneath the slab to lift it back to its original position.
By correctly diagnosing the type of crack you're dealing with, you’re not just patching a symptom—you’re solving the actual problem. It's the difference between a temporary fix and a repair that will last for years to come.
Gearing Up: Your Concrete Repair Toolkit
Showing up to a project with the right gear is half the battle. I can't tell you how many times I've seen a simple driveway repair turn into a frustrating mess simply because the right tools weren't on hand. Think of this as your complete shopping list to get the job done right the first time.
We'll run through the essentials for prepping the crack, the different materials you'll need for the actual repair, and the tools that give you that clean, professional finish. Knowing what each item does is just as important as owning it—it’s the difference between a patch that lasts a season and one that lasts for years.
Prep Tools: The Foundation of a Good Repair
Here’s a hard truth: you can't build a strong repair on a weak, dirty foundation. The single most common mistake I see is skimping on the prep work. If your filler can't bond directly to clean, solid concrete, it’s guaranteed to fail.
- Pressure Washer or a good High-Pressure Hose Nozzle: This is non-negotiable. You need it to blast out all the loose dirt, grime, and bits of vegetation that have settled into the crack. For example, a 2000 PSI pressure washer is perfect for this task.
- Stiff-Bristled or Wire Brush: For the stubborn, caked-on gunk that water pressure alone can't dislodge.
- Shop Vacuum: After you've scrubbed everything out, a shop vac is the best way to get the crack bone dry and suck out any lingering dust.
- Hammer and Cold Chisel: Use these to gently chip away any crumbling or weak concrete along the crack's edges. You need to create a solid, stable surface for the new material to grab onto.
- Wire Wheel Drill Attachment: If you want the absolute best bond, a wire wheel on your drill will scour the inside of the crack far more effectively than a handheld brush. It really roughs up the surface for maximum adhesion.
Choosing Your Repair Materials
The material you use to fill the crack is the heart of the repair. There's no one-size-fits-all product here; the right choice depends entirely on the type of crack you're dealing with.
My Two Cents: Here in Atlanta, our weather causes a lot of expansion and contraction. For any crack that might move with temperature changes, a flexible sealant is your best bet. A rigid epoxy in a moving joint will just crack again next season. Save the heavy-duty, rigid fillers for static breaks you're certain won't shift. For example, use a flexible sealant for the control joints that were cut into your driveway.
- Flexible Polyurethane Sealant: This is my go-to for most active cracks up to about a 1/2-inch wide. It stays flexible after it cures, moving with the concrete. You'll find it in tubes that fit a standard caulk gun, from brands like Sika or Quikrete.
- Epoxy Injection Kits or Pastes: These are two-part systems that create an incredibly strong, rigid bond—they essentially "glue" the concrete back together. Perfect for structural cracks that aren't moving.
- Polymer-Modified Concrete Patch Compound: Think of this as a super-powered, sticky concrete mix. The added polymers give it extra strength and adhesion. It's fantastic for patching wider, non-moving cracks and spalled areas (where the surface has flaked off) because it looks and feels more like the original concrete.
- Foam Backer Rod: This is a must-have for deeper cracks. It’s a flexible foam rope you press into the crack before adding the sealant. For a 1/2-inch wide crack, you would typically use a 5/8-inch backer rod so it fits snugly. It saves you a ton of expensive material and ensures the sealant is at the proper depth to flex correctly.
Finishing Tools for a Professional Look
The final application is what separates a DIY-looking job from a professional one. These tools help you work the material correctly and get that smooth, clean finish.
- Caulk Gun: An absolute necessity for applying sealants and some epoxies. Don't cheap out—a good one with a high thrust ratio gives you much better control for a smooth bead.
- Margin Trowel or Putty Knife: You'll need one of these for pressing patching compounds into cracks and smoothing the surface. A 2-inch margin trowel is a very versatile size for this job.
- Disposable Gloves: Concrete products can be caustic and sealants are incredibly sticky. Always protect your hands with nitrile or latex gloves.
- Bucket for Mixing: A simple 5-gallon bucket is all you need for mixing any cement-based patch compounds with water.
Having this gear ready before you start will save you a lot of headaches and extra trips to the hardware store. Here’s a quick look at what you can expect to budget for your toolkit.
Essential Tools and Materials Cost Breakdown
This table gives you a ballpark idea of what you might spend gathering the necessary supplies for a typical driveway crack repair project. Remember, investing in quality tools often pays off in the long run.
| Item | Typical Use | Estimated Cost Range |
|---|---|---|
| Pressure Washer | Deep cleaning cracks and surfaces | $100 – $300 (or rent for ~$50/day) |
| Wire Brush & Chisel | Removing loose debris from edges | $15 – $30 |
| Polyurethane Sealant | Filling active, non-structural cracks | $8 – $20 per tube |
| Epoxy Repair Kit | Bonding static, structural cracks | $25 – $60 per kit |
| Concrete Patch Mix | Filling wide gaps and spalls | $10 – $30 per bag |
| Caulk Gun & Trowel | Applying and finishing materials | $10 – $25 |
With the right tools laid out and a solid plan, you're well on your way to a successful repair that will protect your driveway for years to come.
A Practical Guide to Lasting Concrete Repairs
Alright, with your tools laid out, it's time to get your hands dirty. This is where we get into the nitty-gritty of fixing those driveway cracks for good, ensuring your hard work holds up against whatever the weather throws at it. The real secret is matching your repair technique to the type of crack you're dealing with. A hairline fissure and a deep, jagged gap are two completely different beasts.
We'll start with the most common and straightforward fix—hairline cracks—and then work our way up to the wider, more challenging repairs. Just remember, proper preparation is 90% of the job. I've seen countless DIY repairs fail simply because this stage was rushed. For example, a repair failed because old, damp leaves were left at the bottom of the crack, preventing the new sealant from bonding. Take your time here, and you'll guarantee a repair that lasts.
This simple workflow shows the core process for any successful concrete crack repair.
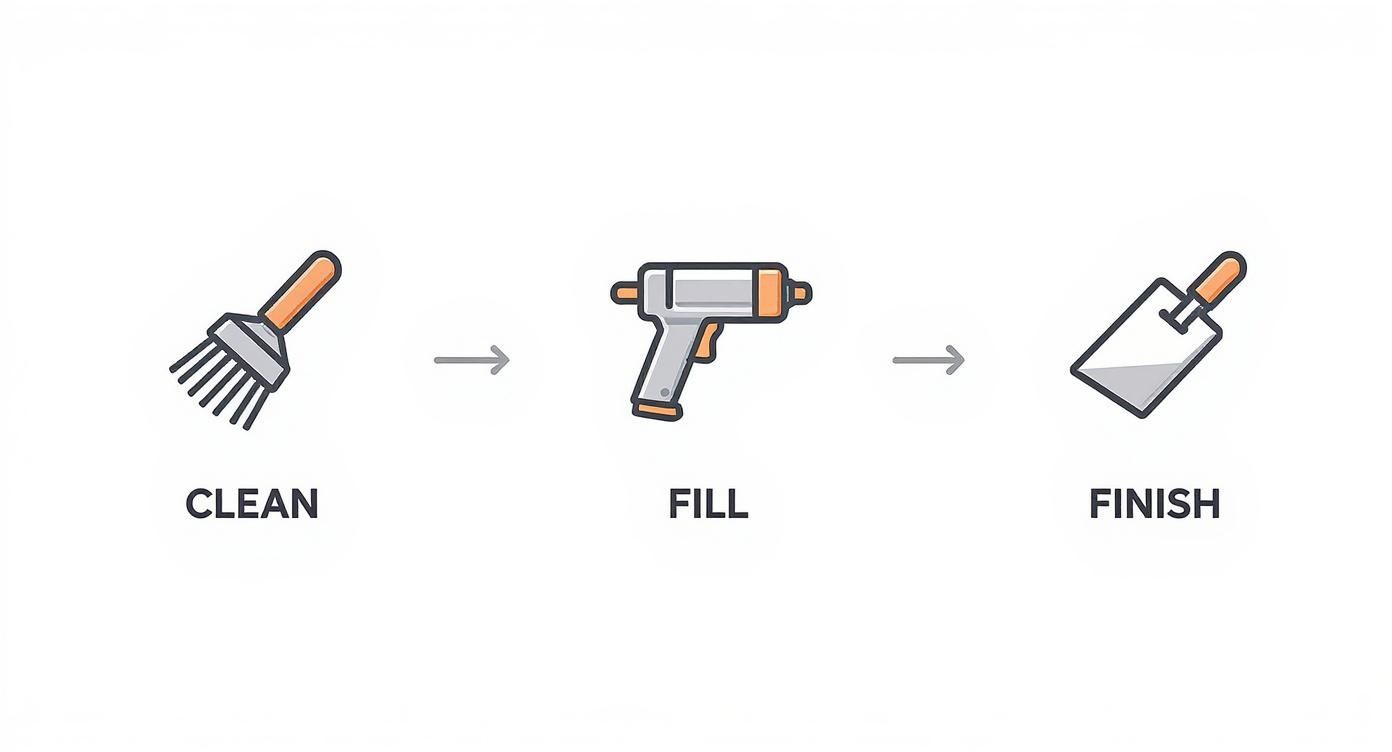
As the infographic shows, it’s a universal three-stage approach: meticulously clean out the damage, fill it with the right material for the job, and finish the surface so the repair is both durable and seamless.
Addressing Fine Hairline Cracks
Hairline cracks, those tiny fissures less than 1/8-inch wide, are usually the easiest to tackle. They might not look like a big deal, but they’re wide enough to let water seep into the slab, which is the last thing you want. Sealing them is a smart, preventative move.
For these, your best bet is a cementitious resurfacer or a high-quality elastomeric crack filler. These products are designed to spread a thin, tough layer over a large area, filling all those tiny cracks at once and giving the whole surface a fresh, uniform look. Concrete resurfacing is a seriously effective method—so much so that the global market for these products hit USD 4.44 billion in 2024 and is still climbing. You can learn more about the growth of concrete resurfacing solutions to see why it's such a popular choice for driveway makeovers.
To do the repair, you'll just mix the resurfacing product following the manufacturer's guide, pour it onto the cleaned and dampened concrete, and spread it out evenly with a long-handled squeegee. The idea is to get a thin, consistent coat that fills every crack and bonds tightly to the old slab.
Sealing Wider Cracks Up to a Half-Inch
Once you’re dealing with cracks between 1/8-inch and 1/2-inch wide, you need to step up your game. This is where a flexible polyurethane sealant really proves its worth. It can stretch and compress as temperatures fluctuate, which stops the repair from cracking again when the seasons change.
Start by cleaning the crack with a wire brush and a shop vac. You want to get every last bit of dust, dirt, and loose debris out of there. For example, you might have to use a screwdriver to scrape out stubborn weeds that have taken root.
Next up is a crucial step that many people skip: inserting a foam backer rod. This flexible foam rope gets pushed into the crack until it sits about a 1/2-inch below the surface. This little trick not only saves you a ton of expensive sealant but also creates the perfect "hourglass" shape for the sealant bead, which is what allows it to flex correctly without tearing.
Pro Tip: Always give the inside of the crack a light misting with a spray bottle before you apply any patch or sealant. Bone-dry concrete will literally suck the moisture out of your repair material, making it cure too fast, shrink, and crack all over again. A slightly damp surface ensures a stronger, more gradual bond.
With the backer rod in place, you can apply a self-leveling sealant. Just squeeze a smooth, even bead into the crack. The "self-leveling" part is great—it settles on its own to create a flat, professional-looking finish that blends right in.
Tackling Deeper and More Damaged Cracks
For cracks that are wider, deeper, or have crumbling edges, a simple filler just won’t cut it. The patching material needs a solid mechanical grip, or it will get pushed out by car tires or popped loose by a freeze-thaw cycle. To solve this, you need to create what we call a "dovetail" joint.
Grab a hammer and a cold chisel and carefully chip away at the inside edges of the crack. You’re aiming to make the bottom of the crack slightly wider than the top. This inverted "V" shape creates a mechanical lock, anchoring the patch material so it physically cannot pop out once it has cured.
After undercutting the edges, give the area another thorough cleaning. For these heavy-duty repairs, a polymer-modified concrete patching compound is the perfect material.
Here’s how to apply it for a rock-solid fix:
- Mix the Compound: Prepare the patching material based on the package directions. You’re looking for a consistency similar to peanut butter. For example, a common ratio is 4 parts mix to 1 part water.
- Dampen the Area: Lightly mist the prepped crack with water. This helps the patch cure slowly and strongly.
- Apply in Layers: Using a margin trowel, press the compound firmly into the crack. Work in layers to make sure you eliminate any air pockets.
- Finish the Surface: Overfill the crack just a bit, then use your trowel to smooth it level with the surrounding driveway. To help it blend in, you can lightly drag a stiff-bristled brush over the patch to mimic the original concrete texture.
By tailoring your technique to the crack's specific personality—from a simple resurfacing for hairlines to an anchored patch for deep damage—you're not just making a temporary fix. You're creating a durable solution that will protect your investment for years to come.
How to Prevent Future Driveway Cracks
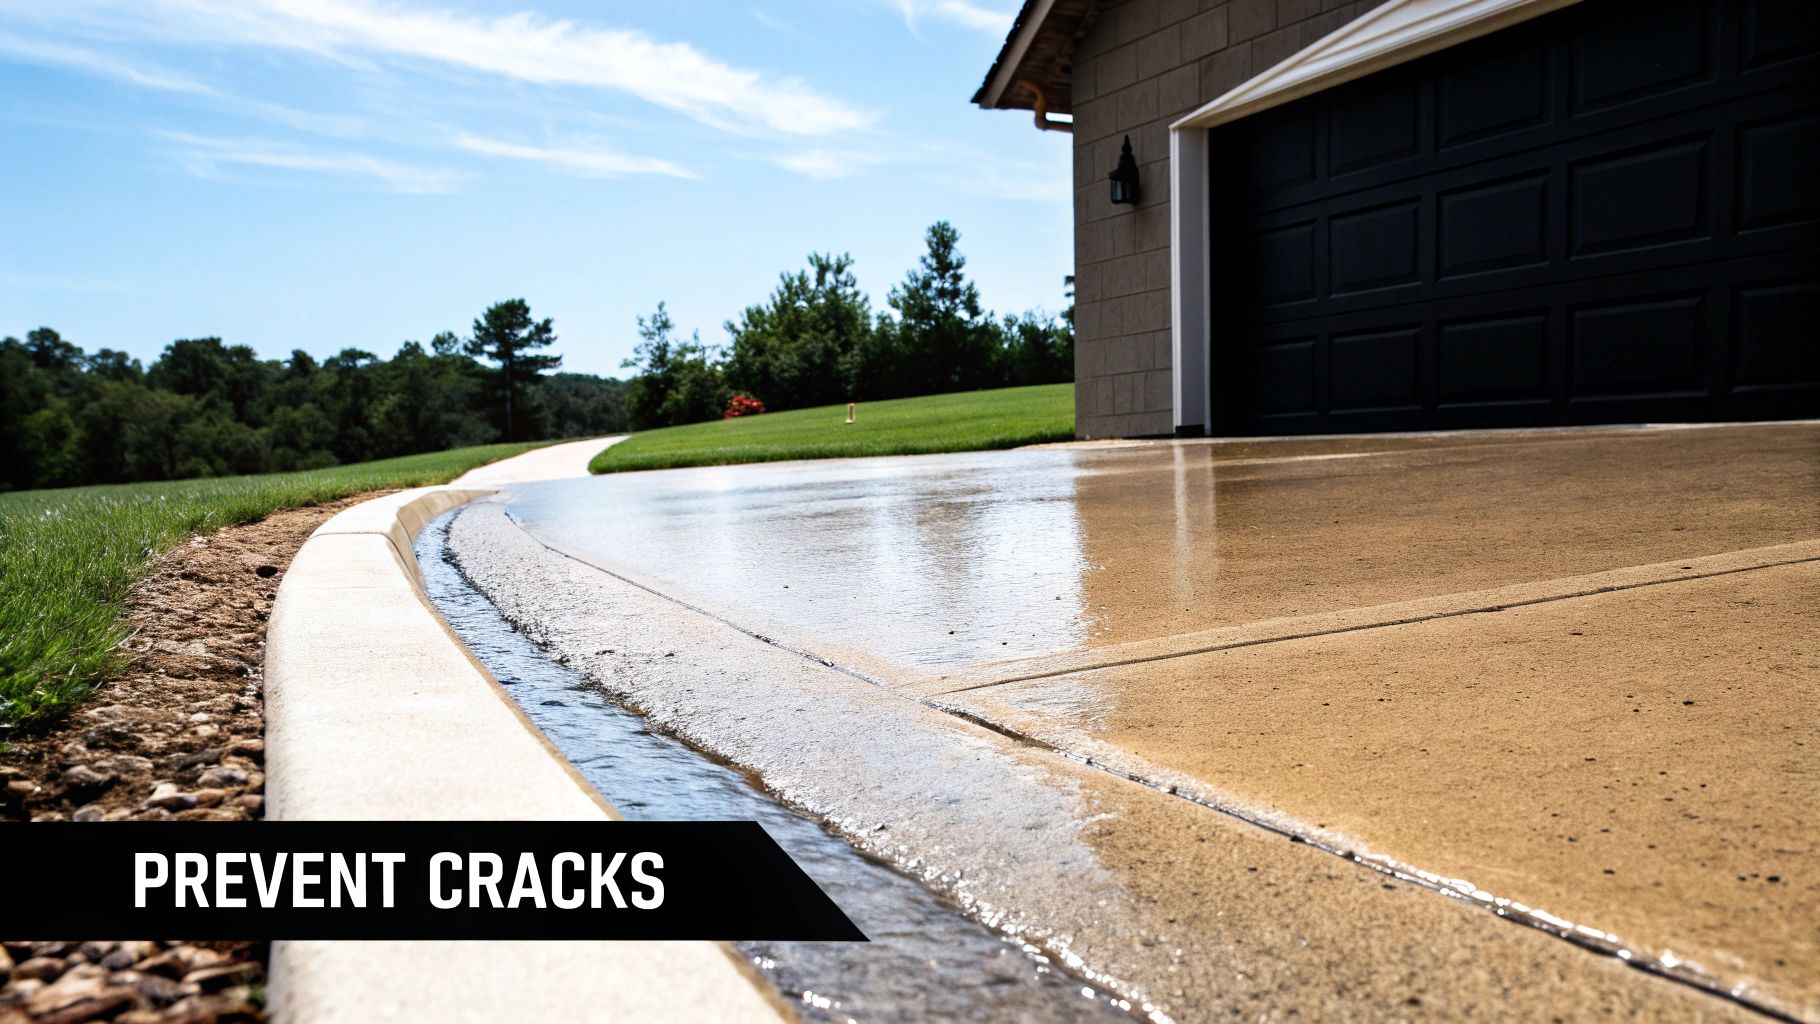
After all the time and effort you've invested in repairing your driveway, the last thing you want is to see new cracks forming. The best approach is to shift from reactive repairs to proactive maintenance. A little prevention now saves you a ton of time, money, and hassle down the line.
These aren't complicated strategies, but they are incredibly effective. By folding them into your regular home upkeep, you can defend your driveway against its biggest threats: water, shifting soil, and heavy loads. Think of it as creating an invisible shield that keeps your concrete strong and stable for years to come.
Apply a Quality Concrete Sealer
Consider a concrete sealer your driveway's most important line of defense. Concrete looks tough and impermeable, but it’s actually full of tiny pores. These pores act like a sponge, soaking up water, de-icing salts, and other chemicals that can cause serious damage from the inside out. This is especially true in winter, when trapped water freezes, expands, and literally pries the concrete apart.
Applying a quality penetrating sealer every two to three years is the single best thing you can do. This isn't just a topcoat that sits on the surface; it dives deep into the concrete's pores to create a protective chemical barrier. For instance, a silane/siloxane based sealer offers excellent water repellency without making the surface glossy or slippery.
My Two Cents: A good sealer does more than just waterproof your driveway. It also helps it shrug off oil stains, chemicals, and the corrosive salts used for de-icing. It’s a simple step that protects your investment both structurally and aesthetically.
Ensure Proper Drainage
Water is concrete's number one enemy. If you don't give it an easy way to get away from your driveway, it will find its own path—usually by seeping into the soil right underneath the slab. I've seen more major structural cracks caused by poor drainage than almost anything else.
When water pools around the edges of your driveway, it slowly erodes the compacted base material. This creates hidden voids and soft spots, leaving the heavy concrete slab with no support. Eventually, the slab gives in to gravity, sinks, and cracks under its own immense weight.
Here are a few practical ways to manage water flow:
- Check Your Downspouts: Make sure your gutter downspouts extend several feet away from the driveway. You want them dumping water onto the lawn or a designated drainage area, not against the concrete. A simple plastic extender from a hardware store can solve this common problem.
- Watch Your Grading: The soil and landscaping next to your driveway should always have a slight slope away from the concrete. If you see puddles forming after it rains, fill in those low spots with some extra soil to encourage runoff.
- Keep Joints Clean: Expansion joints aren't just for show. Keep them clear of dirt and weeds so they can do their job of channeling water off the surface.
This is something we obsess over on new installations. When we plan residential poured concrete projects, we build a solid water management plan from the very beginning to avoid these exact problems later on.
Adopt Smart Usage Habits
Finally, how you use your driveway matters. Concrete is built to be tough, but it’s not indestructible. A few small changes in your habits can make a big difference in preventing stress-related cracks.
Try to avoid parking extremely heavy vehicles—like a big RV, a loaded work trailer, or heavy construction equipment—on your driveway for long stretches. The edges are always the weakest point because they have less support underneath. Driving over the same unsupported edge day after day is a recipe for cracking. And when winter hits, be mindful of the de-icing salts you use. Always look for products specifically labeled as "safe for concrete" (like calcium chloride instead of rock salt) to prevent surface damage.
Knowing When to Call a Concrete Professional
There’s a great sense of accomplishment that comes from a successful DIY project, no doubt about it. But a big part of knowing how to fix a cracked concrete driveway is also knowing when not to. Some cracks aren't just cosmetic flaws; they're symptoms of a much bigger problem lurking underneath.
Trying to tackle these serious issues yourself can be a frustrating and expensive lesson. You could spend a whole weekend and a good bit of cash on a patch that's just going to fail in a few months, because you never addressed the real cause.
Red Flags for Serious Structural Issues
Think of your driveway as sending out an S.O.S. These are the signs that it's time to put down the trowel and call in someone with heavy-duty equipment and experience.
-
Major Gaps: If you're looking at cracks wider than one inch, that’s more than a simple fissure. It usually means the entire concrete slab has split apart from serious stress, shifting soil, or foundation issues.
-
Uneven Slabs: Is one side of the crack higher than the other? This is a huge red flag. We call this "heaving" or "sinking," and it's a dead giveaway that the ground supporting your driveway has failed. An example would be a trip hazard of half an inch or more between two sections of the slab.
-
"Alligator" Cracking: When you see a sprawling network of interconnected cracks that looks like an alligator's back, you're seeing a classic sign of sub-base failure. The very foundation your driveway was poured on is likely compromised.
Cracks this severe are almost always caused by problems you can't see, like water eroding the soil underneath, poor compaction when the driveway was first installed, or even aggressive tree roots. A professional can diagnose that root cause, something a bag of concrete patch from the hardware store just can't do.
For homeowners in the Metro Atlanta area, getting a professional diagnosis for these kinds of problems is essential. A true expert can offer solutions that go way beyond a simple filler.
For example, a sinking slab might be a candidate for slab jacking, a process where a specialized grout is injected underneath to lift the concrete back into place. This fixes the underlying support issue without having to tear everything out. If your driveway's problems seem bigger than a simple fix, your best bet is to explore professional residential driveway concrete services for a solution that’s actually going to last.
Got Questions? We've Got Answers
Even the most straightforward DIY project can throw a few curveballs your way. When it comes to driveway repair, a couple of questions pop up all the time. Getting these details sorted out beforehand can save you a world of frustration and ensure your repair holds up.
Let's start with a big one I hear often: "When's the best time to actually do this work?" Weather is your biggest variable here. Most of the products you'll be working with—sealants, patch kits, you name it—perform best in that sweet spot between 50°F and 80°F. Trying to patch a crack in the blistering summer sun or with rain on the horizon is a recipe for a weak bond and a wasted afternoon. A good example of ideal conditions would be a clear, mild spring morning.
How Long Until I Can Park on It?
Another popular question is about downtime: "How long until I can drive on the repaired spot?" This isn't a one-size-fits-all answer; it comes down to the material you've chosen.
- A simple polyurethane sealant for a hairline crack might be ready for traffic in just a few hours.
- A deeper patch using a heavy-duty, polymer-modified concrete mix? You'll need to give that 24 to 72 hours to cure properly before it can bear the weight of a car.
When in doubt, the manufacturer's instructions on the package are your best friend. For example, Quikrete's vinyl concrete patcher states it can handle foot traffic in 24 hours and vehicle traffic in 7 days. Don't rush it!
Sealant vs. Filler: What's the Difference?
Understanding your materials is key to a lasting fix. People often mix up flexible sealants and rigid fillers, but they do very different jobs.
A flexible sealant is designed to expand and contract with the concrete as temperatures change. This makes it perfect for control joints or active cracks that shift with the seasons.
A rigid epoxy filler, on the other hand, is more like a structural glue. It creates an incredibly strong, non-flexible bond that's ideal for static breaks where you need to lock the concrete back together.
Using the wrong product can cause the repair to fail almost immediately. For instance, if you put a rigid filler in an expansion joint, it will just crack again the first time the concrete expands in the heat.
Taking a moment to clear up these details ensures your hard work pays off with a durable repair, not just a temporary band-aid.
When the cracks are too much for a weekend project, it's time to call in the pros. For a professional assessment and a lasting solution in the Atlanta area, contact Atlanta Concrete Solutions for a free, no-obligation estimate.