Fixing up crumbling concrete steps isn't as daunting as it sounds. At its core, the job involves cleaning out the bad spots, using a bonding agent so the new stuff sticks, and then patching it all up with a good concrete repair mix. The real secret to a repair that lasts is getting rid of all the loose material and making sure the patch bonds like crazy to the old, solid concrete. For example, a patch that pops out after one winter almost always failed because the old, dusty concrete underneath wasn't cleaned properly, preventing the new material from forming a strong bond.
Getting to the Root of Your Crumbling Concrete Steps
Before you can jump into fixing your crumbling steps, you have to play detective and figure out why they’re failing in the first place. Concrete looks tough as nails, but it's actually a porous material with a few arch-enemies. Nailing down the root cause is the only way to pick a repair strategy that will actually work long-term.
Here in Atlanta, the most frequent offender is the freeze-thaw cycle. It’s a simple but destructive process: water gets into tiny pores and cracks, then it freezes. When water turns to ice, it expands by about 9% with incredible force, prying the concrete apart from the inside. This happens over and over, winter after winter, leading to that tell-tale crumbling and flaking.
Another major culprit is the quality of the original pour. If the concrete was mixed wrong—for example, with too much water—or didn't cure properly, it was weak from the start. Believe it or not, concrete is one of the most used materials on the planet, but its strength is all about the recipe and how it's handled. A proper mix needs a full 28 days to cure to its final design strength. Rushing that process results in a surface that just can't handle everyday foot traffic and weather. You can get a deep dive into the science of concrete over on Wikipedia.
Identifying the Type of Damage
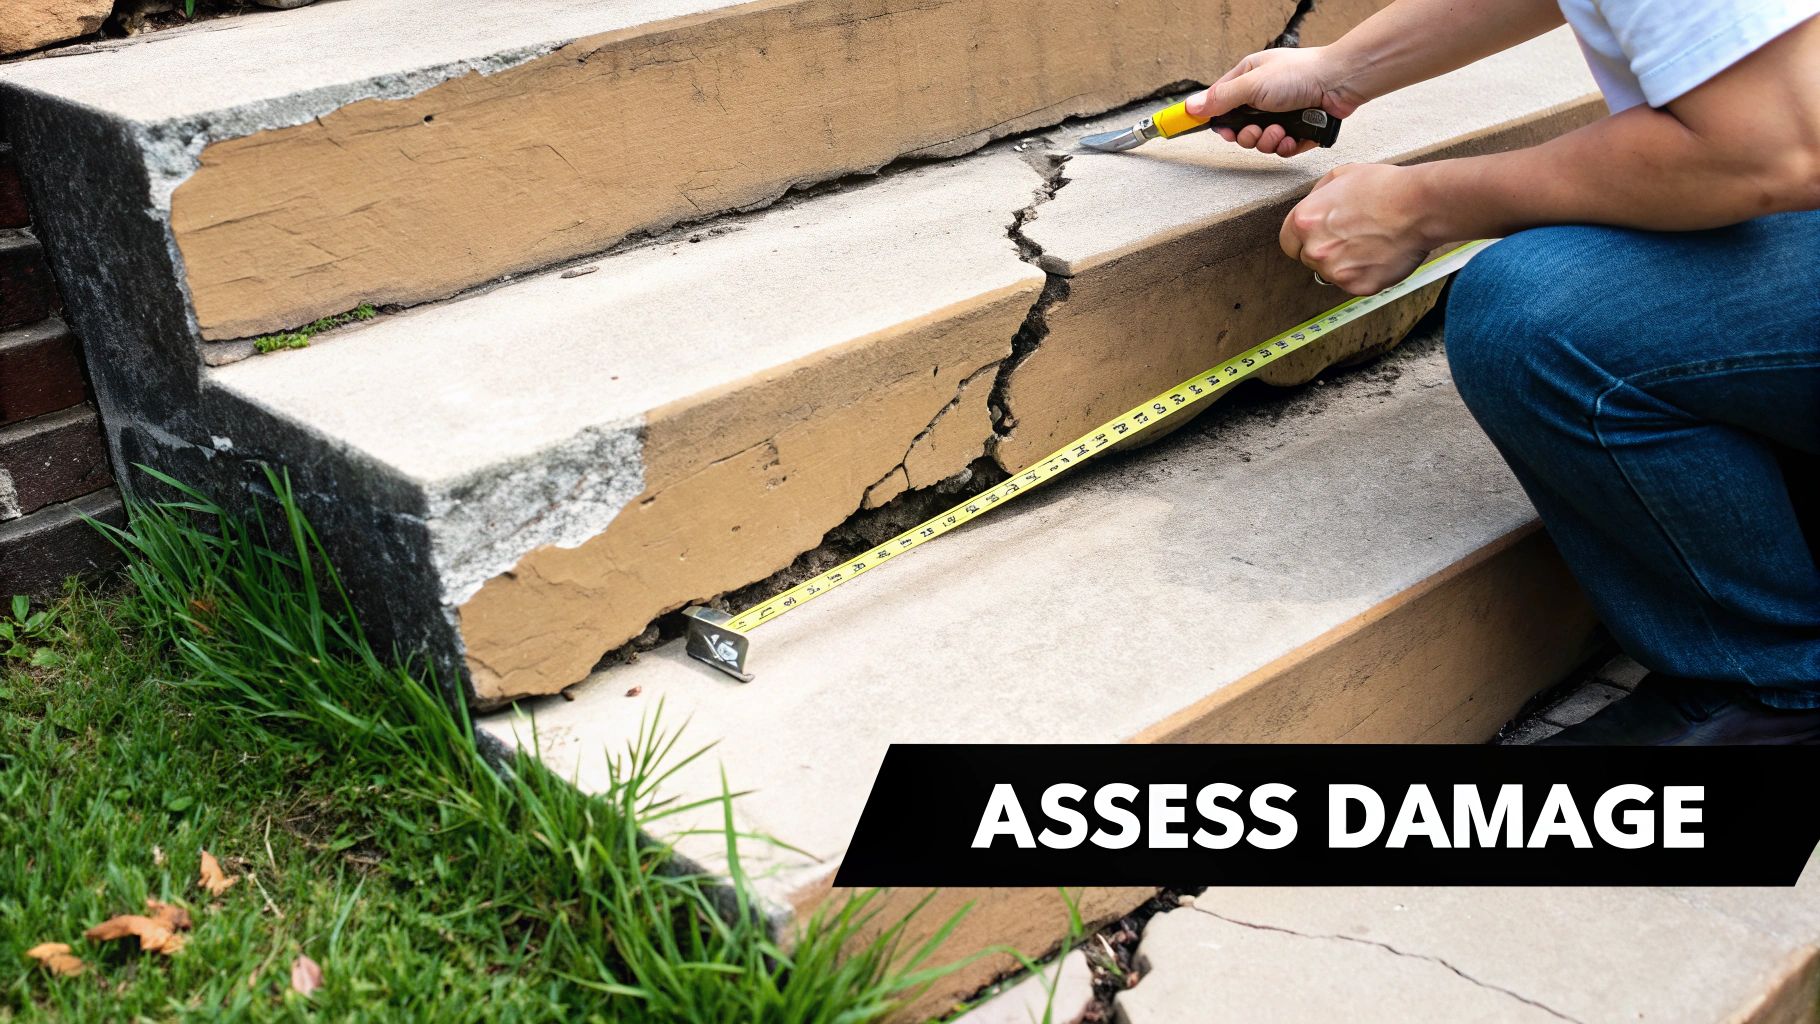
Not all concrete damage is the same, and your repair will fail if you misdiagnose the problem. You need to figure out if you're looking at a simple surface flaw or a symptom of a much bigger, more serious issue.
- Spalling or Scaling: Does it look like the top layer is peeling or flaking away, showing the gravelly stuff underneath? That's spalling. It’s almost always caused by freeze-thaw damage or harsh de-icing salts. For example, if you see a shallow, pockmarked area on the tread where people walk most, that is a classic case of spalling.
- Hairline Cracks: These are tiny, super-fine cracks that are just on the surface. They’re mostly a cosmetic problem but should be sealed to keep water from getting in and making things worse. A good example is a crack so thin you can barely fit a fingernail into it.
- Structural Cracks: These are the ones that should make you pause. If a crack is wider than a credit card, seems to go deep into the step, or spreads out like a spiderweb, you might have a problem. This can mean the ground underneath is shifting or the whole staircase is becoming unstable. For instance, a crack running vertically down the riser and horizontally across the tread indicates significant stress.
Pro Tip: Grab a screwdriver and poke around the damaged spots. If the concrete just crumbles away with a little pressure, you're dealing with more than just a surface issue. Solid concrete will resist the screwdriver tip, but compromised concrete will feel soft and gritty.
Assessing the Severity
After you've put a name to the damage, it's time to figure out how bad it really is. A small chip on the edge of a tread from dropping something heavy is a quick patch job. But if an entire corner has busted off, creating a 3-inch-wide void, you're looking at a more complex repair where you'll have to build a form to hold the new concrete as it sets.
Now, take a step back and look at the whole picture. Are your steps pulling away from the house? Do they look like they’re sinking or tilting to one side? These are major red flags. Patching the surface won't fix an underlying problem like soil washing out from under the slab or a settling foundation. These big-picture issues usually need a pro to take a look, because if they get worse, they can cause serious damage to your home. If you're seeing big gaps or your steps are noticeably sinking, it's important to understand the relationship between the steps and your home's residential concrete foundation.
This handy table can help you quickly sort out what you're seeing.
Damage Assessment Quick Guide
| Symptom | Description | Severity Level | Recommended Action |
|---|---|---|---|
| Spalling/Flaking | The top surface is peeling or chipping off, exposing aggregate. | Low to Medium | Clean, apply bonding agent, and resurface with a polymer-modified repair mortar. |
| Hairline Cracks | Fine cracks less than 1/8 inch wide on the surface. | Low | Clean the crack and fill with a flexible concrete caulk or sealant to prevent water entry. |
| Chipped Edges | Small pieces have broken off the corners or edges of the steps. | Low to Medium | Clean the area, use a form if needed, and patch with a vinyl concrete patcher. |
| Wide/Deep Cracks | Cracks wider than a credit card that extend deep into the step. | High | This may indicate structural movement. Monitor for growth. A professional assessment is recommended. |
| Sinking/Tilting | The entire staircase is uneven, tilted, or has sunk into the ground. | Very High | This points to a foundational issue. Stop and call a professional for an evaluation immediately. |
Use this as a starting point. If your issue falls into the "High" or "Very High" category, it's always best to get a second opinion before you start mixing any concrete.
Choosing the Right Tools and Repair Materials
Walking into the hardware store for a concrete repair project can be overwhelming. You're hit with a whole aisle of bags, buckets, and tubes, all promising a quick fix for your crumbling steps. It’s enough to make you turn around and walk out. But here’s the secret: picking the right product isn't about finding a magic, one-size-fits-all solution. It's about matching the material to the specific damage you’re dealing with.
I’ve seen it a hundred times—someone grabs the wrong patch, and the repair fails before the next season. For example, using a simple filler for a structural problem is like putting a band-aid on a broken arm; it might look covered, but it offers zero real strength. The success of your entire project hinges on getting the right tools and materials before you even think about mixing.
Matching the Repair Product to the Problem
That confusing patch aisle really boils down to three main types of products. Each one has a specific job, and knowing the difference is what makes a repair last.
-
Acrylic-Fortified Concrete Patch: This is your general workhorse. The acrylic polymers in the mix give it fantastic bonding strength and weather resistance. It’s my go-to for resurfacing areas where the top layer is flaking off (we call that spalling) or for filling in medium-sized chips up to about a half-inch deep.
-
Vinyl Concrete Patcher: When you need to rebuild a corner or an edge, this is what you want. It's much stickier than standard mixes and can be applied in thicker layers without sagging. That makes it perfect for those tricky vertical repairs, like reconstructing the front face (riser) of a step.
-
Epoxy-Based Fillers and Mortars: For pure, brute strength, nothing beats epoxy. It creates a bond that’s often stronger than the original concrete. If you’re dealing with deep, structural cracks or need to anchor a railing, this is the only real choice. For instance, filling a deep crack that goes through the entire step requires the unyielding strength of an epoxy mortar.
So, if the surface of your steps is just flaking away, you'd use an acrylic-fortified resurfacer and spread it on with a squeegee. But if a whole corner has broken off, you need the heavy-duty, buildable power of a vinyl patcher to reconstruct it.
One of the biggest mistakes I see is people trying to use a standard bag of concrete mix for patching. It just doesn't work. It's missing the bonding agents and fine aggregates needed for a repair, so it shrinks, cracks, and pops right out within a few months. Always grab a product specifically labeled for "repair" or "patching."
Assembling Your Essential Toolkit
Besides the patch itself, having the right tools is the difference between a frustrating mess and a repair that looks like a pro did it. You don't need a truckload of gear, but a few items are absolutely non-negotiable.
A good toolset is really about one thing: proper surface preparation. I can’t stress this enough—if you don’t give the patch a clean, solid surface to stick to, even the most expensive material will fail.
The Non-Negotiables for Preparation
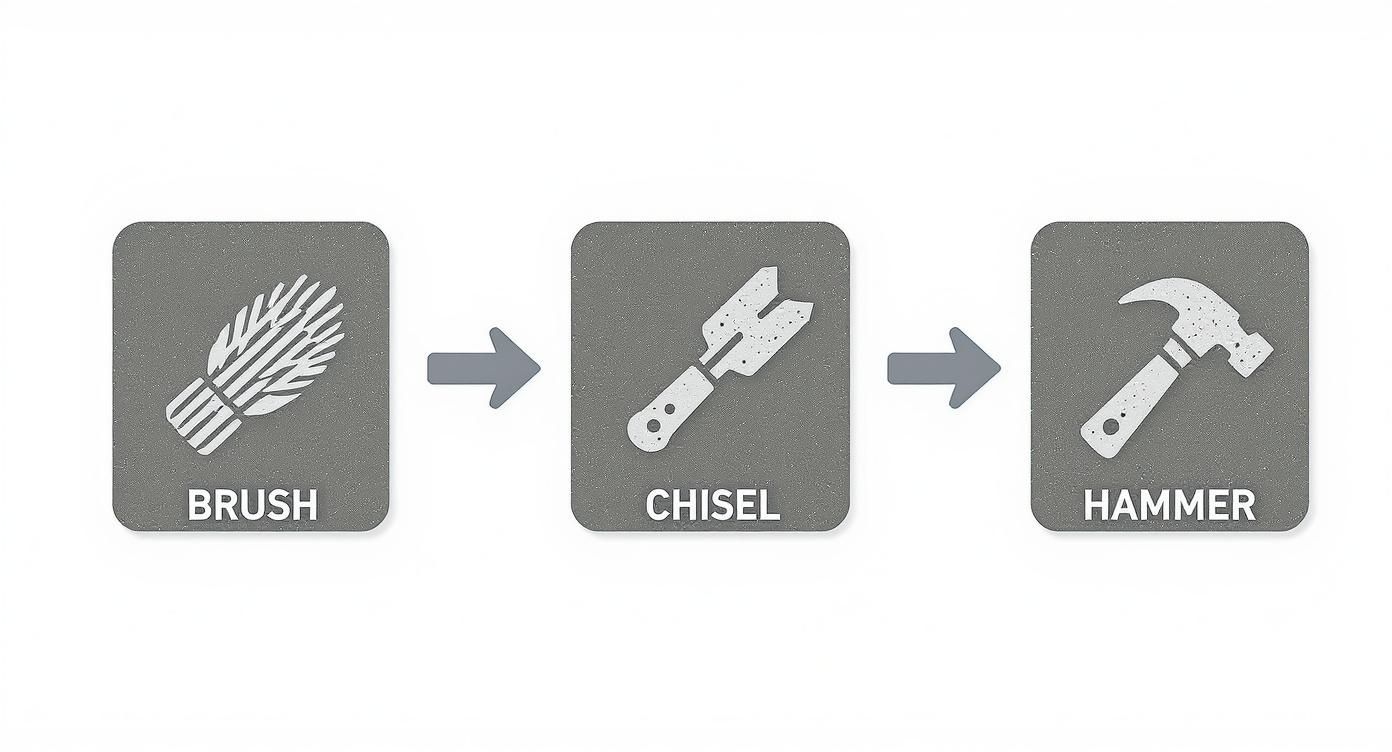
- Masonry Hammer and Cold Chisel: This classic duo is your best friend for chipping away all that weak, crumbly concrete. You have to keep going until you hit a solid, sound surface.
- Wire Brush: Once the loose stuff is gone, a stiff wire brush is crucial for scrubbing away every last bit of dust and debris that could kill the bond.
- Shop Vacuum or Blower: Don't just sweep! A powerful vacuum or blower is the only way to get the area perfectly clean and ready for the new material.
Tools for Mixing and Application
- Mixing Bucket and Trowel: You’ll need a sturdy bucket and a good pointed trowel for mixing the patch and shaping it. A 5-gallon bucket is a perfect size for most step repairs.
- Margin Trowel: This smaller, rectangular trowel is a lifesaver for forcing material into tight cracks and corners.
- Wood for Forms (If Needed): If you're rebuilding a corner, a couple of small pieces of plywood or melamine are essential for building a temporary form to hold the patch in place as it sets up.
Let's put this into practice. Say a corner of a step is gone, leaving a two-inch deep gouge. You’d start with the hammer and chisel to square up the edges of the damaged spot, then scrub it hard with the wire brush. After that, you'd build a simple "L" shaped form with two scraps of wood to recreate the corner's shape. Then, you'd mix up a vinyl concrete patcher to a thick, peanut-butter-like consistency and pack it firmly into the form with your trowel.
For larger jobs, it's always helpful to understand the full scope of professional techniques. Getting familiar with different approaches to residential concrete and masonry repair can provide valuable context and confidence for your own project.
Mastering Surface Preparation and Application
The real secret to a concrete repair that lasts isn’t the patching material itself—it's the prep work. I’ve seen it a hundred times: a patch that pops right out after the first winter is almost always because of a weak bond, and that weak bond comes from cutting corners on preparation.
You have to be aggressive here. Think of it like a surgeon removing all the unhealthy tissue before a graft.
Get to Solid Ground
First things first, you need to get rid of every single piece of weak, crumbling, or loose concrete. This isn't a job for a light touch. Grab a masonry hammer and a cold chisel and start firmly chipping away at the damaged areas.
Your goal is to keep removing material until you hear a solid, ringing sound with each strike of the hammer. That sound is your signal that you've finally hit strong, stable concrete. A dull thud means the concrete is still weak, so you need to keep chipping.
Creating a Mechanical Lock
Once you've cleared out all the junk, it's time to use a pro technique called undercutting. Instead of chipping straight down, angle your chisel so the bottom of the repair area is slightly wider than the top. You're creating a dovetail shape, sometimes called a "keyway."
This simple trick makes a world of difference. When you pack the new patch material in, it physically locks itself into place. It’s a mechanical bond that works with the chemical bond of the material, making it almost impossible for freeze-thaw cycles to push the patch out. For example, for a one-inch-deep patch, you would aim to make the cavity at the bottom about one and a quarter inches wide.
Think of it like a dentist preparing a cavity. They don't just drill a straight hole; they shape it so the filling is mechanically anchored. We're doing the exact same thing, and it's a hallmark of a professional-grade repair.
After shaping, it's cleaning time. Use a stiff wire brush to scrub every surface, dislodging any remaining dust or tiny particles. Your best friend here is a shop vacuum. Sweeping just pushes dust around, but a vacuum removes it completely, leaving a perfect surface for bonding.
The Power of a Bonding Agent
You’re clean, you're prepped, and you're ready to mix your patch. Hold on. There's one more step that separates a good repair from a great one: applying a concrete bonding agent. It’s a milky, paint-like liquid you brush directly onto the old concrete surface.
Its job is crucial. Old, thirsty concrete will suck the water right out of your new patch mix, causing it to dry too fast and fail. The bonding agent acts like a primer, sealing the old surface and creating an incredible adhesive layer that fuses the old and new materials together.
Applying it is simple:
- Use a cheap, disposable brush to apply a thin, even coat to every surface inside the repair zone.
- Make sure you work it into every little nook and cranny.
- Apply your patch material while the bonding agent is still tacky to the touch. Don't let it dry completely. If it dries, you must apply another coat before patching.
Mixing and Applying the Perfect Patch
Now, let's mix the repair material. You’re aiming for the consistency of thick, stiff peanut butter. It needs to hold its shape without slumping but still be workable. Too wet, and your patch will be weak and crack. A good example of "too wet" is if the mix runs off your trowel. Too dry, and it won’t pack in or bond well.
Once mixed, start packing the material into the cavity immediately. Use a margin trowel to force the mix firmly into all the corners and against every surface. This is vital for preventing air pockets—hidden weak spots that trap water and will destroy your patch from the inside out.
Modern repair mortars are fantastic for this. Many are quick-setting, meaning you can often walk on the steps the very same day. It's no surprise that these quick-setting cement mortars hold about 45% of the concrete restoration market share; their effectiveness is proven. You can learn more about the science behind modern concrete materials on Wikipedia.
Slightly overfill the repair area, mounding the material just a bit above the existing surface. This gives you some extra to work with when you smooth and finish it off, ensuring a perfectly level and seamless repair.
Giving Your Repair a Professional Finish That Lasts
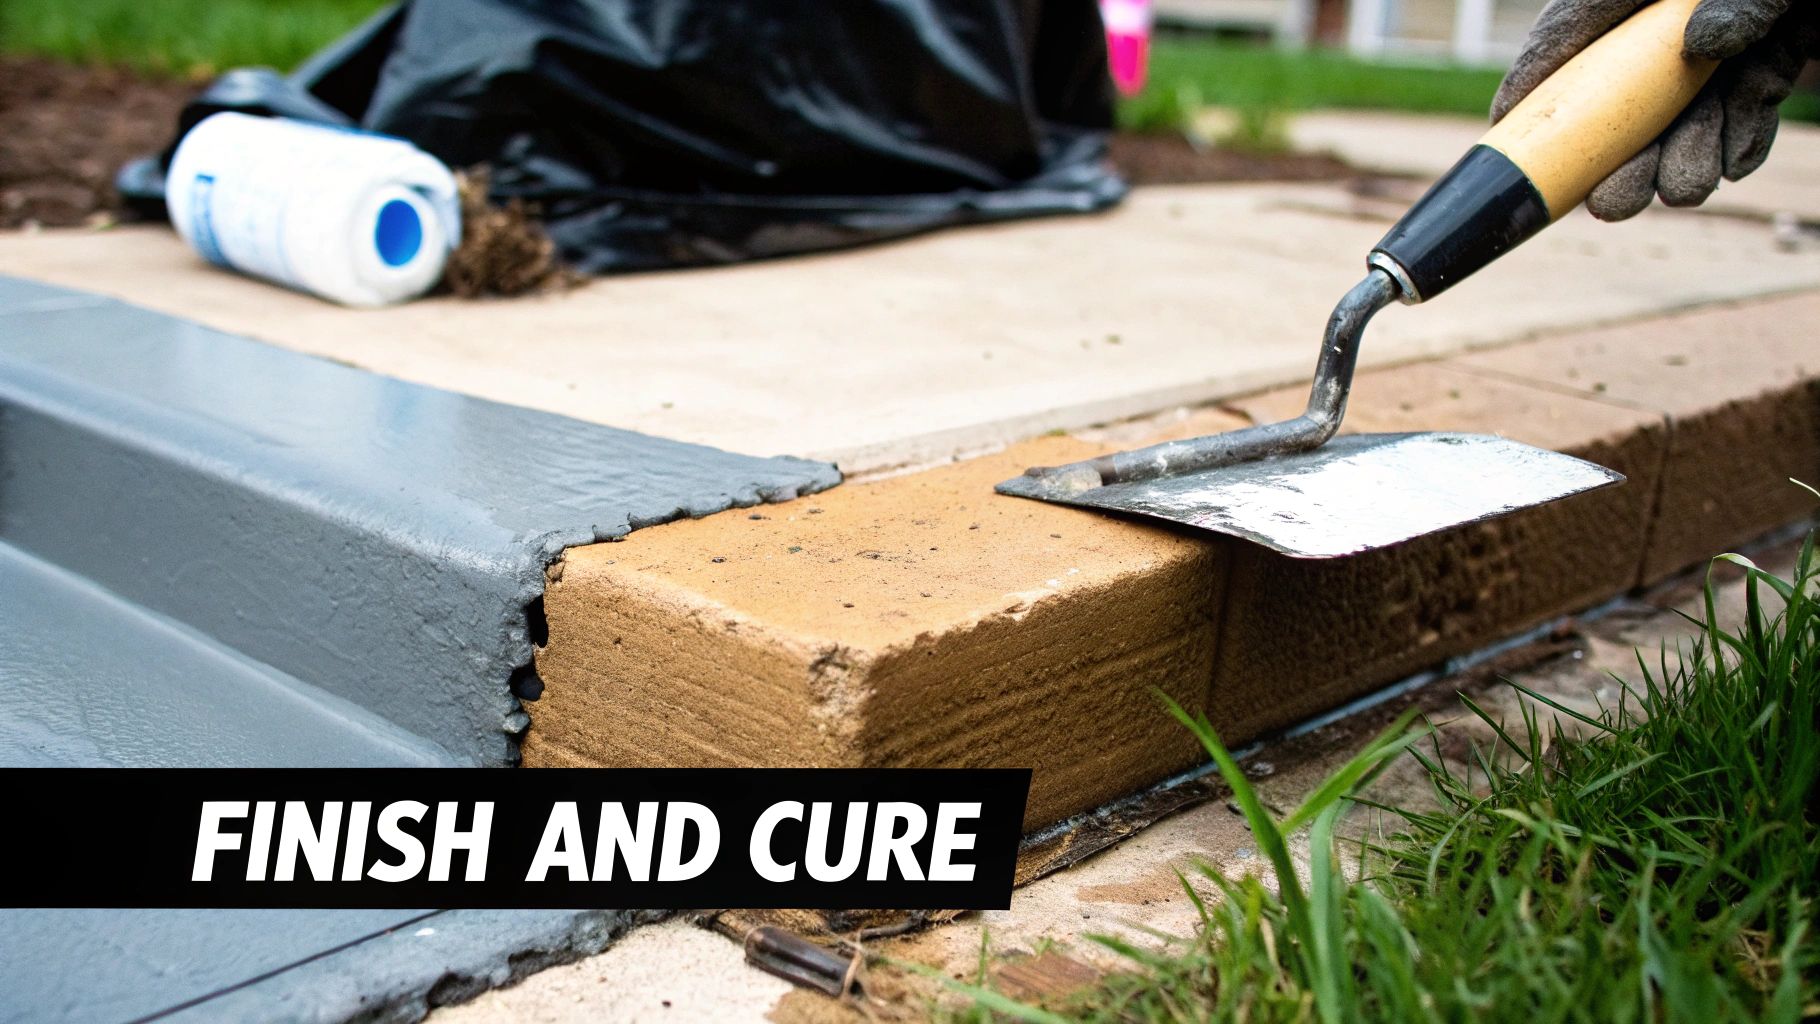
You’ve filled the gaps and packed the patch material in tight. It’s tempting to wipe your hands and call it a day, but what you do next is what separates a quick fix from a professional repair that will stand the test of time.
Finishing and curing aren't just about making it look pretty. These final steps are absolutely critical for building the strength and durability of the patch. If you skip them, you're setting yourself up for another repair job sooner than you think.
Create a Seamless, Safe Surface
The idea here is to make your patch blend in with the surrounding concrete. A lumpy, obvious patch is an eyesore, but worse, a poorly textured one can become a slippery hazard, especially on rainy Atlanta days.
You’ve got two main techniques to choose from, and the right one depends on the texture of your existing steps.
- For a Smooth Look: If your steps have a clean, flat surface, grab a damp steel trowel. Hold it at a low angle and glide it across the patch in long, smooth motions. Don't press too hard; just let the weight of the trowel do the work to create that seamless finish. For example, for a small patch, you might make two or three passes, each one lighter than the last.
- For a Non-Slip Texture: This is the one you’ll see most often on outdoor steps for good reason. Wait until the concrete patch has stiffened up a bit—it shouldn't feel soupy. Then, take a stiff-bristled broom and gently drag it across the surface in a single, straight line. This creates those fine grooves that give you traction.
A small chip on a smooth front stoop calls for a trowel finish. But for a larger repair on a main walkway, that broom finish is non-negotiable for safety and will match the original look much better.
Why Curing Is the Most Important Step You Can't See
This is where so many DIY repairs go wrong. Curing isn't just about letting the concrete dry. It’s a chemical process called hydration, where the water in the mix reacts with the cement to form super-strong crystalline bonds.
If the patch dries out too fast, that reaction grinds to a halt. The concrete will never reach its full design strength, leaving you with a brittle, weak spot that’s just waiting to crack and crumble again.
I can't stress this enough: the number one reason I see patches fail is because they weren't cured properly. People see a dry surface and assume it's done, but they've accidentally sabotaged the entire repair. A slow, moist cure is the secret to durability.
So, how do you do it right? Your goal is to keep the surface consistently damp for several days to let that chemical magic happen. It's easier than it sounds.
- The Plastic Sheeting Trick: Just lay a sheet of plastic over the repair. This traps the moisture, creating a perfect humid environment for hydration to work its wonders. For example, a simple plastic drop cloth, weighed down at the edges with rocks or bricks, works perfectly.
- The Misting Method: If you can't cover the area, use a spray bottle or a garden hose on a "mist" setting to lightly dampen the patch a few times a day. You're aiming for damp, not drenched. For instance, misting it in the morning, at midday, and in the evening for three days is a great schedule.
Seal the Deal for Long-Term Protection
Give your patch at least 7 days to cure (though 28 days is ideal for it to reach maximum strength). Once it's fully hardened, it's time for the final touch: a good concrete sealer. Think of it like a coat of wax for your car—it’s an invisible shield.
A quality sealer soaks into the pores of the concrete and creates a barrier. This barrier is your best defense against water, de-icing salts, and the brutal Atlanta freeze-thaw cycles that likely caused the damage in the first place.
Taking this step seriously puts your repair in line with professional standards. The global concrete restoration market was valued at USD 15.0 billion in 2021 and is expected to grow to over USD 20.4 billion by 2026, a clear sign of how critical proper maintenance is. You can learn more about these trends in concrete restoration on marketsandmarkets.com. By applying a sealer, you're making sure your own concrete is built to last.
Knowing When to Call a Professional
Sometimes, the smartest move you can make on a DIY project is knowing when to put the tools down and pick up the phone. While tackling minor chips and a bit of surface flaking is a great weekend warrior project, some warning signs point to much deeper issues that a simple patch will only hide for a little while.
Knowing how to fix your own crumbling concrete steps also means knowing your limits. Ignoring the big red flags doesn't just lead to bigger, more expensive repairs down the road—it creates a serious safety hazard for your family and anyone visiting your home.
Red Flags That Demand an Expert Eye
If you run into any of these problems, it’s a clear signal that the damage is more than skin deep. These are the kinds of symptoms that usually hint at underlying structural or foundation problems that need a professional diagnosis.
- Large, Interconnected Cracks: A tiny hairline crack isn't a huge worry. But if you're seeing cracks wider than a credit card that zigzag across multiple steps, you're looking at a potential structural failure. For example, a step that has cracked all the way through from front to back is a major structural concern.
- Noticeable Sinking or Tilting: Do your steps look like they're pulling away from the house? Or maybe they're leaning heavily to one side? This is a classic sign of soil washing out from underneath or a foundation settlement issue that no amount of patching on top can fix. A specific example would be if the top step, once flush with your porch, now has a one-inch gap.
- Widespread Crumbling: If the spalling and crumbling covers more than 25% of the surface area of your steps, you’ve moved past a simple patch job. At this stage, you’re really looking at a major resurfacing project or a complete tear-out and replacement.
Think of it this way: patching a deeply cracked and sinking step is like putting a brand-new tire on a car with a broken axle. Sure, you’ve addressed a symptom, but the root cause is still there, just waiting to cause more problems.
Understanding Deeper Structural Issues
Often, the crumbling you see on the surface is just the last, most visible stage of a much bigger problem. Here in Atlanta, poor water drainage is a common culprit. If water is constantly pooling around the base of your steps, for example, from a misplaced downspout, it can easily wash away the compacted soil that’s holding them up, causing them to sink and crack under their own weight.
In more serious cases, shifting steps can actually be tied to your home’s main foundation. This is a real possibility if you're also seeing other warning signs inside, like doors that suddenly stick or new cracks showing up in your drywall. When you see these things happening together, it's time for a concrete specialist to find out what's really going on.
A professional assessment can save you thousands in the long run. It's far better to pay for an expert opinion now than to perform a DIY repair that fails and then have to pay for an even bigger professional fix later.
Building Codes and Professional Compliance
Finally, don't forget that serious structural work almost always falls under local building codes. Major concrete repairs, especially anything connected to your home’s foundation, will likely require permits and inspections to make sure the work is safe and up to standard. For example, replacing an entire staircase requires adherence to specific codes regarding riser height and tread depth. A licensed contractor like Atlanta Concrete Solutions knows all the local requirements and will handle the job correctly, protecting your home's value and integrity.
The concrete restoration market is a huge part of the construction industry, valued at around USD 9.5 billion back in 2022 and still growing. This just shows how critical it is to maintain aging structures safely. You can find more details about these industry trends at foamworkspro.com.
If your project feels like it's getting too big to handle, exploring our professional concrete repair services is the best way to get a safe, durable, and code-compliant solution.
Questions That Come Up When Repairing Concrete Steps
No matter how well you plan, you're bound to hit a snag or have a question pop up right in the middle of a project. When you’re dealing with crumbling concrete, getting the right answer quickly can save you from a world of frustration. Here are some of the most common questions we hear from homeowners, answered from years of hands-on experience.
How Long Will My Concrete Patch Actually Last?
This is the big one, isn't it? The lifespan of your repair really boils down to two things: how well you prepped the surface and what material you used.
If you do the job right—meaning you chip away all the weak, crumbling bits and use a quality bonding agent—that patch can easily hold up for 10 years or more. But if you cut corners on cleaning or grab the wrong repair mix, you might be looking at the same problem again after just one winter. The freeze-thaw cycle is unforgiving and will find any weakness in the bond. A classic example of a failed patch is one that pops out in a single, solid piece, indicating a complete bond failure.
Can I Fix My Steps When It's Really Hot or Cold Out?
This is a critical question, especially with Atlanta's unpredictable weather. Most concrete repair products are a bit like Goldilocks; they need the temperature to be just right, usually somewhere between 50°F and 90°F (10°C to 32°C).
- Working in the Cold: If it's too chilly, the chemical reaction that gives concrete its strength (hydration) grinds to a halt. The patch simply won't cure properly, leaving it weak and prone to failure. For instance, applying a patch when it's 40°F might result in a repair that never fully hardens and crumbles away.
- Working in the Heat: On a scorching summer day, the water in your mix evaporates way too fast. This starves the curing process, leading to a brittle patch that’s likely to develop shrinkage cracks. A 95°F day with direct sun is a recipe for a failed patch.
A Pro's Trick: If you have to work on a hot day, aim for the early morning or wait until the evening when things cool down. You can also give the old concrete a light misting of water right before applying the patch. This slows down the moisture wicking from your new mix, giving it a better chance to cure correctly.
What's the Real Difference Between Mortar and Concrete Mix?
This is a common mix-up that can completely derail a repair. They might look similar in the bag, but they are built for totally different jobs.
- Concrete Mix has large aggregates (gravel) in it. It’s designed for pouring thick, structural things like slabs and footings. It’s not sticky and won't bond well in thin layers, making it a terrible choice for patching. For example, trying to patch a one-inch-deep chip with concrete mix would be impossible because the gravel pieces are too large.
- Mortar Mix uses only fine sand, cement, and lime. It's much stickier and is made for bonding bricks and blocks together. While it’s better than a concrete mix, it's still not the best tool for this job.
Your best bet is always a dedicated concrete repair mortar. These products have polymers and other additives that drastically improve bonding, strength, and weather resistance—far beyond what standard mortar can do. The industry knows this, which is why the market for these specialized materials is projected to grow from $3.31 billion in 2025 to $6.54 billion by 2034. It just goes to show how crucial using the right product is for a lasting fix. You can find more insights about this growing market on foamworkspro.com.
Can I Get the New Patch to Match the Color of My Old Steps?
Getting a perfect color match is probably the toughest part of any concrete repair. New, wet concrete is always darker and will lighten up as it cures over the next few weeks and months.
For smaller patches, the difference in color often fades over time as everything weathers together. But for larger, more noticeable repairs, you've got a couple of good options:
- Mix in a Color Additive: You can buy liquid or powdered cement dyes to tint your patch material. This takes a bit of experimenting—mix a small test batch and let it dry on some cardboard to see the final color before you commit. For example, start with half the recommended amount of dye and adjust from there.
- Paint or Stain Everything: Once the patch has fully cured (give it at least 30 days), you can simply paint or stain the entire staircase. This is often the easiest way to get a perfectly uniform, clean finish.
If your steps have extensive crumbling, deep structural cracks, or if you'd rather just have a guaranteed, professional result, the team at Atlanta Concrete Solutions is ready to help. Our experienced technicians deliver durable, safe, and attractive concrete repairs that are built to last. Reach out today for a free, no-obligation quote and let's restore the safety and curb appeal of your home. Find out more at https://atlantaconcretesolutions.com.