Ready to transform that boring, gray concrete patio into a stunning outdoor living space? Staining is a fantastic way to do it. We're not talking about painting, which just sits on the surface waiting to chip and peel. Concrete stain actually penetrates the slab, creating a rich, permanent color that looks a whole lot more expensive than it is.
For example, a simple cola-colored acid stain can turn a standard builder-grade patio into a surface that mimics the warm, earthy look of Tuscan stone. The result is a unique, marbled look that lets the natural character of the concrete shine through. It's a project that delivers serious bang for your buck, adding both style and value to your home.
So, Why Stain Instead of Just Painting?
It's a common question, and I get it. Painting seems easier, right? But in my experience, it's a short-term fix that leads to long-term frustration, especially outdoors.
Let's break down why staining is the superior choice:
- It Lasts: Stain doesn't form a film on top of the concrete. It either reacts chemically (acid stains) or soaks into the pores (water-based stains). This means no chipping, no peeling, and no fading away after one sunny season. A painted patio, for example, often starts to bubble and peel near high-traffic areas like doorways or under furniture legs within a year.
- It Looks Better: Honestly, there's no comparison. Stain gives you a deep, translucent color with subtle variations—something that looks organic and high-end. Paint gives you a flat, opaque finish that often looks cheap and artificial. Imagine the difference between stained wood grain and wood that's been painted a solid brown; one has depth and character, the other is just a flat color.
- Less Work in the Long Run: A properly stained and sealed patio will look great for years. A painted one? You'll likely be scraping and repainting every couple of years. Who has time for that?
This isn't just a niche trend; homeowners everywhere are catching on. The North American concrete stain market is already valued at about USD 1.8 billion in 2024 and is projected to hit USD 3.1 billion by 2034. That booming interest means you have more and better products to choose from than ever before. If you're curious about the numbers, you can read more about this market growth.
In this guide, I'll give you the practical, no-fluff advice you need to get a professional-looking finish on your own. Let's get started.
Choosing Your Stain: Acid-Based vs. Water-Based
Before you even think about buying a roller or a sprayer, you have to make a fundamental decision that will shape the entire look and feel of your patio project. Are you going for an acid-based stain or a water-based one? This isn't just about picking a color from a chart; it's about choosing the very character of your finished surface.
These two types of stains are completely different animals. An acid stain works through a chemical reaction, becoming a permanent part of the concrete itself. A water-based stain, on the other hand, is more like a high-tech dye that soaks into the concrete’s pores. Let's dig into what that really means for your patio.
The Classic Look of Acid-Based Stains
If you’ve ever seen a concrete floor with a rich, marbled, almost stone-like appearance, you were probably looking at an acid stain. This is the old-school, traditional method, and for good reason—the results are timeless.
It works by using a solution of metallic salts and hydrochloric acid to react with the free lime (calcium hydroxide) in your concrete. This reaction literally etches the color into the surface. Since every concrete slab has a slightly different chemical makeup, the final look is always a one-of-a-kind creation. For example, a stain labeled "Walnut" might appear as a deep, rich brown on one patio but have subtle amber highlights on another due to variations in the original concrete mix.
Here’s what you get with an acid stain:
- Earthy Color Palette: The color choices are limited to a range of natural tones—think rich browns, warm tans, terracotta reds, and some soft blue-greens. You won't find a bright purple or fire engine red in an acid stain lineup.
- Variegated Appearance: You won't get a solid, painted look. Instead, you'll see beautiful, mottled variations in tone and depth that look incredibly organic.
- Permanent Results: Because the color is chemically bonded to the concrete, it’s extremely durable. It won’t chip, fade, or peel.
An acid stain is your go-to if you’re after a sophisticated, rustic, or old-world vibe. It beautifully highlights the natural texture and imperfections of the concrete, making them part of the charm.
The Vibrant World of Water-Based Stains
Water-based stains are the modern alternative, offering a level of control and a color palette that acid stains just can't match. Instead of a chemical reaction, these products use microscopic pigment particles suspended in a water-based acrylic solution. These particles flow into the concrete’s pores, depositing color as they go.
This process results in a much more predictable and consistent finish. If you need to match a specific color in your outdoor furniture or want a bold, contemporary look, a water-based stain is almost certainly the right choice. For instance, if you have navy blue patio cushions, you can find a water-based concrete stain in a similar shade to create a cohesive design. The color spectrum is massive, from subtle grays and beiges to bright blues, deep reds, and even jet black.
Pro Tip: The real magic of water-based stains is the creative freedom they offer. You can easily layer different colors, blend them for a custom shade, or use them with stencils to create intricate patterns. For example, you could apply a light tan base coat and then use a sea sponge to dab on a darker brown, creating a faux stone effect. This is something you simply can't do with an acid stain.
Let’s say you want a deep charcoal gray patio to complement the modern trim on your house. A water-based stain can nail that exact shade. On the flip side, if you're dreaming of a warm, leather-like brown with organic high and low spots, an acid stain will deliver that character far better.
Making the Right Choice for Your Project
To help you lock in your decision, it helps to see the two options side-by-side. Think about the aesthetic you’re aiming for, the current state of your concrete, and how hands-on you want to be during the application process.
This table breaks down the key differences to help you choose the right stain for your patio.
Comparing Acid-Based and Water-Based Concrete Stains
| Feature | Acid-Based Stain | Water-Based Stain |
|---|---|---|
| Final Appearance | Mottled, variegated, and translucent with natural color variations. | More opaque and uniform, offering a consistent color finish. |
| Color Options | Limited palette of earthy tones (browns, tans, terra-cottas, soft greens). | Wide spectrum of vibrant colors, including bold primary colors, pastels, and black. |
| Application | Requires a neutralizing step with ammonia or baking soda after application. | Simpler application; no neutralization needed, just a clean water rinse. |
| Forgiveness | Less forgiving of surface imperfections; blemishes can become more apparent. | More forgiving; can help mask minor flaws and color inconsistencies in the concrete. |
| Environmental | Contains mild acids; requires more safety precautions (gloves, goggles, ventilation). | Low VOC (Volatile Organic Compounds) and low odor, making it more eco-friendly. |
In the end, there’s no single "best" choice here—only what’s best for your project. An acid stain delivers a unique, timeless finish that truly becomes one with the concrete. A water-based stain gives you vibrant color, predictability, and a ton of creative flexibility. Let your vision for the final space be your guide.
Getting the Surface Ready: The Most Important Step for a Lasting Finish
Let’s get one thing straight: the absolute most critical part of your entire patio staining project is the prep work. If you cut corners here, I can almost guarantee you'll be unhappy with the results.
Think of it like this: your concrete is a canvas. Stain is translucent, meaning it’s designed to enhance the concrete, not cover it up like paint. Every single grease spot from the grill, every old leaf stain, and any leftover sealer will show right through the final coat. For example, a faint rust mark from an old metal planter will be permanently highlighted by the stain if not removed first. A perfectly clean surface isn't just a friendly suggestion—it’s the only way to get a finish that looks professional and actually lasts.
Deep Cleaning Your Patio
First things first, you need to give that patio a serious deep clean. Your mission is to get rid of every bit of dirt, grime, mildew, and oil that has built up over the years. A quick spray with the garden hose won't cut it.
You'll need a pressure washer for this. But be careful—blasting it on the highest setting can permanently etch lines into your concrete. A good starting point is a 25-degree (green) or 40-degree (white) tip, holding it about 12 inches from the surface. It’s worth taking a moment to understand choosing the correct pressure washer spray tips to avoid damaging the very surface you're trying to improve.
Got some nasty oil or grease stains? You'll need a dedicated concrete degreaser. Follow the directions on the bottle, give it a good scrub with a stiff-bristled brush, and then hit it with the pressure washer. Oil and stain are enemies; any oily residue left behind will actively repel the stain, leaving you with a blotchy mess.
Stripping Off Old Sealers and Coatings
A lot of concrete patios, especially older ones, have been sealed at some point. If your patio has ever had that glossy, "wet" look, it’s a safe bet there’s a sealer on it. You must get it off. New stain can't penetrate a sealed surface. Period.
Not sure if it’s sealed? Here’s a simple trick: sprinkle a little water on the concrete. If the water beads up like on a freshly waxed car, you’ve got a sealer to strip. If it soaks in right away and darkens the concrete, you're probably good to go.
Chemical strippers are your best bet for getting rid of old acrylic sealers. It's a bit of a process, but it's straightforward:
- Apply the stripper: Pour or spray it evenly across the patio.
- Let it dwell: Give the product time to work its magic and soften the old sealer. This can take anywhere from 20 minutes to several hours depending on the product.
- Scrape and scrub: Use a long-handled scraper and a stiff brush to lift up all that gummy, dissolved gunk.
- Clean it all off: Finally, pressure wash the entire patio to remove every last trace of the stripper and sealer residue.
Yes, it's a workout. But skipping this step is a recipe for failure. Your new stain simply won't stick.
Opening Up the Pores of the Concrete
Once your patio is clean and stripped, there's one last prep step: opening up the pores of the concrete. This is called "profiling," and it gives the slab the right texture to absorb the stain deeply and evenly. Concrete that's too smooth, like a garage floor that has been power-troweled to a mirror finish, just won't take stain well.
What you're aiming for is a texture that feels like 120-grit sandpaper. In the industry, we call this a Concrete Surface Profile (CSP) of 1-2.
You’ve got two main ways to get there:
- Chemical Etching: This involves using a mild acid (like phosphoric or muriatic) to dissolve the very top layer of the concrete and open up the pores. It’s a good DIY option, but you have to be careful with the chemicals and make sure you neutralize the surface properly afterward. A common product is a concrete etching solution found at most hardware stores.
- Mechanical Grinding: For really smooth surfaces or slabs that had thick coatings, grinding is the way to go. You’ll use a concrete grinder with a diamond-abrasive disc (for example, a 40-grit or 80-grit disc) to physically rough up the surface. It’s more intense and might mean renting a machine, but it gives you the most consistent and reliable surface for stain absorption.
If you uncover big cracks or areas where the concrete is flaking (spalling) during this process, you need to fix them before you stain. For folks in the Atlanta area dealing with these kinds of underlying issues, it might be wise to get a professional opinion. You can find more on expert residential decorative concrete to make sure your patio is solid before you make it beautiful.
The Water Drop Test: How to Know You're Ready
So, how do you know for sure if your concrete is ready to drink up that stain? Use the water drop test. After all your cleaning, stripping, and profiling is done and the slab is completely dry, just sprinkle a few drops of water on it. If the water soaks in within 30-60 seconds, you're golden. If it just sits there beaded up, the pores are still sealed, and you've got more profiling to do.
This chart gives you a quick visual on how differently acid and water-based stains behave on a properly prepped surface.
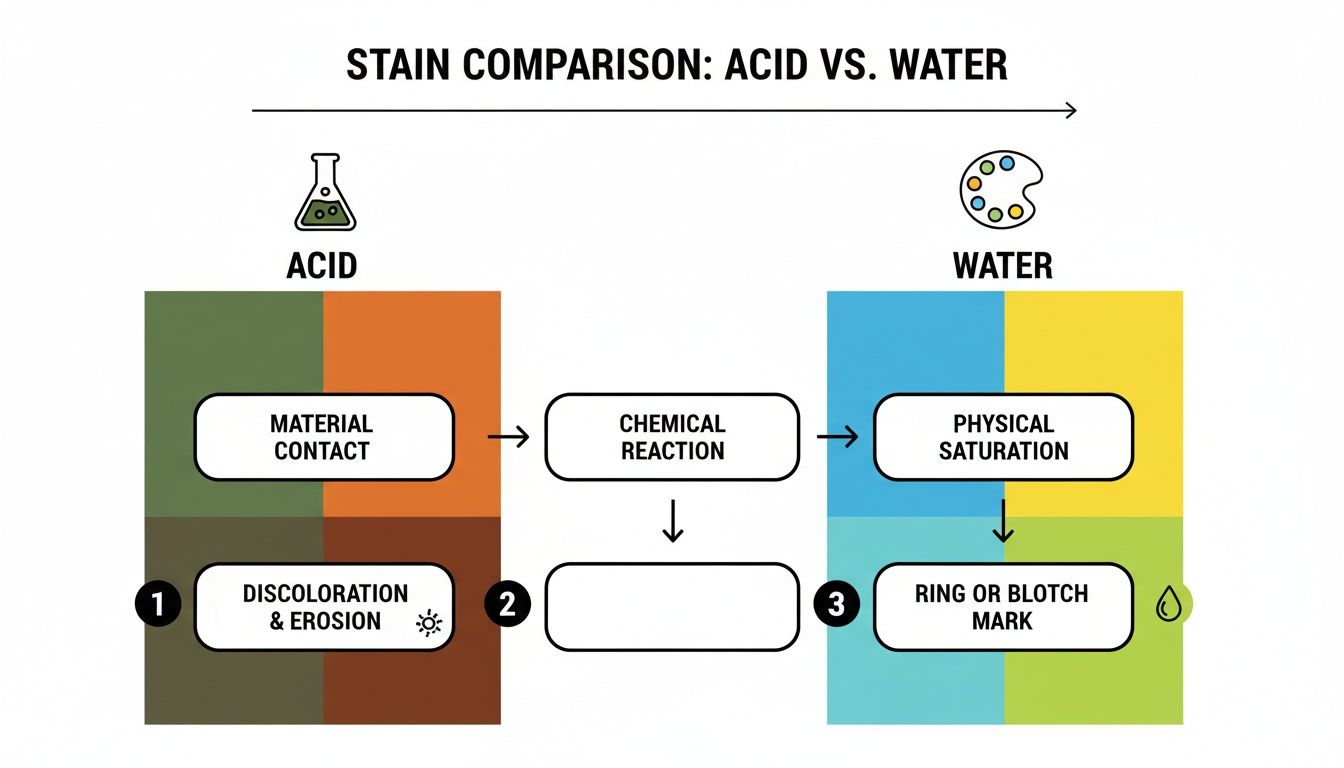
As you can see, acid stains create a more mottled, natural look, while water-based stains provide a more uniform and predictable color. No matter which you choose, good prep is what allows the concrete to accept the stain beautifully and deliver the result you want.
Getting the Stain Down for a Pro-Level Finish
Alright, your concrete is clean and ready. Now for the fun part—the part where that boring gray slab starts to come to life. Applying the stain is where your vision truly takes shape.
This isn't a step you want to rush. The difference between a project that looks like a weekend DIY job and one that looks like a professional crew did it comes down to a careful, methodical application. Haste here can lead to streaks, blotches, and uneven color that are a real pain to fix later. Let's walk through the right way to do it.
Protect Your Surroundings First
Before you even think about popping the top on that stain, your first job is to protect everything you don't want stained. Trust me, overspray is a sneaky enemy that can permanently discolor siding, brick, door frames, and your prize-winning rose bushes.
Grab your painter's tape and plastic sheeting. Get meticulous about masking off any adjacent surfaces. For example, run a line of tape along the bottom edge of your vinyl siding, then attach plastic sheeting to that tape, letting it drape down to the ground. Cover the bottom few feet of your house's siding, foundation walls, and any nearby planters or light fixtures. A little extra time spent here will save you a massive headache down the road.
Pro Tip from the Field: Always, always test your stain on a small, hidden spot first. Find a corner where a grill or large planter will live. Concrete is a finicky material; its age, porosity, and even the original mix will change how it takes the stain. That test patch is your only guarantee that you'll love the color before you're committed to the whole patio.
The Art of Spraying It On
For most patios, nothing beats a simple pump-style garden sprayer for applying concrete stain. Look for a model with a plastic wand and acid-resistant seals, especially if you're using an acid stain. It allows you to lay down a fine, even mist, which is exactly what you need for that beautiful, variegated look. Trying to use brushes or rollers almost always leaves obvious lines and marks you'll regret.
The whole game is about applying the stain in light, overlapping layers. Here’s a technique we’ve perfected over the years:
- Fill your sprayer and pump it up according to the directions.
- Start in a back corner—the one farthest from the door—so you can work your way out without painting yourself into a corner.
- Use gentle, sweeping circular motions with the sprayer wand, keeping the tip about 18-24 inches from the concrete.
- Overlap each pass by about 50%. This is the secret sauce for preventing hard lines and getting a soft, natural blend.
Whatever you do, don't spray in straight lines like you're mowing the lawn. It’s that organic, almost random-looking circular pattern that produces a high-end finish. Also, be sure to keep a "wet edge"—never let the edge of a stained area dry before you blend the next section into it.
If this level of detail feels a bit overwhelming, you're not alone. For homeowners in the Atlanta area who want to guarantee a flawless outcome, looking into professional residential decorative concrete services can offer both peace of mind and a truly stunning result.
Don't Forget to Neutralize (For Acid Stains)
Did you opt for an acid-based stain? If so, there's one more non-negotiable step after the stain has worked its magic (usually a few hours). You must neutralize the acid. This stops the chemical reaction and, just as importantly, prevents a chalky white residue from appearing later.
It’s straightforward, but you can’t skip it.
- Mix up your solution: Add a box of baking soda or one cup of ammonia to a gallon of water. A five-gallon bucket is perfect for this.
- Apply it generously: Flood the entire stained surface with your neutralizing solution.
- Scrub it down: Using a stiff-bristled brush, give the whole patio a good scrub. You should see some foaming, which is how you know it's working.
- Rinse, rinse, rinse: Finally, rinse the whole area with clean water until every last bit of residue is gone. A wet/dry vac can be a lifesaver here for sucking up the slurry. It might take two or three passes.
If you went with a water-based stain, you can breathe easy. This step isn't necessary. Just a simple cleanup with water after the stain has dried is all you'll need.
Sealing and Curing Your New Patio Surface
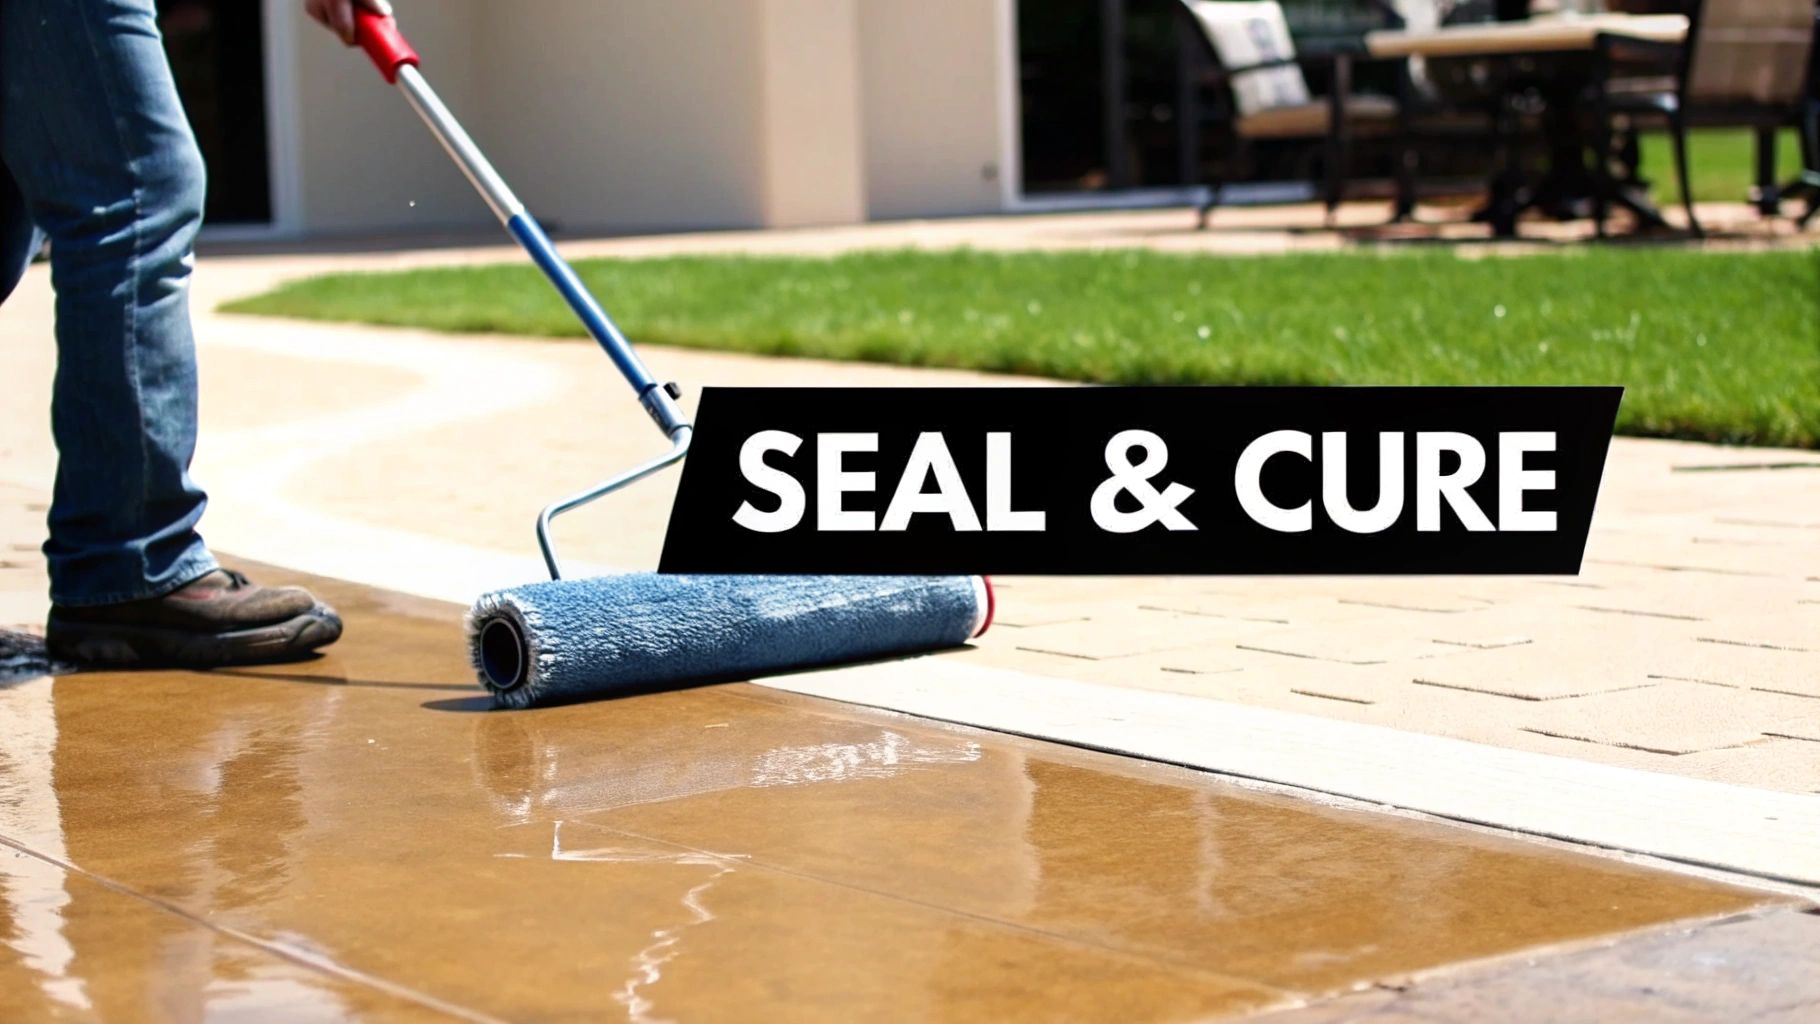
You’ve done the hard work, and your patio is looking fantastic. But don't celebrate just yet. Skipping this final step is like framing a masterpiece without putting glass over it—it leaves your beautiful work completely exposed to the elements.
Sealing isn't just a suggestion; it’s the essential last step that protects your investment. A good sealer locks in the stain, defends against UV rays and spills, and adds a beautiful sheen that makes the whole project look professionally done.
Choosing the Right Sealer for Your Patio
For an outdoor patio, you absolutely need a high-quality, UV-stable acrylic sealer. These are made specifically for exterior use and won't turn yellow after a season in the sun, which is a common problem with cheaper, interior-grade products.
You'll generally choose between two main finishes:
- Matte or Natural Look: This finish gives you solid protection without adding much shine, which is perfect if you want to keep the earthy, organic look of the stain.
- High-Gloss or "Wet Look": This is a really popular option that makes the color pop. It dramatically enhances the stain's depth and gives the patio a polished, reflective surface.
Your choice of sealer finish can completely change the final look. For example, a high-gloss sealer can make a simple brown stain look like rich, polished stone, while a matte finish keeps things more subtle and rustic. Think about the overall style of your home and garden when you make your decision.
While we're focused on concrete, understanding how different protective coatings work can be helpful. You can find some good insights on choosing an effective sealant that apply across various materials. The core principles of durability and protection are often universal.
Applying the Sealer for a Streak-Free Finish
The application itself is pretty straightforward, but your technique is what counts. The goal here is thin, even coats. One of the most common DIY mistakes is applying the sealer too thickly, which leads to a cloudy, hazy finish that’s a real headache to fix.
Grab a short-nap roller (a 3/8 inch nap is ideal) designed for smooth surfaces. Start in a corner and work your way out in small, manageable sections, like a 4×4 foot square. Just like with the stain, you need to maintain a "wet edge" to avoid leaving obvious roller marks where you stop and start.
Most projects will need two thin coats for the best protection. Make sure to read the manufacturer's instructions for the recommended drying time between coats—it's usually a few hours. This multi-layer approach gives you complete coverage and a much more durable shield. If you're really aiming for that flawless, glass-like surface you see in showrooms, checking out how pros create a professional finish can give you some great tips.
Patience Is a Virtue: The Curing Process
Once the final coat of sealer is down, the waiting game begins. This is the curing period, and it’s different from just drying. This is when the sealer chemically hardens to achieve its maximum strength and durability.
- Light Foot Traffic: After about 4-6 hours, you can typically walk on the surface in socks.
- Heavy Foot Traffic: Give it a full 24-48 hours before allowing regular shoe traffic or letting pets onto the patio.
- Moving Furniture Back: Hold off for at least 72 hours before moving heavy furniture, grills, or large planters back. Dragging a chair leg across a semi-cured sealer can leave a permanent scratch.
Giving your newly stained patio a full three days to cure is the best insurance you can buy. It guarantees a tough, long-lasting finish that will keep your patio looking great for years to come.
Troubleshooting Common Staining Issues
Even when you follow every instruction to the letter, concrete has a mind of its own. It’s part of its character. So, don't panic if you see a few imperfections after the stain dries. Most common issues are entirely fixable and just part of the learning curve.
From blotchy patches to stubborn spots that just wouldn't take the color, a few simple techniques can save the day. The trick is to tackle these problems before you lay down that final sealer, because once it's on, those mistakes are locked in for good.
Fixing Common Application Glitches
One of the most frequent headaches I see is uneven color or tell-tale lines from the sprayer. This usually happens from moving a little too fast or not quite getting the overlap right on your spray passes. It happens.
Here's how to deal with it:
- For Blotchy Areas: A diluted second coat is your secret weapon. Try mixing your stain with water at a 1:1 ratio. Lightly spray only the lighter, blotchy spots, and make sure to feather the edges out. This layers the color gently and helps it blend seamlessly.
- For Sprayer Lines: If you're seeing distinct stripes, the goal is to soften them up. Use that same diluted stain mixture, but this time, apply it with a circular motion right over the lines. This breaks up that linear pattern and gives you a more organic, mottled look.
- For Stain-Resistant Spots: Every now and then, a small area will refuse to take the stain. This is often because of a ghost of an old sealer or a tiny oil spot you missed. You can try carefully roughing up just that spot with some 120-grit sandpaper to open the pores. Clean it well, then dab the stain on with a rag or sponge.
If you're fighting a particularly stubborn spot, it might be a sign of something deeper in the concrete itself. It's tempting to just keep adding more stain, but resist! You'll likely end up with a dark, obvious bullseye. Sometimes, the best move is to accept a minor imperfection as part of your patio's unique story.
A Simple Plan for Long-Term Care
Once your patio is sealed and looking fantastic, keeping it that way is surprisingly easy. A little bit of routine care goes a long way in protecting all that hard work.
For general cleaning, steer clear of harsh, acidic cleaners—and definitely anything with citrus. They can slowly degrade the sealer. All you really need is a bucket of water and a simple pH-neutral cleaner. For example, a few drops of dish soap in a gallon of water works perfectly for most spills and dirt.
Think of your sealer as a sacrificial layer. It's the patio's first line of defense, but it wears down over time. Plan on giving it a fresh coat every 2-3 years. A good rule of thumb is when you notice water soaking in instead of beading up, it's time to reseal. This one proactive step is the best thing you can do to keep your stained concrete patio looking sharp for years to come.
Common Questions We Hear About Patio Staining
Even with the best guide, a few questions always pop up before you get your hands dirty. That's completely normal. Staining a concrete patio is a big project, and a little extra clarity can go a long way. Let's tackle some of the most frequent things people ask.
Can I Just Stain Over an Old Painted Patio?
The short answer is no, but the long answer is a qualified "yes"—with a lot of prep work. You absolutely cannot apply stain directly over paint. The paint creates an impenetrable barrier, and the stain needs to soak into the concrete pores to work.
To make it happen, you'll have to completely remove every last bit of that old paint. We're talking chemical strippers, a good amount of scraping, and maybe even renting a concrete grinder to get the surface back to its raw, porous state. It's a tough job, but it's the only way. For example, if you just stain over peeling paint, the stain will simply flake off along with the old paint chips.
How Long Will My Stained Patio Actually Last?
When you do it right—proper prep, application, and sealing—a stained concrete patio can look great for decades. The stain itself is a permanent chemical reaction with the concrete. The real hero here is the sealer, which takes all the abuse from foot traffic and the elements.
To keep it looking vibrant, plan on giving it a good cleaning and a fresh coat of sealer every 2-3 years.
A lot of people think their stain is "fading," but that's rarely the case. What's usually happening is the sealer has worn down, making the color look dull and lifeless. A new topcoat of sealer almost always brings that rich color roaring back to life.
Is Staining a Better Choice Than Stamped Concrete?
This is a bit of an apples-and-oranges comparison. Staining is all about adding color, while stamping is about adding texture and pattern, like mimicking the look of flagstone or brick.
The great news is you don't have to choose. Staining a stamped concrete patio is one of the most popular ways to get a stunningly realistic and high-end look. Imagine a patio stamped to look like slate, then stained with varying shades of gray, blue, and brown to perfectly mimic the natural stone. If you're starting from scratch and weighing a simple stain against a new stamped installation, your decision really comes down to your budget and the final look you're aiming for.
Ready to get that gorgeous, durable finish for your patio but feeling like it's a job best left to the pros? The team at Atlanta Concrete Solutions has the experience and equipment to get it done right. Contact us for a free quote and let's talk about your project.