Looking to give that boring gray slab of a patio a major upgrade? Staining your concrete is one of the quickest and most budget-friendly ways to create a beautiful, high-end outdoor space. For example, a simple semi-translucent brown stain can transform a basic patio into a warm, inviting space that mimics the look of natural flagstone. The whole process really just boils down to a few key stages: getting the surface perfectly clean and prepped, applying the stain itself (either a water-based or acid-based formula), and locking it all in with a good sealer. With a little bit of work, you can completely change the look of your backyard and boost your home's curb appeal in a single weekend.
Your Blueprint for a Stunning Concrete Patio Makeover
If you're tired of that plain, uninspired concrete patio, you're in the right place. Staining is a game-changer, giving you the rich, vibrant look of expensive pavers or natural stone without the hefty price tag. For instance, you could use a combination of tan and brown stains applied with a sponge to create a convincing faux leather or travertine effect. We’re going to walk through the entire project together, covering everything from the nitty-gritty of surface prep to applying that final protective coat.
This isn't just a basic list of instructions. Think of it as a collection of hard-won advice from the field, designed to help you sidestep common mistakes and get a professional-looking finish that will actually last. For example, a common mistake is not neutralizing acid stain properly, which can prevent the sealer from adhering and cause it to peel within months.
A beautifully stained patio does more than just look good; it adds tangible value to your property. Think of it as an investment in your home’s first impression, creating a welcoming and polished outdoor living area. For example, real estate agents often highlight features like a custom-stained patio as a key selling point for outdoor entertaining spaces.
Why Staining Is Such a Smart Investment
Let's be clear: staining your concrete isn't just about making it look pretty. It's a strategic move for any homeowner. A well-done stain job can convincingly replicate the appearance of premium materials like slate or flagstone, but at a fraction of the cost.
The numbers back it up. The decorative concrete market is expected to surge from USD 17.3 billion in 2024 to USD 29.6 billion by 2034, which tells you just how popular this approach has become. Here in Atlanta, staining can give you that high-end look for 60-70% less than what you'd spend on pavers, and it can genuinely increase your home's value. For example, a paver patio might cost $15-$25 per square foot, while a professional stain job might only be $4-$8 per square foot. A great-looking patio is a huge selling point.
After all, a gorgeous patio is a core part of your home's overall vibe. It’s a project that can truly elevate your home's exterior and property value, turning a functional space into a stunning feature.
And the best part? It's more doable than you might imagine.
- It’s Incredibly Cost-Effective: You get the look of luxury materials without the luxury price. For example, a 500-square-foot patio could be stained for under $500 in DIY materials, whereas installing natural stone could cost over $10,000.
- It’s Built to Last: When you seal it properly, a stained patio can stand up to fading, chipping, and the elements for years. A well-maintained sealed surface will resist common outdoor stains like spilled wine or greasy food.
- You Can Make It Your Own: With a huge spectrum of colors and different application methods, you can create a look that's totally unique to your home. For example, you could use tape to create a geometric pattern or a border before staining for a custom, tile-like effect.
If you want to see what's possible, it's worth checking out some local examples of residential decorative concrete to get your creative juices flowing.
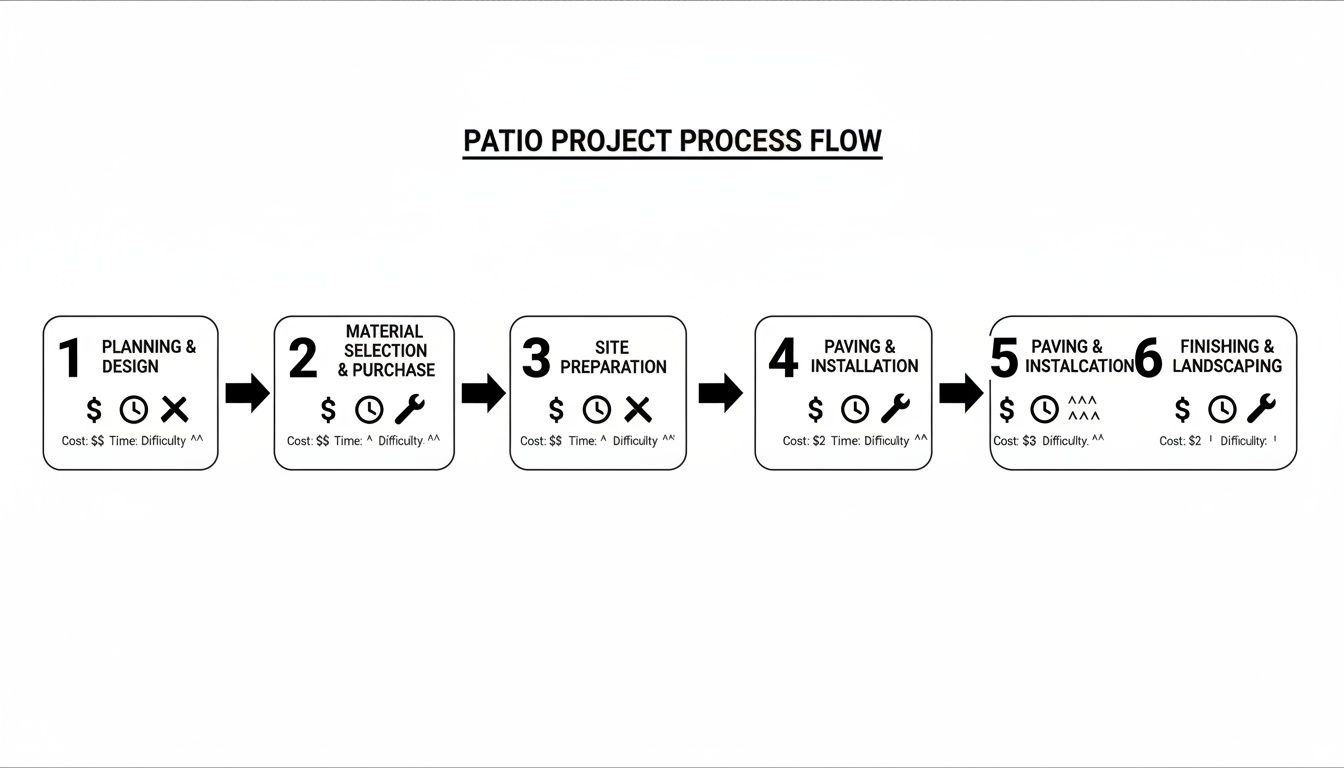
Mastering the Prep Work for a Flawless Stain Job
If you ask any seasoned pro, they'll tell you the same thing: the final look of your stained patio is 90% determined before you even open a can of stain. This is the unglamorous, nitty-gritty work that makes all the difference. Rushing this stage is the biggest mistake you can make, because stain doesn't hide flaws—it magnifies them.
Your first job is to get that concrete truly, deeply clean. This goes way beyond a simple sweep. We're talking about erasing years of built-up dirt, oil drips, algae, and anything else that could get between the concrete and the stain.
Think about it: that stubborn grease spot from last summer's barbecue will completely block the stain from penetrating, leaving a perfect outline of the mishap on your finished patio. The same thing happens with old paint splatters or a failing sealer that's starting to peel. For instance, even the residue from a flower pot's drainage hole can leave a mineral deposit that shows up as a light ring after staining.
As you can see, the prep and application stages are the most hands-on and require real attention to detail, which is why we're so focused on getting them right.
Getting Down to a Clean Surface
First things first, clear everything off the patio. Sweep it thoroughly and pull any weeds that have found a home in the cracks. Now, grab a pressure washer (a model with at least 3000 PSI is ideal) and a high-quality concrete degreaser, such as one containing sodium metasilicate.
Follow the directions on the degreaser, usually letting it sit for about 20 minutes to really break down the grime. After it's had time to work, get in there with a stiff-bristled broom and give the whole surface a vigorous scrubbing. Then, fire up the pressure washer and rinse everything away completely. Keep rinsing until the water runs clear, paying extra attention to the corners where gunk loves to hide.
Dealing with Cracks and Blemishes
Once the slab is clean, you'll get a brutally honest look at its condition. Don't worry, small hairline cracks and little chips are perfectly normal. But you have to deal with them now. If you don't, the stain will seep into these voids and make them stand out like a sore thumb.
For these minor issues, a good concrete crack filler or patch compound is your best friend. Look for a sandable, stainable product. Follow the product’s instructions, slightly overfilling the crack and then smoothing it perfectly flush with a putty knife. Be aware that these patches might take the stain a bit differently than the original concrete, but a smooth, filled-in surface looks infinitely better than an open crack.
If you're looking at large, deep cracks or uneven sections, that's a sign of a bigger problem. For example, a crack wider than a quarter-inch that runs the length of the patio could indicate foundational shifting. It's best to look into professional residential concrete and masonary repair to make sure the slab is sound before you put any more effort into a cosmetic finish.
The Most Important Step You Can't Skip: Etching
After the patio is clean, repaired, and bone dry, it's time for the most critical part of the prep work: etching. Most concrete patios, especially newer ones, have a smooth, dense surface from being troweled. This non-porous finish is great for durability, but terrible for staining. A good way to test this is to sprinkle some water on the surface; if it beads up instead of soaking in, your concrete needs to be etched.
Etching roughs up the surface on a microscopic level, creating a texture like fine-grit sandpaper. This gives the stain something to physically grab onto, allowing it to penetrate deep into the concrete instead of just sitting on top.
This step is what ensures your color bonds permanently and won't peel or flake off in a year. You can use a muriatic acid solution (typically a 1:10 acid-to-water dilution) or, for a less hazardous option, one of the many safer, biodegradable etching products on the market like those based on phosphoric acid.
No matter which you choose, safety is non-negotiable. Wear heavy-duty gloves, splash-proof goggles, and a respirator. Apply the etcher with a plastic garden sprayer, let it fizz and do its job for 5-10 minutes, and then follow the instructions to neutralize (usually with a baking soda and water mix) and rinse it away completely. It might seem like a hassle, but this single step is the secret to a professional-grade stain job that lasts.
Choosing the Right Stain: Acid vs. Water-Based
With your patio prepped and ready, we get to the fun part—choosing the stain that will completely transform the space. This decision really comes down to two main types of products: acid-based and water-based stains. They work in fundamentally different ways, and understanding their unique personalities is the key to getting the look you're after.
This isn't just about picking a color. It's about choosing a process. One creates a one-of-a-kind, marbled effect through a chemical reaction, while the other offers predictable, consistent color with a more straightforward application.
The Artistic Reaction of Acid-Based Stains
If you’re aiming for a rich, deeply translucent finish that looks like natural stone, an acid-based stain is your classic go-to. This isn't just a layer of paint sitting on top of the concrete; it’s a genuine chemical reaction. The stain contains metallic salts suspended in a mild acid, and when applied, it reacts with the free lime (calcium hydroxide) in your concrete slab.
This reaction lightly etches the surface, allowing the metallic salts to create stunning, earthy tones. For example, a "walnut" acid stain might produce a range of colors from light tan to dark amber on a single patio, depending on the concrete's composition. Because no two concrete slabs have the same mineral composition or porosity, the result is always unique. You'll get a beautiful, marbled look that simply can't be duplicated.
It's this unique aesthetic that makes acid stains so popular. In fact, they still command over 55% of the market share, largely because of their high-end, distinctive appearance. The chemical reaction itself can take 4-8 hours to fully mature, slowly revealing translucent shades of walnut, slate, or terracotta that become a permanent part of the concrete. You can dive deeper into these market trends by reading the full research on concrete stain markets.
The Vibrant Versatility of Water-Based Stains
On the other hand, if you want a broader spectrum of colors or a more uniform look, water-based stains are the way to go. Unlike their acid-based cousins, they don’t rely on a chemical reaction to work their magic. Instead, they are sophisticated blends of pigments and polymers that penetrate the concrete's pores to deposit color.
This gives you a ton more control over the final outcome. The color you see in the bucket is almost exactly what you'll get on your patio. For example, if you want a modern, solid gray patio or a vibrant terracotta color to match your home's trim, a water-based stain is the perfect choice.
Think of it this way: An acid stain is like developing a photograph in a darkroom—you have to wait for the image to emerge. A water-based stain is more like painting—what you apply is what you get, giving you direct control over the outcome.
This predictability makes water-based formulas a favorite for many DIYers. They're also much lower in volatile organic compounds (VOCs), which means less odor and a more environmentally friendly application. A huge bonus, especially in Atlanta's humid climate, is their faster drying time, which minimizes the window for leaves, pollen, or dust to settle on your fresh stain.
To help you decide what’s best for your patio, here’s a quick side-by-side comparison.
Comparison: Acid-Based vs. Water-Based Concrete Stains
Choosing between acid and water-based stains depends entirely on the aesthetic you want and how much control you prefer to have over the process. This table breaks down the key differences to help guide your decision.
| Feature | Acid-Based Stain | Water-Based Stain |
|---|---|---|
| Appearance | Variegated, marbled, translucent, stone-like | Opaque, uniform, consistent color |
| Color Palette | Limited to earthy tones (browns, tans, terracottas) | Wide range of vibrant colors (blues, greens, grays) |
| Application | More complex; requires neutralization and rinsing | Simpler; apply and let dry |
| DIY-Friendly | Moderate difficulty; requires more safety gear | High; very user-friendly |
| Cost | Generally more affordable per gallon | Can be slightly more expensive |
Ultimately, there's no "wrong" choice here. An acid stain will give you a timeless, rustic look full of character, while a water-based stain opens up a world of creative possibilities with bold, modern colors. It all comes down to your personal vision for the space.
Proven Techniques for Applying Concrete Stain
Alright, this is where the magic happens. All that prep work is done, and now it's time to bring your vision to life. Applying the stain is really a game of technique and patience. The right approach is what separates a DIY-looking job from a professional, even finish, regardless of whether you're using an acid or water-based product.
Before you mix up a single drop, here’s a tip I consider non-negotiable: always test your stain in a small, hidden area first. Pick a spot behind where the grill will sit or under a future planter. This one simple step saves a world of headaches by confirming the color and making sure there are no weird reactions with your specific slab of concrete.
Applying Acid-Based Stains
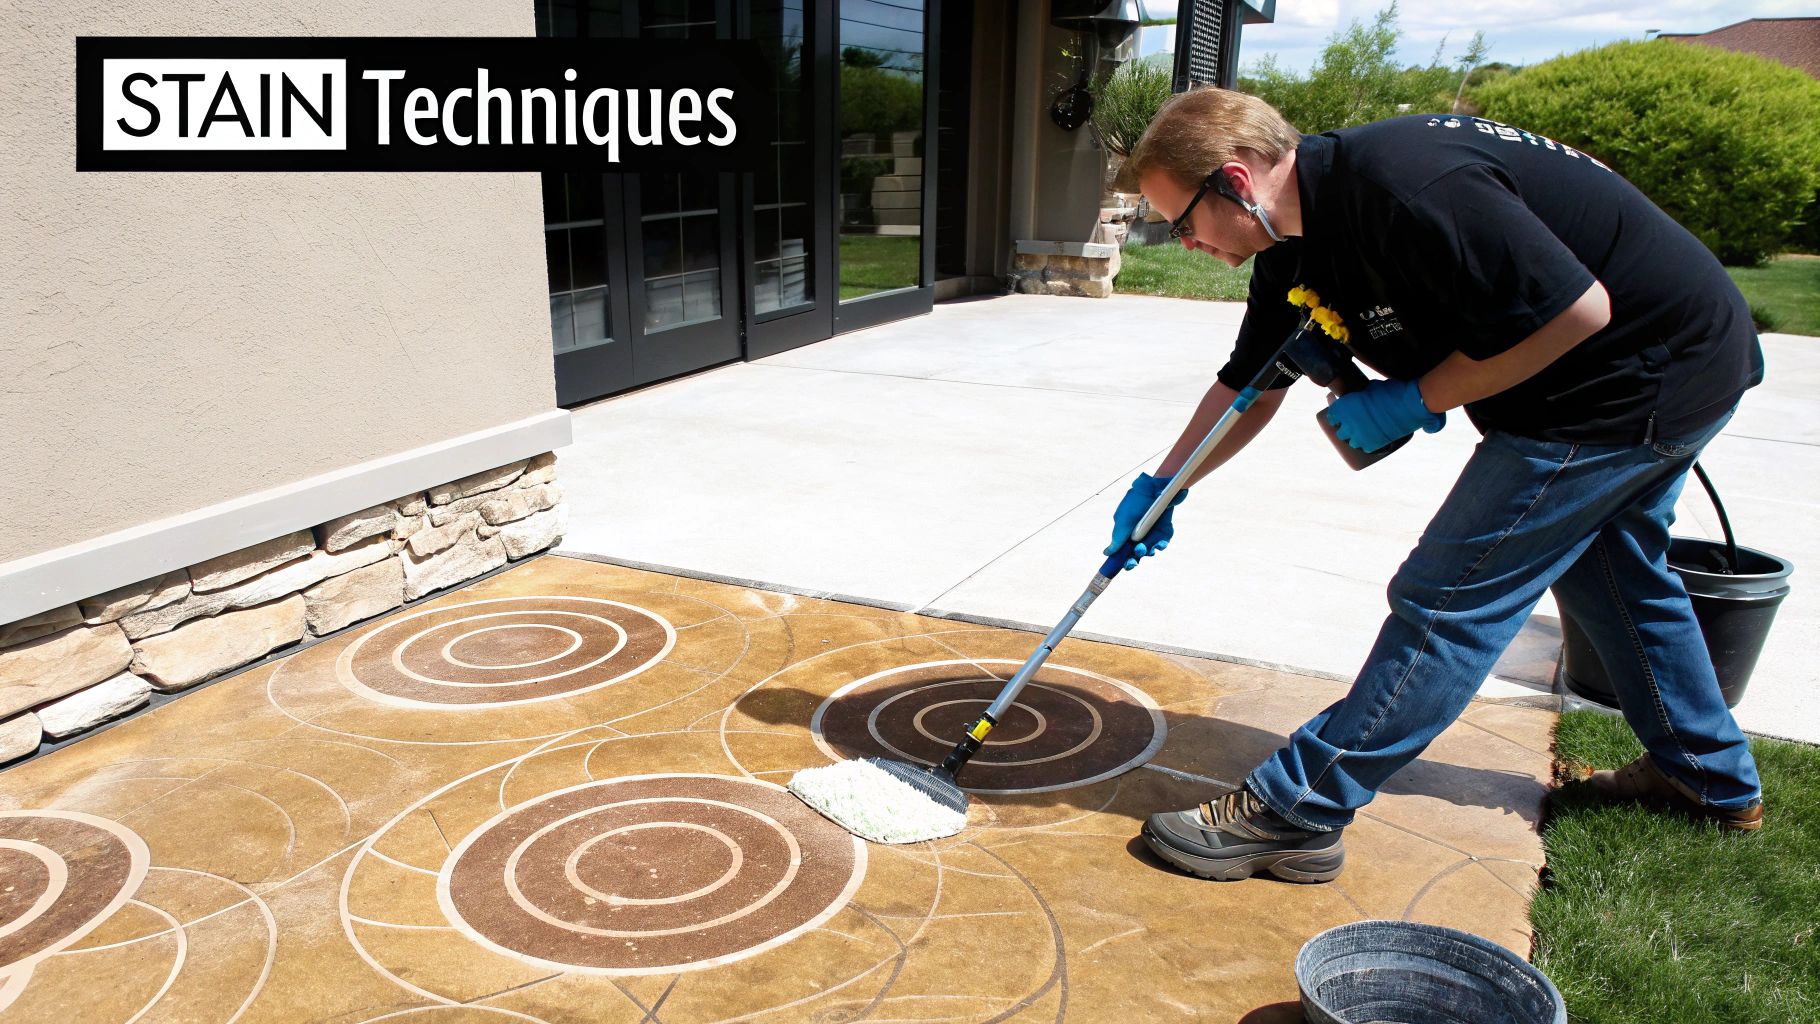
Working with acid stain feels a bit like a science experiment mixed with art. You're not aiming for a perfectly solid color; the whole point is to get that rich, marbled appearance that looks like natural stone. For any decent-sized area, your best friend is a plastic, acid-resistant garden sprayer.
Hold the sprayer wand about two feet from the surface and go to town with random, overlapping circular motions. Whatever you do, don't spray in straight lines—it will look completely unnatural. You actually want the stain to pool and react a little differently across the patio. For example, spraying more heavily in some areas and lighter in others will enhance the natural variation. That variation is what creates the beautiful, mottled effect you're after.
Once the stain is down, it needs time to work its magic, usually 4-8 hours. When the bubbling stops and the color has developed, you have to thoroughly rinse the residue off and neutralize the surface. You can use a solution of baking soda and water (1 cup per gallon of water) or grab a commercial neutralizer. This step is absolutely critical; it halts the chemical reaction and gets the concrete ready for sealing.
Applying Water-Based Stains
If you want more control and a predictable outcome, water-based stains are the way to go. These stains are projected to grow the fastest in the industry, mostly because of their low-VOC formulas and much faster cure times. In fact, they can cure in just 1-2 hours, a huge difference from the typical 24-hour timeline for acid stains. It's no wonder that pros report 70% of patio projects now use water-based stains, thanks to their ease of use and solid UV resistance. You can learn more about the growth of the concrete stain market and see why it's trending.
For these, you've got options: a garden sprayer, a roller, or even brushes for getting into tight spots. The trick is to apply thin, even coats. Unlike acid, you can build up the color with multiple layers to get a deeper, more uniform look if that's what you want. For a unique look, you can even layer different colors—for instance, a light tan base coat followed by a light sponging of a darker brown can create a beautiful, textured appearance.
A crucial technique for both stain types is maintaining a 'wet edge.' This just means you should always work from a wet area into a dry one, keeping the edge of your application area wet. This simple practice is the secret to preventing lap marks—those ugly, distinct lines that scream "I stopped and started here."
Essential Application Tips for a Flawless Finish
No matter which stain you're using, a few core principles will help you nail the application.
- Work in Sections: Don't try to tackle a huge patio all at once. Break it up into smaller, more manageable sections, like 4×4 foot squares. This makes it much easier to maintain that wet edge and work consistently.
- Mind the Weather: The perfect time to stain is on an overcast day with mild temperatures (between 50°F and 90°F). Direct, hot sunlight is your enemy; it will make the stain dry way too quickly, leaving you with streaks.
- Use the Right Tools: A basic pump-up sprayer gives you fantastic, even coverage. Keep a small brush handy for cutting in along walls or adding any detailed patterns. For example, you could use a small artist's brush to touch up the edges along your home's foundation.
By focusing on these proven techniques for how to stain a concrete patio, you’re doing more than just slapping on some color. You’re finishing the surface with real skill, and the result will be a stunning, durable patio that completely transforms your outdoor space.
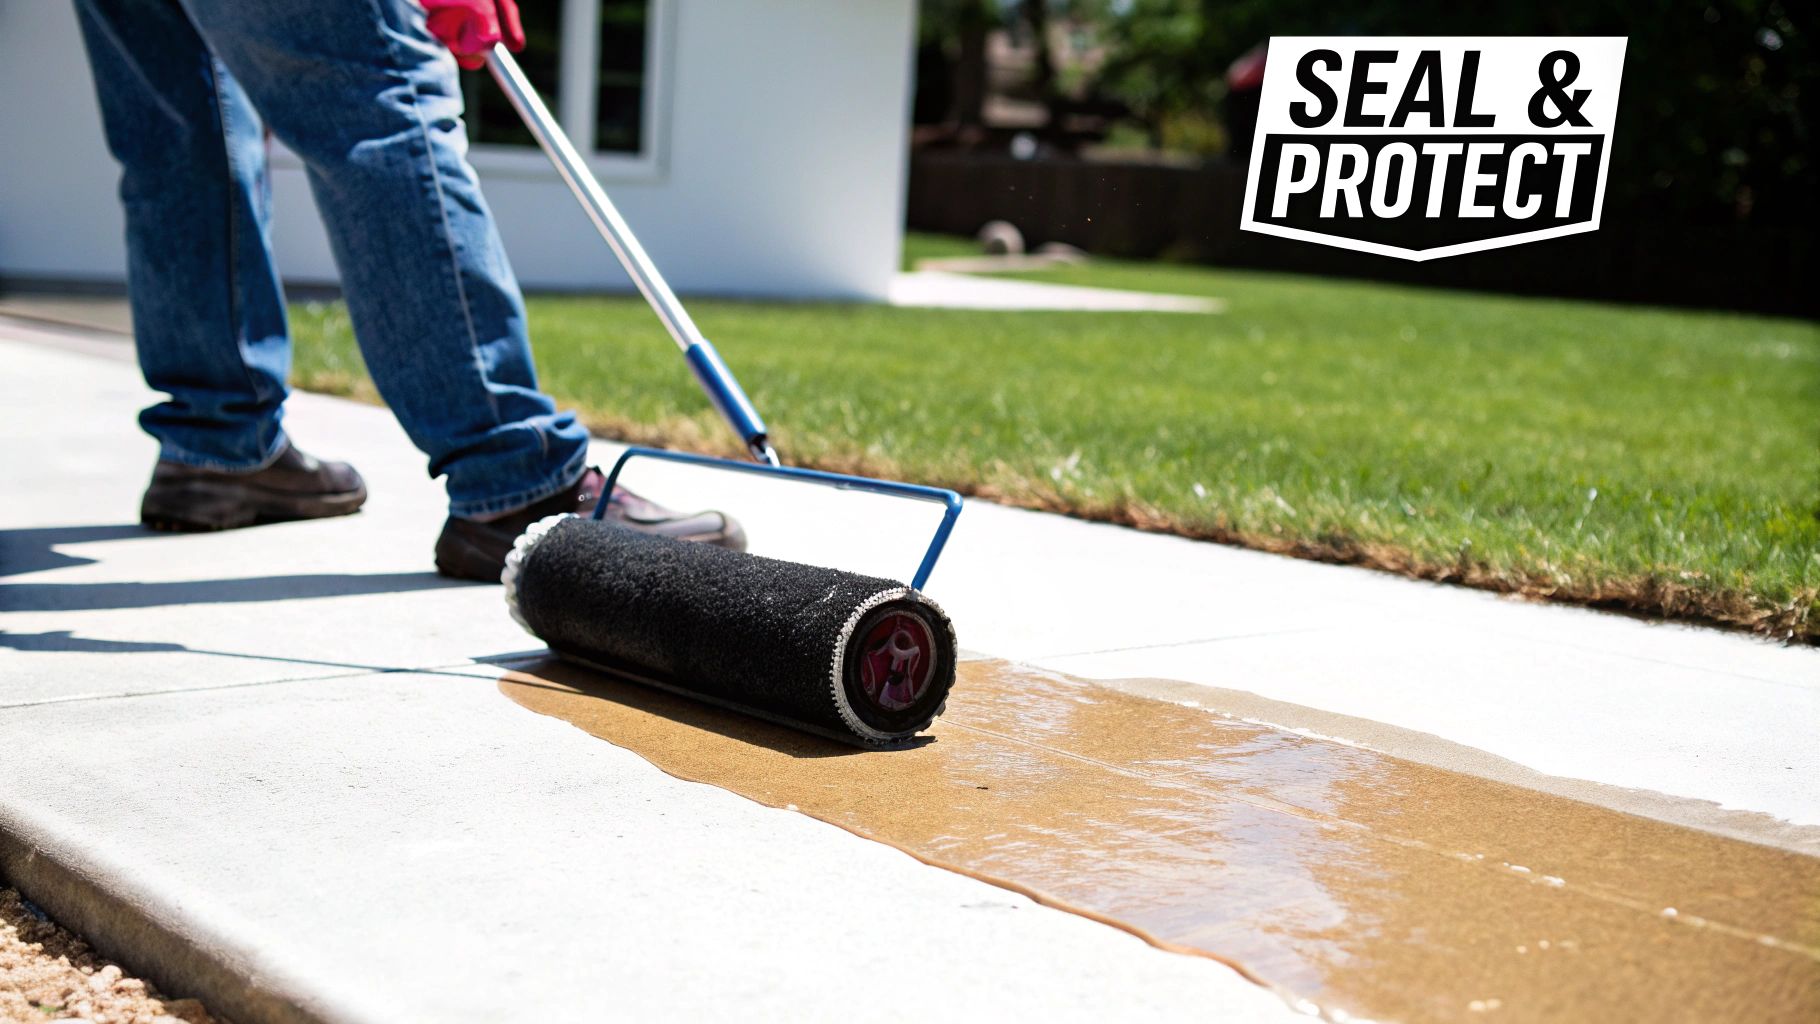
Sealing and Protecting Your Newly Stained Patio
You've done the hard part. The prep, the cleaning, the careful staining—it's all behind you. But don't break out the patio furniture just yet. The final step, sealing, is what separates a good-looking patio from one that stays good-looking for years.
Think of it this way: skipping the sealer is like buying a new car and never washing or waxing it. It leaves all your hard work exposed to the elements. Sealing is non-negotiable; it locks in that beautiful color and protects your investment from moisture, UV fading, and the wear and tear of everyday life. A good sealer doesn't just protect—it enhances the color's depth and makes future clean-ups a breeze. For example, a "wet look" sealer will dramatically deepen the colors of an acid stain, making them appear richer and more vibrant.
Choosing the Right Sealer for Your Patio
The sealer you pick directly affects both the final look and the durability of your project. For outdoor surfaces like a patio in Atlanta, you need something that can breathe and stand up to our intense sun.
- Acrylic Sealers: These are the go-to for most DIYers, and for good reason. They're affordable, easy to work with, and offer solid protection from sun and water. You can find them in everything from a subtle matte finish to a high-gloss sheen. For example, a solvent-based acrylic will provide a richer color enhancement, while a water-based one is lower in odor and easier to clean up.
- Polyurethane Sealers: If your patio is a high-traffic zone for parties, kids, and pets, polyurethane is your best bet. It forms a tougher, thicker protective layer that’s highly resistant to scuffs, scratches, and chemicals. For example, this is the type of sealer you'd want if you plan on having heavy patio furniture with metal feet that could scratch a softer acrylic.
One crucial timing note: make sure the stain is completely cured before you even think about sealing. This usually takes 24 to 48 hours, but always default to the stain manufacturer's instructions. Sealing too early traps moisture underneath, which can lead to a cloudy, blotchy mess.
Applying the Sealer and Maintaining the Finish
Applying sealer is less about muscle and more about finesse. Grab a good-quality paint roller with a short-nap (3/8-inch) cover and work in small, manageable sections. The goal is a thin, even coat.
Pro Tip: The most common rookie mistake is laying the sealer on too thick. This doesn't add more protection; it just causes a cloudy finish and prevents the sealer from curing correctly. Always remember: two thin coats are far better than one thick one. For example, apply the first coat north-to-south and the second coat east-to-west to ensure complete coverage.
Let that first coat dry completely, which typically takes a few hours. Once it's no longer tacky, you can apply your second coat for that extra layer of defense. After the final coat is on, the real test of patience begins. You need to let the surface cure for at least 48-72 hours before walking on it or moving furniture back.
Long-term care is simple. Just sweep it regularly and wash it down with mild soap and water when needed. Avoid any harsh, acidic cleaners that could eat away at the sealer. To keep that finish looking sharp, plan on reapplying a fresh coat every 2-3 years. A good rule of thumb is to do it when you notice water soaking in instead of beading up on the surface.
This little bit of upkeep is all it takes to keep your stained concrete patio looking fantastic for years. Of course, if you're dealing with a massive area or a tricky surface, getting professional help is always a smart move. Exploring local concrete services can connect you with experts who handle these jobs every day.
Common Questions About Staining Concrete Patios
As you're gearing up to stain your concrete patio, you're bound to have a few questions pop into your head. Getting good answers upfront can save you a world of headaches down the road. Let's walk through some of the things homeowners in Atlanta ask me all the time.
How Much Does This Actually Cost?
This is always the first question, and for good reason. If you're tackling this yourself, your materials—the stain, cleaner, sprayer, and a quality sealer—will probably run you between $0.75 and $2.00 per square foot. For example, a 200-square-foot patio might cost around $250 for all materials. The final number really depends on the products you choose and how much work your concrete needs beforehand.
Thinking about hiring a pro? You can expect to pay somewhere in the range of $4 to $8 per square foot. That price covers all the labor, materials, and the peace of mind that comes with a professional warranty.
Can I Stain My Old, Painted, or Sealed Patio?
You sure can, but don't underestimate the prep work involved. The stain has to soak into bare, porous concrete. It can't just sit on top of paint or an old sealer.
- For old, unsealed concrete: A really good power washing and an acid etch are usually all it takes to open up the pores and get it ready for stain. For example, concrete that is over 10 years old and has never been sealed is a perfect candidate for this simple prep.
- For painted or sealed concrete: This is where the real work begins. You have to get every last bit of that old coating off. That means using chemical strippers or, more likely, renting a concrete grinder with a diamond-grit wheel. It’s a tough job, but it's absolutely critical for the stain to take properly.
How Long Will a Stained Patio Last?
This is a common point of confusion. The stain itself becomes a permanent part of the concrete; it reacts chemically and won't just flake off. The real hero—and the component that needs attention—is the sealer on top.
It's the sealer, not the stain, that dictates the lifespan of your project. Think of it as the clear coat on your car. Regular maintenance is what keeps the color vibrant and the surface protected for years.
Here in Atlanta, with our hot sun and humid summers, you should plan on cleaning and reapplying a fresh coat of sealer every 2 to 3 years. It’s a weekend project that makes all the difference, shielding the color from UV damage and wear. For instance, if you notice the high-traffic areas are starting to look dull compared to the edges, it's a clear sign that it's time for a maintenance coat.
For a deeper dive into different finishes and how to care for them over the long haul, this comprehensive guide on concrete flooring finishes and maintenance is an excellent resource. A little bit of upkeep ensures your patio looks just as good in five years as it does on day one.
Ready to transform your patio but thinking this sounds like a job for the pros? The team at Atlanta Concrete Solutions has the right tools and years of experience to guarantee a perfect, long-lasting finish. Give us a call for a free quote at https://atlantaconcretesolutions.com and let's talk about your project.