If you want to pour a concrete slab that lasts, you have to get the fundamentals right. Mastering the site prep, building solid forms, and knowing how to finish and cure the concrete are non-negotiable. These are the steps that guarantee your patio, shed base, or walkway will stay durable and crack-free for years. For example, a well-cured slab can be up to 50% stronger than one left to dry out in the sun, preventing spiderweb cracks and surface flaking.
Your Foundation for a Flawless Concrete Slab
Tackling a concrete slab project on your own can feel like a massive undertaking, but when you break it down into stages, it's completely manageable. Whether you're pouring a small foundation for a garden shed or a sprawling backyard patio, success starts with careful planning—long before a single bag of concrete is opened. Think of this guide as your complete roadmap, designed to get you from start to finish with confidence.
Concrete is a cornerstone of construction, and it’s not going anywhere. In fact, the global market for concrete slabs is expected to jump from around $150 billion in 2025 to a staggering $250 billion by 2033. For those of us here in Atlanta, a professionally poured slab isn't just about adding functional space; it's about building a durable, code-compliant foundation that genuinely increases a property's value.
Understanding the Project Scope
Before you dig a single shovel of dirt, you need to make a few key decisions that will define the entire project. Every choice you make from here on out, from the mix to the reinforcement, will directly impact the slab's strength and final look.
Here’s what you need to think about with some specific examples:
- Concrete Mix Design: Are you going with a standard 3,000 PSI mix for a simple sidewalk, or does your project need something tougher, like a 4,000 PSI mix for a driveway that will support a heavy truck? Here in the Atlanta area, our occasional freeze-thaw cycles make this a critical choice, as higher PSI mixes often have better durability.
- Reinforcement Needs: A simple garden path, for instance, might be fine without it. But a driveway that needs to support a 5,000-pound SUV? That absolutely needs a rebar grid or wire mesh to handle the load and prevent cracking.
- Slab Type: The kind of foundation you pour really matters. It's worth taking a moment to understand the basics of what is a floating slab foundation versus a monolithic slab to ensure you're using the right approach for your specific needs. For example, a shed in an area with stable soil might use a simple floating slab, while a garage attached to a house will require a more robust monolithic foundation.
A well-planned slab is more than just a flat surface; it's a permanent structural element. Taking the time to select the right materials and reinforcement for your specific application is the single most important factor in preventing costly failures down the road.
Budgeting for Tools and Materials
A realistic budget is your best friend on a project like this. By creating a detailed list of every tool and material you'll need, you can avoid those frustrating, last-minute trips to the hardware store that blow your budget. For example, a 10×10 foot slab (4 inches thick) would require approximately 1.2 cubic yards of concrete, 100 sq ft of wire mesh, 40 feet of 2×4 lumber for forms, and about 1.5 tons of gravel.
For bigger jobs like a new driveway or a garage floor, bringing in a professional is often the most cost-effective route in the long run. You can see how an expert handles the complexities of these jobs by learning more about our approach to residential foundation concrete. For now, let this guide be your blueprint to avoid common mistakes and get your project started on solid ground.
Laying the Groundwork: Site Prep and Formwork
Any seasoned pro will tell you that the real work of a concrete slab happens long before you see a single drop of concrete. The prep work—the digging, the grading, and the form-building—is where a project succeeds or fails. Get this part right, and you're setting yourself up for a slab that's level, strong, and will outlast everything around it. This is your foundation, literally.
First things first, you need to map out exactly where your slab will live. I like to start by driving wooden stakes roughly at the corners and running some string lines between them. This gives you a visual outline. From there, you can dial in the exact dimensions and make sure everything is perfectly square.
Getting the Layout Just Right
Nothing screams "amateur" like a crooked patio. To get those perfect 90-degree corners, we rely on a trick as old as geometry itself: the 3-4-5 method.
For example, to square up a planned 12×16 foot patio: from one corner stake, measure 3 feet down one string line and make a mark. On the other string line from that same corner, measure out 4 feet and mark it. Now, measure the diagonal distance between those two marks. If it’s exactly 5 feet, congratulations, you've got a perfect right angle. If not, just adjust the stakes until you hit that magic number. Do this for all four corners, and your layout will be spot on.
Once you’re happy with the layout, grab a can of marking paint and trace your string lines on the ground. This painted outline will be your guide for digging, so take your time. It’s a heck of a lot easier to move a string now than to backfill a trench you dug in the wrong spot.
Digging In and Building a Bulletproof Subbase
With your perimeter marked, it's time to start moving some dirt. How deep you need to go really depends on what the slab is for. Here in the Atlanta area, we have a lot of clay soil, which loves to expand and shrink with the rain. That movement can wreck a slab, so a solid subbase isn't optional—it's essential.
For something simple like a walkway, you might only need to dig down 8 inches. That gives you room for a 4-inch gravel base and 4 inches of concrete. But for a driveway that’s going to see cars and trucks? You'll need to go deeper. Plan on at least a 4 to 6-inch gravel subbase and a 5 to 6-inch concrete slab, bringing your total excavation depth to somewhere between 9 and 12 inches.
To make this easier to visualize, here's a quick reference I use on my projects.
Excavation Depth and Subbase Guide for Common Projects
| Project Type | Typical Concrete Thickness | Recommended Subbase Depth | Purpose |
|---|---|---|---|
| Walkway/Small Patio | 4 inches | 4 inches | Supports foot traffic and light furniture. |
| Driveway | 5-6 inches | 4-6 inches | Withstands vehicle weight and frequent use. |
| Shed Foundation | 4 inches | 4-6 inches | Provides a stable base and moisture barrier. |
| Garage Floor | 4-5 inches | 4 inches | Supports vehicles and heavy equipment. |
Remember, this subbase is doing more than just taking up space. It's your drainage system.
That gravel layer is what lets water escape from under the slab instead of pooling up. This prevents the ground from heaving during a freeze and ultimately saves your concrete from cracking down the line.
When you're ready to add the gravel, do it in lifts. For example, to build a 4-inch base, spread a 2-inch layer, give it a light spray with a hose to help it settle, and then go over it with a plate compactor until it’s packed down tight. Repeat with another 2-inch layer. You’ll know it’s done when you can walk on it without leaving footprints.
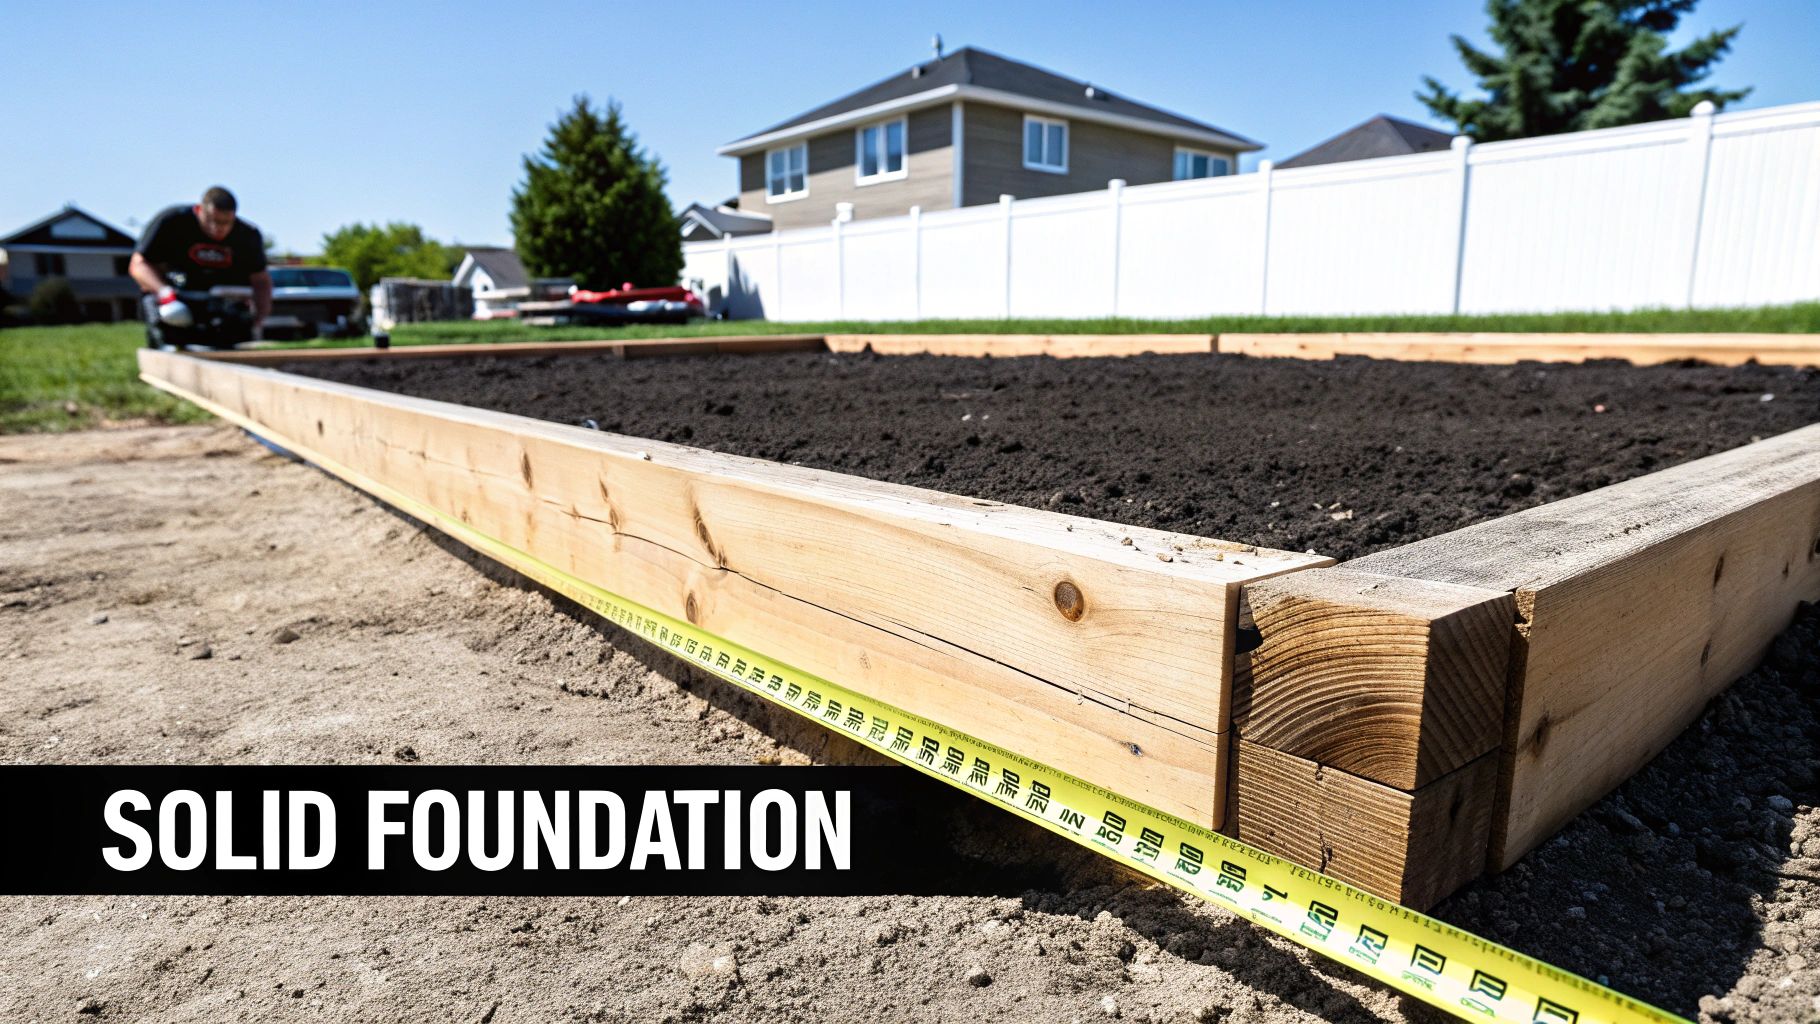
Building Forms That Won’t Budge
Now you get to build the wooden mold that will give your slab its shape. For most residential jobs, 2x4s or 2x6s are the go-to material. Stand them on edge, following your string lines, making sure the tops are perfectly level and set to the final height you want for your slab.
Screw the corners together securely—you don't want them pulling apart when the weight of the concrete hits them. Next, drive wooden stakes into the ground every 2 to 3 feet along the outside of the forms. Attach the stakes directly to the form boards with screws to lock everything in place.
I’ve seen plenty of rookie mistakes, but the most common one is underestimating the sheer force of wet concrete. It’s incredibly heavy and will push your forms outward in a heartbeat if they're not braced properly. This is called a blowout, and it can turn a good day into a disaster.
To avoid this, add some extra braces called "kickers." These are just more stakes driven into the ground a foot or so away from your form stakes, with a diagonal board connecting the two. This simple addition provides a massive amount of reinforcement.
Before you even think about ordering your concrete, do one final check of your forms. Make sure they are:
- Level: Put a 4-foot level across the tops in every direction.
- Square: Check those diagonal measurements one last time.
- Solid: Give the forms a good shove. They shouldn’t move at all.
Taking the time to build meticulous formwork is your best insurance policy when you pour a slab. It’s the behind-the-scenes work that guarantees the concrete goes where you want it and stays there, giving you a professional result that will last for decades.
Reinforcement, Mixing, and Pouring: The Main Event
Alright, your site is prepped, and the forms are set and sturdy. Now comes the part where all that prep work pays off: the pour. This is where your project transforms from a dirt patch into a solid, functional slab. Nailing this stage comes down to two things: getting the right reinforcement inside the concrete and mixing that concrete to the perfect consistency.
First, let's talk about what gives concrete its real muscle. Concrete on its own is incredible at handling compression (being squished), but it's terrible with tension (being pulled or bent). That's where reinforcement comes in—it gives the slab the tensile strength it needs to fight off cracks and handle heavy loads.
Choosing Your Reinforcement: Mesh vs. Rebar
For most projects around the house or on a small job site, you're looking at two main choices: welded wire mesh or steel rebar. They are definitely not the same, and picking the right one is crucial for your slab's long-term health.
- Welded Wire Mesh: Think of this as a lightweight grid of steel wires. Its main job is to prevent those pesky shrinkage cracks that can pop up as the concrete cures. It's the perfect fit for lighter-duty applications like a simple walkway, a small patio for your grill, or the base for a garden shed. A common example is 6×6 W1.4/W1.4 mesh.
- Steel Rebar: This is the heavy hitter. Rebar is made of thick, ribbed steel rods that you tie together with wire to create a strong grid. It provides serious structural strength, making it the only real option for any slab that has to carry significant weight. We're talking driveways, garage floors, or foundations for larger structures. A slab with a good rebar grid can handle thousands of pounds, no problem. A typical driveway grid might use #4 rebar (1/2" diameter) spaced 18 inches on center.
Let's put this in perspective. Say you're pouring a little 8×10 foot patio. Welded wire mesh is all you need. It’s easy to handle and will keep the surface looking solid. But if you're pouring a new driveway for your 4,000-pound truck? You absolutely need a grid of #3 or #4 rebar, spaced about 18-24 inches apart. Without it, that slab is going to crack under the weight.
Pro Tip: Reinforcement does no good sitting on the ground. It needs to be in the middle of the slab's thickness. Use small plastic supports called "chairs" or even broken-up concrete blocks to lift the mesh or rebar grid off the gravel base before you pour. For a 4-inch slab, you'd use 2-inch chairs.
This visual guide shows the key steps that get you to this point, setting the stage for a solid pour.
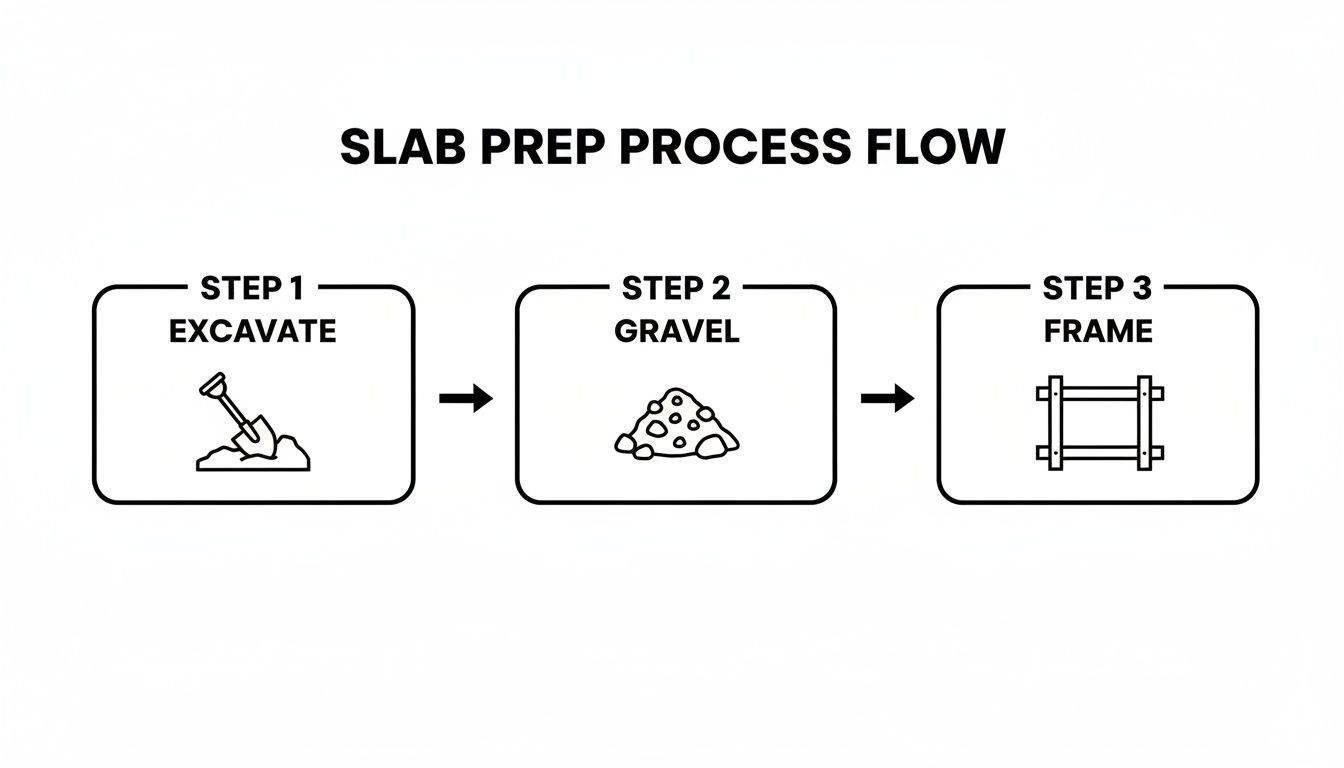
From digging out the site to framing it up, each step builds on the last, creating a stable foundation for the concrete itself.
Getting the Concrete Mix Just Right
With your steel in place, it’s time to focus on the mud. The consistency of your concrete—what we call its "slump"—is everything. If it's too dry, it'll be a nightmare to work with and finish properly. If it's too wet, you're sacrificing a ton of strength.
You're aiming for a consistency like thick oatmeal or a good, hearty stew—workable, but not soupy. If you're mixing 80-lb bags in a portable mixer, a good starting point is about 3 quarts of water per bag. Go easy on the water. Add it slowly until you hit that sweet spot. It's a lot easier to add more water than it is to take it out.
For any decent-sized slab, do yourself a favor and order a ready-mix truck. You can specify exactly what you need (a 4,000 PSI mix is a great all-around choice for durability). When the truck arrives, have a quick chat with the driver. They're pros and can often add a little water on-site to get the slump perfect before they start the pour.
Have all your tools—shovels, a concrete rake, your screed board, and floats—lined up and ready to go. And whatever you do, don't try to pour a slab by yourself. Get at least one or two buddies to help. A solo pour is just asking for a stressful, back-breaking day.
The Pour: Time to Move
Once that concrete starts coming down the chute, the clock is ticking. You only have so much time before it starts to set up, so you need a plan.
Start pouring in the corner farthest from your access point and work your way back. For example, if you're pouring a patio in your backyard, start against the house and pour towards the yard. This way, you aren't constantly dragging your tools and feet through the wet concrete. As the mix comes out, have your helpers use shovels or a concrete rake to spread it around.
The goal is to slightly overfill the forms. You want the concrete to be just a bit higher than the top of your lumber, as you'll be removing this excess when you screed it. Try not to get too aggressive with the rake; overworking the concrete can make the heavy stone aggregate sink to the bottom, leaving you with a weaker, soupy layer on top.
This kind of on-site efficiency is revolutionizing construction, cutting build times by up to 50% and labor needs by 30% on some commercial jobs. For property owners here in Atlanta, that means projects get done faster. If you're interested in the bigger picture, you can discover more insights about the precast concrete market on Transpire Insight. A smooth, well-managed pour is how you tap into those benefits on your own project.
The Art of Finishing and Curing Concrete
Pouring the concrete feels like a huge milestone, but the job is far from over. The next several hours—and weeks—are what transform that gray mud into a tough, durable, and good-looking surface. This is where real craftsmanship comes into play, turning an average job into a pro-grade slab that will last for decades.
The whole game from here on out is timing. If you move too fast, you can weaken the surface. Wait too long, and the concrete becomes impossible to work with. Each step has a specific window of opportunity you don't want to miss.
The Immediate First Steps in Finishing
As soon as the concrete is in the forms, your first job is to level it out. This process is called screeding. Grab a long, straight 2×4, rest it on the form boards, and pull it toward you with a side-to-side sawing motion. This scrapes off the excess concrete and fills in low spots, giving you a roughly flat surface to start with.
Right after screeding, it's time for the bull float. This is a long-handled tool with a wide, flat head that you push and pull across the slab. The goal here is twofold: it flattens things out even more and pushes the heavier stones down slightly while bringing a rich "cream" of cement and sand to the top. That cream is what you'll be working with for the final finish.
A light touch is everything when using a bull float. You're just gliding it over the surface to smooth out the ridges left by your screed board. If you push down too hard, you’ll end up with a weak, uneven surface.
Knowing When to Wait and When to Trowel
Now for the hardest part: waiting. After bull floating, you'll see "bleed water" rise up, giving the slab a wet sheen. You absolutely must wait for this water to evaporate before you do anything else. Trying to work that water back into the slab will seriously weaken the top layer.
Here in the warm Atlanta climate, this might only take an hour. But on a cool, cloudy day, be prepared to wait several hours. A simple test is to press your thumb gently onto the surface in a corner; if it leaves an impression less than 1/4 inch deep, you're likely ready.
Once that sheen is gone and the concrete is firm enough to support you on kneeboards, it's time to trowel. Using a steel hand trowel, sweep it in long, arcing motions across the surface. This further compacts the concrete, creating a dense, hard, and smooth finish. For a surface like a garage floor that will be sealed or polished, you'll likely need to make several troweling passes. For an idea of the beautiful, modern looks you can achieve, check out some options for residential polished concrete.
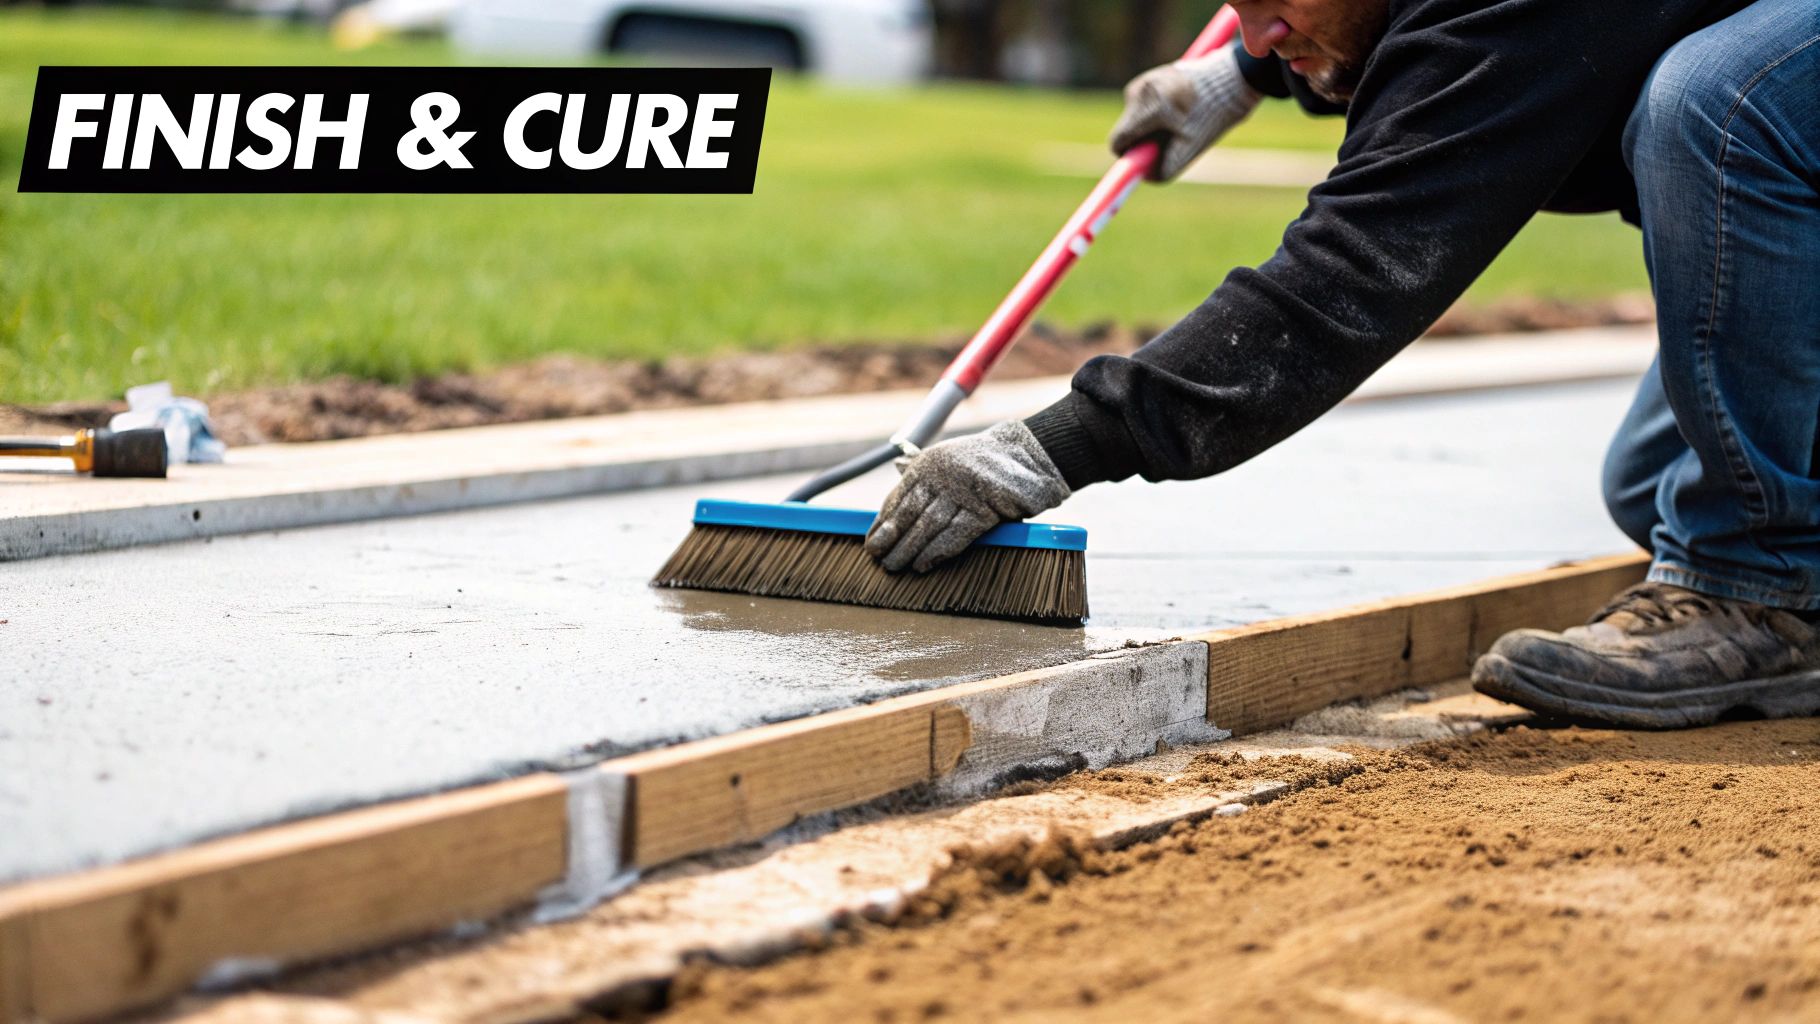
Applying a Slip-Resistant Broom Finish
For outdoor slabs like patios, walkways, or driveways, a perfectly smooth surface can be a slipping hazard when it gets wet. A broom finish is the perfect, simple solution.
After your final troweling pass, gently drag a clean push broom across the surface.
- Direction Matters: Pull the broom in one continuous direction for a clean look, slightly overlapping each pass. For example, on a walkway, you might pull it from side to side.
- Timing is Crucial: The concrete needs to be firm enough that the bristles leave fine lines but don't dig in and pull out chunks of stone.
This easy technique creates a textured, slip-resistant surface that’s both safe and attractive.
Why Curing Is the Most Important Step
Finishing creates the look, but curing is what creates the strength. Concrete doesn't "dry" out like paint does; it hardens through a chemical reaction called hydration, and that reaction needs water. If the slab loses moisture too quickly—especially in the first week—hydration stops, and the concrete will never reach its full potential strength.
A properly cured slab can be up to 50% stronger than one that's just left to dry in the open air. This is how concrete achieves its legendary longevity.
Here are two of the most effective ways to cure your new slab:
- Covering with Plastic: Once the surface is hard enough that it won't be marred, cover the entire slab with 6-mil plastic sheeting. Make sure to overlap the seams and weigh down the edges with lumber or rocks to trap all that crucial moisture inside.
- Using a Curing Compound: This is a spray-on liquid that forms a thin membrane over the surface to slow evaporation. It's a fantastic and easy method, especially for larger jobs. For example, a single gallon of compound typically covers 200-300 square feet.
No matter which method you pick, you need to let the concrete cure for at least seven days. This patient final step is your insurance policy, guaranteeing that the slab you worked so hard on will perform beautifully for many years to come.
Deciding Between DIY and Hiring a Contractor
There's a special kind of pride that comes from successfully pouring a small patio slab yourself. I've seen it countless times. But I've also seen the other side—when a project gets too big or complicated, that line between a satisfying weekend job and a costly, back-breaking disaster gets very thin, very fast.
Before you even start pricing out lumber for forms, you need to take a hard, honest look at what you're planning.
Some projects are just not cut out for DIY, no matter how handy you are. If you're dealing with significant grading, a slab so big it requires a concrete pump truck, or anything structural like a foundation for a home addition, it's time to call in the experts. The financial and safety risks of getting those wrong are just too high. A professional crew has the experience and equipment to handle these jobs efficiently and correctly.
Making an Honest Assessment
So, how do you know where that line is for your project? Start by asking yourself a few tough questions. The answers will tell you whether you're setting yourself up for success or a major headache.
- What's the real scale? A simple 8×10 foot pad for a shed is one thing. A 600-square-foot driveway is a completely different animal. That driveway requires over 7 cubic yards of concrete, weighing more than 28,000 pounds. The sheer volume and the speed you need to work at can overwhelm a novice in a hurry.
- Do you have the right gear? I'm not just talking about shovels and a wheelbarrow. Do you own or have easy access to a plate compactor, a power trowel, and a heavy-duty mixer? Renting adds up, and there's a real learning curve to using this equipment under pressure.
- Are you physically ready? Be honest. Pouring and finishing concrete is a race against the clock. It's incredibly demanding physical labor that can punish your back and joints for days. Screeding and floating a 200 sq ft patio is a full-body workout.
A poorly poured slab isn't just an eyesore—it's a potential structural failure. That DIY driveway that cracks and heaves in the first year can cost you thousands to tear out and replace, wiping out any money you thought you saved.
The Value of Professional Expertise
When you bring in a contractor like Atlanta Concrete Solutions, you're not just paying for a few extra sets of hands. You're buying experience, efficiency, and the peace of mind that comes from knowing the job will be done right. A pro team brings a lot to the table that's tough for a DIYer to match.
It’s not just about the pour itself. A professional can also guide you on material choices, helping you navigate decisions like Pavers Vs Concrete for a new walkway, ensuring the final product fits your long-term needs and budget.
DIY vs. Professional Concrete Pour Checklist
Still on the fence? Use this checklist to weigh the specifics of your project. Be realistic about your answers—it can save you a world of trouble down the road.
| Project Factor | Good for DIY | Consider Hiring a Pro (Atlanta Concrete Solutions) |
|---|---|---|
| Project Size | Under 150 sq ft (e.g., small patio, shed base, AC pad) | Anything larger; driveways, garage floors, large patios |
| Complexity | Simple square or rectangle on a flat, level site | Slopes, complex shapes, integrated drainage, thick edges |
| Structural Needs | Non-load-bearing pads (e.g., for a hot tub) | Foundations, retaining walls, support footings |
| Your Experience | You've done small concrete projects successfully before | First-time pour or only minor repair experience |
| Time & Help | You have a full weekend and 2-3 reliable helpers | Limited time, working alone, or need it done fast |
| Tool Access | You own or can easily rent basic tools | Need specialized equipment like a pump truck or power trowel |
After reviewing the table, the right choice for your situation should be much clearer. Small, simple projects are a fantastic way to build your skills.
But when it comes to the bigger, more critical jobs, the guaranteed quality and expertise of a professional is a smart investment. If you want a flawless result without the risk, exploring our professional concrete services ensures it's done right the first time.
Common Questions We Hear About Pouring Concrete
Even with the best plans, you’re bound to have a few questions pop up. And when you're working with something as permanent as concrete, getting clear answers before you start mixing is key. Here are some of the most common things folks in the Atlanta area ask us, answered straight from our experience in the field.
Getting these details right can be the difference between a slab that lasts a lifetime and one that gives you headaches down the road.
How Thick Should a Concrete Driveway Be?
For a standard driveway that just sees cars and maybe a light pickup, 4 inches is the absolute minimum thickness. Honestly, though, we almost always recommend going up to 5 inches.
Why the extra inch? If you have a heavy SUV, get frequent deliveries, or plan on parking an RV, that additional thickness provides a huge boost in strength for a pretty small bump in material cost. For example, on a 500 sq ft driveway, going from 4" to 5" thick only adds about 1.5 cubic yards of concrete but increases load-bearing capacity significantly. It’s cheap insurance. But what’s underneath is just as important. You need a solid, compacted gravel base of at least 4 inches. Here in Atlanta, our clay soil loves to shift and hold water, so a good subbase is non-negotiable for preventing cracks and keeping your driveway stable for years to come.
What’s the Best Temperature to Pour Concrete?
This is a big one. Weather can make or break a concrete pour. The sweet spot for pouring concrete is anywhere between 50°F and 85°F. In that range, the concrete has the ideal amount of time to cure and reach its full potential strength.
For us in the Atlanta area, that makes spring and fall the best seasons for this kind of work. Try to pour concrete in the middle of a hot Georgia summer when it's 95°F, and the water in the mix will evaporate way too fast. This can cause the slab to set too quickly, leading to shrinkage cracks and a weaker finish. Winter pours are tricky, too. If the temperature drops to 25°F overnight, you have to use special techniques like warm water and insulating blankets to keep the slab from freezing. If fresh concrete freezes, the damage is permanent.
Remember, the ground temperature matters just as much as the air temperature. If you have a day planned for a pour and the forecast shows a freeze within 24 hours, just reschedule. It's not worth the risk.
Do I Really Need to Put Joints in My Slab?
Yes. One hundred percent. This is something you simply can't skip. As concrete cures, it shrinks, and that shrinkage creates a tremendous amount of internal stress. If you don't give that stress a planned escape route, the concrete will make its own—in the form of ugly, random cracks all over your beautiful new slab.
Control joints are just pre-planned cracks. By cutting shallow grooves into the slab, you create a weak spot that encourages the concrete to crack in a neat, straight line where you can't see it.
Here’s the rule of thumb we follow with an example:
- Depth: Your cut needs to be at least one-quarter of the slab's thickness. For a 4-inch slab, that means a 1-inch deep cut.
- Spacing: Space your joints every 8 to 12 feet for a 4-inch slab. The general formula is to space them (in feet) no more than two to three times the slab's thickness (in inches). So for that 4-inch slab, the maximum spacing would be 4 x 3 = 12 feet.
It’s a critical detail that protects the look and life of your slab.
Can I Just Pour New Concrete Over an Old Slab?
We get this question a lot, and the short answer is almost always no. Pouring a new layer over an old one (called an "overlay") is a bad idea unless the existing slab is nearly perfect—no major cracks, no heaving, no sinking. For example, if your old patio has a crack running all the way through it, that same crack will appear in your new overlay within a year. Any problem with the old slab will just telegraph right up through the new one, and you’ll have cracks in no time.
For any project like a driveway, patio, or walkway, the only right way to do it is to tear out the old concrete completely. This lets you fix any problems with the ground underneath and build a fresh, properly compacted base. It’s more work upfront, but it’s the only way to guarantee your new slab has the solid foundation it needs to last for decades.
Having the right answers helps, but there's no substitute for experience. If your project is feeling a bit overwhelming or you just want a perfect finish without the guesswork, Atlanta Concrete Solutions is here to help. Head over to https://atlantaconcretesolutions.com to get a free quote and talk with one of our experts.