That dark, fresh oil stain on your concrete driveway looks bad, I know. It can feel like it's there to stay, but what you do in the next few minutes is what really counts.
The trick is to soak up as much of that surface oil as you can before it has a chance to seep into the porous concrete. Getting to it quickly with some basic household items is your best bet and dramatically improves your odds of getting the stain out completely. For example, a fresh drip of motor oil caught within an hour can often be almost completely removed with basic absorption, while the same drip left for a week becomes a much more complex cleaning project.
Your First Moves Against Fresh Concrete Oil Stains
Finding a new oil stain is a real pain, but don't rush for the power washer just yet. The difference between a temporary spot and a permanent eyesore often comes down to how fast you react. Think of concrete as a giant, hard sponge—the longer that oil sits, the deeper it goes, making it a much bigger headache to remove.
Your first move, before you even think about soaps or scrub brushes, should always be absorption. You need to lift that pooled, excess oil right off the surface. This one move prevents the bulk of the liquid from diving deep into the concrete's pores. For instance, if you've just spilled a quart of oil while doing an oil change, absorbing it first removes 90% of the problem before it has a chance to soak in.
What to Use for Immediate Absorption
You probably already have something that will work sitting in your garage or kitchen. The idea is simple: completely cover the spill with a thick layer of one of these absorbents and then give it time to do its thing.
- Clay Cat Litter: This is the old-school, go-to solution for a reason. It's cheap, super absorbent, and works like a charm. Just make sure it's the non-clumping clay kind. Pile it on thick, maybe grind it in a little with your shoe to get good contact, and then leave it for at least 24 hours. A 10-pound bag can easily handle multiple spills.
- Baking Soda or Cornstarch: Perfect for smaller drips and splatters. For example, a few drops of leaked power steering fluid can be completely covered with baking soda. These kitchen staples are surprisingly good at wicking oil out of that top layer of concrete.
- Sawdust or Sand: If you happen to have a pile of either nearby, they’ll also do a fantastic job of soaking up a fresh spill. Woodworkers often keep a bucket of sawdust specifically for this purpose.
The single most important thing you can do is cover the fresh stain and let the absorbent material work. If you jump straight to scrubbing or pressure washing a fresh, pooled oil spill, you risk forcing the oil deeper into the concrete. You'll actually make the problem much worse.
A Roadmap for Deeper Cleaning
Once you've soaked up all the excess oil you can, it's time to pick a more targeted cleaning strategy. The right method really depends on how old and how bad the stain is. This guide will walk you through the most effective approaches, from simple degreasers to heavy-duty poultices, so you have a clear plan no matter what you're up against.
Getting your concrete back to looking its best is absolutely achievable. And remember, a clean, well-maintained surface is a huge part of your home’s curb appeal. For anyone thinking about bigger projects, understanding what goes into installing new residential driveway concrete really drives home the value of proper care from the very beginning.
Assess the Stain and Prep the Area
Before you even think about grabbing a bottle of cleaner, stop and take a good look at the stain. It might sound obvious, but this is where most people go wrong. You can't treat a fresh cooking oil splatter from a tipped-over grill the same way you'd tackle a decade-old motor oil stain baked into the driveway from a leaky engine.
Think of it like a crime scene investigation. The age, size, and darkness of the stain are all clues that will point you to the right method and save you a ton of time and frustration later.
What Is the Stain Telling You?
Not all oil stains are the same beast. The type of oil, how long it's been soaking in, and the condition of the concrete itself will completely change your game plan.
Here’s what to look for:
- Age and Color: Is the stain still wet-looking and light-colored? That's a fresh one. If it's dark, almost black, and dry to the touch, you're dealing with an old stain that's had plenty of time to sink deep into the concrete's pores. For example, fresh motor oil is amber, but an old stain will be black due to oxidation and dirt.
- Size and Shape: A few small, round drips are one thing. A giant, sprawling patch suggests a bigger leak and will definitely require a more heavy-duty approach. A small drip might only need a poultice, while a large patch will likely require a commercial degreaser and pressure washing. You'll likely need to start by soaking up the excess before moving on to a chemical treatment.
- Concrete Condition: Take a close look at the surface. Are there cracks or unsealed joints? Oil loves to creep into these spots, making it a real nightmare to get out. For these situations, you may need something like a poultice that can literally pull the oil out from those crevices, as a simple scrub won't reach it.
For a brand-new spill, your first moves are the most important. This flowchart breaks down exactly what to do the moment you spot a fresh drip.
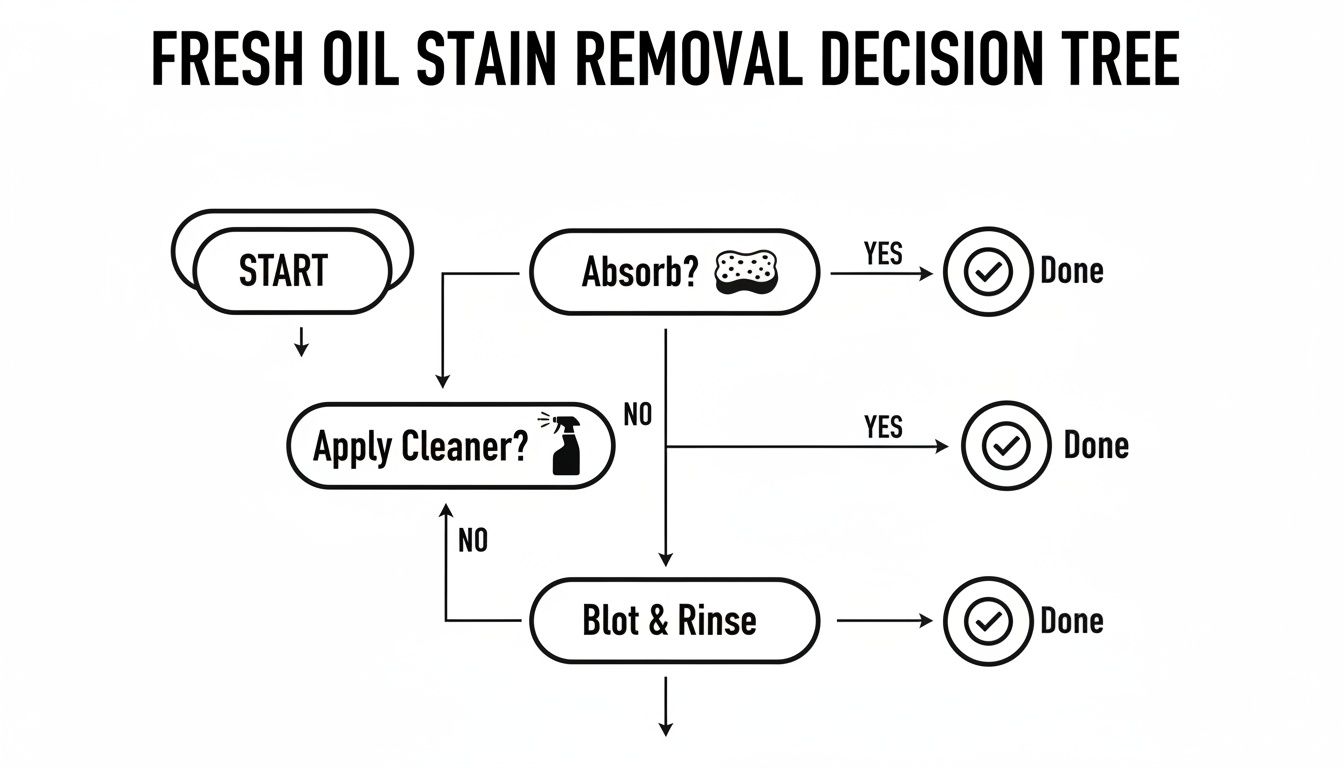
The main point here is simple: absorbing the excess oil immediately is your best first defense. It paves the way for everything that comes next.
Get the Surface Ready for Cleaning
After you've sized up the enemy, it’s time to prep the battlefield. This is the single most critical step for success. Trying to clean a dirty, unprepared surface is like trying to paint over dust—the product just won't work properly. You need to clear the way so your cleaner can get straight to the oil.
I've talked to countless professional concrete cleaners, and they all say the same thing: 90% of a successful job is in the prep work. A clean surface lets the chemicals do their job evenly and effectively.
First, grab a stiff-bristled broom and give the entire area a thorough sweep. Get rid of all the loose dirt, leaves, and any other debris. You don't want to turn that grit into a muddy mess when you start cleaning. For example, if you have pebbles or sand on the driveway, they can act as an abrasive and scratch the concrete when you start scrubbing.
Next, give the area a quick rinse with a garden hose on a low-pressure setting to wash away fine dust. Be careful not to blast it with high pressure, as that can actually force the oil deeper into the concrete. Let the surface air dry completely before you apply a single drop of any cleaner.
This isn't just a homeowner problem, either. The market for these products is huge, with industrial settings like factories making up about 40% of the demand and residential garages and driveways right behind them at 35%. It just goes to show how common—and annoying—this issue is. You can discover more insights about the concrete cleaning market and who's buying these solutions.
Effective DIY Concrete Cleaning Solutions
Once your concrete is prepped and ready to go, it’s time to tackle the stain itself. The great thing is, you have a whole range of options, from simple household concoctions to heavy-duty commercial products. The best choice really boils down to how old and how bad the stain is.
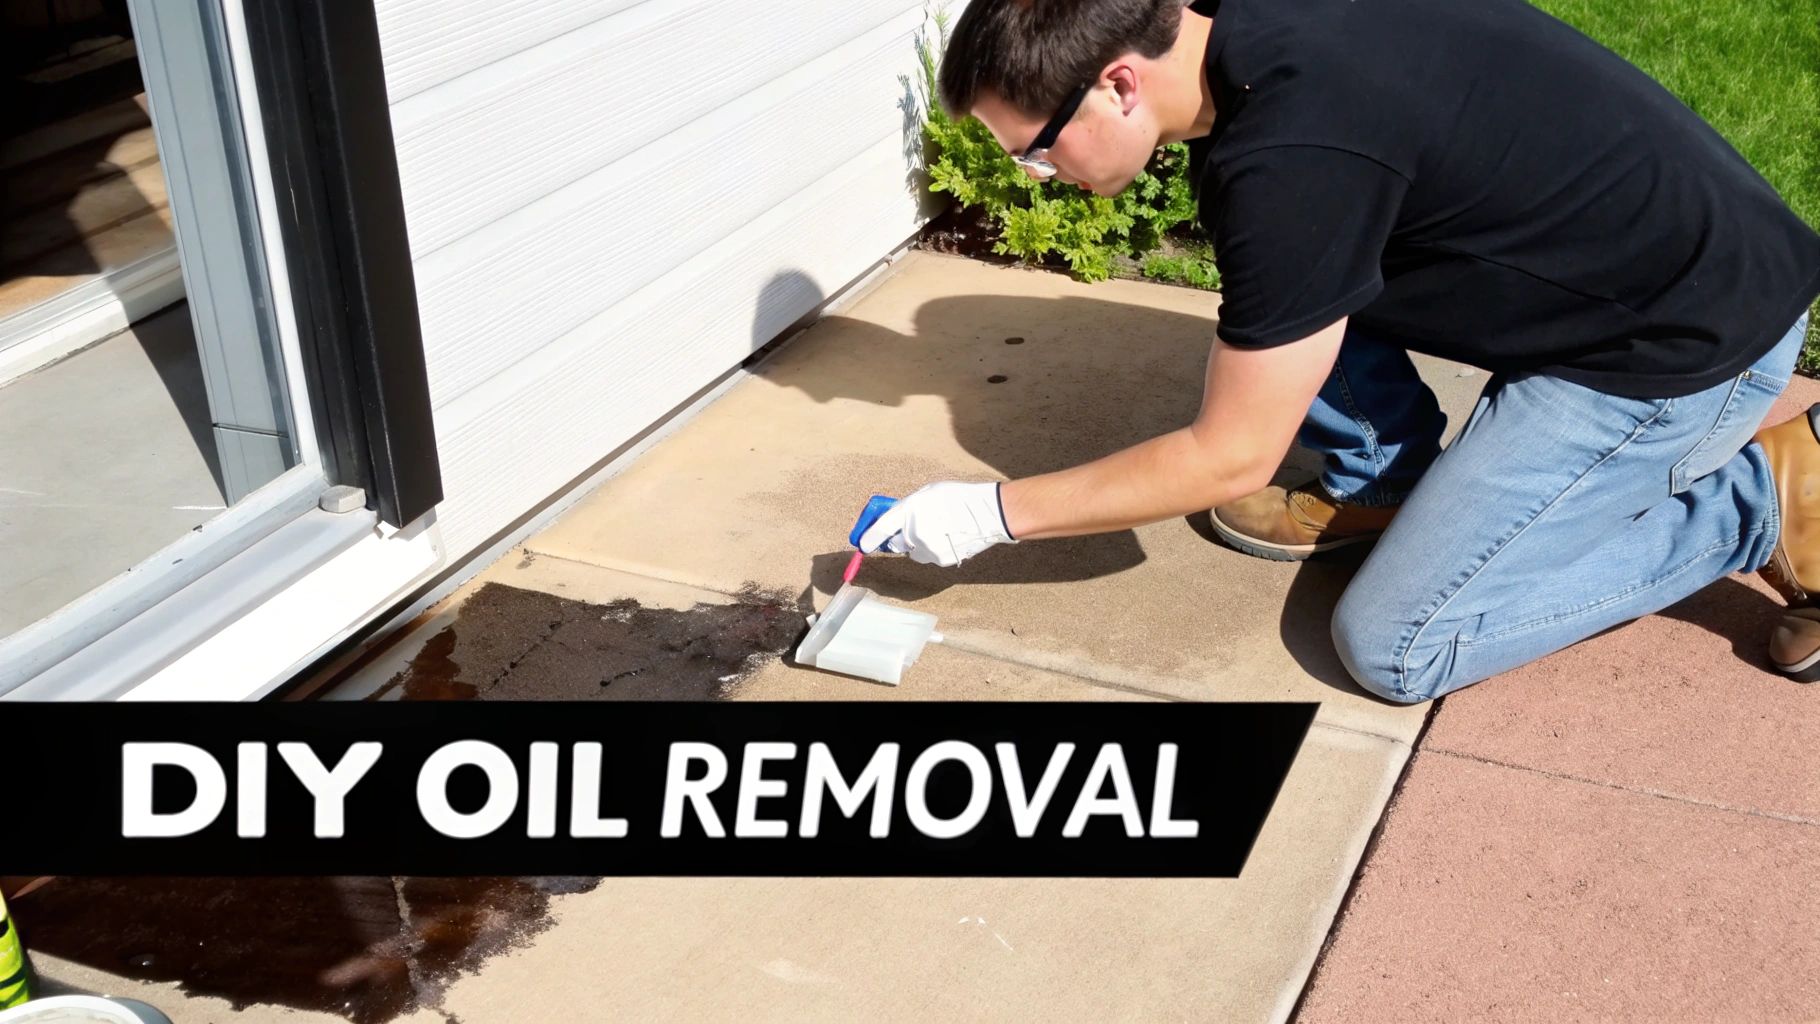
It’s always tempting to reach for the most powerful chemical on the shelf, but I’ve learned it's much smarter to start with the gentlest method first. This approach is safer for your concrete and ensures you’re not using more muscle than you actually need. For fresh spills or lighter stains, a homemade poultice is a fantastic first line of defense.
The Power of a Homemade Poultice
A poultice is just a fancy word for a thick paste that pulls stains out of porous surfaces. It works by combining an absorbent material with a cleaning solvent. When you spread it over an oil stain, the solvent gets to work dissolving the oil, while the absorbent powder wicks it up and out of the concrete as the whole thing dries.
Putting one together is surprisingly simple. You just need an absorbent powder and a liquid solvent.
- Absorbent Powders: Baking soda, diatomaceous earth, or even powdered laundry detergent are all great choices. For example, a box of baking soda can create enough poultice for a medium-sized stain.
- Liquid Solvents: For a gentle start, plain water works. For something with a bit more punch, you can use acetone or mineral spirits—just be sure you have plenty of ventilation and the right safety gear, like chemical-resistant gloves.
To create the paste, slowly mix your solvent into the powder until it has a consistency like peanut butter. Slather a thick layer (about a quarter-inch) over the stain, making sure to go about an inch past the edges. Cover it with plastic wrap, tape down the sides, and just let it sit for 24 to 48 hours. As the paste dries, it pulls the oil right out. When it's done, scrape it off and give the area a good rinse.
A homemade poultice is my go-to for small, fresh leaks. I once had a small power steering fluid drip on a new sidewalk. A simple baking soda and water paste, left overnight, pulled almost the entire stain out in one application without any harsh chemicals.
When to Escalate to Commercial Degreasers
If that poultice didn't quite do the trick, or if you're up against a bigger, more stubborn stain, it’s time to call in the big guns: a commercial-grade concrete degreaser. These products are specifically engineered to break down the tough hydrocarbon molecules found in motor oil and grease.
The market for these cleaners is huge, which just goes to show how common this problem is. In fact, North America is the top consumer of concrete oil stain removers, thanks to a strong industrial sector and a thriving DIY culture. If you're interested in the market dynamics, you can dive deeper by checking out the full market report from Dataintelo.
When you're browsing the aisle, you'll typically find a few main types:
- Citrus-Based (d-Limonene): These are perfect for lighter, fresher stains and are much more environmentally friendly, using natural solvents from citrus peels. A good example is removing a recent cooking oil spill near an outdoor grill.
- Alkaline Degreasers: These are the heavy-hitters. They're water-based cleaners that turn grease into a soapy substance that you can easily wash away. They work wonders on old, set-in stains, such as a multi-year-old motor oil stain in a garage.
- Solvent-Based Degreasers: These are the most powerful options available, using potent chemicals to dissolve thick oil and grease. They absolutely require excellent ventilation and very careful handling and are best for industrial-type grease stains.
No matter which one you choose, always follow the manufacturer's instructions to the letter. Most will have you apply the degreaser, let it sit for a bit to soak in, then give it a good scrub with a stiff nylon brush before rinsing it all away.
A Greener Approach With Enzymatic Cleaners
For those looking for a powerful yet eco-friendly option, enzymatic cleaners are an incredible choice. Instead of harsh chemicals, these products are packed with microbes and enzymes that literally "eat" the oil. This process, called bioremediation, is completely safe for your lawn, pets, and the groundwater.
Enzymatic cleaners are particularly effective on old, deep stains that have soaked way down into the concrete. You just apply the product and walk away. The microbes will get to work, consuming the oil over days or even weeks, until the stain gradually fades away. It's not a quick fix, but it's a "set-it-and-forget-it" solution that removes oil stains from concrete at a microscopic level. For instance, a stubborn stain that a degreaser only lightened can often be completely eliminated by an enzymatic cleaner over the course of a month.
Here’s a good way to think about it: a degreaser is like using soap to wash grease off your hands, while an enzymatic cleaner is like unleashing a tiny army to consume the grease until there’s nothing left.
To help you decide, here’s a quick breakdown of the most common DIY options.
Comparison of DIY Oil Stain Removal Agents
Choosing the right cleaner can feel overwhelming, but this table breaks down the pros and cons of each method, from their ideal use cases to what you can expect to pay.
| Cleaning Agent | Effective On | Average Cost | Safety Notes |
|---|---|---|---|
| Homemade Poultice | Fresh, small-to-medium oil & grease stains | $ (Low) | Generally safe, but solvents like acetone require ventilation and gloves. |
| Citrus-Based Degreaser | Fresh-to-moderate oil, grease, & transmission fluid stains | $$ (Moderate) | Eco-friendly and safer than chemical-based options. |
| Alkaline Degreaser | Old, large, set-in oil & heavy grease stains | $$ (Moderate) | Caustic; requires gloves and eye protection. Avoid contact with skin. |
| Solvent-Based Degreaser | Very old, heavy, and deeply penetrated stains | $$$ (High) | Highly flammable; requires excellent ventilation and full PPE. |
| Enzymatic Cleaner | Old, deep stains where a slow, thorough removal is desired | $$$ (High) | Non-toxic and eco-friendly. Safe for pets, plants, and groundwater. |
Ultimately, the best agent depends on your specific stain. For a minor, recent spill, a simple poultice is a great, low-cost start. For a decade-old stain in the middle of your garage, an alkaline or enzymatic cleaner will be a much better investment.
Bringing in the Big Guns: Pressure Washing Stubborn Stains
When you’ve tried everything and that deep, set-in oil stain just won’t budge, it’s time to escalate your approach. A pressure washer can be your best friend for restoring concrete, but there’s a right way and a wrong way to do it. It’s not about brute force; it’s about smart technique.
Simply blasting an oil spot with high-pressure water is a rookie mistake. You'll likely just push the oil deeper into the concrete's pores or spread the stain over a wider area. The real trick, the one the pros use, is a combination attack: pre-treat the stain with a powerful degreaser and then use the pressure washer to blast away the loosened grime.
This one-two punch is what separates a frustrating afternoon from a truly clean driveway. The degreaser does the chemical heavy lifting, and the pressure washer provides the mechanical force to finish the job.
Dialing in Your Pressure Washer
Getting the pressure setting right is absolutely critical. The force of the water, measured in PSI (pounds per square inch), can be a tool or a weapon. Too little power, and you’re just wasting water. Too much, and you can permanently etch or chip your concrete, a nasty bit of damage called "spalling."
For most residential concrete, like driveways or garage floors, a pressure setting between 2,500 and 3,000 PSI is the perfect middle ground. It’s strong enough to deep clean but not so aggressive that it will tear up the surface. Knowing the right PSI is a key part of the puzzle for getting great results without causing new problems.
Pro Tip: Don't just point and shoot. Start with the nozzle further away from the concrete and at a lower pressure, for example, 18 inches away at 2000 PSI. Slowly move closer and increase the pressure until you see the stain lifting without affecting the concrete itself. Every slab is different.
The Nozzle and Temperature Make the Difference
The nozzle you pick is just as important as the pressure. It controls the shape and intensity of the water stream, and choosing the right one can make your job much easier.
- Fan Nozzle (Green or White Tip): Your go-to for most jobs. A nozzle with a wider spray pattern, like a 25-degree (green) or 40-degree (white) tip, cleans a broader path and prevents you from creating ugly, harsh lines in your concrete.
- Turbo Nozzle (Rotating Nozzle): This is for serious business. It spins a tight, zero-degree stream in a cone shape, giving you the impact of a direct jet but with better coverage. Use it on the most stubborn spots, but keep it moving constantly to avoid drilling a hole in your driveway.
Want to know a real game-changer? Hot water. Think about washing a greasy pan in the sink—hot water melts the grease away far better than cold. The same principle applies here. A hot water pressure washer liquefies the oil, making it dramatically easier for the degreaser and water pressure to lift it out. Most homeowner units are cold-water only, but renting a hot-water machine for a day can be a fantastic investment for tackling a truly awful stain.
A Professional Workflow for Flawless Results
To get that professionally cleaned look, you need to follow a professional process. It's a simple, methodical approach that combines chemical and mechanical cleaning.
- First, Hit it With a Degreaser: Generously apply a high-quality concrete degreaser directly to the stain. Let it soak for at least 15-30 minutes (or whatever the manufacturer suggests). You need to give it time to work its way into the concrete and break the oil down.
- Get Scrubbing: Grab a stiff-bristled brush (nylon, not wire) and give the area a good scrub. This agitation is key—it forces the degreaser deeper into the pores and physically breaks the oil's bond with the surface. For example, scrubbing for 2-3 minutes can significantly improve the degreaser's effectiveness.
- Time to Wash: Now, fire up the pressure washer. Keep the nozzle about 12 inches from the surface and work your way from the outside of the stain inward. This contains the oily mess and stops you from accidentally making the stain bigger. Use smooth, overlapping passes for a clean, even finish.
- Final Rinse: After the stain is gone, switch to a low-pressure setting and give the entire area a thorough rinse to clear away any leftover oil and cleaner residue.
Imagine an old commercial parking garage, stained with years of fluid leaks. You could scrub all day with off-the-shelf cleaners and barely make a dent. That’s where this advanced tactic shines. A pro would come in with an industrial degreaser and a hot-water pressure washer, and in a few hours, the surface would look brand new. It’s the ultimate proof that the right tools and the right technique can conquer any stain.
Preventing Future Stains and Protecting Your Concrete
You’ve done it. You put in the elbow grease and that ugly oil stain is finally gone. It feels good, right? The last thing you want is to do it all over again in a few months. Now that you’ve done the hard part, it’s time to shift from cleaning to protecting. A few preventative measures will save you a ton of hassle down the road and keep your property looking its best.
This isn’t just about dodging future scrubbing sessions. It’s about defending your concrete against the elements—sun, rain, and road salt—that cause cracking and chipping over time.
Seal the Deal Against Stains
Honestly, the most effective way to stop future oil stains is to apply a quality concrete sealer. Think of your raw concrete as a giant, hard sponge. It’s full of tiny pores just waiting to soak up any liquid that hits them, oil included. A sealer creates a protective shield that blocks oil from penetrating the surface.
This shield buys you precious time. When a spill happens, you can simply wipe it up before it has a chance to leave its mark. For example, a transmission fluid leak on sealed concrete will bead up on the surface, allowing you to wipe it clean with a rag, whereas on unsealed concrete it would soak in immediately. There are a couple of great options to consider:
- Film-Forming Sealers: Acrylics are a popular go-to. They create a thin, glossy film on the surface that makes cleanup a breeze and adds a nice, finished look.
- Penetrating Sealers: Products made with silane or siloxane work differently. They soak into the concrete and create a water- and oil-repellent barrier from the inside out. They don’t change the appearance, so they’re perfect if you prefer a natural finish.
The right choice really depends on the space. A busy garage floor that sees dropped tools and chemical spills might benefit from a heavy-duty epoxy coating. For an outdoor driveway, a UV-resistant acrylic or a good penetrating sealer is usually the way to go.
A sealed surface does more than just stop stains. It protects against freeze-thaw cycles that cause cracking and makes the entire surface easier to sweep and keep clean, boosting your home's curb appeal year-round.
Smart Habits for a Spotless Surface
Sealing is your best line of defense, but a few good habits can make a huge difference, too. The easiest way to deal with an oil stain is to prevent it from ever happening.
Start simple. Place a large piece of cardboard or a drip pan under your car, especially if it’s an older model known for minor leaks. It’s a cheap, zero-effort trick that catches drips before they become a problem. Of course, it’s also smart to fix the leak at its source. When you understand how often to change your car's oil and handle the job carefully, you can stop most spills from ever hitting the ground.
You’re not alone in wanting clean concrete. The global market for concrete oil stain removers was valued at around $121 million in 2025 and is expected to keep growing. This just shows how many homeowners are realizing the importance of maintaining their concrete.
If you're thinking about a complete upgrade, options like residential polished concrete create an incredibly dense, durable, and stain-resistant surface that looks fantastic.
When to Call a Concrete Cleaning Professional
While tackling an oil stain yourself can be incredibly satisfying, there comes a point where you might be doing more harm than good. Knowing when to wave the white flag isn't admitting defeat—it's the smartest way to protect your concrete and save yourself a ton of frustration.
If you’ve already thrown everything you have at it—absorbents, degreasers, even a couple of poultice attempts—and that stubborn stain is still staring back at you, it’s probably time to call in a pro. Stains that have been sitting for months, or even years, have soaked so deep into the concrete's pores that consumer-grade products just can't reach them.
Stains That Demand an Expert Eye
Some situations are just plain tricky. For certain types of concrete or particularly nasty stains, a simple mistake can lead to permanent damage. This is where a professional’s experience is worth every penny.
Here are a few classic scenarios where picking up the phone is your best bet:
- Deeply Set, Ancient Stains: Oil that’s been sitting for years doesn’t just sit on the concrete; it becomes part of it. A pro brings out the heavy artillery: industrial, heated pressure washers that can blast water over 200°F. That intense heat is the only thing that can liquefy oil trapped deep inside the concrete, something a cold-water washer from a hardware store could never do.
- Decorative or Colored Concrete: Is your concrete stamped, stained, or colored? Tread very carefully. The wrong chemical, no matter how gentle it seems, can strip the color right out, etch the pattern, or leave a bleached blotch that looks way worse than the original oil spot. Professionals know exactly which chemicals and pH levels are safe for these delicate, expensive surfaces. For example, an acid-based cleaner could ruin the pigment in red-tinted concrete.
- Large-Scale or Commercial Spills: Trying to scrub a massive oil spill on a commercial property or a sprawling driveway with a deck brush is a recipe for a sore back and a terrible result. Professionals use large surface cleaners—imagine a large, spinning disc attached to a pressure washer—that cover huge areas quickly and consistently, giving you a clean, uniform finish instead of the dreaded "zebra stripes" that wand-style pressure washers often leave behind.
A word of caution: It's shockingly easy to damage concrete with a pressure washer if you don't know what you're doing. Professionals are trained to avoid spalling—the chipping and flaking of the surface—which is a common and irreversible mistake that happens when too much pressure is used.
The Professional Advantage
Hiring an expert isn’t just about getting access to bigger, better tools. You're paying for their experience, efficiency, and peace of mind.
They show up with equipment you can't just rent at the local hardware store, from powerful commercial degreasers to the hot-water pressure systems that make all the difference. More importantly, they can diagnose a stain just by looking at it and know immediately which treatment will work, saving you the time and money you would have spent on trial-and-error with products that were never going to work anyway. For instance, they can distinguish a synthetic oil stain from a hydraulic fluid stain and choose the exact solvent needed for each.
In the end, a pro gets the job done right the first time, protecting your property's value. If you're dealing with a stain that just won't quit and want it gone for good, looking into professional concrete cleaning services is the surest way to restore your surface safely and completely.
Got Questions About Oil Stains on Concrete?
Even with a solid plan, you're bound to run into a few questions when tackling oil stains on concrete. It happens to everyone. Here are some of the most common things people ask, along with straight-up answers based on years of experience.
Can I Just Pour Bleach on an Oil Stain?
That's a definite no. Bleach is a powerful oxidizer, which is great for killing germs, but it's not a degreaser. It won't actually break down and lift the oil out of the concrete's pores.
Worse yet, bleach can seriously harm your concrete. It can cause discoloration, especially on colored concrete, and even weaken the surface over time by damaging the cement paste that holds the aggregates together. It's always best to stick with products specifically made for lifting oil and grease.
How Long Do I Have Before an Oil Stain Is Permanent?
There’s no magic number here, but the golden rule is the sooner, the better. Think of concrete as a hard sponge; the longer that oil sits, the deeper it soaks in.
A fresh spill you catch within a few hours or a day has an excellent chance of being removed completely. For example, oil spilled in the morning and treated in the evening has barely penetrated the surface.
A stain that's been baking in the sun for months or years? That's a different beast entirely. It has settled deep into the concrete and will likely require some serious chemical treatments and a powerful pressure washer to even lighten it. Full removal at that point is never guaranteed.
I Got the Stain Out, But Now There's a Big Clean Spot. What Gives?
Yep, that’s incredibly common. When you aggressively clean a small area, you’re not just removing the oil—you’re also blasting away years of built-up dirt and grime. The result is a clean patch that can look almost as obvious as the stain did.
The fix is simple: clean the entire surface to match. If you treated a spot on your driveway, plan on pressure washing the whole thing. If it was in the garage, clean the entire garage floor. This gives you a uniform, consistent finish and makes the whole space look brand new, not just one little spot. For example, if you clean a 2×2 foot square, it's best to then clean the entire driveway slab it's part of for a consistent look.
If you've tried everything and that stubborn stain just won't budge, or you want to prevent future stains with professional-grade sealing, it might be time to call in the experts. The team at Atlanta Concrete Solutions has the right tools and know-how to get the job done right. Contact us today for a free, no-obligation quote and we'll take care of it for you.