Yes, you absolutely can pour concrete over an existing asphalt surface. But—and this is a big but—it's not a project you can just jump into. The success of this technique, which we call "whitetopping" in the industry, hinges entirely on the condition of the asphalt you're covering up. For example, a driveway with only a few hairline cracks and solid, compacted edges might be a perfect candidate.
For a new concrete surface to last, it needs a rock-solid base. If your asphalt is in great shape, you're in business. If not, for instance, if it has areas that feel spongy after a heavy rain, you could be setting yourself up for a costly failure.
What is a Concrete Over Asphalt Overlay?

The idea of pouring a fresh layer of concrete over an old asphalt driveway is tempting. It sounds like a great way to skip the mess and expense of a full tear-out, which can cost thousands of dollars in demolition and disposal fees alone. And when the conditions are right, it can be an excellent, long-lasting solution.
But here’s the critical part: you can't treat it as a quick fix for a failing driveway. That's a recipe for disaster.
Think of your current asphalt as the foundation of a house. If that foundation is crumbling, shifting, or sinking, you wouldn't build a new house on top of it, right? The same logic applies here. A rigid concrete slab poured over a weak, flexible asphalt base will crack in no time. For example, if your asphalt has deep ruts from years of use, the concrete will settle into those ruts and crack under the stress, and you'll be right back where you started.
Core Concepts You Need to Know
To get a successful overlay, three things need to be in your favor. Nailing these down is the first step in deciding if this project is right for you. Get a handle on these concepts, and you'll be able to assess your driveway and have a productive conversation with any contractor.
Here’s what really matters:
- Subgrade Stability: This is all about what’s underneath the asphalt. We're talking about the soil and compacted gravel base. If the ground itself is unstable or wasn't packed down properly in the first place, it can't support the immense weight of a new concrete slab. A good example of a poor subgrade is one with a high clay content that swells when wet and shrinks when dry, causing constant movement.
- Asphalt Condition: Your existing asphalt has to be structurally sound. That means very few cracks, no soft or spongy spots, and no widespread "alligator cracking" (those interconnected cracks that look like a reptile's back). A good candidate might have an asphalt layer that is consistently 3-4 inches thick across the entire driveway.
- Proper Preparation: You can’t just pour and go. A proper overlay involves a deep clean of the asphalt, filling any minor cracks with an epoxy-based filler, and usually adding a bond breaker material and steel reinforcement. This is key to making sure the two layers work together instead of against each other.
The number one reason concrete overlays fail is a weak base. Your new concrete is only as strong as the asphalt and soil supporting it from below. If you ignore the problems underneath, they will find a way to ruin your new investment. For instance, a small, soft spot that you ignore can become a large pothole in your new concrete within a year.
Before you jump in, it helps to see where your driveway stands. This quick table gives you a rough idea of whether an overlay is even on the table.
Quick Guide Overlay vs Full Replacement
| Driveway Condition | Good Candidate for Overlay | Requires Full Replacement |
|---|---|---|
| Cracking | A few hairline cracks, less than 1/4 inch wide. For example, minor cracks that don't connect to each other. | Widespread "alligator" cracking, large cracks, or deep potholes. For example, a web of cracks covering more than 25% of the surface. |
| Surface | Mostly level and even, with good drainage. For example, water runs off quickly into the street or yard after rain. | Significant sinking, ruts, or areas where water pools. For example, puddles that are still present a day after a storm. |
| Edges | Edges are intact and not crumbling. For example, a clean, solid line where the asphalt meets your lawn. | Edges are broken, crumbling, or being undermined by erosion. For example, the edges are ragged and breaking off in chunks. |
| Base | Asphalt feels solid and stable underfoot, no soft spots. For example, it feels as firm as a sidewalk when you walk on it. | Spongy or soft areas that give way under pressure. For example, an area feels boggy or soft when you press down with your heel. |
This table is just a starting point, but if your driveway is leaning more toward the "Full Replacement" column, it’s probably best to save yourself the headache and start fresh.
Throughout this guide, we'll walk you through everything you need to know, from a deep-dive evaluation of your driveway to costs and finding the right pro for the job. For homeowners in the Atlanta area thinking about an upgrade, checking out options for professionally installed residential poured concrete is a great way to see what top-tier quality looks like. In the end, doing it right the first time is what guarantees a beautiful driveway that will last for years.
How to Assess Your Existing Asphalt Driveway
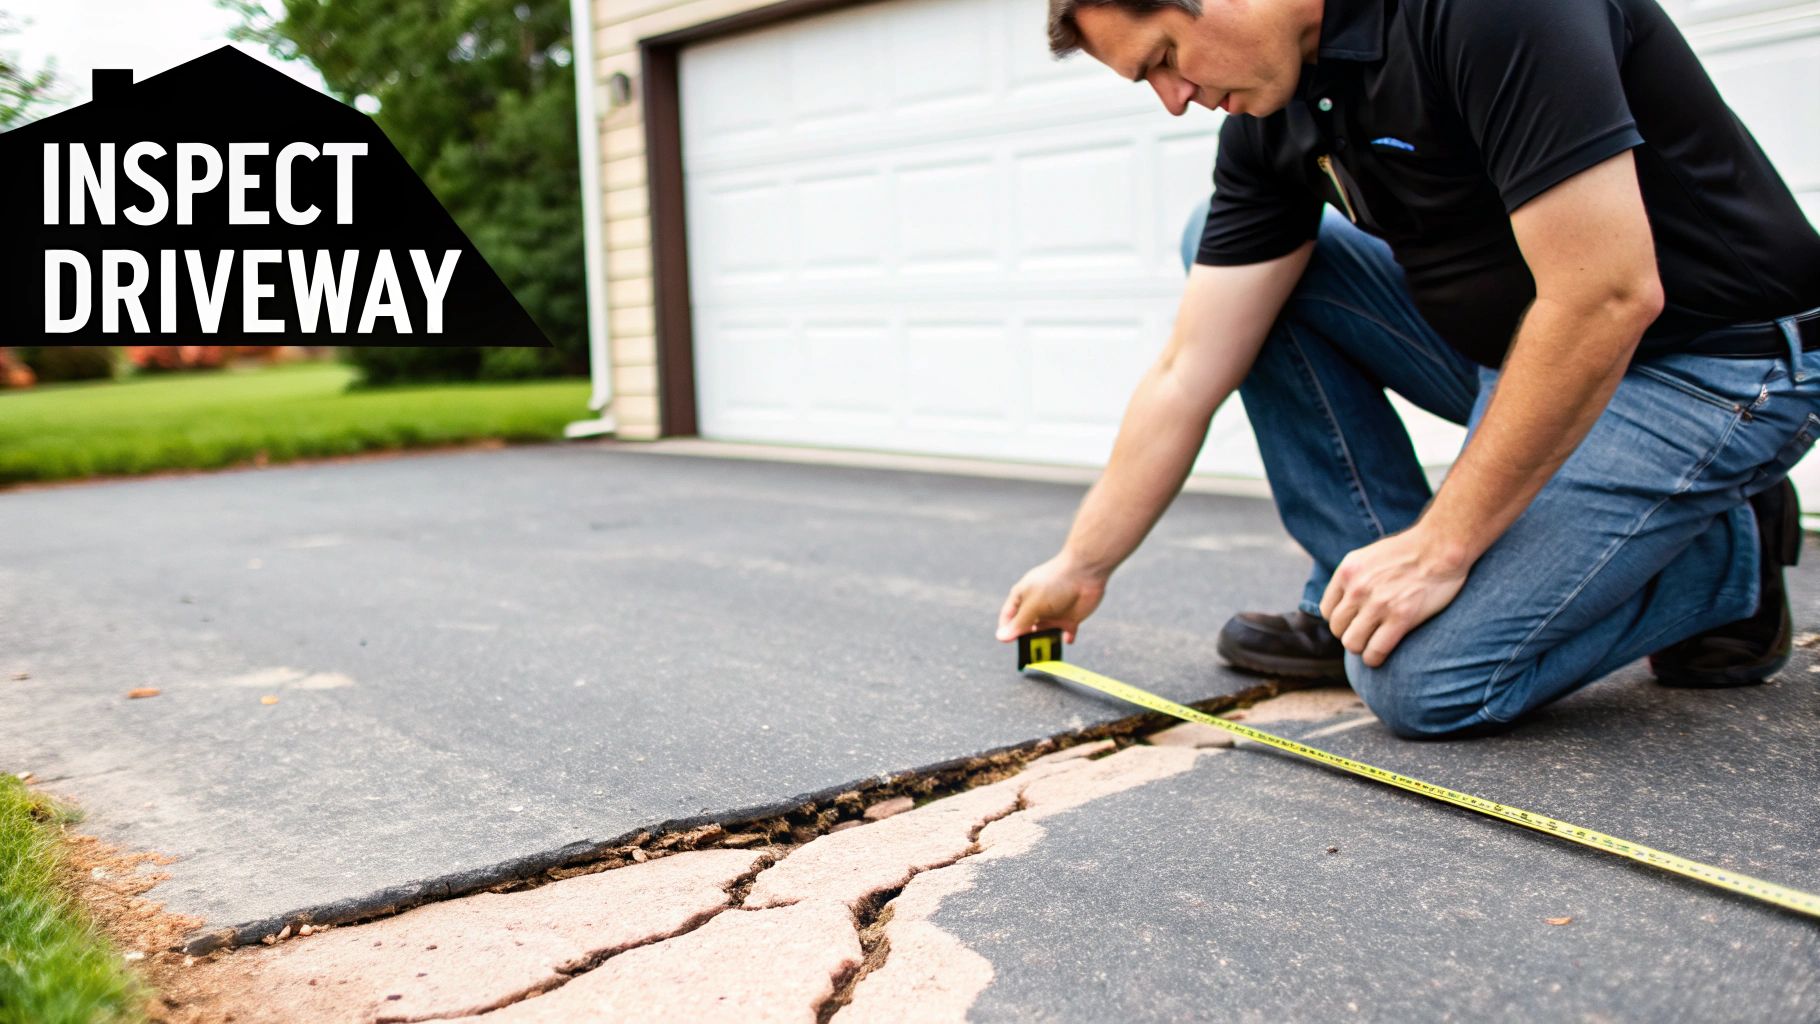
Before you even think about ordering a concrete truck, you need to play detective with your current driveway. The whole idea of pouring concrete over asphalt sets up a natural conflict: you’re laying a rigid, unbending slab over a surface that’s designed to be flexible. If that asphalt base is weak, brittle, or unstable, you’re just setting yourself up for expensive cracks and a failed project.
Think of it like putting a fine china plate on a wobbly table. It doesn’t matter how perfect the plate is; the instability underneath will eventually cause it to break. In this scenario, your new concrete is the china plate, and the old asphalt is the table—it absolutely has to be solid.
This assessment is hands-down the most important step in the entire process. Getting it right saves you from a massive headache and an even bigger bill. Get it wrong, and your brand-new concrete will simply inherit all the problems you tried to cover up.
Identifying Structural Red Flags
Your first job is to get out there and walk the entire driveway. You're on the hunt for specific warning signs that tell you the asphalt is not a suitable foundation for a concrete over asphalt overlay. These aren't just surface-level blemishes; they're clues that the real problems run much deeper.
You're looking for evidence that the asphalt itself, or the subgrade beneath it, is failing. While you can fix minor imperfections, deep structural flaws can't just be paved over. Be brutally honest with yourself here.
Here's a checklist of the most critical red flags to look for:
- Alligator Cracking: This is the big one. If you see a web of interconnected cracks that looks like an alligator's skin, stop right there. This is a tell-tale sign of subgrade failure, meaning the very ground under the asphalt is unstable. As an example, this often happens when the original gravel base was too thin or wasn't compacted properly.
- Deep Rutting: Look for the long, shallow grooves where tires travel every day. If those ruts are more than an inch deep, it signals that the asphalt layers are shifting under the weight of vehicles—a classic sign of a weak base. You can check this by laying a straight board across the driveway and measuring the gap.
- Potholes and Upheaval: Potholes are obvious—they’re spots where the asphalt has completely given up and crumbled away. Heaving, or upheaval, is the opposite, where sections of the driveway are being pushed upward, usually because of frost or major water issues below from something like a broken sprinkler line.
A stable asphalt base should be at least 2-3 inches thick after it has been prepared for the concrete. If your asphalt is thin, crumbling, or breaking apart at the edges, it just doesn't have the muscle to support a new concrete slab. For example, if you can see the gravel base showing through at the edges, the asphalt is likely too thin.
Probing for Hidden Weaknesses
Sometimes, the most serious issues aren't the ones you can see. You also need to physically test the surface for instability that might not be obvious at first glance. This simple, hands-on approach can tell you a lot.
A healthy asphalt driveway should feel completely solid underfoot. Any "give" or softness is a major cause for concern.
Take a slow walk across the entire surface and pay close attention to how it feels. Do some areas feel different than others?
- Spongy or Soft Spots: Press down hard with your heel on different sections, especially near cracks or low spots. If the surface feels spongy or has any give, it's a dead giveaway that water has seeped in and turned the base layer to mush. Pouring concrete over that is like building on a swamp. For example, this is common in low-lying areas of a driveway where water collects.
- Poor Drainage: Notice where water goes after it rains. Does it pool in certain areas and sit there for hours or days? Poor drainage is the enemy of both asphalt and concrete. That standing water will saturate the subgrade, leading to the instability you want to avoid. An example of poor drainage is a large puddle forming near the garage door that doesn't drain away.
If your driveway is showing any of these major structural flaws—especially widespread alligator cracking or soft spots—it is not a candidate for a concrete overlay. The only real fix in these cases is a complete tear-out and replacement. For homeowners facing these kinds of extensive problems, looking into professional residential concrete and masonry repair is the best way to understand your options and find a lasting solution.
The Real Pros and Cons of a Concrete Overlay
Deciding whether to pour concrete over your old asphalt driveway is a classic case of weighing a tempting shortcut against some very real risks. On one hand, you see the dollar signs you could save. On the other, you have a host of technical challenges that could turn that dream project into a costly nightmare.
The biggest pull, of course, is the money. You get to skip the messy, expensive job of tearing out and hauling away all that old asphalt. For example, on a typical 600-square-foot driveway, demolition and disposal alone could cost over $1,500. This isn't just about saving on demolition costs; it also means you're using that existing asphalt as a pre-compacted base for your new concrete.
But this is exactly where things get tricky. The downsides are significant, and they deserve a hard look before you even think about calling a concrete truck.
The Major Advantage: It's All About Cost and Speed
Let's be honest—the most attractive reason to even consider a concrete overlay is the upfront savings. By leaving the old asphalt in place, you’re basically doing a major renovation instead of a full teardown and rebuild.
This approach gives you a couple of big financial wins:
- No Demolition Costs: You completely sidestep the expense of bringing in heavy equipment, the labor needed to bust up the old surface, and the fees for trucking and disposing of the asphalt debris. For example, a full tear-out might add 1-2 days to the project timeline, whereas an overlay skips this step entirely.
- Less Base Material to Buy: A stable, solid asphalt slab can act as a ready-made sub-base. This often means you won't need to buy and install nearly as much new compacted gravel, saving hundreds of dollars in material costs.
When the stars align and the conditions are just right, this strategy can save you a good chunk of change and get you a new driveway much faster and with a lot less chaos.
The Critical Drawback: Reflective Cracking
Now for the big one. The single greatest risk you run with a concrete over asphalt project is something called reflective cracking. This is the number one reason these jobs fail, and it's exactly what it sounds like: cracks in the old asphalt "reflect" right up through your beautiful new concrete.
Think of it like this: if you place a sheet of paper over a cracked piece of glass and press down, the paper will eventually tear along the exact same lines as the cracks below. That's reflective cracking in a nutshell. Every existing crack, seam, or weak spot in the asphalt becomes a point of stress for the new concrete sitting on top.
This happens because concrete and asphalt are two completely different beasts. They expand and shrink at different rates with temperature swings. For example, on a hot summer day, the black asphalt can get much hotter than the lighter concrete, causing it to expand more and put stress on the concrete above. As the flexible asphalt base moves and shifts, it pulls on the rigid concrete, eventually forcing it to crack along those pre-existing weak points.
When the underlying asphalt isn't in near-perfect shape, reflective cracking isn't a matter of "if" but "when." A pro installation will use bond breakers and steel reinforcement to fight this, but even they can't stop it if the foundation is fundamentally flawed.
Other Hidden Risks to Watch Out For
Beyond cracking, slapping a new layer of concrete on top of your driveway can cause a domino effect of other problems. You’re raising the overall height of the surface, even if it's just by a few inches, and that changes everything around it.
You absolutely have to plan for these issues:
- Drainage and Water Flow: That extra height can completely reroute how water drains off your driveway. For instance, you might accidentally create a mini-dam that funnels rainwater straight into your garage or against your home's foundation, leading to some serious water damage.
- Transitions and Accessibility: How is the new, higher driveway going to meet the garage floor, the sidewalk, or the street? A sudden lip creates a tripping hazard, an annoying bump every time you pull in, and it might not even meet local building codes. For example, many municipalities have rules about the maximum height difference between a driveway and a public sidewalk.
It also helps to understand the bigger picture. Asphalt is everywhere—of the roughly 2.3 million miles of paved roads in the U.S., a staggering 94% are surfaced with it, mainly because it's cheaper and faster to install. But while concrete roads can have 28% higher initial costs, their long-term maintenance needs are often 19% lower thanks to their incredible durability. Homeowners looking to blend that same toughness with high-end looks should definitely explore residential decorative concrete for a great long-term investment.
The Proper Way to Install Concrete Over Asphalt
Pouring concrete over an old asphalt driveway isn't just about dumping a mix and spreading it around. Far from it. This is a skilled construction job where every single step matters. Cutting a corner anywhere in the process, like failing to properly clean the surface, can lead to a complete and costly failure down the road.
Think of it this way: a surgeon doesn't just start cutting. There's a meticulous prep process, a precise plan, and a specific sequence for a reason. The same professional discipline is required for a concrete overlay to last.
This process is your quality checklist. If a contractor you're considering suggests skipping any of these stages—for instance, saying a bond breaker isn't necessary—it's a massive red flag. It tells you they probably don't have the specific experience needed for this kind of project.
Step 1: Meticulous Surface Preparation
The real work starts long before the concrete truck ever shows up. The first, and arguably most important, phase is getting the old asphalt surface ready. It has to be perfectly clean and structurally sound to act as a solid foundation for the new concrete.
It all begins with a serious power washing. We're talking about blasting away years of caked-on dirt, oil stains, moss, and any crumbling bits of asphalt using a pressure washer with at least 3000 PSI. If you leave any of that grime behind, it creates a weak spot, preventing the new layers from settling properly and almost guaranteeing a failure point.
Once it's squeaky clean, a good contractor will meticulously repair any existing damage. This isn't optional.
- Crack Repair: Every significant crack gets filled with a high-quality asphalt repair compound. This stops those weak lines from "telegraphing" up and reappearing in your brand-new concrete. For wider cracks, a rubberized filler is often used for better flexibility.
- Pothole Patching: Any potholes or big gouges are cut out to create clean, vertical edges and patched with fresh asphalt. The goal is to create a smooth, uniform base without any major dips or voids.
- Final Debris Removal: The entire area is swept or blown clean one last time with a power blower. You want absolutely no dust or loose debris trapped between the old asphalt and the new concrete.
Step 2: Creating a Bond Breaker
Now, here’s a step that often surprises people because it seems backward. Instead of trying to make the new concrete stick to the old asphalt, we intentionally create a separation layer. This is called a bond breaker, and it's the secret to preventing a common problem called reflective cracking.
Here’s the thing: concrete and asphalt are different materials. They expand and contract at different rates when the temperature changes. Without a bond breaker, they'd be fused together, fighting each other with every temperature swing. That stress has to go somewhere, and it usually results in ugly cracks.
A bond breaker is the key to managing the different thermal expansion rates of concrete and asphalt. It essentially lets the new concrete slab "float" on top of the asphalt base, so the asphalt's movement doesn't transfer stress and crack the concrete above.
There are a couple of standard ways to do this:
- A Thin Sand Layer: A fine, even layer of sand, about a half-inch thick, is carefully spread across the entire asphalt surface.
- Geotextile Fabric: A durable, specialized fabric is rolled out over the asphalt, creating a perfect, consistent separation. This is often the preferred method for high-end jobs.
Step 3: Installing Steel Reinforcement
Concrete is incredibly strong when you try to crush it (this is called compressive strength). But it's surprisingly weak when you try to pull it apart or bend it (tensile strength). To fix this inherent weakness, adding steel reinforcement is an absolute must for a quality overlay.
This steel grid acts like a skeleton inside the concrete, giving it the internal strength it needs to handle the pulling forces from vehicle weight and temperature changes. For a standard residential driveway, this is usually welded wire mesh. It's a grid of steel wires that gets rolled out and propped up on small supports called "chairs," ensuring it ends up in the middle of the concrete slab for maximum effect, not lying uselessly at the bottom.
If you’re planning a pad for a heavy RV or truck, your contractor will likely recommend upgrading to rebar (thick reinforcing steel bars) tied together in a much stronger grid pattern, for example, a 2-foot by 2-foot grid of #4 rebar.
Step 4: Pouring and Finishing the Concrete
With all the prep work done, it's finally time for the main event. A professional crew moves fast to pour the concrete and spread it evenly within the forms. For a concrete overlay to have any chance of lasting, it needs to be a minimum of four inches thick. Anything thinner simply won't have the structural muscle to survive.
As soon as the concrete is down, the finishing work begins:
- Screeding: A long, straight tool, like an aluminum screed board, is pulled across the concrete to strike off the excess and make it level.
- Floating: A large "bull float" is used to smooth the surface and push the heavy gravel just below the top layer, which helps prevent surface cracking.
- Troweling: As the concrete starts to set, it's worked with steel trowels to create a denser, smoother finish.
- Broom Finish: For driveways and walkways, a special broom is lightly dragged across the surface. This creates a fine-lined texture that provides crucial traction, especially when it's wet.
Last but not least, the crew will cut control joints into the surface, typically in a 10×10 foot grid pattern. These are carefully planned grooves that create a weakened line in the slab. As the concrete naturally shrinks and cures, it will crack along these neat, straight lines instead of spiderwebbing randomly across your beautiful new surface. It's a controlled crack, and it’s a sign of a job done right.
What to Expect in Terms of Cost, Lifespan, and Climate
Alright, let's talk numbers and long-term value. It's one thing to understand the process, but what you really need to know is how a concrete overlay stacks up financially and how it will hold up over the next couple of decades. The upfront cost is tempting, but it’s the full story of durability and climate that really matters.
The big draw is pretty obvious: pouring concrete over existing asphalt is almost always cheaper than a full tear-out and replacement. You're skipping the heavy costs of demolition, hauling away old material, and preparing a brand new base. This initial savings, however, comes with a trade-off in longevity. A properly done overlay on a solid asphalt base can realistically give you 15 to 20 years of good service.
Now, compare that to a brand-new concrete driveway installed from scratch. While the initial investment is higher, you’re looking at a surface that can easily last 30 years or more. That extra decade-plus of life often makes the higher upfront cost a much smarter move in the long run.
Cost and Lifespan: A Head-to-Head Comparison
To really see the difference, it helps to put the options side-by-side. The price per square foot is a good starting point, but the real value emerges when you look at cost and lifespan together.
This table breaks down how the most common driveway paving methods compare.
Cost and Lifespan Comparison for Paving Options
| Paving Method | Estimated Cost per Sq. Ft. | Typical Lifespan | Key Considerations |
|---|---|---|---|
| Concrete Overlay | $6 – $11 | 15 – 20 years | Success is entirely dependent on the condition of the existing asphalt base. For example, a perfect base might yield a 20-year lifespan, while a mediocre base might only last 10-12 years. |
| New Asphalt Driveway | $4 – $8 | 15 – 25 years | Requires periodic sealcoating (e.g., every 3-5 years) and is more susceptible to oil stains and heat damage. |
| New Concrete Driveway | $8 – $18 | 30+ years | Highest upfront cost but offers the greatest durability and lowest long-term maintenance. For example, it doesn't need regular sealing like asphalt. |
As you can see, a concrete overlay sits in a middle ground for initial cost, but its lifespan is much closer to new asphalt than it is to new concrete. This makes the health of your existing driveway the single biggest factor in deciding if those upfront savings are truly worth it.
The process itself is a three-part system, as this visual shows.
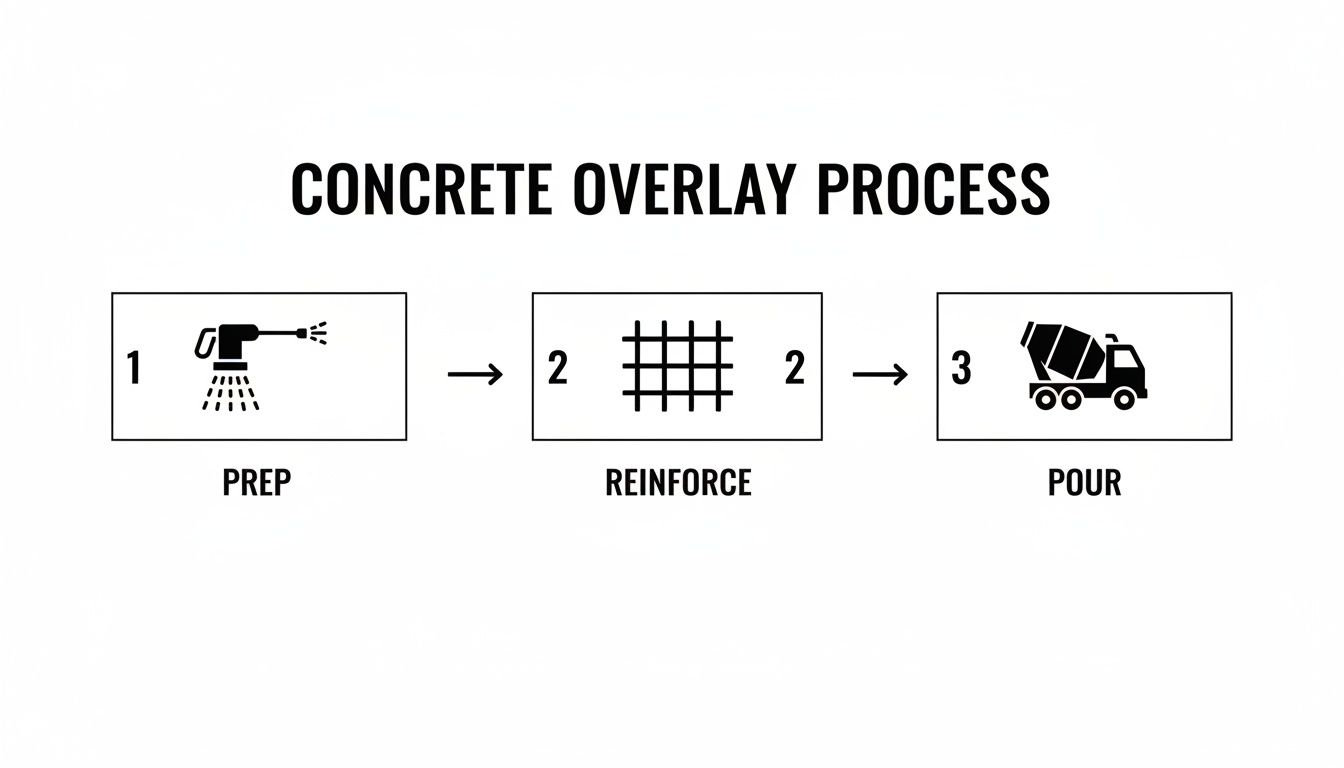
This really drives home the point that a successful overlay is all about the prep work and reinforcement—the quality of the pour depends entirely on the foundation you build for it.
How Your Local Climate Changes Everything
Beyond the budget, your local climate plays a massive role in whether an overlay is even a good idea. Here in Atlanta, we get hot, humid summers and the occasional winter freeze. That’s a big problem because concrete and asphalt expand and contract at very different rates when the temperature changes.
Think of it as two layers of material constantly fighting each other. This invisible tug-of-war creates a ton of stress right at the bond line between the two surfaces. For example, on a summer day when the temperature swings from 70°F at night to 95°F in the afternoon, the asphalt can expand significantly more than the concrete, putting the concrete slab under tension.
In regions with dramatic temperature swings, the different thermal expansion rates of concrete and asphalt are a primary cause of overlay failure. This is especially true during freeze-thaw cycles, where trapped moisture can be incredibly destructive.
Those freeze-thaw cycles are the real killer. Any bit of moisture that gets into the old asphalt can freeze, expand with incredible force, and literally pop the concrete slab from underneath. It's a hidden, internal pressure that can cause widespread cracking that’s impossible to fix. For example, a single harsh winter with multiple deep freezes can cause more damage than five years of normal weather.
Because of this, in climates with harsh winters or significant temperature swings, most experienced contractors will tell you a full replacement is the only reliable way to get a durable, long-lasting surface.
Hiring a Contractor and What to Ask
Let's be clear: pouring concrete over asphalt is not a weekend DIY job. This is a complex project where the materials are heavy, the process is unforgiving, and the margin for error is razor-thin. One small mistake, for instance, placing the wire mesh reinforcement on the bottom instead of in the middle of the slab, can lead to a total failure of the new surface. This is one of those times when hiring an experienced professional is essential.
Knowing when to make that call is the first step. If your own inspection turns up widespread alligator cracking, deep ruts, or spots that feel spongy underfoot, it's time to pick up the phone. Those aren't just cosmetic flaws; they're giant red flags signaling that the foundation is failing. The job requires a pro's diagnosis, and it will almost certainly involve a full replacement, not just a simple overlay.
When it comes to choosing the right contractor, it's about so much more than just finding the lowest bid. You need a true expert who gets the unique challenges that come with a concrete over asphalt installation.
Key Questions for Every Potential Contractor
You can move past a simple price quote and really dig into a contractor's expertise by arming yourself with the right questions. How they answer will tell you everything you need to know about their experience and their commitment to doing the job right. A real pro will be happy to answer; in fact, they’ll respect you for asking.
If you get a vague or dismissive response, consider it a major warning sign. Here’s a checklist to use during your conversations:
-
How do you evaluate the existing asphalt base? A good contractor won’t just glance at it. They should describe a hands-on process of checking for soft spots, figuring out the depth of the cracks, and making sure the drainage is correct. For example, they might say, "I'll do a core sample to check the asphalt's thickness and inspect the subgrade." They need to be able to explain why your specific driveway is (or isn't) a good candidate for this.
-
What is your strategy to prevent reflective cracking? This is the single most important technical question you can ask. You're listening for specific terms like "bond breaker" (which could be a sand layer or a special geotextile fabric) and steel reinforcement, like wire mesh or rebar. If they don't mention these, they don't know what they're doing. A great answer would be, "We'll apply a geotextile fabric as a bond breaker and use #4 rebar on an 18-inch grid for maximum strength."
-
What concrete mix and reinforcement do you recommend for our Atlanta climate? The answer here needs to be specific. With our region's heat, humidity, and occasional freeze-thaw cycles, a generic mix won't cut it. They should specify a concrete strength, like 4000 PSI, and may suggest adding air-entrainment admixtures to help it resist freeze-thaw damage. They should also explain their reasoning for the type and placement of the reinforcement they plan to use.
Protecting your investment starts with hiring the right team. A contractor who can’t clearly explain their process for preventing common failures is likely to be the one who causes them. Don’t be afraid to ask for details.
The demand for paving materials isn't slowing down. The global asphalt concrete market was valued at around US$ 3.38 billion in 2024 and is expected to grow by 5.1% annually. This shows that while asphalt is still a go-to for many projects, more people are choosing concrete for its raw durability and long-term value. You can discover more insights about the asphalt concrete market to see the trends.
By asking these pointed questions, you can move forward with confidence, knowing you've selected a qualified professional who can deliver a driveway built to handle whatever time and weather throw at it.
Common Questions We Hear About Concrete Overlays
When it comes to pouring concrete over an old asphalt driveway, a lot of questions pop up. It makes sense—it’s a big project. Here are the straight answers to the questions we get asked most often.
How Thick Does the Concrete Need to Be?
For a typical residential driveway that sees daily use from cars and SUVs, you absolutely need a minimum of four inches of concrete. Skimping on this is asking for trouble. Anything thinner just won't have the strength to support vehicle weight over time and will inevitably crack under the pressure. For example, a 3-inch slab has significantly less structural strength and is far more prone to cracking than a 4-inch one.
If you have heavier toys, like an RV, a work truck, or a boat trailer, we'll likely recommend bumping that up to five or even six inches. That extra thickness is your insurance policy for a slab that lasts.
Will This Make My Driveway Taller?
Yes, and it's a detail you can't afford to overlook. A four-inch concrete overlay raises your entire driveway surface by, you guessed it, four inches. This can create a few potential headaches if not planned for.
Suddenly, you might have a new drainage problem on your hands, a new trip hazard where the driveway meets the sidewalk, or a steep, jarring bump getting into your garage. For example, your garage floor might now be four inches lower than your driveway, creating a difficult transition that could scrape the bottom of your car.
A seasoned pro knows how to handle these height changes. They'll plan the project to make sure water still flows away from your house and that all the transitions—to your garage, the sidewalk, and the street—are smooth and safe. For example, they might grind down the asphalt near the garage to create a gentle slope.
Can I Just Pour Concrete Over My Cracked Asphalt?
That’s a definite no. Trying to hide significant damage like deep "alligator" cracking, heavy ruts, or soft, sinking spots by pouring concrete over them is a guaranteed way to waste your money.
Think of it this way: the old asphalt is the foundation for your new concrete. If the foundation is weak, whatever you build on top of it will fail. Those existing cracks and unstable areas will just transfer right up through the new slab, a problem we call "reflective cracking." For instance, a long crack running down the center of your asphalt will almost certainly reappear in the same spot on your new concrete within a year or two. Before you can even think about an overlay, the existing asphalt has to be a solid, stable base.
Wondering if a concrete overlay is the right move for your driveway? The crew at Atlanta Concrete Solutions can give you a professional, honest assessment and deliver an installation that's built to withstand Georgia's climate. Get your free, no-obligation quote today!