
You're standing in the back yard with a tape, trying to picture chairs around a fire. The catalog makes the ring look like furniture you can drop on any slab. It isn't. A stamped concrete patio fire pit has to be a constraint on the concrete, not a decoration added after the pour.
Most cracked hearths, rocking bowls, and scorched edges start with a decision made before the truck arrives. Clearance, hearth size, drainage, and control-joint placement are fixed at layout. Change them after the stamp and you cut the pattern, land a joint under the burner, or sit too close to a fence.
Say the yard is about 40 by 50 feet and the first sketch puts a small ring near the wood fence. That ring is already inside the distance model codes use for a recreational fire, and a maple hangs over the same spot. The pit has to move, or the patio has to grow. I'd lock that on paper before ordering a yard of concrete.
Set Fire-Pit Clearances Before Sizing the Patio
The ICC sample of model fire-code provisions states that recreational fires should not be conducted within 25 feet (7,620 millimeters) of a structure or combustible material, and that conditions allowing fire to spread within that distance must be eliminated before ignition. The same provisions put fires in approved containers at least 15 feet (4,572 millimeters) from a structure, and open burning generally at least 50 feet (15,240 millimeters) from a structure.
Those numbers are planning benchmarks, not an Atlanta permit. City, county, and HOA rules can set different distances for gas appliances, wood pits, property lines, decks, fences, and burn bans. I still start the tape at the house wall, not at the edge of the dream patio.
| Case | Reference distance | Source basis | Planning note |
|---|---|---|---|
| Recreational fire from a structure or combustible material | 25 feet (7,620 millimeters) | ICC model provisions | Treat as a minimum; confirm with local rules |
| Fire in an approved container from a structure | 15 feet (4,572 millimeters) | ICC model provisions | Check the pit's listing and manufacturer clearance |
| Minimum separation from anything that can burn | 10 ft (3 m) | NFPA educational guidance | Not a permit approval on its own |
| Open burning from a structure | 50 ft (15 m) | ICC model provisions | Applies where jurisdictions enforce NFPA 1 style rules |
| Overhanging branches, eaves and roof projections | Manufacturer-specified | Pit manual | Keep canopies out of the clearance zone entirely |
A yard that forces the pit to move
Take that 40 by 50 foot yard. The first sketch holds a 14 by 18 foot pit zone. A wood fence sits 9 feet from the ring, and a red maple canopy covers the same patch. The fence is inside the 25-foot recreational-fire benchmark, and the canopy is over the flame.
Move the pit 16 feet toward open lawn. The fence clears the zone, and the maple stays out of it. The stamped patio then grows to about 24 by 30 feet, which leaves roughly 8 feet of clear seating around the hearth. A 4-foot ring on a 10-foot pad looks fine in a showroom and fails in this yard.
Practical rule: Size the clearance circle first, then draw the slab around the circle that remains.
Build order stays the same on every lot I lay out. Confirm local rules, choose the pit type, mark the clearance zone, prep the base, pour, stamp, build the pit, then commission it. Skip the first three and the pour locks in the mistake.
Choose a Fire-Pit Type That Suits a Stamped Slab
| Pit type | Slab and clearance impact | Best fit |
|---|---|---|
| Gas kit in a masonry or steel surround | Gas line, drain path, level pad sized to the burner pan | Frequent use, low smoke |
| Wood-burning masonry ring | Noncombustible hearth, spark control, larger clearance | Traditional look, occasional use |
| Prefab steel bowl on a concrete pad | Freestanding; follow the listed manufacturer clearance | Smaller yards, tighter budgets |
Pick the type before the forms go in. Hearth dimensions set joint layout, sleeve locations, and how much of the stamp field stays decorative.
Gas, if you will use it regularly. Choose a gas kit when the patio will see fire more than twice a week in cooler months and a gas line can reach the pad within about 30 feet. The burner pan needs a level pad, a sleeve outside the hottest zone, and a drain so rain doesn't sit in the pan. That sleeve is why the slab edge and the control joints can't be drawn as a simple rectangle.
Wood, if smoke is the point. A masonry ring needs a noncombustible hearth, a spark screen, and the larger recreational-fire clearance, because it throws embers. It also needs an ash path that doesn't stain the stamp. I'd choose wood when the look and the smoke matter more than lighting a switch on a Tuesday.
A steel bowl, if the yard is tight. A prefab bowl on its own pad is the lightest touch on the stamp and the lowest build. It still follows the manufacturer's listed clearance, and it is not a license to tuck it under a soffit. Portability helps only if you have a noncombustible spot to move it to.
NFPA research on fires caused by playing with fire estimated that U.S. municipal fire departments responded to an average of 30,460 fires caused by playing with fire each year during 2014 to 2018, causing about 50 deaths, 510 injuries, and $205 million in direct property damage annually. Those figures don't isolate patio fire pits.
Concrete itself won't burn. Leaves, mulch, cushions, and overhanging plants are where a small flame becomes a yard fire. Clear those the same day you set the pit, and check local burn rules before the first match. Pattern and color can wait. Containment, clearance, drainage, and a way to put the fire out cannot.
Permits and Budget for an Atlanta Patio
Settle the permit line before the excavator shows up. If the work touches the sidewalk, curb, verge, or street connection, including a driveway apron that meets the patio, city right-of-way rules apply. The Atlanta Department of Transportation right-of-way page lists installing or repairing a driveway apron among activities that need authorization, along with sidewalk work and road closures.
A patio that stays entirely on private land still isn't a free-for-all. A gas line and a listed pit usually mean a licensed gas installer and an inspection. Confirm that path with the City of Atlanta before you order the kit or the concrete. I would not treat a driveway permit as cover for curb or apron work.
A first-pass cost stack
These ranges are 2026 Atlanta planning estimates, not bids. Replace every line with written quotes that list the same scope.
| Line item | Typical range |
|---|---|
| Stamped slab, 4 inch reinforced, installed | $10-$18 per sq ft |
| Excavation, gravel base and compaction | $1-$3 per sq ft |
| Gas fire pit kit and installation | About $3,000 (worked example) |
| Gas line extension | About $1,000 (worked example) |
| Penetrating or film sealer | About $300 for 300 sq ft (worked example) |
| City permit fees | Confirm the fee for your exact scope with the City of Atlanta |
Work a 300 square foot patio at about $12 per square foot for the slab, and the concrete line is $3,600. Add the $3,000 gas kit, the $1,000 gas line, and $300 of sealer, and you're near $7,900 before excavation and permits. Excavation at $1 to $3 per square foot is about $300 to $900 on this pad.
Hold a 10 to 15 percent contingency, roughly $800 to $1,200 on that stack, for soft clay or buried debris. Atlanta yards often hide both. A quote that omits the gas permit, the sleeve, or the hearth ring is not the same job as one that includes them. Ask each bidder to price those lines separately so you can compare the pour, not the sales language.
Prepare the Base and Pour the Slab
The finish can hide a bad base for one season. The hearth edge shows it at the first hard freeze. By layout day, the ring, sleeve, drainage path and joint lines are already fixed, so the pour has to serve them. GDOT miscellaneous-concrete requirements cover excavating and grading the subgrade, compacting it to the firmness of the adjoining ground where concrete is placed, and setting concrete on a compacted, wetted bed; the same set lists a minus tolerance of 0.5 inch and shows minimum specified 6- or 8-inch pavement with No. 3 bars at 12-inch centers where plans require it. Read that as a roadway section. A backyard slab still needs thickness matched to foot traffic, soil, drainage and any vehicle-bearing apron.
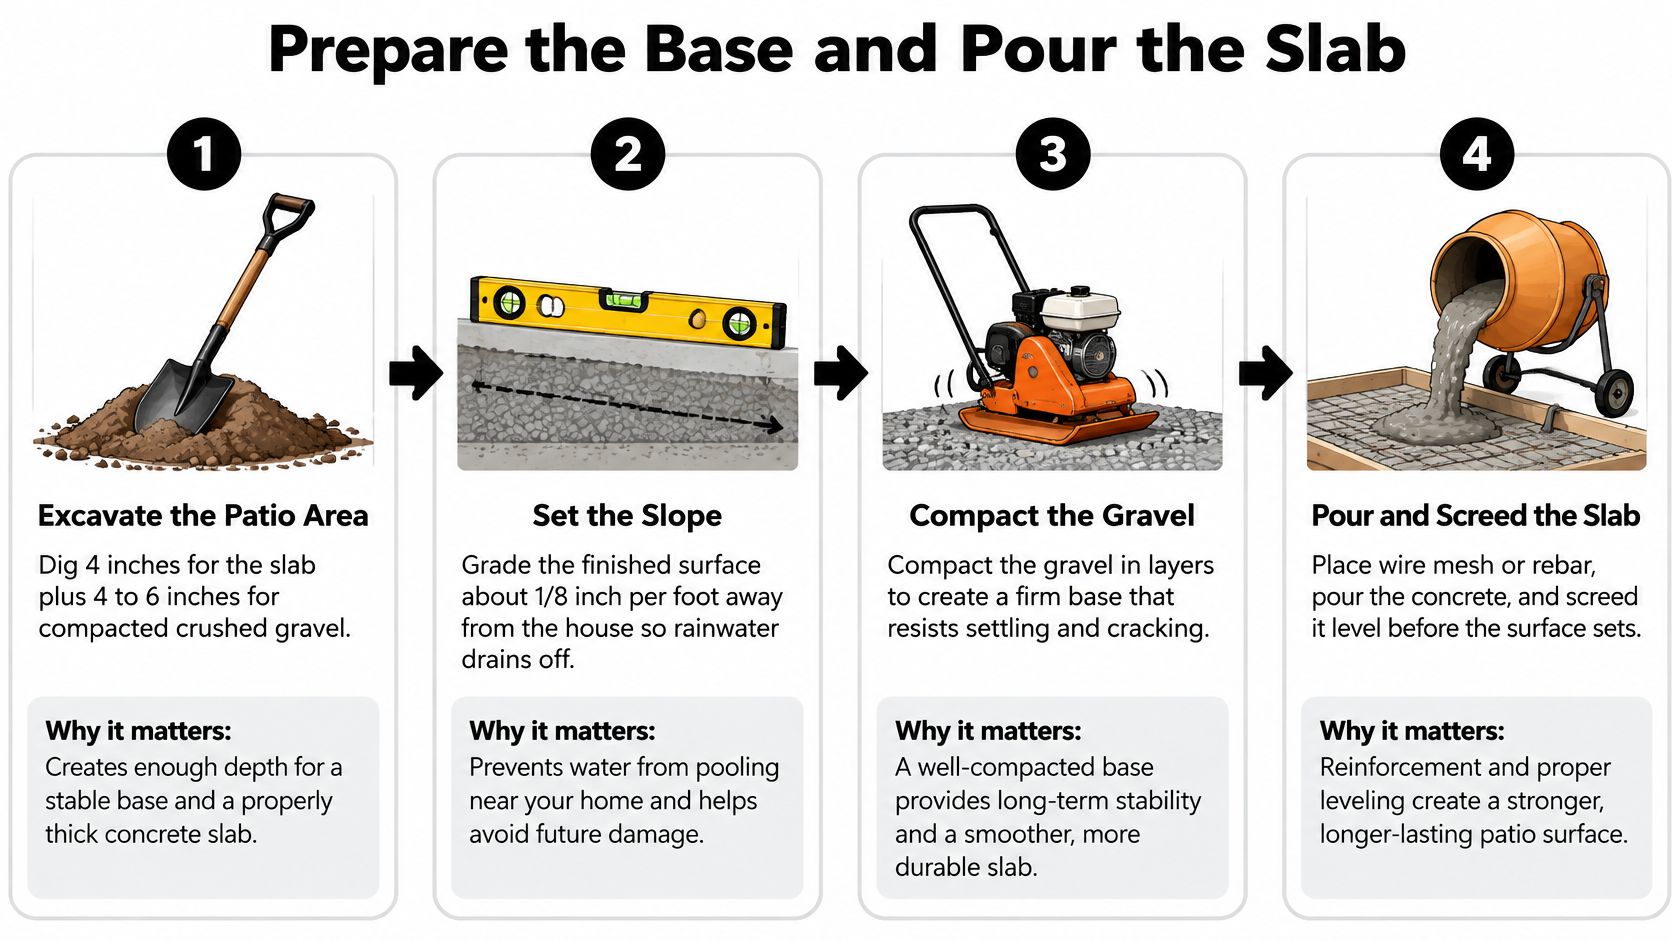
Seven steps and the reason for each
- Excavate for structure. Set depth for a 4-inch slab over 4 to 6 inches of compacted crushed gravel. Slope the finished surface about 1/8 inch per foot away from the house and the pit so rain leaves the hearth.
- Compact, then wet. Compact the subgrade until it matches the firmness of the ground beside it, then wet it before placement. A dry, loose bed pulls water out of the mix and leaves a weak bottom.
- Build the drainage shown on the plan. Where the drainage plan shows a weep or pocket, excavate it and fill it with coarse aggregate so water moves away from the slab. A low spot under the pit holds water against the slab all winter.
- Pick steel for the load. Welded wire or rebar at mid-depth is enough for foot traffic. Use a 6-inch section where a vehicle-bearing apron ties into the patio, and keep steel where tires will sit. A highway mat belongs on highway loads.
- Hold the thickness. Stay within that 0.5 inch minus tolerance of the specified depth. A 4-inch callout that measures 3 inches at the hearth is already thin where heat and moisture meet.
- Joint the field around the fire. Cut control joints so panels stay near 8 feet square, and keep every joint out of the hearth zone. A joint through the burner is a planned crack under the hottest spot.
- Place it once. Screed and float only as far as the stamping window allows. The same miscellaneous-concrete spec bars overlay pours for that class of work. A failed slab gets removed and replaced.
If you want a plain-language companion on outdoor layout before you stake forms, the patio building advice for outdoor living notes from Woodstock Furniture & Mattress Outlet are a useful read beside a contractor's pour plan. For the structural pour itself, look at how residential poured concrete is scoped when the slab has to carry more than patio furniture.
The mistake that shows up first is skipped compaction. The gravel looks flat, the stamp looks sharp, and by the first freeze-thaw cycle the hearth edge has settled and cracked. Press a shovel heel into the base before the forms go in; if it pumps or holds a footprint, recompact. You can't stamp your way out of a soft subgrade.
Stamp, Color and Seal the Surface
Stamp when a thumb pressed on the surface leaves a mark without sinking. In warm Atlanta weather that is often one to two hours after floating. Cool or humid days push it later. Start early and the mat sinks. Start late and the pattern is a scratch.
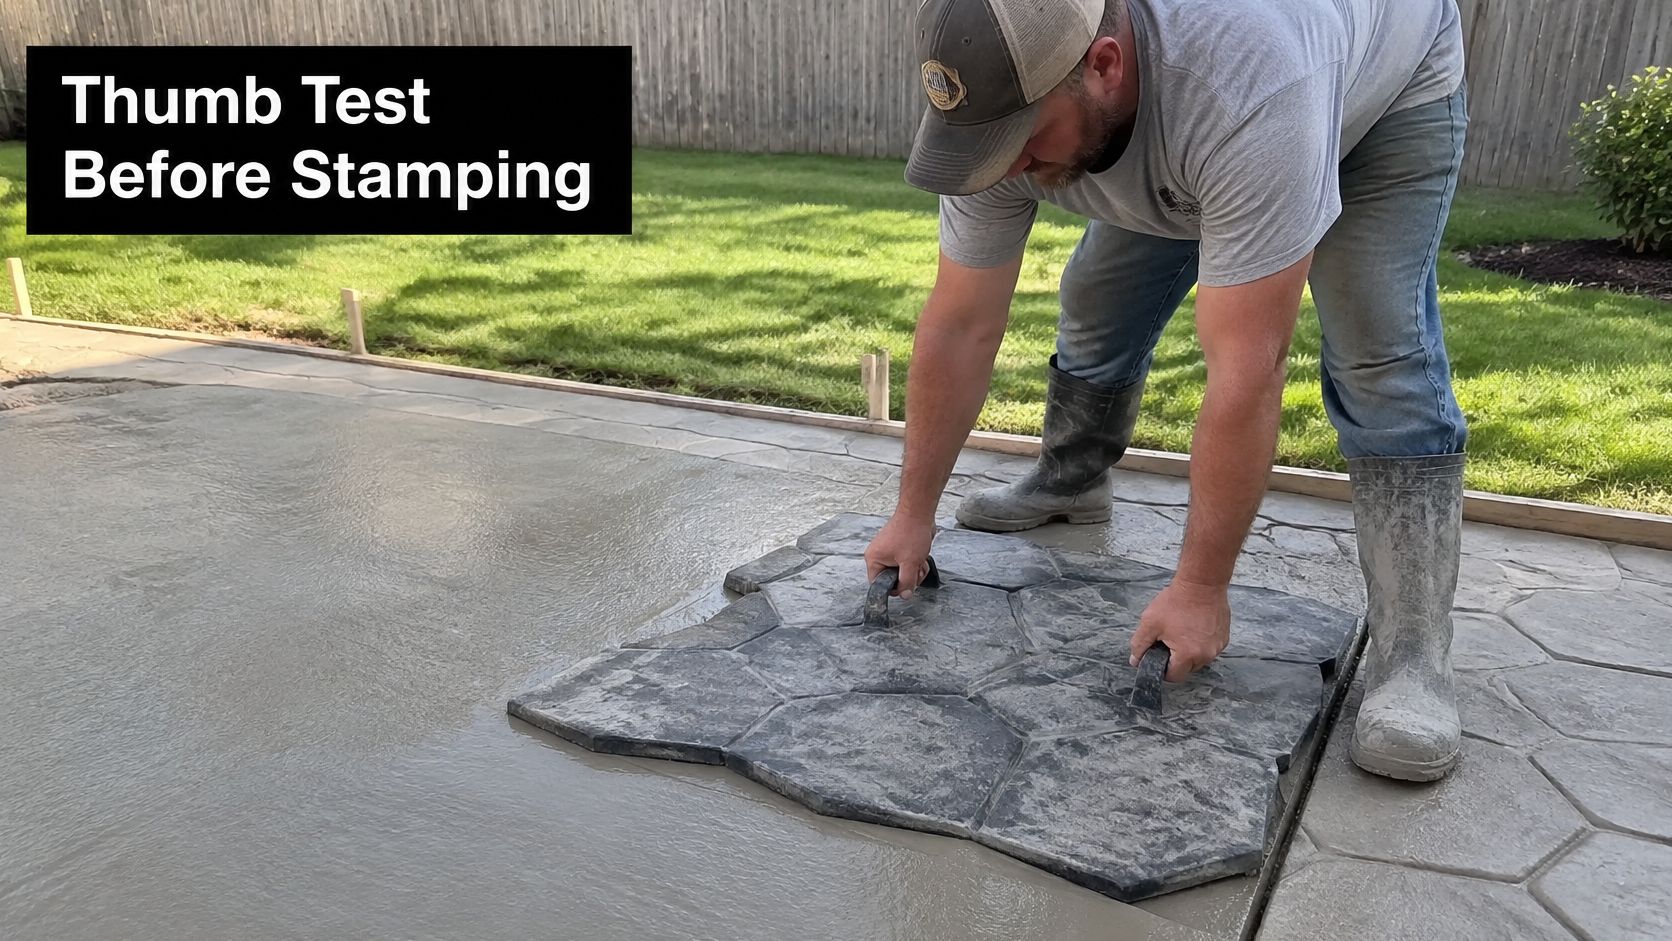
What the crew does, and what a miss looks like
- Color goes in even, or it never looks even. Broadcast or dry-shake color hardener and float it until the tint is consistent. A thin spot reads louder than a slightly soft stamp line, especially next to a dark hearth.
- Release is a dusting, not a coat. Apply it lightly. A heavy coat washes the joints out and leaves a powdery film that sealer will trap.
- Stamp from the edge inward. Overlap mats so grout lines meet, and keep the control joints where the layout put them. A twisted ashlar field around the future ring is the usual result of starting in the middle.
- Texture, then wait to wash. Broom only where the design calls for grip, such as a step or a wet path to the house. Rinse release after the surface has firmed. A hard rinse on soft concrete pulls the color.
- Seal after a full cure, in two thin coats. Use a penetrating or film-forming sealer, and skip rain or high humidity. One thick coat clouds, traps moisture, and peels at the hearth where heat cycles are hardest.
Ashlar slate reads formal and photographic. Cobblestone reads rustic and hides scuffs from chair legs better than a smooth field. Busy texture also hides the light wear a fire-pit patio collects. Smooth color shows every spark scar.
If you want to see how pattern, border, and color are specified on Atlanta work, review residential stamped concrete before you pick a mat. Bring the hearth outline to that conversation so the border doesn't run through the burner.
A pretty stamp on a joint that cuts the fire zone is still a bad slab.
Build the Fire Pit and Test It Before Use
Run this with a notepad. A clean first evening doesn't prove the install. Warning signs often show after the concrete heats and cools several times.
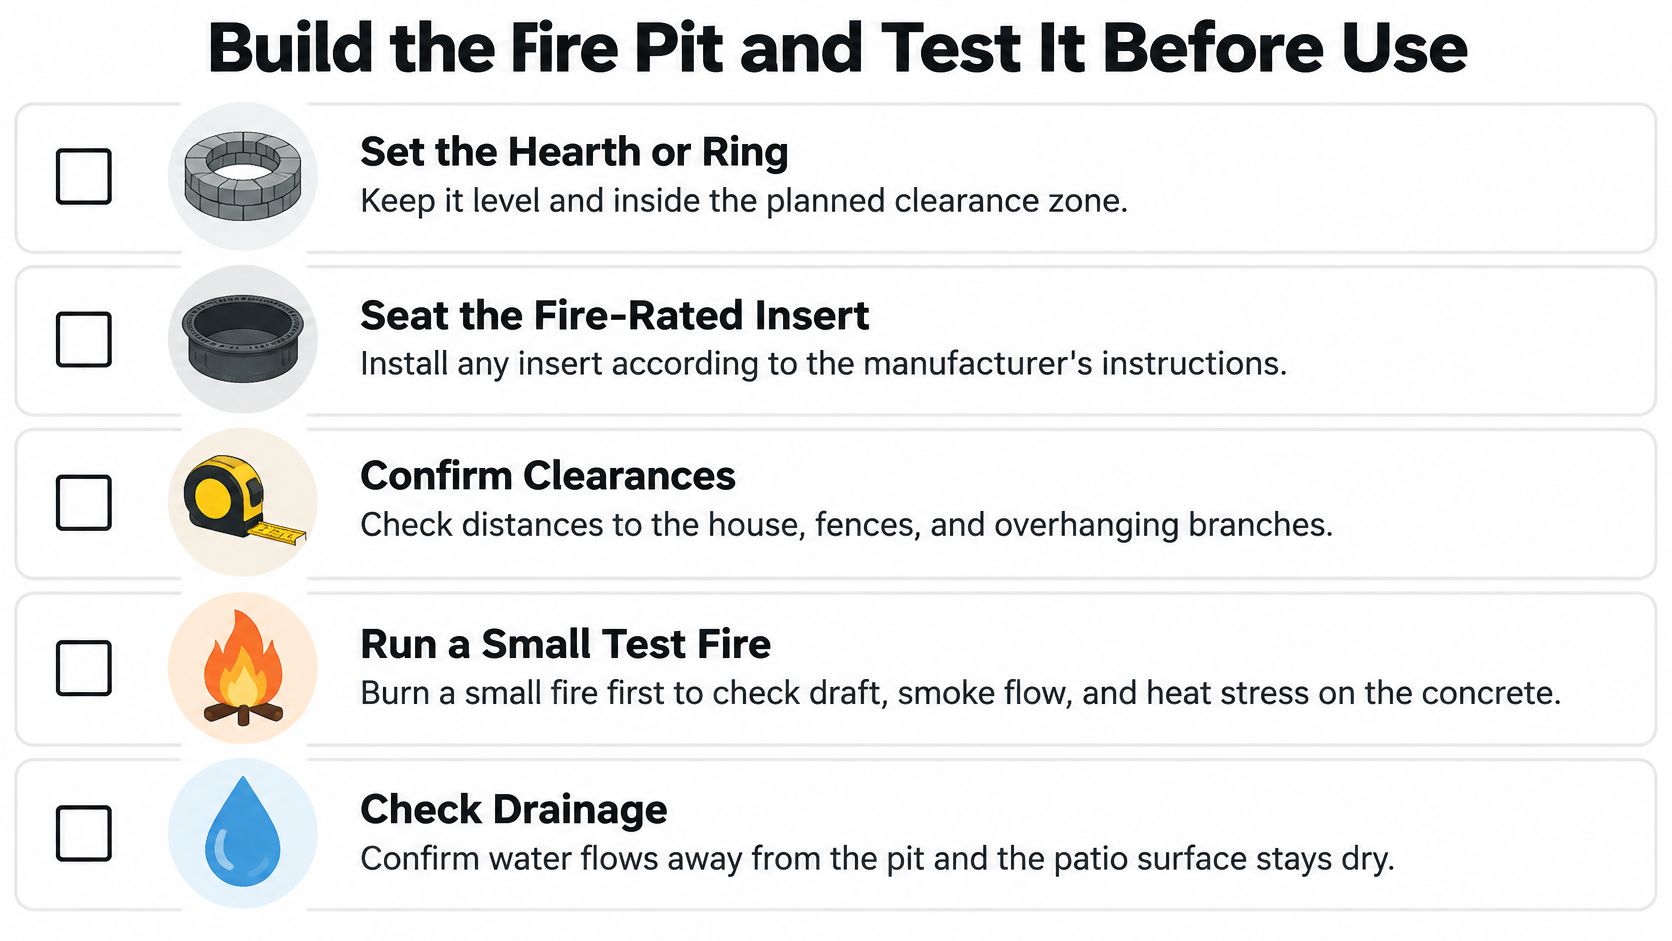
The NFPA guidance on fire pits and outdoor fires uses 10 ft (3 m) as a minimum separation from anything that can burn, while jurisdictions enforcing NFPA 1 may require outdoor fires at least 50 ft (15 m) from a structure. Don't treat the 10-foot figure as a permit. Local rules, property lines, fuel, pit size, and the manufacturer's listing govern. That guidance gives clearances, not a success rate for installations.
Commissioning checklist
- Set the hearth or ring level, inside the marked zone. Seat any fire-rated insert the way the manual shows. The stamp stays outside the flame. The insert takes the heat.
- Route gas and sleeves outside the hottest region. Seal every penetration so water can't follow the pipe into the slab.
- Prove the drain. Pour water at the pit and watch it leave. Ponding under the assembly is a fail before any flame.
- Wait for a full cure, commonly about 28 days, before the first fire. Early heat on wet concrete is how surfaces pop.
- Run a low-output test for about 20 minutes. Look for discoloration, cracking, rocking, gas odor, and heat on railings or siding. Check gas fittings with soap solution, never with an open flame.
- Inspect again after the first several heating cycles. Write the date, the runtime, and what you saw.
A short field video of a pit going in on a finished pad is worth watching before you light anything, so you can see how the ring, the insert, and the surrounding slab are supposed to sit together.
| Finding | Likely meaning | Action |
|---|---|---|
| Discoloration or soot streaks at the hearth | Heat exposure beyond the rated zone | Check clearance and insert seating; keep use low until resolved |
| Hairline cracks that widen | Trapped moisture or weak subgrade | Stop use; have a contractor assess |
| Radial cracks, delamination or pop-outs | Thermal damage or moisture | Stop use until inspected |
| Exposed reinforcement | Cover lost under heat | Stop use; professional repair |
| Rocking or settling pit | Base compaction failure | Stop use; re-level and check drainage |
| Gas odor or leak on soap test | Connection leak | Shut off gas; call a licensed technician |
| Heat transfer to railing or siding | Clearance too small | Stop use; relocate or add shielding |
Say the 20-minute low test on a 300 square foot patio leaves a hairline at the burner cutout, and the soap test on the fittings holds with no bubbles. Log the crack with the date and a photo, shorten the next burn, and look again after three heating cycles. If the crack widens or turns radial, stop and call a contractor. A bubble on the soap test means shut the gas off and call a licensed technician the same day.
Maintenance and Deciding Whether to Hire a Crew
Most fire-pit patio problems are maintenance problems only after they were layout problems. If clearance, hearth size, drainage, and control joints were fixed before the pour, upkeep stays simple. If they were not, sealing and sweeping will not undo it.
Trapped moisture is the quiet risk. When damp concrete is heated hard, expanding moisture can spall the surface, so keep the slab as dry as the site allows, keep the insert between flame and stamp, and keep joints and gas sleeves out of the hot zone.
- Clear the zone in season. Pull leaves, mulch, and overhanging growth back from the clearance circle.
- Look at the hearth each spring. Note new cracks at the ring and at pit joints before the first burn.
- Rinse after hard rain. Clear drain paths the same day so ponding is corrected while it is still a grade problem.
- Reseal when water stops beading. Traffic and sealer type set the timing. Thin coats beat one heavy coat.
- Have gas connections checked yearly by a licensed technician, then rechecked after any fitting work.
A homeowner can handle a prefab bowl, sealer, and seasonal cleanup. Hire a crew when the work is a gas line, a slab already showing radial cracks or heave, a drainage regrade, or a driveway apron that touches the right-of-way. For that scope, concrete and masonry repair in Atlanta is the kind of service call to make before another season of heat cycles.
Get three written quotes with the same scope, confirm who pulls each permit, and have the clearance zone drawn on the plan before concrete arrives. Treat the commissioning findings as the standing stop-use list: radial cracking, exposed steel, a rocking pit, heat reaching siding, or any gas odor ends the burn and starts the repair call.
Atlanta Concrete Solutions builds stamped patios and fire-pit slabs for Atlanta homeowners, from base and pour through decorative finishes and masonry repair when a hearth or driveway pad needs more than sealer. If you are laying out a stamped concrete patio fire pit and want clearance, drainage, and joints set before the truck shows up, visit Atlanta Concrete Solutions and ask for a quote that lists the pit, the slab, and the permits on one scope.