
You're usually not looking at a “bad brick” problem.
You're looking at a patio that puddles after one hard Atlanta rain, dries unevenly in the shaded corner, loses joint sand every storm, and has one edge that keeps dropping a little more each year. Homeowners often notice the crack, the wobble, or the weed growth first. The underlying cause is usually lower in the assembly. It's in the base, the drainage path, or the soil movement under the surface.
That's why good brick patio repair starts with diagnosis, not with bags of sand and a broom. If you fix the symptom first, the same spot usually opens back up. If you identify whether the failure is in the surface, the base, or the drainage, the repair has a chance to last.
Why Atlanta Brick Patios Fail Before They Should
A common Atlanta call goes like this. The patio looked mostly fine in spring. Then summer storms started hitting, water sat near the back door, and one corner began to feel soft underfoot. By fall, the joints had opened, two bricks rocked when stepped on, and the low area stayed damp long after the rest of the yard dried.
That sequence tells you a lot.
Bricks rarely fail first. The visible damage usually follows water movement. Roof runoff dumps too close to the patio. Clay-heavy soil holds moisture. Edge restraints loosen. Bedding sand washes out. Then the surface starts showing you the problem.
What homeowners see first
People notice one of these before anything else:
- A low corner: Water gathers after rain and leaves a dark patch.
- Joints that won't stay full: You sweep in sand, then the next storm takes it back out.
- Loose bricks near the edge: The perimeter opens first when lateral support is gone.
- White residue on the surface: Moisture is moving through the patio, even if the bricks themselves still look solid.
In Atlanta, the drainage question gets skipped too often. A lot of patio advice is written for colder markets and jumps straight to freeze damage. Freeze thaw is real. Water enters porous brick and mortar, freezes, expands, and causes microcracks, scaling, and loss of strength. In a laboratory study using 25 repeated freezing and thawing cycles, tested brick and mortar materials lost about 14% to 27% compressive strength depending on the material tested, with different brick types showing different responses under the same exposure conditions (freeze thaw brick durability study).
Atlanta usually doesn't behave like a northern freeze zone, but wet winters, shaded areas, standing water, and repeated temperature swings still matter. More often, though, the patio is settling because water has nowhere good to go.
Practical rule: If the patio keeps moving, treat the water path as the first suspect and the brick surface as the second.
Four failures that matter most
Most brick patio repair work here falls into four buckets:
- Settlement from base failure or soil movement
- Joint failure in either mortar or sand-filled joints
- Efflorescence that signals recurring moisture travel
- Drainage failure that keeps feeding the first three problems
Once you know which one you're dealing with, the repair path gets much clearer.
How to Inspect and Diagnose a Brick Patio
A patio can look almost level from standing height while water collects beneath the bricks. Inspect it after rain whenever possible. Atlanta's clay soils and intense storm runoff can expose a drainage problem that a dry surface conceals.
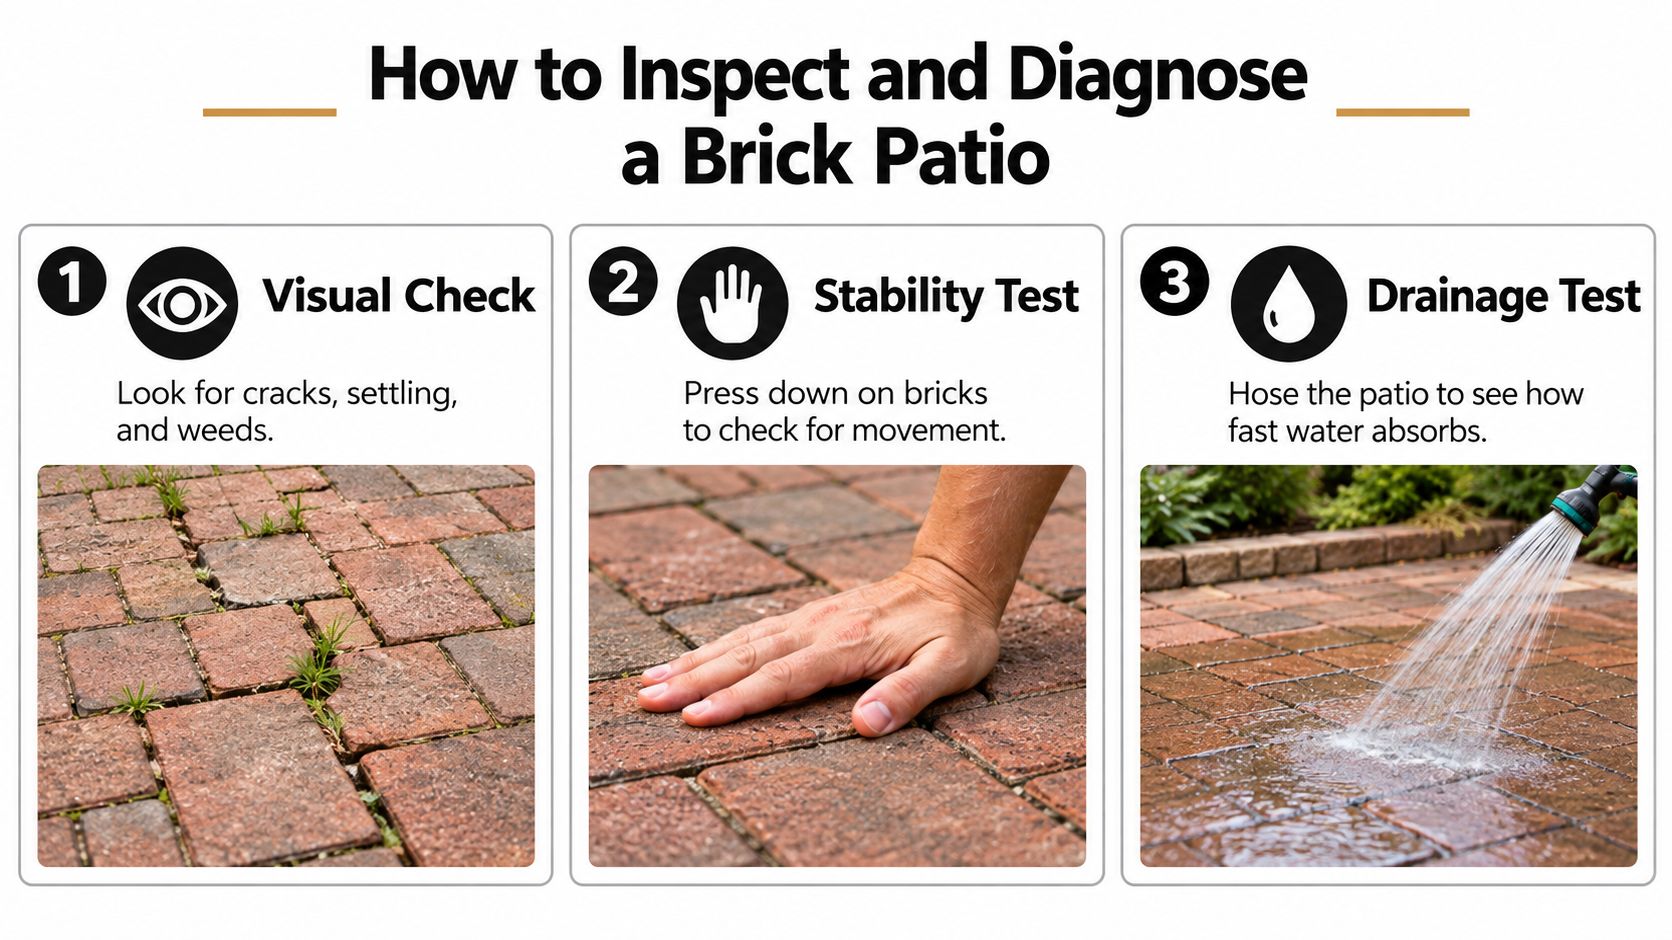
Walk the patio in a set order
Start with the surface, then work down through the joints, bedding, edges, and drainage path. A consistent inspection keeps one ugly brick from distracting you from the actual failure.
Sight across the surface at a low angle. Crouch near one edge and look across the brick field. Dips, raised areas, and twisted courses become easier to see from that angle.
Examine the joints. Check whether the material is full, recessed, cracked, or soft. Low joints reduce the interlock between pavers and give water more room to move through the assembly. The Federal Highway Administration recommends replenishing joint aggregate when it sits more than 13 mm (1/2 in.) below the paver chamfer (FHWA paver maintenance guidance).
Test suspect bricks underfoot. Press down with your heel and shift your weight. A rocking unit can indicate lost bedding, a void, edge movement, or a weak base below the brick.
Inspect every perimeter edge. Failed or missing restraints let the field spread outward. Open joints along the border often signal movement below the surface, not a simple cosmetic defect.
Check grade, water, and washout
Now trace the water. The patio should direct runoff away from the house, steps, retaining walls, and other vulnerable structures. During a proper rebuild or repair, a finished surface slope of about 1% to 2%, or roughly 1/8 to 1/4 inch per foot, provides that fall.
Mark ponding areas while the surface is still wet. Follow downspouts, splash blocks, roof valleys, and other discharge points. A concentrated stream can wash bedding from beneath one section while leaving nearby bricks untouched. Look for sand fans, exposed edges, soft spots, and small voids around the perimeter.
Sketch the patio and circle each low area. Mark where water enters, where it sits, and where it exits. That simple map separates a surface defect from a base problem and a drainage problem.
Separate surface, base, and drainage clues
Use the pattern rather than the worst-looking brick:
- Surface issue: A few damaged bricks, no broad movement, and stable joints around them.
- Base issue: A low section, rocking units, uneven support, or settlement that returns after resetting.
- Drainage issue: Ponding, washed joints, eroded edges, damp borders, or movement that worsens after storms.
Permeable clay-brick systems require a closer drainage inspection because the pavement can serve as part of stormwater management, not merely as a finish. A technical brick bulletin reports suspended-solids removal of about 83.8% to 95.2% in brick-based permeable systems. It also notes that sediment-clogged permeable pavement can drop to infiltration rates of roughly 1 to 10 inches per hour (permeable clay-brick pavement bulletin). Mortaring over a system designed to drain may hide the symptom while increasing runoff elsewhere.
If water remains against the house, the repair includes drainage. Stop the DIY work and call a crew when the flow path is unclear or the foundation area is involved.
When to call a contractor
Bring in a masonry contractor when you find:
- Movement near the foundation: Settlement and water beside the house need a drainage solution, not just replacement bricks.
- A broad low or loose area: Widespread movement usually extends below the visible surface.
- Failed restraints on multiple sides: Rebuilding the perimeter requires more than adding joint material.
- Deep washout: Voids, sinking borders, and recurring depressions point to excavation and base reconstruction.
Common Failure Modes and How to Tell Them Apart
Not every bad-looking patio is failing the same way. Pattern matters more than appearance.
Settlement
Settlement usually shows up as a dip, a sunken edge, or a section that rocks underfoot. In Atlanta, that often tracks back to washed bedding, poor compaction, expansive or poorly drained soil, or concentrated runoff. If the depression gets worse after storms, think base or drainage before you think brick replacement.
Mortar joint failure
Mortar failure looks different. You'll see cracked joints, missing sections, and edges that start to loosen even though the bricks themselves still look decent. This is common on older patios that were patched over time with materials that don't match the original assembly. A rigid patch on a patio that wants to flex usually breaks first at the joints.
Efflorescence
Efflorescence is the white bloom that keeps returning after cleaning. It's a moisture clue. The patio is carrying dissolved salts to the surface as water moves through it. Efflorescence by itself isn't the structural failure, but it tells you that water is traveling through the system often enough to leave evidence behind.
Drainage failure
Drainage failure is the root problem that often causes the other three. You'll see ponding, washed-out joint material, softened edges, and recurring trouble near downspouts or discharge paths. In Atlanta's storm pattern, this is the category that gets missed most. Homeowners focus on the loose bricks because that's what they can touch. The water path is what keeps reopening the repair.
| Diagnosing Brick Patio Failure Modes in Atlanta | |||
|---|---|---|---|
| Failure Mode | Typical Symptoms | Most Likely Cause | Repair Category |
| Settlement | Low spots, rocking bricks, sunken edge | Base loss, poor compaction, soil movement | Lift and rebuild affected section |
| Mortar joint failure | Cracked or missing mortar, loosening edges | Rigid joints failing in a moving assembly | Re-pointing or joint-system correction |
| Efflorescence | White residue that returns | Moisture moving through brick and joint system | Moisture-source diagnosis, then cleaning |
| Drainage failure | Ponding, washout, recurring joint loss | Poor grade, runoff concentration, clogged permeable joints | Drainage correction with or before surface repair |
The timing tells you a lot
Use the pattern of movement to separate one cause from another.
- After unusual cold and broad uplift: Freeze-related movement is more likely.
- After heavy rain and isolated depressions: Base washout or drainage failure is more likely.
- At the perimeter with widening joints: Edge restraint failure moves up the list.
- Near a downspout or roof line: Start with drainage every time.
A good maintenance mindset also helps. Repair isn't a one-time event with masonry. A study of masonry maintenance found that repair impacts are shaped by variables including the number of maintenance interventions, the longevity of each repair, the total surface area repaired, the embodied-carbon coefficient of materials, and transportation emissions. The same research also reviewed repair history across 171 masonry façades over a 13-year period beginning in 2006, showing why dated inspection records matter when you're deciding between another patch and a more durable rebuild (masonry maintenance life-cycle study).
That applies directly to patios. If the same area keeps failing, stop treating each visit as a fresh surprise.
Re-Leveling a Sunken Brick Patio the Right Way
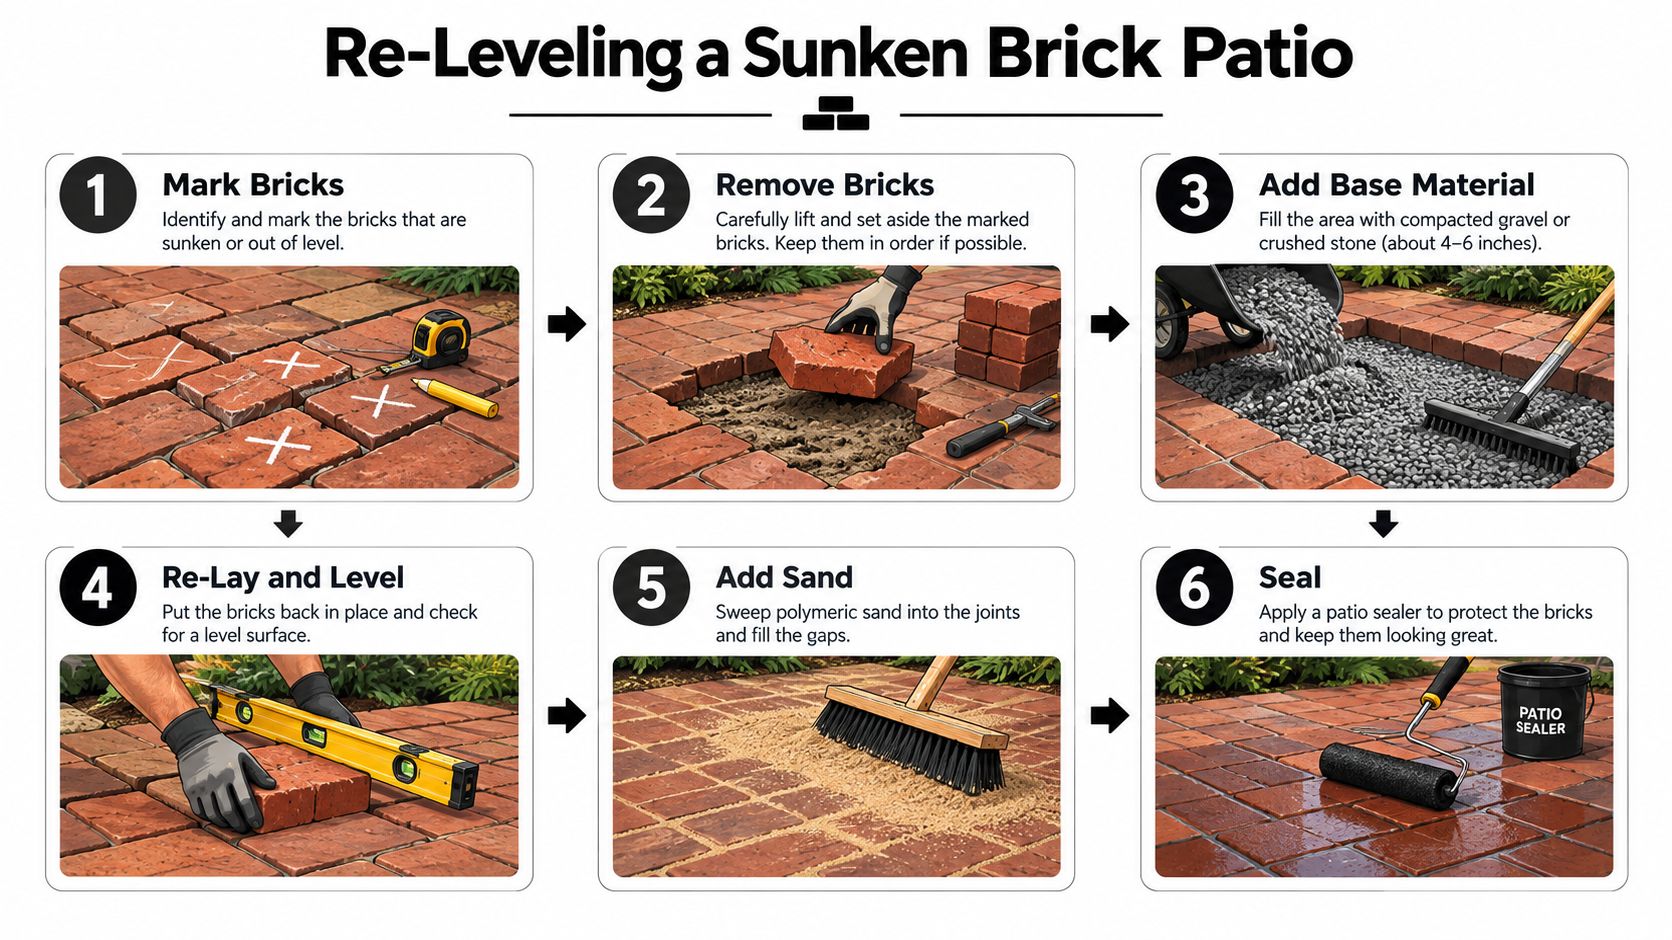
A low brick patio often looks like a surface problem, but the actual failure may be beneath the bricks or beside the house. Re-leveling lasts only when the repair identifies whether the issue is the surface, the base, or drainage.
Start with removal, not filling
The working sequence is remove, diagnose, rebuild.
Lift affected bricks vertically to protect their corners, then stack them in order if the pattern matters. Remove failed joint sand and any bedding or base material that is soft, contaminated, or visibly displaced. Continue until the exposed subgrade is firm enough to support a rebuilt section.
The same principle applies beneath finished flooring. Flacks Flooring offers useful professional subfloor leveling advice that applies to hardscape repairs too. Correcting only the visible layer leaves the weak support in place.
Rebuild the support layers correctly
Use angular, well-graded crushed aggregate for the replacement base, rather than loose fill from another project. Spread and compact it in lifts no thicker than about 50 mm (2 in.), checking the grade as each layer is rebuilt. A screed and level help keep the repaired area aligned with the patio that remains.
The finished surface should fall away from structures at about 1% to 2% slope. In Atlanta, that drainage detail deserves particular attention. Clay soils can hold water, while intense storms can concentrate runoff around a downspout, wall, or patio edge. A section may be flat after repair and still settle again if water continues washing through the base.
Restore or install rigid edge restraints before resetting the brick. Place about 25 mm (1 in.) of coarse bedding sand over the compacted base and screed it flat without pre-compacting. Reset the bricks straight down, compact the surface with a protective rubber pad, then sweep jointing sand into full joints and compact again until they remain filled.
For completed site examples, review Atlanta concrete and masonry project photos. Pay attention to edge control, transitions near structures, and how surface grades direct water.
Later in the process, this video gives a useful visual for patio re-leveling workflow:
What shortcuts fail fastest
A thick, uneven sand bed may look flat on installation day, then settle unevenly after wet weather. Bedding sand supports the brick; it does not replace a properly compacted base. If the low area is deep, remove material and rebuild the support instead of burying the problem under extra sand.
Drainage is the other common shortcut. Correct the slope, runoff path, or washout before closing the joints. Inspect downspouts and the perimeter, not only the depression in the middle. Loose or missing restraint lets the brick field migrate sideways, reopening joints even after the center has been leveled.
When re-leveling is enough
A localized reset makes sense when the surrounding patio remains stable and the failure is confined to one area. If the field has waves, several low zones, or settlement on more than one side, repeated spot repairs usually become a full reconstruction decision.
Stop and call a crew when the base stays wet, the edge has lost support, or the affected area extends into drainage corrections near the house. That work requires excavation, compaction, and controlled grades, not another cosmetic lift.
Re-Pointing Mortar Joints vs Refreshing Polymeric Sand
Joint repair only works when it matches the kind of patio you have. A lot of bad brick patio repair comes from using a rigid fix on a flexible system.
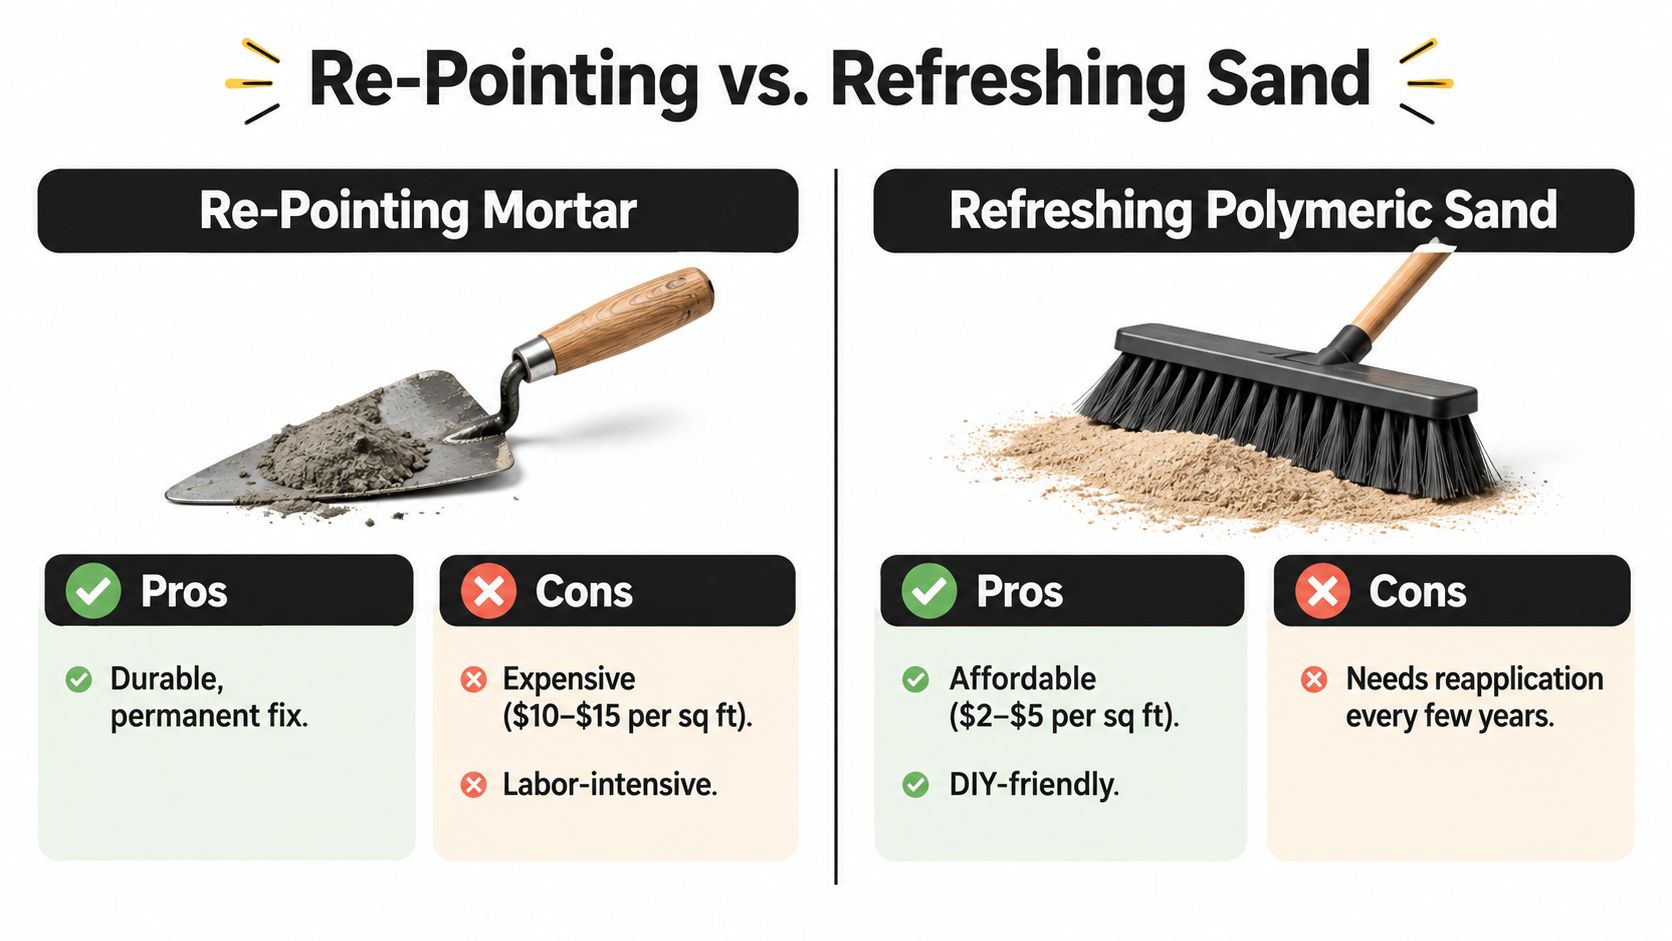
When mortar re-pointing makes sense
Use mortar re-pointing on patios that were built as mortar-set assemblies and are meant to behave as rigid masonry surfaces. In that case, the goal is to remove failed mortar, clean the joint, and install compatible new mortar without smearing the face of the brick.
Mortar makes sense when:
- The patio was originally mortar-set: Don't switch systems casually.
- Joint edges are sound: If the base is stable and the failure is limited to the joint, re-pointing can hold.
- You need architectural continuity: Older masonry details often look wrong with sand-filled joints.
When polymeric sand is the better fix
Polymeric sand belongs on sand-set patios that rely on interlock and a draining joint system. It doesn't turn the patio into a slab. It helps lock the units together while still working with a flexible assembly.
Use it when:
- The patio is a dry-laid system.
- Joints are losing sand but the base is otherwise stable.
- You want a practical maintenance repair that can be renewed without chiseling mortar later.
The trade-off Atlanta homeowners need to understand
The wrong choice can make drainage worse.
Permeable and sand-set systems are designed to let water move through the assembly in a controlled way. If you hard-pack dense mortar into a patio that was built to drain through joints, you can redirect runoff sideways, hold water where it shouldn't sit, and accelerate base failure. In Atlanta, where intense rain can expose every grading mistake, that matters more than the clean appearance of a fresh joint line.
A simple way to decide:
- Rigid patio, rigid joint repair
- Flexible patio, flexible joint repair
Field judgment: If the joint failure keeps returning and the surrounding bricks are also moving, the joint isn't the root problem.
What each method actually solves
Re-pointing solves failed mortar joints.
Refreshing polymeric sand solves joint loss in a sand-set field.
Neither one fixes a washed-out base, a missing edge restraint, or a drainage slope that sends water back toward the house. If those conditions exist, joint work is only part of the repair.
DIY vs Hiring a Pro in the Atlanta Market
Some brick patio repair work is realistic for a homeowner. Some of it turns into a weekend-long excavation with the wrong tools and nowhere to put spoils.
Repairs that are usually reasonable to handle yourself
DIY works best when the problem is shallow, localized, and clearly at the surface.
- Joint refresh work: Cleaning and replacing joint sand on an otherwise stable patio
- Single-brick replacement: If you have matching units and no sign of broader movement
- Light edge cleanup: Minor vegetation removal and cleaning around restraints that are still intact
- Basic drainage housekeeping: Extending discharge away from the patio or clearing blocked surface flow paths
Jobs that usually need a crew
Professional help makes more sense when the failure is structural, widespread, or tied to site drainage.
- Base reconstruction: Once you're excavating to firm subgrade, compaction quality matters.
- Large settled areas: Moving and relaying a broad field takes labor, layout control, and compaction equipment.
- Multiple failed edges: That usually means the field has lost confinement.
- Drainage redesign: If runoff needs to be redirected, captured, or coordinated with surrounding hardscape, that's a bigger site problem.
In the Atlanta market, access matters too. Tight side yards, rear-lot patios, HOA restrictions, and limited space for material staging can turn a simple reset into a harder logistics job.
Watch the permit and connection points
Most patio repairs on private property won't raise right-of-way questions. But if hardscape work ties into a driveway apron, sidewalk, curb, gutter, or another disturbed public area, permit rules can come into play. The Atlanta Department of Transportation states that any disturbance to the public right-of-way requires a permit and specifically lists driveway apron work among the examples (Atlanta right-of-way permit guidance).
If your patio repair blends into broader flatwork or site changes, it helps to compare scopes with established Atlanta concrete and masonry services so you know whether you're pricing a surface repair, a rebuild, or a drainage project wearing a patio label.
The honest decision point
If you can identify the failed area, lift a small section, and confirm the base is intact, a homeowner can often handle the finish work.
If you don't know where the water is coming from, if the patio drains toward the house, or if the low area keeps returning, hire the crew before you spend time on a cosmetic reset that won't last.
Maintenance Tips and When to Call Atlanta Concrete Solutions
Brick patios last longer when you inspect them on a schedule instead of waiting for a trip hazard.
A practical Atlanta maintenance routine
Use one annual walk-through before storm season and one after winter.
- Top up joints when needed: Don't let joint loss continue until units start moving.
- Watch the drainage path: Check ponding, discharge points, and any change in slope near the house.
- Clear vegetation early: Weeds don't cause structural failure, but they do open joints further.
- Inspect shaded sections closely: Damp, slow-drying areas often show trouble first.
- Record what changed: A dated photo from each season helps separate a one-time issue from recurring movement.
Signs the repair has become a rebuild
Call for help when the patio has multiple low areas, recurring washout, broad edge movement, or water collecting near the structure. Those are no longer simple maintenance items. They point to a base or drainage problem that needs excavation, grading correction, or both.
If you've reached that point and want a local assessment, request a free patio and masonry quote. Weekend availability and service coverage across Alpharetta, Marietta, Johns Creek, and Duluth make it easier to schedule a site visit before another rainy stretch exposes the same problem again.
Atlanta Concrete Solutions handles brick patio repair the way it should be handled in this market. They diagnose whether the failure is in the surface, the base, or the drainage before recommending a fix. If your patio is sinking, washing out, or holding water near the house, visit Atlanta Concrete Solutions to request a quote and get a repair plan that matches the actual cause.