
You notice the crack while taking out the trash. It starts near the corner of the concrete block wall, climbs in a stair-step pattern, and seems wider than it was last season. A dark band runs along the base, the downspout empties nearby, and one section looks slightly out of line. The temptation is to buy a tub of patching compound and cover everything before the problem grows.
That approach often wastes money. Concrete block wall repair works when the repair matches the cause, whether that cause is moisture, movement, age, or load. Before spending anything, inspect the wall systematically, classify the damage, and decide whether the right response is patching, repointing, a partial rebuild, drainage correction, or replacement.
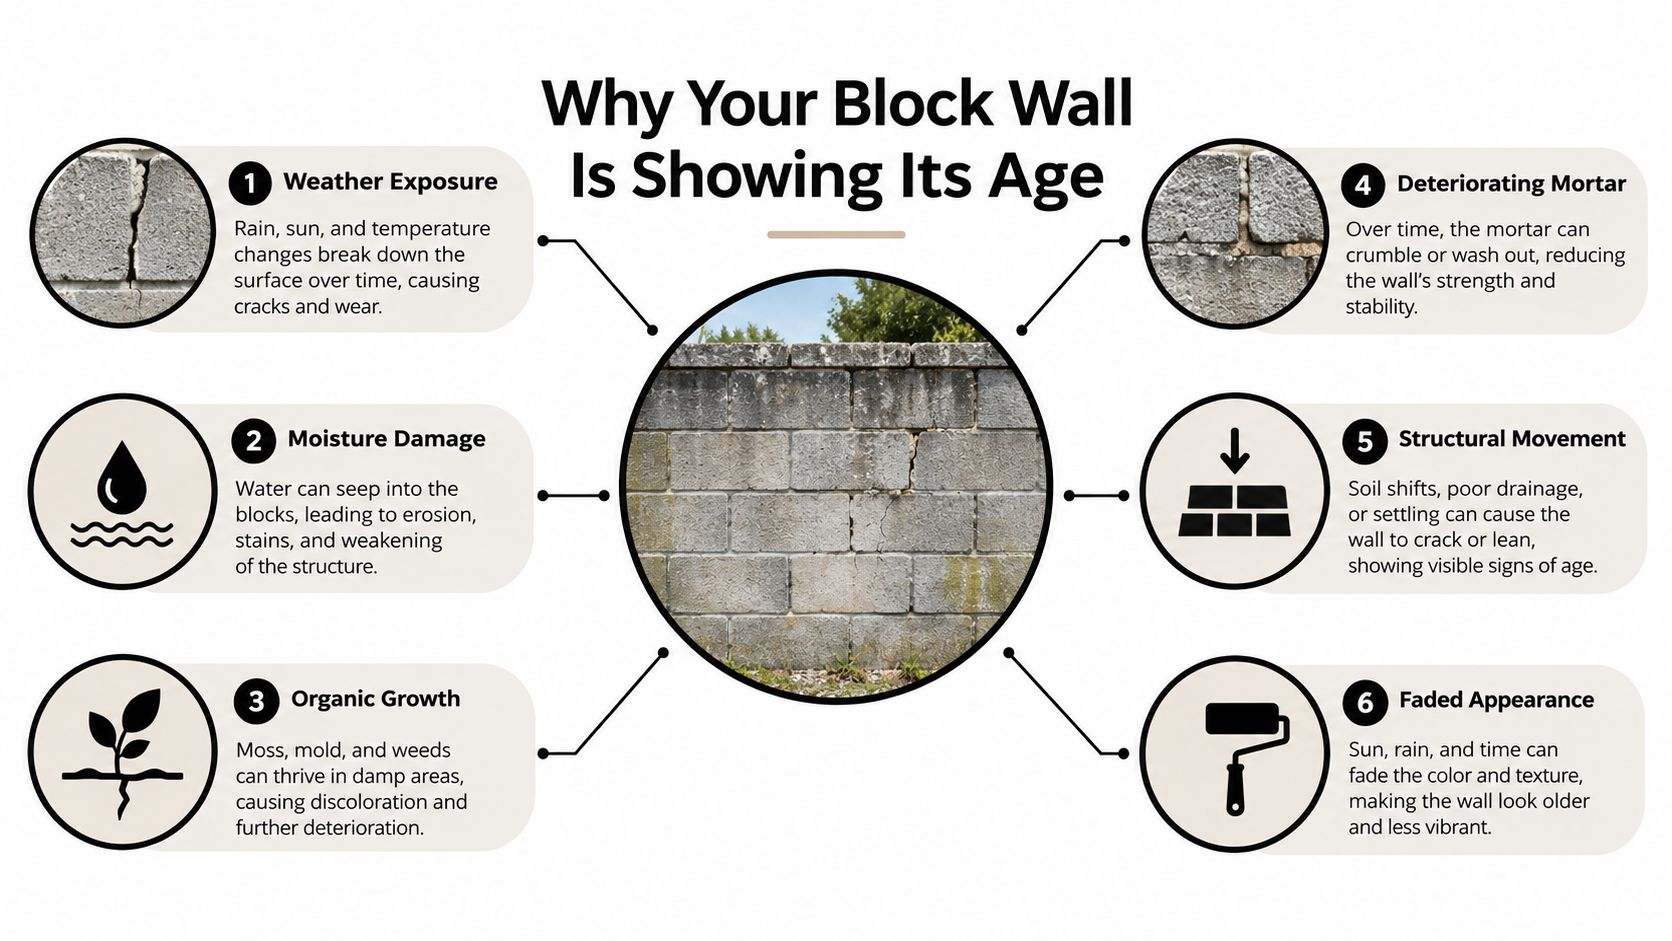
Why Your Block Wall Is Showing Its Age
Concrete masonry units are porous. Atlanta's rain can enter through block faces, mortar joints, coping, cracks, and poorly directed runoff. Water then carries salts to the surface as efflorescence, weakens vulnerable joints, and creates conditions for repeated deterioration. If temperatures fall below freezing, absorbed water can expand and break the face of a block or push mortar out of its joint.
A wall can also move without looking dramatically damaged at first. Minor settlement at the footing may create a diagonal or stair-step crack through mortar joints. A retaining wall can bow when saturated soil presses against it. Rusting rebar or wall ties can expand inside the assembly and force surrounding material apart, a process commonly called rust-jacking. Old mortar may lose cohesion as its binder deteriorates.
Practical rule: A stain tells you where water has been. A displaced block tells you that the wall has moved.
The age of the masonry matters because repair materials haven't always been compatible. Fired clay masonry units date to around 300 BC in Mesopotamia, while the Industrial Revolution enabled mass production of masonry units in the 19th century. Portland cement emerged in the mid-19th century and later became the dominant binder in modern masonry systems. Historic masonry restoration guidance explains why hard, impervious modern repairs can accelerate decay in older walls instead of solving it.
What the surface is telling you
Peeling paint, isolated discoloration, or light efflorescence may be cosmetic. They still deserve attention, but they don't automatically mean the wall is failing. By contrast, horizontal cracks, widening joints, displaced units, recurring moisture, rust staining, or a visible lean point to a deeper issue.
Historic masonry also shifted from thick load-bearing mass walls toward cavity and veneer systems between the 1890s and World War II, which changed how walls transfer loads and manage water. Concrete repair guidance from ICRI notes that older masonry walls relied on their own mass to carry loads, with thickness increasing with building height and ranging from 8 inches to several feet. Modern block walls may be lighter, tied to other construction, or supported by a footing that has experienced erosion.
Not every ugly wall is failing, and not every small crack is harmless. Diagnosis comes first because the same visible line can require anything from cosmetic patching to structural evaluation.
Reading the Damage Before You Touch Anything
Start with a slow visual sweep from the top of the wall down to the footing. Check the cap, coping, corners, control joints, block faces, mortar joints, and soil line. Take photographs with a ruler or coin beside each defect, then mark the ends of important cracks with the date so you can check whether they grow.
A homeowner damage checklist
- Measure the crack: Hairline cracks under 1/8 inch are often cosmetic, while cracks from 1/8 to 1/4 inch can reflect shrinkage or minor movement. Anything wider than 1/4 inch, especially a stair-step crack, deserves closer scrutiny.
- Study the pattern: A vertical line through the face may differ from a stair-step crack that follows mortar joints. Horizontal cracking through the middle of a wall is more concerning because lateral pressure can be involved.
- Test the joints: Drag a key across the mortar. If it powders, crumbles, or cuts with little resistance, the joint may need repointing rather than surface coating.
- Look for displacement: Place a straightedge across the wall or sight along its length. Bulging, leaning, offset blocks, and widened joints indicate movement rather than simple surface wear.
- Trace moisture: Dark staining, a musty indoor smell, white salt blooms, and water pooling at the base all deserve attention. Efflorescence that returns after cleaning usually means moisture is still traveling through the wall.
A crack that remains narrow, dry, and unchanged is a different problem from a crack that grows after storms. Rust streaks near reinforcement, exposed steel, or blocks pushed outward by corrosion should not be treated as ordinary patching work.
For walls tied to the house or connected to a foundation, compare your observations with the broader considerations covered in this residential foundation concrete resource. The connection matters because a wall can be reacting to movement outside its own footprint.
Match the symptom to the likely cause
A damp base with intact blocks often points to grading, a leaking downspout, or irrigation. A stair-step crack with uneven footing suggests settlement or loss of support. A horizontal crack with bowing suggests lateral pressure. Soft, recessed joints point toward mortar deterioration. Spalled faces with rust stains suggest moisture reaching embedded metal.
Stop the inspection if blocks are loose overhead, the wall is actively leaning, or excavation would remove soil supporting the footing. A visual checklist can classify risk, but it can't certify a structural wall.

Repair or Replace Making the Right Call
Repair makes sense when the defect is isolated and the wall remains aligned. A stable wall with sound joints, a dry footing, and isolated cracks under 1/4 inch can often be patched or repointed. A failed pier, a spalled top course beneath a leaking cap, or a section undermined by a downspout may justify a partial rebuild.
Replacement becomes more practical when the problem is widespread. Active bowing, recurring water intrusion at the base, erosion beneath the footing, tree-root damage, and broad cracking all indicate that a surface repair won't restore the load path. On a wall more than 50 years old, mortar that crushes to powder under finger pressure is a strong reason to consider rebuilding rather than applying new material over failing joints.
| Signal | Repair | Partial Rebuild | Full Replacement |
|---|---|---|---|
| Crack width and pattern | Isolated cracks under 1/4 inch, no growth | Cracks concentrated in one damaged section | Widespread or recurring cracks, especially stair-step or horizontal |
| Block displacement and alignment | Blocks remain flush and wall is straight | One pier, course, or bay has failed | Wall leans, bows, or has repeated displacement |
| Footing and subbase | Dry, stable, and supported | Local erosion or drainage damage | Failed footing, major erosion, or root disturbance |
Cost-per-square-foot math can mislead if the wall's support is compromised. As a practical rule, when repairs approach roughly 30 percent of replacement cost on a structurally damaged wall, rebuilding is usually the sounder investment. A residential concrete and masonry repair service can help distinguish a surface defect from a failure that needs reconstruction.
Preparing the Wall for a Lasting Fix
A patch fails early when the wall wasn't prepared. Clear vegetation, mulch, loose soil, and debris from the base so you can see the footing and give the repair room to dry. Redirect sprinklers and gutter downspouts first. Mortar won't compensate for water repeatedly striking the same joint.
Remove loose or deteriorated concrete with a cold chisel and masonry hammer until you reach sound material. Don't stop at the first firm-looking surface. Feathered edges are weak because the repair has little mechanical grip, so undercut the sides of a crack or cavity where the material allows it.
Clean, condition, and protect
Brush the opening with a stiff wire brush, then remove dust with a vacuum or compressed air. Dust acts like a release layer between the old block and new mortar. Protect nearby planting beds with a tarp, but don't seal moisture inside the wall with plastic that prevents drying.
Pre-wet the block to a saturated-surface-dry condition. The surface should be damp but not glossy or carrying standing water. A dry block can pull water from the repair too quickly, which weakens adhesion and increases shrinkage.
Apply a latex or epoxy bonding agent according to its manufacturer's instructions. Then place compatible repair mortar in thin lifts rather than filling a deep cavity in one pour. A concrete block repair workflow recommends removing loose material to sound substrate, undercutting edges, cleaning thoroughly, pre-wetting, using a bonding agent, applying thin lifts, and curing moist for 24 to 48 hours.
What professionals don't skip: Preparation takes time, but it determines whether the patch becomes part of the wall or remains a layer sitting on top of it.
Keep the repair damp during the initial cure and shield it from hot sun, wind, and rain. The exact product instructions control, but rushing the cure is one of the easiest ways to create a repair that cracks before the surrounding wall does.

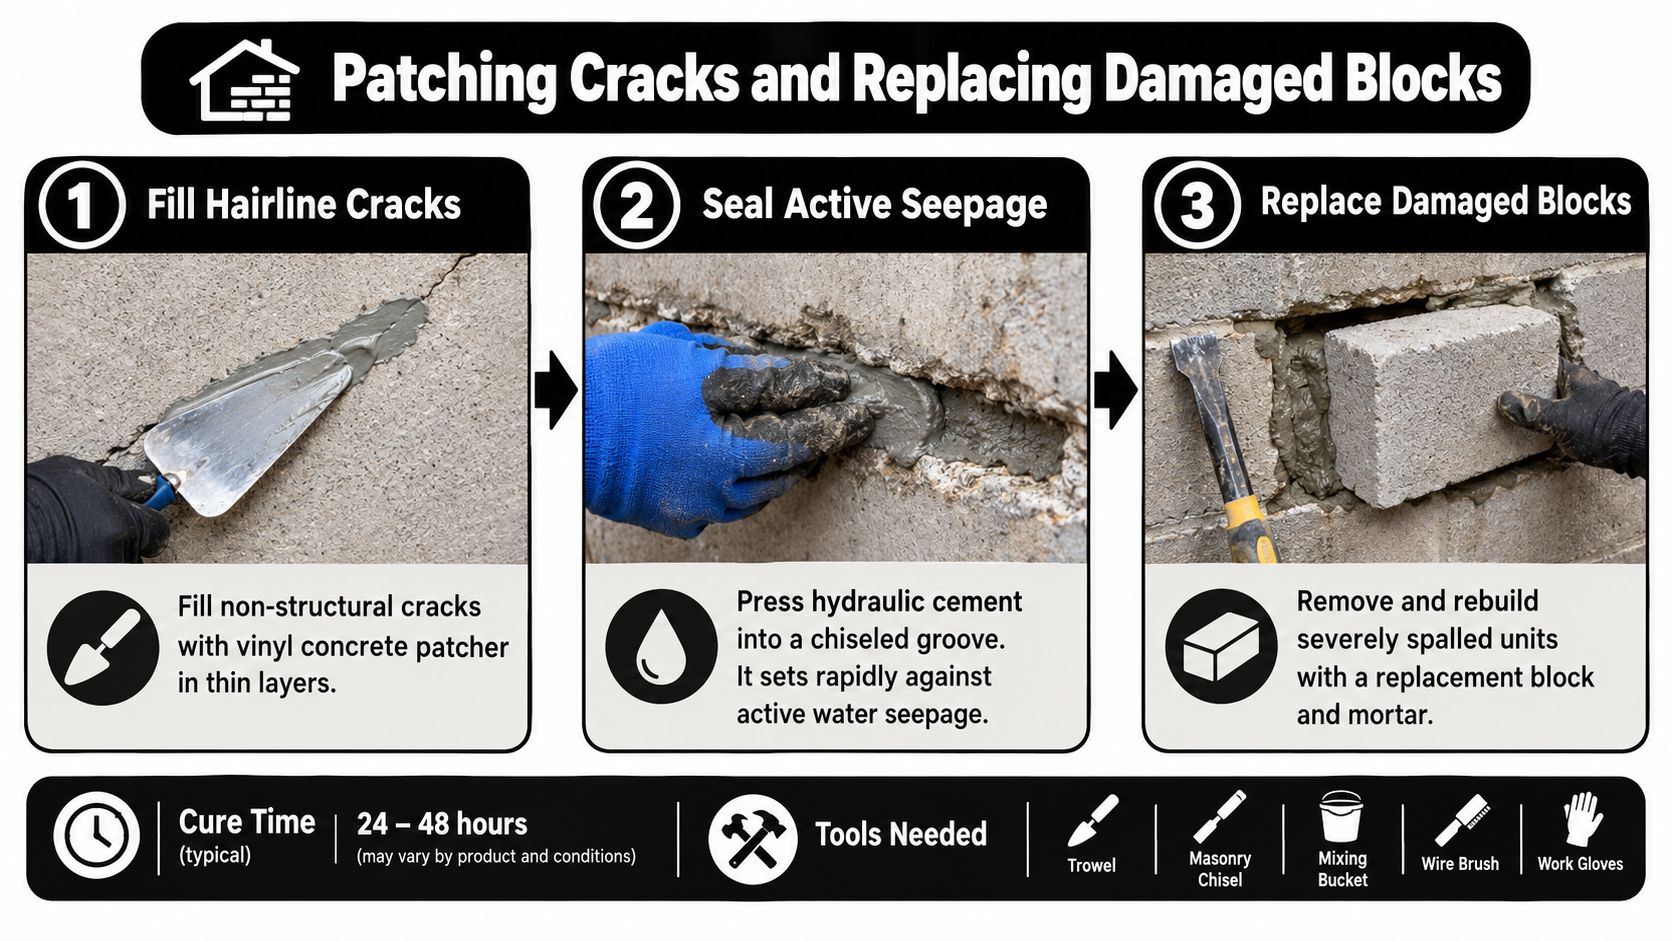
Patching Cracks and Replacing Damaged Blocks
For a dry, non-structural crack, open the surface enough to remove weak edges and fill it with a vinyl concrete patcher or suitable hydraulic cement. Apply material in lifts no thicker than 1/2 inch, compact each lift, and keep the repair moist for at least three days to reduce shrinkage cracking. A cosmetic patch won't stop movement, so don't use it to hide a growing stair-step crack.
Narrower cracks with a void behind them may need injection. Surface-mounted ports allow a two-part epoxy or polyurethane foam to enter the crack rather than merely covering its face. The material choice depends on whether the priority is structural bonding, flexibility, or water control. Masonry restoration specifications describe crack grouting through injection holes spaced roughly 0.3 to 0.6 meters apart, after sealing the crack and cleaning the substrate.
Replacing one damaged unit
Single-block replacement is reasonable when neighboring units and the footing are sound. Cut the surrounding mortar joints, remove the damaged block carefully with a chisel, and avoid levering against adjacent units. Clean the opening, dampen it, and test-fit a matching block before mixing mortar.
Butter all four sides with Type S mortar, set the block into alignment, and tool the joints to match the existing profile. Match dimensions, face texture, and color as closely as practical. A structurally sound repair that visibly differs from the rest of the wall can still look unfinished.
Repointing follows a similar principle, but the mortar joint must be opened to full depth before new mortar is packed in. Don't overwork the surface, don't skip damp curing, and don't apply generic patch material to a structural crack that needs injection or engineering attention.
The accompanying video shows the general workflow and tool handling:
Repointing Mortar Joints the Right Way
Repointing is more than smearing new mortar over an old joint. Rake out failed mortar to a depth of at least twice the joint width, commonly 3/4 to 1 inch, using hand mortar rakes or a grinder fitted with a diamond tuckpointing blade. A grinder is faster, but it can widen edges and scar block faces when the operator pushes too hard.
Blow or vacuum out the joint completely. New mortar needs clean masonry to grip. If dust remains in the cavity, the repair may look full on the surface while remaining weak behind it.
Match the mortar, not just the color
Use a mortar compatible with the existing wall. Portland-rich modern mortar can be too hard for older lime-based masonry, trapping moisture and contributing to spalled edges and failed joints. Sand color, aggregate size, and surface texture also affect the finished appearance, so make a small test area before committing to a large section.
Pack the back of the joint first, then add a second lift, and finish with a final tooling pass after the mortar firms enough to hold a thumbprint. Choose a profile that matches the surrounding work, whether it is concave, weathered, flush, or struck. Brushing too early pulls the binder from the joint and leaves a weak surface.
Don't repoint below 40°F, and avoid hot, windy conditions that draw moisture from fresh mortar too quickly. Lightly mist the work and protect it as needed during curing, following the mortar manufacturer's instructions. A typical 8-by-10-foot wall section can take a careful DIYer a full weekend and a professional a single day, so labor often becomes the deciding cost rather than the mortar itself.
Costs Timelines and When to Call a Pro
A wall with one stable hairline crack belongs in a different budget than a wall that leans, bulges, or shows repeated stair-step movement. Start with that diagnosis before pricing materials. A DIY crack patch using hydraulic cement or epoxy injection may run $50 to $150, while repointing a small wall section may cost $300 to $800 in materials and labor. These are illustrative planning ranges based on typical Atlanta-area jobs, not quotes. Partial block replacement or full waterproofing on a typical Atlanta home may reach $1,500 to $4,000, depending on access, excavation, drainage, and the extent of failed masonry.
A hairline patch can take an afternoon. Repointing a 4-by-8-foot section commonly takes a homeowner a weekend, while block replacement may span two to four days when removal, mortar work, and curing are included. Treat these figures as planning ranges. Site access, hidden damage, and the condition behind the wall can change the final price.
| Repair Method | DIY Cost Range | Pro Cost Range | Typical Timeline | Skill Level |
|---|---|---|---|---|
| Hairline crack patch | $50 to $150, illustrative | Qualitative site-dependent quote | Afternoon | Basic masonry |
| Small-section repointing | Materials and tools vary | $300 to $800, illustrative | Weekend DIY, shorter professional visit | Intermediate |
| Partial block replacement | Materials and tools vary | $1,500 to $4,000 when combined with broader repair, illustrative | Two to four days | Advanced |
| Waterproofing and drainage correction | Site-dependent | $1,500 to $4,000 on a typical Atlanta home, illustrative | Site-dependent | Professional recommended |
Allow for costs that do not appear in a material list. Dump fees, scaffolding for tall walls, restricted access, excavation, and permit pulls can raise the total. Walls over six feet may require permits in many Georgia jurisdictions, so confirm local requirements before demolition.
Bring in a professional masonry crew when you find:
- Wide horizontal cracking: Cracks wider than 1/4 inch, especially with displacement, may indicate subbase or lateral-pressure failure. Repair-versus-replacement guidance identifies crack width and vertical displacement as important factors when deciding whether patching is appropriate.
- Stair-step movement: Cracking through multiple blocks needs more than surface filler.
- Wall deformation: Bulging, leaning, or displaced courses create safety risks.
- Corroded reinforcement: Exposed rebar or rust-jacking requires controlled removal and repair.
- Foundation connections: Work touching the footing or tying into the house structure deserves professional assessment.
Drainage remains part of the repair. Keep roof runoff away from the wall, correct low spots at the base, and do not seal damp masonry before finding the water entry point. For a site-specific evaluation and repair plan, contact Atlanta Concrete Solutions. The Atlanta-area team handles masonry repair, including patching, tuckpointing, block and brick replacement, grouting, and color blending, so the repair method matches the wall's actual condition.