
Your driveway has a crack that keeps reopening, a patch that sounds hollow, or a low spot where every Atlanta storm leaves a puddle. The instinct is usually simple: buy a tube of filler, spread it over the damage, and hope the surface holds. That approach can improve appearance, but it often misses the movement, water, corrosion, or weak base causing the failure.
The right answer to how to concrete repair starts with diagnosis. ACI CODE-562, first published in 2013 after development began in 2006, helped move structural concrete repair toward documented evaluation, durability design, and performance-based rehabilitation rather than improvised patching. The American Concrete Institute describes it as the first material-specific repair code in U.S. practice, with later updates in 2016 and 2019. ACI's concrete repair code portal provides the professional context.
For Atlanta homeowners, the practical lesson is straightforward. A surface defect may need a surface repair, but a moving slab, corroded bar, failing joint, or washed-out subbase needs a different plan.
Why Most Concrete Repairs Fail Before They Should
“Just fill the crack” is one of the most expensive assumptions in concrete work. A sealant can close an opening, but it can't stop settlement, slab movement, trapped moisture, corrosion, or a drainage problem underneath. If the underlying mechanism continues, the repaired line usually returns at the same location or appears beside the patch.
Long-term repair records explain why preparation and diagnosis matter. An NIH-hosted research summary reported that 50% of repaired structural damage had durability of less than 10 years, while the median expected repair durability was 25 years. Historical serviceability data reported approximately 20% of repairs failing within 5 years, 55% within 10 years, and 90% within 25 years. (NIH-hosted repair literature)
Those figures don't mean every driveway repair will fail. They do show that a completed patch isn't the same thing as a durable repair. Concrete repair has to account for the substrate, bond, moisture, traffic, joint movement, curing, and exposure.
Diagnose the mechanism before selecting the material
A dormant shrinkage crack may accept a rigid repair. An active crack needs a flexible sealant or a structural evaluation. A shallow surface defect may respond to a polymer-modified resurfacer, while delamination over reinforcing steel requires removal to sound concrete and corrosion control.
The same principle applies to a garage slab. A crack that stays the same width is different from one with vertical displacement. A light surface stain is different from rust staining around exposed reinforcement. A driveway that slopes water toward the garage needs drainage correction, not another layer of patching compound.
Practical rule: If you can't explain why the concrete failed, you aren't ready to choose the repair product.
Repair guides repeatedly identify incomplete removal, inadequate moisture conditioning, and poor surface preparation as major causes of premature failure. ICRI's repair guidance emphasizes sounding, removal of unsound concrete, reinforcement preparation, cleaning, and saturated-surface-dry conditioning before placement.
Identifying the Four Common Types of Concrete Damage
Walk the slab before buying materials. Mark each defect with chalk, measure the widest crack, and note whether the concrete is merely discolored, separating, displaced, or missing. The visual pattern usually tells you whether you're dealing with shrinkage, water exposure, surface deterioration, settlement, or reinforcement corrosion.
A narrow, stable line is often a different problem from a wide crack with one side higher than the other. Likewise, thin surface flakes don't call for the same repair as a bowl-shaped hole that reaches into the base.
Four Common Types of Concrete Damage at a Glance
| Damage Type | Visual Cues | Typical Depth | Likely Cause |
|---|---|---|---|
| Hairline or structural cracks | Narrow lines, or wider openings with displacement | Surface to full depth | Shrinkage, settlement, movement, or structural loading |
| Spalling | Thin chips or broken areas, aggregate exposed | Shallow to reinforcement depth | Moisture, deicing salts, freeze-thaw exposure, or corrosion |
| Scaling | Broad, dusty, weathered surface loss | Usually shallow | Weak surface paste, poor finishing, or repeated moisture exposure |
| Potholes or popouts | Bowl-shaped loss, isolated pits, loose aggregate | Often deeper than 1 inch | Base failure, trapped moisture, aggregate popout, or rebar corrosion |
Hairline cracks under 1/8 inch commonly indicate shrinkage, but width alone doesn't prove that the crack is harmless. Wider cracks combined with vertical displacement point toward settlement or slab movement and deserve more attention. A practical industrial concrete repair guide also stresses identifying whether a crack is active or dormant and how far the damage extends.
Spalling usually breaks away in flakes or chunks and may expose coarse aggregate or steel. Scaling looks more like widespread surface wear, with a rough or dusty finish across an area rather than one distinct break. Potholes are deeper losses that need a stable base below the patch, or the new material will flex and break at the edges.
For local examples of driveway, slab, and masonry conditions, review the Atlanta concrete repair project portfolio. The important decision isn't whether the defect looks unattractive. It's whether sound concrete remains beneath it and whether the forces that caused the damage are still active.
Safety Gear Tools and Prep Work Before You Start
Concrete dust isn't ordinary household dust. Cutting, grinding, and chipping can put respirable crystalline silica into the air, so a responsible repair starts with respiratory protection and dust control. Wear an N95 or P100 respirator, safety glasses, hearing protection, gloves, and steel-toe boots, and keep children, pets, and unprotected bystanders away from the work area.
A practical driveway repair kit includes:
- Removal tools: Hammer drill with masonry bits, cold chisel, and 4-pound hammer.
- Surface preparation: Angle grinder with a diamond cup wheel, wire brush, shop vacuum, and stiff-bristle broom.
- Placement tools: Margin trowel, mixing bucket, paddle mixer, straightedge, and finishing trowel.
- Protection: Plastic sheeting, painter's tape, cones, and clean water for moisture conditioning.
Choose the material only after identifying the defect. Polyurethane or polyurea sealant suits moving joints and some active cracks. Vinyl or epoxy compounds can work for compatible cracks and rigid repairs. Polymer-modified mortar is more appropriate for spalls and potholes, provided the substrate is sound and the repair is cured correctly.
Preparation controls the bond
Start by sounding the area with a hammer. A sharp, solid ring suggests bonded concrete, while a hollow tone indicates delamination that should be removed. Chip or grind back until the remaining concrete is sound, square the repair edges where practical, and undercut exposed reinforcement so patch material can surround it.
Vacuum dust instead of leaving it in the repair cavity. Clean with high-pressure water or abrasive blasting when the condition and equipment allow, then bring the substrate to saturated-surface-dry, or SSD. The surface should be damp internally but free of standing water. Water-filled pores or puddles can weaken the interface and prevent the patch from bonding.
Don't rush this stage because the bag says the material sets quickly. A fast-curing patch over dirty, dusty, weak concrete is still a failed repair, only a faster one.
Step-by-Step Methods for Cracks Spalling and Potholes
Use the same basic sequence for most repairs: diagnose, prepare, prime when required, fill, finish, and cure. The details change with the defect.
Cracks
For a dormant crack, clean out dust and debris, then chase the line with a grinder or form a controlled V-groove where the selected product requires it. A flexible polyurethane sealant is more suitable where the crack moves. Epoxy injection is a specialist option for appropriate structural cracks, but it doesn't correct settlement or provide a substitute for engineering evaluation.
Don't force rigid filler into an active joint. It may look smooth on installation day and split when the slab moves.
Spalling and scaling
For shallow spalling under 1/4 inch, remove all loose paste, roughen the surface, clean it, and apply a polymer-modified resurfacer according to the manufacturer's mixing instructions. Deeper spalls need a prepared cavity, compatible bonding agent or slurry where specified, and a hand-troweled patch mix placed firmly against the edges.
Broad scaling may require a self-leveling overlay, but only after testing the slab for soundness and correcting moisture or drainage issues. An overlay won't stabilize a delaminated surface underneath.
Potholes
Saw-cut a clean perimeter around a deep pothole, remove loose material, and inspect the base. Rebuild the weak area with compacted base material, apply the specified bonding slurry, then place structural patch mortar in lifts. Tamp each lift to eliminate voids before finishing the top flush with the surrounding slab.
Material prices vary by product, package size, and supplier. The table below gives practical planning ranges for a small Atlanta DIY repair, not a contractor quote. The 1 to 6 hour work window and 24 to 72 hour traffic cure range are job-planning estimates, so follow the product data sheet and weather requirements.
Concrete Repair Methods Time and Cost Estimates
| Repair Type | DIY Time | Cure Before Traffic | Material Cost Range |
|---|---|---|---|
| Crack cleaning and sealant | 1 to 2 hours | 24 to 48 hours | Qualitative, varies by cartridge count and product |
| Shallow spall patch | 2 to 4 hours | 24 to 72 hours | Qualitative, varies by repair-mortar quantity |
| Scaling resurfacer | 3 to 6 hours | 24 to 72 hours | Qualitative, varies by overlay coverage |
| Pothole or deep section patch | 3 to 6 hours | 48 to 72 hours | Qualitative, varies by base repair and mortar volume |
The residential concrete and masonry repair service is one option when the damage extends beyond a manageable surface patch or requires replacement rather than cosmetic repair.
Repairing Control Joints and Expansion Joints Properly
A control joint is a planned weakened line where a slab can crack in a predictable location. An expansion joint is a full-depth separation between slabs or adjacent structures, usually filled with compressible material. Treating both as ordinary cracks is a common reason joint repairs split, debond, or force damage into nearby corners.
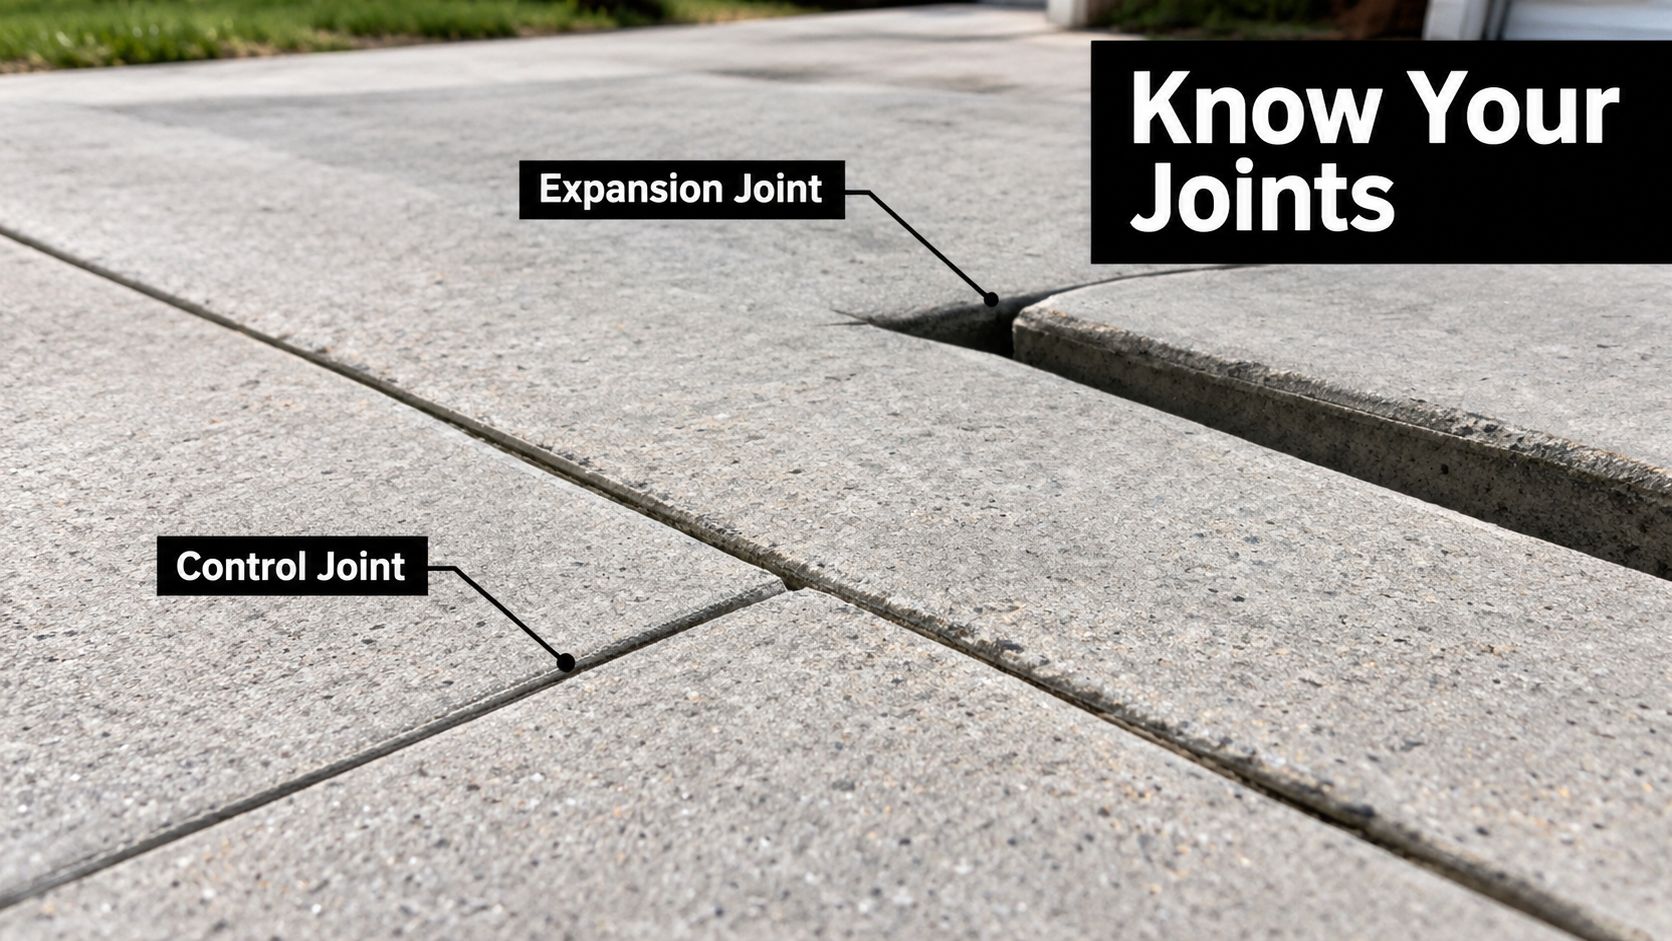
For a failed joint, cut out old sealant with a utility knife and use a grinder carefully where residue remains on the walls. Pull out damaged backer rod, brush the joint sides, vacuum the debris, and confirm that the walls are dry and sound.
Install the correct diameter closed-cell backer rod at the required depth. The rod controls sealant depth and prevents three-sided adhesion, which can restrict movement and tear the sealant. Apply a self-leveling polyurethane or silicone sealant without smearing it across the slab surface.
Temperature and movement matter
Most joint sealants need a dry joint, temperatures above 40°F, and at least 24 hours of curing before joint traffic. Read the product instructions before scheduling work around rain, overnight moisture, or heavy vehicle use.
Missing expansion material lets adjacent slabs press against each other. Corners then chip, spall, or lift because the joint can no longer absorb movement. For projects involving anchors near repaired joints, these pro tips for concrete anchors from XTREME EDEALS INC. can help with placement and installation considerations.
A properly prepared joint repair can remain serviceable for 8 to 12 years, while a surface-only fix may last just 2 to 3 years, as reported in the practical repair guidance cited for these methods. For related pedestrian areas, see residential sidewalk concrete work in Atlanta.
Repair vs Replace How to Decide the Right Fix
A driveway repair should begin with diagnosis, not a patch. Check how much surface is affected, how deep the damage extends, and whether the slab is moving or structurally cracked. Localized damage on stable concrete usually supports repair. Widespread delamination, displaced sections, exposed reinforcement, or a failing base can make replacement the lower-cost choice over the slab's service life.
Atlanta pricing changes with access, demolition, slab thickness, reinforcement, drainage, disposal, and finish. For planning, 2026 Atlanta work may run around $3 to $7 per square foot for resurfacing, $8 to $15 per square foot for partial replacement, and $10 to $20 per square foot for full tear-out and repour, according to this infographic on repair-versus-replacement criteria and Atlanta pricing. Treat those figures as planning ranges, not fixed bids.
| Condition | Likely Direction | Planning Service Life |
|---|---|---|
| Localized surface damage | Patch or resurface | Resurfacer, 5 to 10 years |
| Damaged sections with stable surrounding concrete | Partial replacement | Depends on base and tie-in |
| Widespread failure or structural movement | Full replacement | Replacement, 25 to 40 years |
In practice, replacement becomes easier to justify when repair approaches more than 50% of replacement cost. The same applies when more than 30% of the slab is spalled or cracked, particularly if reinforcement is exposed or water has washed out the base. These are working rules of thumb, not guarantees. A stable base can support a repair, while active settlement can defeat a smaller fix.
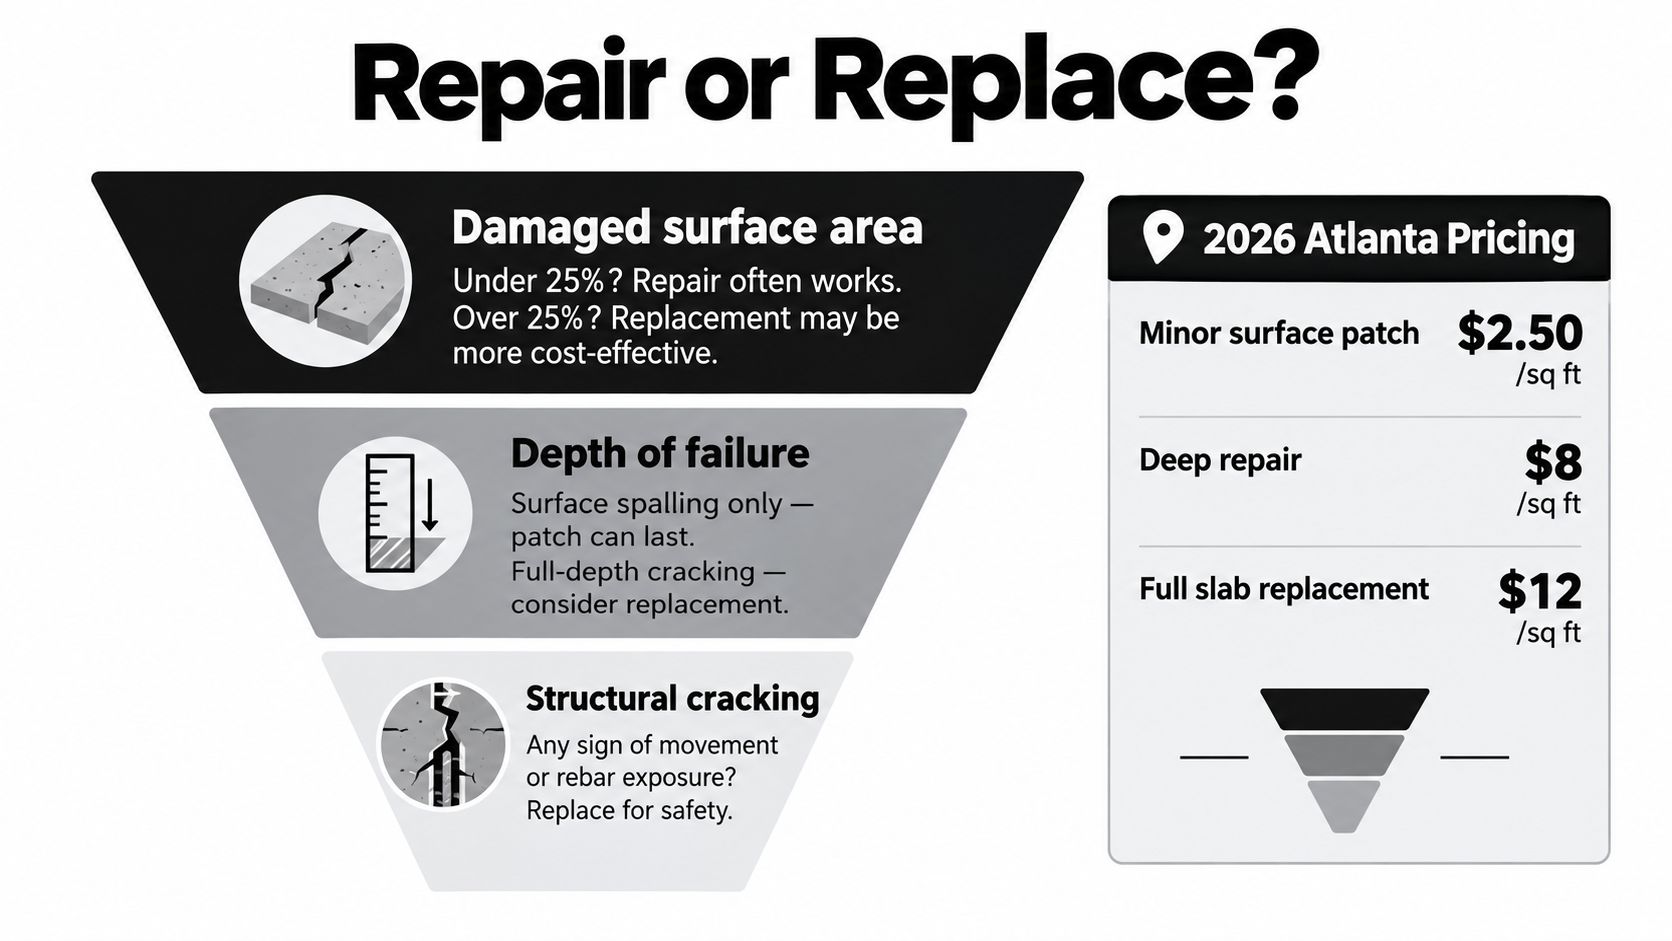
Use this decision path: stable, localized damage points to repair; isolated deep damage points to partial replacement; widespread damage, displacement, or structural warning signs point to full replacement. As another cost benchmark, this driveway repair cost guidance lists targeted repairs at $0.50 to $10 per square foot, full replacement at $8 to $18 per square foot, and uses the half-cost threshold as a replacement rule.
Troubleshooting Repairs That Keep Coming Back
A driveway patch that fails again is evidence. The first repair likely covered the symptom while movement, water, corrosion, or a weak base remained active. Diagnose that mechanism before applying another layer of material. Repeating the same patch usually produces the same failure.
A crack that reopens within 12 months often points to settlement, slab movement, or joint behavior. White efflorescence bleeding through sealer shows moisture moving through the concrete. A hollow sound under a hammer indicates delamination, where the surface has separated from the concrete beneath it.
Exposed rebar with rust staining requires more than a skim coat. Heaving near a downspout commonly reflects concentrated runoff, washout, or a saturated base. Check slope with a 4-foot level, map hollow areas by tapping with a hammer, and inspect nearby plumbing for leaks before rebuilding the surface.
Match the symptom to the next investigation
- Reopening cracks: Measure the opening and check for vertical displacement. Decide whether the crack is active. Flexible material can suit a dormant movement joint, but settlement must be corrected first.
- Efflorescence: Trace water from downspouts, joints, slab edges, and adjacent landscaping. Sealer cannot remove moisture trapped below the slab.
- Hollow areas: Mark the entire delaminated zone, remove unsound concrete, and inspect reinforcement before choosing a patch depth.
- Rust staining: Expose enough concrete to clean and assess the bar. Concrete over corroded reinforcement may require a full-depth patch with rebar tie-in.
- Heaving or washout: Correct the drainage path before repairing the surface. A French drain may suit runoff that repeatedly saturates or erodes the subgrade.
- Settled slabs: Consider mudjacking or polyurethane foam lifting only after checking the base and drainage. Lifting a slab without correcting those conditions can start another settlement cycle.
In my experience, spalling over about 15% of the surface, or cracks wider than 1/4 inch with vertical displacement, deserves an engineer evaluation or qualified contractor assessment. Those signs can indicate movement or structural damage that a cosmetic patch will not control. Treat the percentages as field cutoffs, not a guarantee that every slab beyond them requires replacement.
Price depends on area, depth, access, and the cause. A small patch may cost a few hundred dollars in labor and materials, while major replacement can reach several thousand dollars. A quoted $200 patch and a $5,000 replacement address different scopes. Compare demolition, base work, reinforcement, drainage, thickness, joints, curing, and finish rather than comparing totals alone.
Field checklist for the next driveway walk
Diagnosis
- Identify the damage type and measure crack width.
- Tap for delamination and check slope with a level.
- Look for rust, standing water, washout, and displaced edges.
Preparation
- Clear debris and loose concrete.
- Protect walls, vehicles, landscaping, and drains.
- Stage tools and materials before mixing.
- Confirm dry weather and suitable curing conditions.
Execution
- Mix precisely to the product specification.
- Prime or condition the substrate as required.
- Tool joints and edges cleanly.
- Control curing and keep traffic off the repair.
Follow-up
- Seal the concrete at 28 days where the system calls for it.
- Reseal joints annually.
- Photograph defects for insurance records or contractor bids.
- Schedule a seasonal walkthrough each spring and fall.
Use the checklist to make the decision. Localized damage with a sound base, no active movement, and no exposed or corroded reinforcement supports a targeted repair. Active settlement, repeated moisture entry, widespread delamination, displaced edges, or compromised reinforcement calls for replacement quotes. Request two contractor quotes and compare the full scope, not just the patch price.
Ask for the patch material specification in writing, including ASTM C928 requirements where appropriate. Photograph defects before work begins, keep the images with your estimates, and do not approve a surface-only repair until the contractor explains the failure mechanism and how the proposed work addresses it.
Atlanta Concrete Solutions can evaluate damaged driveways, slabs, sidewalks, and masonry to determine whether targeted repair, resurfacing, section replacement, or full replacement fits the condition. Visit Atlanta Concrete Solutions to request a quote and discuss a diagnosis-first repair plan for your Atlanta property.