
The most popular advice on how to repair a brick retaining wall is backwards. Most guides start with a pointing trowel, a bucket of mortar, and a loose brick. I'd start with what you can't see, the water and soil pressing from behind. If that pressure hasn't been relieved, new mortar just locks the problem in place and gives you a tidier wall that keeps moving. Sort the wall by cause first. Then decide whether you're repointing, rebuilding drainage, or rebuilding the wall itself.
Triage Your Wall Before Any Repair
A retaining wall isn't a garden feature with soil behind it. It's a structure holding back soil that gets heavier and pushes harder every time it saturates. That's why bulging, leaning, recurring cracks, and damp staining usually point to drainage or structural failure before they point to bad mortar.
The Portland retaining-wall code states the diagnostic rule plainly. Unless a drainage system is installed, the wall must resist the full hydrostatic pressure of undrained backfill. The code also requires engineers to account for soil loads under ASCE 7-16 and to add lateral pressure from surcharge loads such as buildings, vehicles, stored materials, or an upslope. A wall that can't drain isn't coping with damp soil. It's coping with water pressure across its whole retained face.
Sort the symptom before you buy materials
Use this table as a first sort, not as a final diagnosis. A single loose brick and a bulging face can sit six feet apart on the same wall, and they don't get the same repair.
| Symptom | Likely cause | Repair path |
|---|---|---|
| Bulging or bowing face | Saturated backfill pushing outward | Stop loading the area and get an engineer's assessment before excavating |
| Leaning or rotating top | Hydrostatic pressure or footing movement | Engineered stabilization or partial rebuild |
| Damp staining or water at the face | Blocked weep holes or no drainage behind the wall | Restore drainage first, then repoint |
| Hairline cracks confined to joints | Deteriorated mortar | Check drainage, then repoint with compatible mortar |
| Single loose or cracked brick | Localized mortar failure or impact damage | Replace the unit and repoint the joints around it |
| Stepped cracks at corners or ends | Foundation settlement or undermining | Engineer's assessment before any masonry work |
Atlanta conditions make the water case harder to dismiss. Clay-heavy soils hold moisture, intense storms deliver it quickly, and roof runoff or irrigation can keep feeding the backfill long after the rain stops. A wall face can look dry on a Tuesday while the soil behind it is still saturated from Saturday.
Rainfall test: After heavy rain, check within a day whether water appears at the face or runs from the weep holes, and whether any lean has grown. Dry outlets with a damp face, or movement that tracks the weather, puts you in drainage-first or engineered territory.
That test sorts most walls into three buckets. Sound and draining means localized masonry repair. Sound but wet means drainage correction before repointing. Moving means stop and get it assessed.
When Lean Means Stop and Call an Engineer
Lean is measurable, so measure it instead of eyeballing it from the driveway. The UK government garden wall guidance recommends expert advice when a leaning brick wall exceeds roughly 30 mm for a half-brick wall, 70 mm for a single-brick wall, or 100 mm for a brick-and-a-half wall.
| Wall thickness | Lean that calls for expert advice |
|---|---|
| Half-brick wall | About 30 mm |
| Single-brick wall | About 70 mm |
| Brick-and-a-half wall | About 100 mm |
Those figures are screening thresholds for garden walls, not a structural design for your retaining wall. A retaining wall also carries soil, water, and whatever sits above it. Treat the numbers as a stop sign, not as proof that a wall below them is safe.
Height is not the only trigger
Homeowners often assume a short wall is a low-risk wall. A short wall with a driveway, parked vehicle, slope, shed, pool, or foundation above it carries surcharge the original builder may never have allowed for. That added load raises both the pressure on the wall and the cost of getting the diagnosis wrong.
Decide the repair by cause, not by appearance:
- Localized brick replacement: One or a few damaged units in a wall that's plumb, draining, and otherwise sound.
- Partial reconstruction: A displaced section where the footing and remaining wall are sound enough to rebuild against.
- Full replacement: A wall whose footing has moved, whose backfill stays saturated, or which never had adequate lateral restraint to begin with.
Repointing a wall that's sliding is a false economy. You're paying for neat joints on a structure that's still travelling. Keep people and vehicles away from the downslope side, photograph the wall, mark crack ends with dates, and remeasure the lean on a schedule. Get an engineer's opinion before you dismantle anything or dig behind a wall that's actively moving, because removing soil or brickwork changes the loads holding it up.
If your project needs more than one professional, it's worth taking time to compare preconstruction team responsibilities so engineering, drainage, and masonry scopes don't fall between contractors. For Atlanta-area properties, confirm permit requirements with your own jurisdiction rather than relying on a universal four-foot rule. Requirements vary, and they can change when a wall carries a surcharge or affects neighbouring property.
Tools and Materials to Gather Before You Start
Gather everything before the first brick comes out. Mid-course stops leave open joints exposed to rain and tempt you to substitute whatever mortar or brick is on the shelf. Sort salvaged brick first, because reclaimed units from the same wall usually match size and colour better than anything new you can order.
For the chisel work itself, the DIY chisel advice from Neasden Hardware is a useful primer on choosing and controlling the tool before you put it near brick edges you intend to keep. Work from the joint, angle blows away from the face, and stop if the brick starts to spall.
| Item | Purpose | Notes |
|---|---|---|
| Cold chisel and club hammer | Removing loose brick and mortar | Work from the joint, not the brick face |
| Diamond-blade grinder or joint raker | Raking deteriorated mortar to depth | Wear a respirator and wet-cut to limit silica dust |
| Pointing trowel and jointer | Filling and tooling joints | Match the existing joint profile |
| Mortar mix, lime-based for older walls | Compatible repair mortar | Strength at or below the original mortar |
| Replacement brick | Matching damaged units | Salvage or match size, colour and porosity |
| Washed gravel | Free-draining backfill zone | Place and compact in lifts |
| Filter fabric | Keeps soil out of the drainage zone | Overlap seams |
| Perforated collector pipe | Carries water to a lawful outlet | Confirm slope and outlet clearance |
| Level, string line and tape | Measuring lean and alignment | Measure before and after each phase |
| Respirator, gloves and eye protection | Personal safety | Required for grinding and mortar work |
A grinder throws silica dust, so the respirator, eye protection, and hearing protection aren't optional extras. Wet cutting cuts the dust down, but it doesn't replace the mask. Count your replacement brick, gravel, fabric, and pipe against the measured repair area before you start. Running short on fabric or pipe is how drainage zones end up narrower than planned.
How to Repair a Brick Retaining Wall Step by Step
This sequence assumes the wall has passed triage, meaning it's stable enough to work on, or an engineer has approved the repair. The order matters more than the speed. Masonry comes after water and stability, never before them.
The visual below lays out the nine phases in working order.
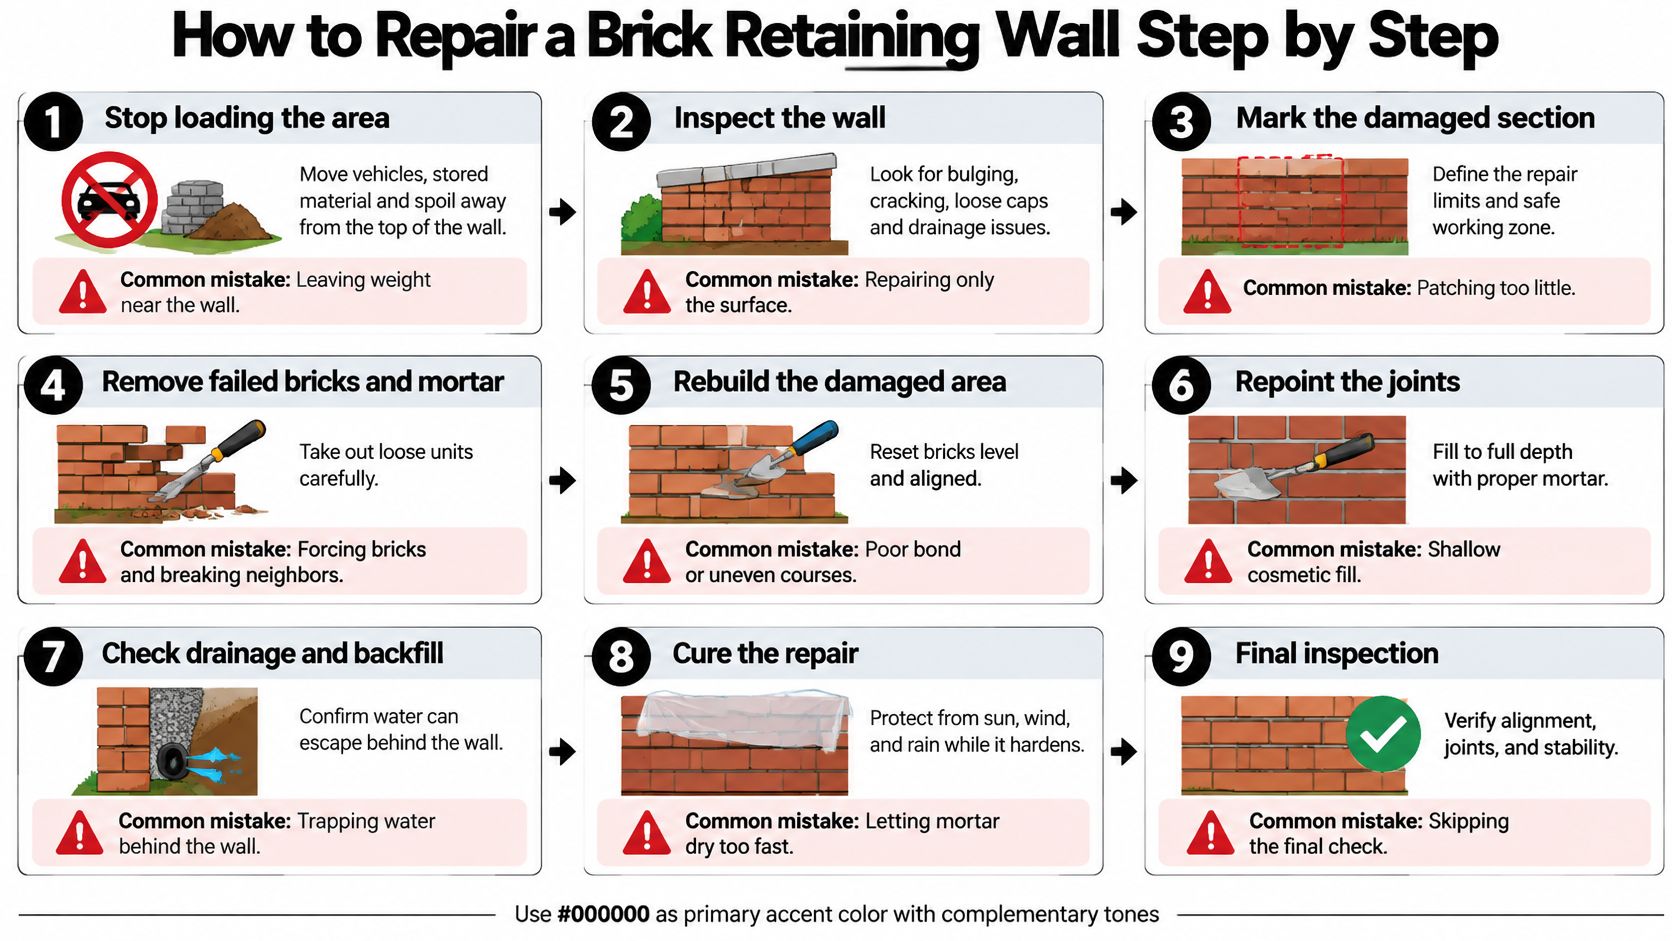
Stop loading the area. Move vehicles, stored material, and spoil away from the top of the wall and keep people off the downslope side. You're reducing surcharge before you disturb anything. The common slip is stacking excavated soil right behind the wall you're trying to relieve.
Document the wall. Photograph every face, measure lean with a level or string line, map cracks and open joints, and note the date and recent rainfall. Without a baseline you can't tell stable damage from active movement. Skipping the photos is the usual mistake, and you'll regret it at the first disagreement about whether a crack is new.
Stabilize before you open anything up. Brace or shore the section and confirm it isn't moving. If the lean is growing between measurements, stop and call an engineer. Dismantling an unbraced, moving wall removes the little restraint it still has.
Cut off the water source. Fix gutter outlets, irrigation heads, and surface grading that send water toward the wall. There's no point rebuilding a drainage zone while a downspout keeps filling it. Missing an irrigation line that soaks the backfill nightly is an easy error.
Excavate backfill in controlled sections. Work one bay at a time and remove saturated soil so the drainage zone can be rebuilt. Short sections keep the remaining wall supported. Digging the full length at once is faster and considerably riskier.
Rebuild displaced or broken units. Set matching brick on sound mortar beds, check plumb and line as each course goes in, and don't force units so hard that you crack their neighbours. Rebuilding onto old, crumbling bedding just inherits the original failure.
Install the drainage zone. Lay filter fabric, place free-draining aggregate in lifts with light compaction, set the perforated collector pipe to a positive fall, and leave weep holes open. Backfilling before you've confirmed the outlets run clear is the slip that undoes the whole repair.
Rake out and repoint. Remove deteriorated joints to sound material and repoint with compatible mortar at full depth. A shallow cosmetic smear over crumbling mortar looks finished for one season. Full-depth work is what bonds.
Cure, protect, and reinspect. Shield fresh mortar from driving rain, frost, and harsh sun while it hardens. Then inspect after the next heavy storm, not just the next dry weekend.
The short demonstration below shows the hands-on brick and mortar work within that sequence.
Success at the end is specific, not cosmetic. You want a dry face after rain, outlets that run, joints filled to full depth, courses back in line, and no new cracks at the marks you dated in step two. If the wall passes a storm inspection, the repair has earned its keep. If damp returns to the same patch, the water path is still wrong no matter how tidy the pointing looks.
Fixing Drainage Behind the Wall
Read the water path in order, from the surface down to the outlet. During and after a storm, note where water emerges. Water appearing high on the face suggests surface water getting in at the top. Water at the base with dry weep holes suggests the collector or outlet has failed. The pattern tells you where to dig.
Start with the cheapest check. Weep holes get blocked by mulch, soil, and landscaping, and owners sometimes seal them because they look like defects. Open them. A public masonry specification from New York's Office of General Services places weep holes at approximately 600 mm on center, which gives you a reference spacing when you're judging whether a wall has enough outlets or just two token holes at one end.
Rebuild the zone in this order
- Filter fabric against the soil, with seams overlapped, so fines don't migrate into the gravel and clog it.
- Washed gravel in lifts, lightly compacted as you go, forming a continuous free-draining column behind the wall.
- Perforated collector pipe at the base, falling to an open outlet that discharges to a lawful point. The New Zealand Canterbury rebuild guide identifies 38 to 50 mm plastic pipes as a typical outlet range and warns that trapped water creates hydrostatic pressure.
Finish at the surface. Grade the ground so it falls away from the top of the wall, and check roof runoff and irrigation overspray, since clay-heavy Atlanta soils stay saturated far longer than most owners expect. If you're rebuilding planted areas above the wall at the same time, it helps to compare retaining wall planter materials before you refill, because planter soil and watering habits change how much moisture reaches the backfill.
Surface waterproofing and sealant cannot replace a drain. Sealing the face of a wet wall traps the water that's already behind it and pushes the damage into the brick.
Say a base outlet ends up buried under a flowerbed. The face looks sound, the joints are tight, yet the foot of the wall stays damp after every storm. That's an outlet problem wearing a masonry disguise. Reinspect after the next heavy rain for dampness, outlet blockage, soil movement, or widening cracks, and clear those faults before any repointing begins. Don't excavate behind a wall that's still moving without shoring and professional input. The drainage fix doesn't outrank the stop rule.
Repointing Depth, Mortar Mix and Curing Limits
Repointing is where cosmetic work and durable work part company, and the difference is measurable. Three controls decide the outcome, depth, mortar strength, and temperature. Get any one wrong and the joint fails early or damages the brick around it.
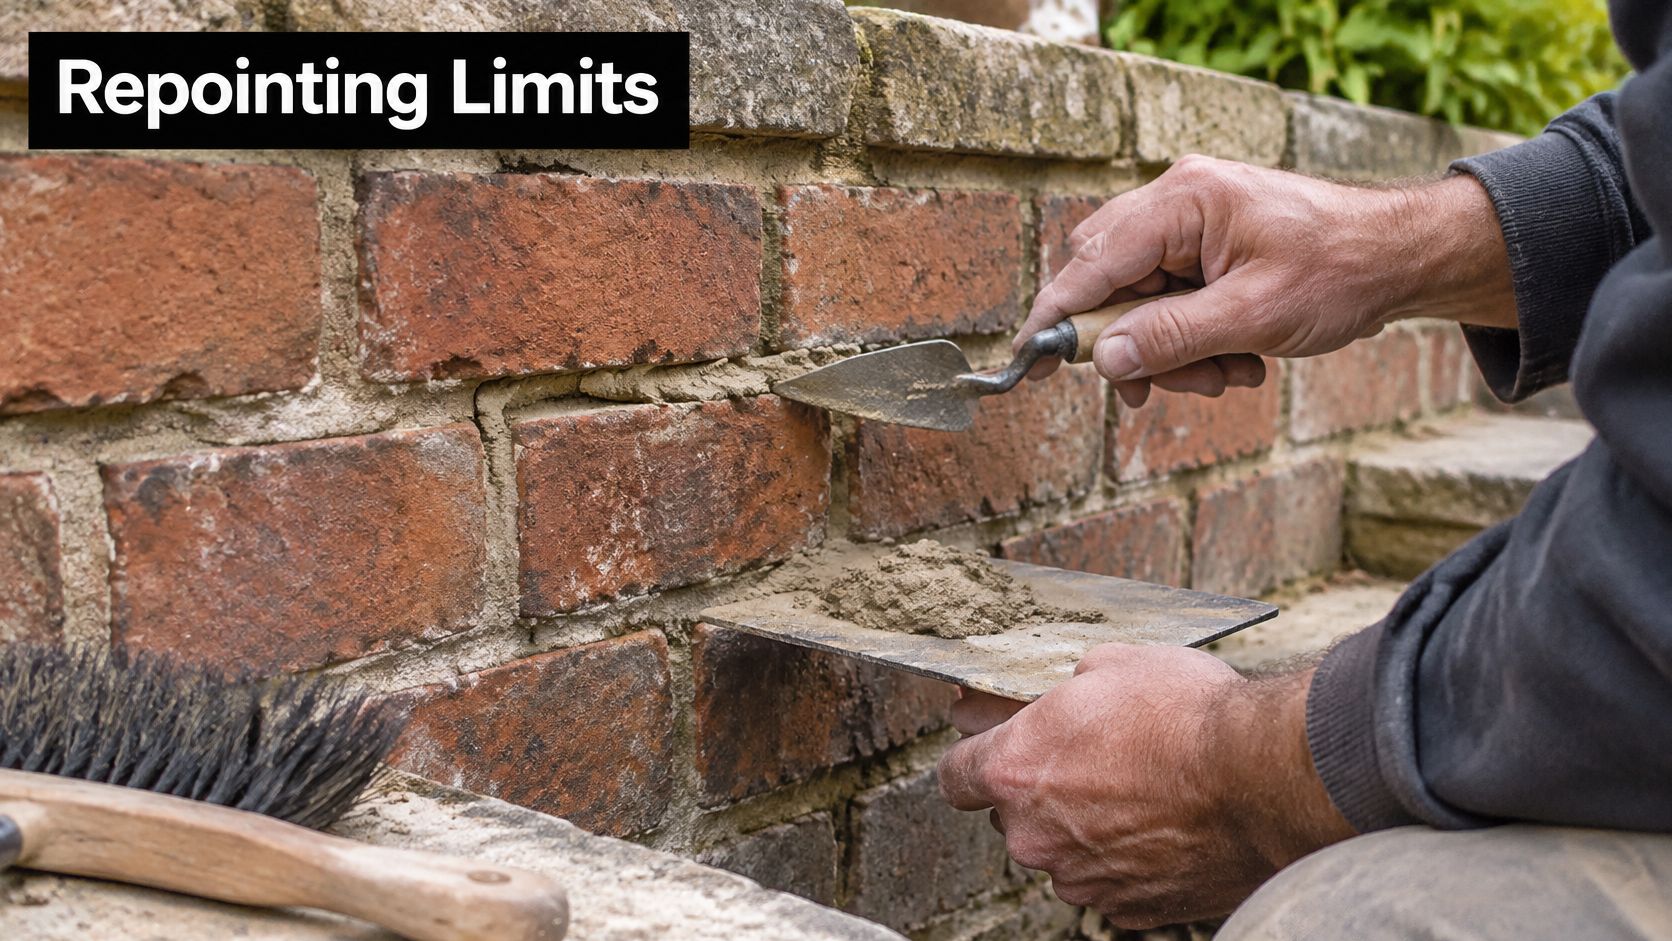
Depth comes first. The National Park Service repointing brief recommends removing deteriorated mortar to a depth of at least 2 to 2.5 times the joint width. On a 10 mm joint, that means raking out 20 to 25 mm to reach sound material. Shallow fills don't have enough body to bond, so they curl, crack, and pop out. The same guidance says new mortar should match the existing mortar in color, texture, tooling, and sand while staying compatible rather than excessively hard.
The close-up below shows mortar being placed into a prepared joint rather than smeared across its face.
Strength and temperature limits
Your replacement mortar should be equal to or weaker than the original mortar and the surrounding brick. A hard, cement-rich mix sounds stronger and behaves worse. It forces normal moisture movement and thermal expansion into the softer brick, which then cracks or spalls while the joint survives. On older walls, a lime-based mix is usually the safer choice. The joint is meant to be the sacrificial part of the wall. Let it be.
Work within 5 and 25 degrees Celsius to reduce frost damage in fresh mortar and rapid drying that weakens the bond. In an Atlanta summer, that argues for early starts, shade where you can get it, and protection from sun and wind during curing. Dampen porous brick before pointing so it doesn't pull water out of the mortar on contact, but don't flood the joint. Saturated brick bonds poorly too.
Apply mortar in lifts, pressing each one fully into the raked joint so no voids sit behind the face. Tool the joint to the existing profile once it's thumbprint-firm, since tooling too early smears mortar across the brick and tooling too late won't close the surface. Protect the finished work from rain and harsh sun for several days while it cures.
Two restraint rules matter as much as technique. Leave sound joints untouched, because every joint you rake out is a chance to damage a brick edge that didn't need attention. And never repoint a wall that's still moving. Fresh mortar in a travelling joint cracks on schedule and tells you nothing you didn't already know.
Confirm Your Repair Plan Before Digging
Set the repair scope before excavation, while changes are still straightforward. Bring dated photos, lean measurements, the wall's height, the slope above and below, any driveway, building, pool, or shed loading the top, and the dates of recent heavy rain. This information helps focus the assessment on whether trapped water, movement, or another cause is driving the failure.
Ask for a written scope that identifies the likely cause, the repair it calls for, and any outlet work alongside repairs to the brick face. Confirm how local permit requirements apply to the wall's height and loading with your jurisdiction. Atlanta Concrete Solutions provides a project timeframe during the initial consultation.
A stable wall with a blocked outlet may need drainage correction and repointing. If the wall continues to lean after heavy rain, have it assessed before ordering mortar or starting excavation. Never repoint a wall that is still moving.
For a free quote, call Atlanta Concrete Solutions at (678) 554-4433. The company provides masonry repair across the greater Atlanta area, with clear communication before work begins.