
You usually notice failed mortar the same way most homeowners do. A few joints look recessed, sand starts collecting on the sill or walkway below, and one small repair turns into a bigger question about whether the wall needs repointing at all.
That's the right question to ask first. How to repair mortar between bricks isn't just about cutting out old joints and pushing in new mix. Good repointing starts with diagnosis, because plenty of brick problems are really moisture problems, movement problems, or brick-failure problems that fresh mortar won't solve.
When Mortar Repair Actually Makes Sense
You see a few open joints under a window, some sandy grit on the sill, and a crack or two near the corner. That is the point where many homeowners jump straight to patching. On a brick wall, that is backwards. Repointing starts with diagnosis.
Mortar repair makes sense when the joint has failed, the brick is still serviceable, and the wall is stable. If water is getting in from a bad cap, failed flashing, hard previous repairs, or movement in the structure, fresh mortar will only cover the symptom for a while. The repairs that fail fastest usually start with the wrong diagnosis, not bad trowel work.
SPAB makes the same point in its guidance on inappropriate cement pointing. Matching the wall matters. A mortar that is too hard or too dense can trap moisture and push the damage into the brick.
Signs the joints are failed
Look for loss of bond and loss of depth, not just ugly surface wear.
- Crumbling or loose mortar: If the joint powders under light scraping, it is spent.
- Recessed joints: Mortar worn back from the brick face sheds water poorly and usually needs attention.
- Open edges at the brick arris: A visible gap where mortar has let go is a failed joint.
- Voids behind a thin outer skin: The face can look sound while the joint is hollow behind it.
- Repeated patch failure: If a small repair keeps breaking loose in the same area, there is usually a moisture or compatibility problem behind it.
Here is the field rule I use. If the mortar is only weathered at the surface but still firm and well bonded, leave it alone. If it comes out as grit, has separated from the brick, or is eroded deep enough that water can sit in the joint, repointing is justified.
Diagnose the wall before you diagnose the mortar
Depth matters. Compatibility matters more.
A proper repointing job usually means removing mortar to a depth of about twice the joint width, or until sound mortar is reached, whichever is greater. If only the outer skim has failed, a surface patch will not last because the new mortar has no real body to key into. Many DIY tutorials skip that point, and that is one of the main reasons small repairs pop out after a freeze-thaw season.
The second check is mortar type. Older brick often needs a softer, more vapor-open mortar than a newer veneer wall. Hard modern mortar in a soft historic wall shifts stress and moisture into the brick itself. As noted earlier, preservation guidance treats the mortar as the sacrificial part of the assembly. The brick should not be.
Mortar failure and brick failure are different problems
Homeowners lose time and money.
If the brick face is flaking, spalling, or breaking loose, the problem is no longer just the joint. Water may be trapped in the wall. A previous repair may have used mortar that is too hard. The brick may have reached the point where replacement is part of the repair. Packing fresh mortar into those joints without fixing the cause can speed up face loss.
A few quick checks help sort that out:
- Scratch test: Softer mortar should scratch easier than the brick.
- Tap test: Hollow-sounding joints or loose brick faces need closer inspection.
- Moisture pattern check: Dark damp areas, white salts, or recurring staining usually point to a water source that repointing alone will not solve.
Crack pattern tells you whether repointing belongs here
| Crack or condition | What it usually suggests | What to do |
|---|---|---|
| Fine crack only in the mortar | Minor shrinkage or weathering | Monitor or repoint if the joint is weak |
| Stair-step cracking along joints | Movement or settlement | Find the cause before repair |
| Crack running through brick units | Structural distress or brick failure | Get a mason or engineer involved |
| Bulging or leaning wall | Loss of stability | Stop and investigate |
| Spalled brick faces | Moisture or incompatible past repairs | Fix the cause before repointing |
Joint profile matters too. A concave joint, flush joint, weathered joint, or struck joint handles water differently and changes how the wall reads in sunlight. If the original profile is ignored, the repair will stand out even when the mortar color is close.
DIY repair is reasonable when the area is small, the joints are clearly failed, and the wall is otherwise sound. Garden walls, step cheeks, and limited veneer repairs often fit that category. Broad failure across a wall, unknown older mortar, or visible movement is a different call. In that situation, it makes sense to bring in a contractor who handles commercial concrete and masonry repair.
Red flags that mean stop
Some conditions call for investigation before any mortar comes out.
Bricks that move by hand, step cracks that continue through units, interior leaks, bulging sections, and widespread spalling are not routine repointing work.
Use this checklist before calling it a mortar-repair job:
- The damage is in the joints, not the bricks
- The wall is plumb and stable
- The failed areas are localized
- You know where the water is coming from, or you have ruled out an active leak
- The replacement mortar can be matched to the wall, not just to the color
If many joints are failing across the same elevation, spot repairs usually turn into a patchwork that ages unevenly. At that stage, full repointing is often the cleaner and longer-lasting choice.
Tools and Safety Setup for Repointing
The tool list depends on the size of the repair. A few failed joints under a window need a different setup than a long run of brick veneer.
Hand tools for smaller repairs
For a compact repair area, hand tools give you more control and less risk of chipping the brick arris.
- Plugging chisel and masonry hammer for careful mortar removal
- Pointing trowel for packing joints
- Margin trowel for handling small batches
- Brick jointer sized to the existing profile
- Hawk to hold mortar at the wall
- Whisk broom or soft brush for clearing crumbs
- Garden sprayer for dampening the wall before filling
If the brick is older or soft, hand work is usually the safer route.
Power tools for larger areas
Once the wall area grows, hand raking gets slow. That's where a 4-inch or 4.5-inch angle grinder with a diamond tuckpointing blade earns its keep. A dedicated mortar rake can also work, especially if you want better dust control.
Use power tools only when the joints are wide enough and the operator can hold a straight line. Most damage from grinders comes from wandering into the brick edge.
Mixing gear and safety gear
Mixing setup matters more than people think. Inconsistent water is one of the easiest ways to ruin a batch.
- Mortarboard or wheelbarrow
- Hoe or paddle mixer
- Consistent bucket for sand measurements
- Calibrated water container
Safety setup isn't optional.
- ANSI Z89.1 hard hat if you're working where overhead hazards exist
- Sealed safety glasses
- N95 or P100 respirator during raking, especially with grinder dust
- Cut-resistant gloves
- Hearing protection for grinder work
Silica dust is the hazard in this job. If you're grinding, use a shroud and HEPA vacuum setup where practical. For work above one story, stop thinking ladder-only and start thinking scaffold.
Most first-timers should buy the hand tools and rent the grinder or mortar rake if the job justifies it. That keeps cost down without locking you into equipment you may use once.
Raking Out the Old Mortar the Right Depth
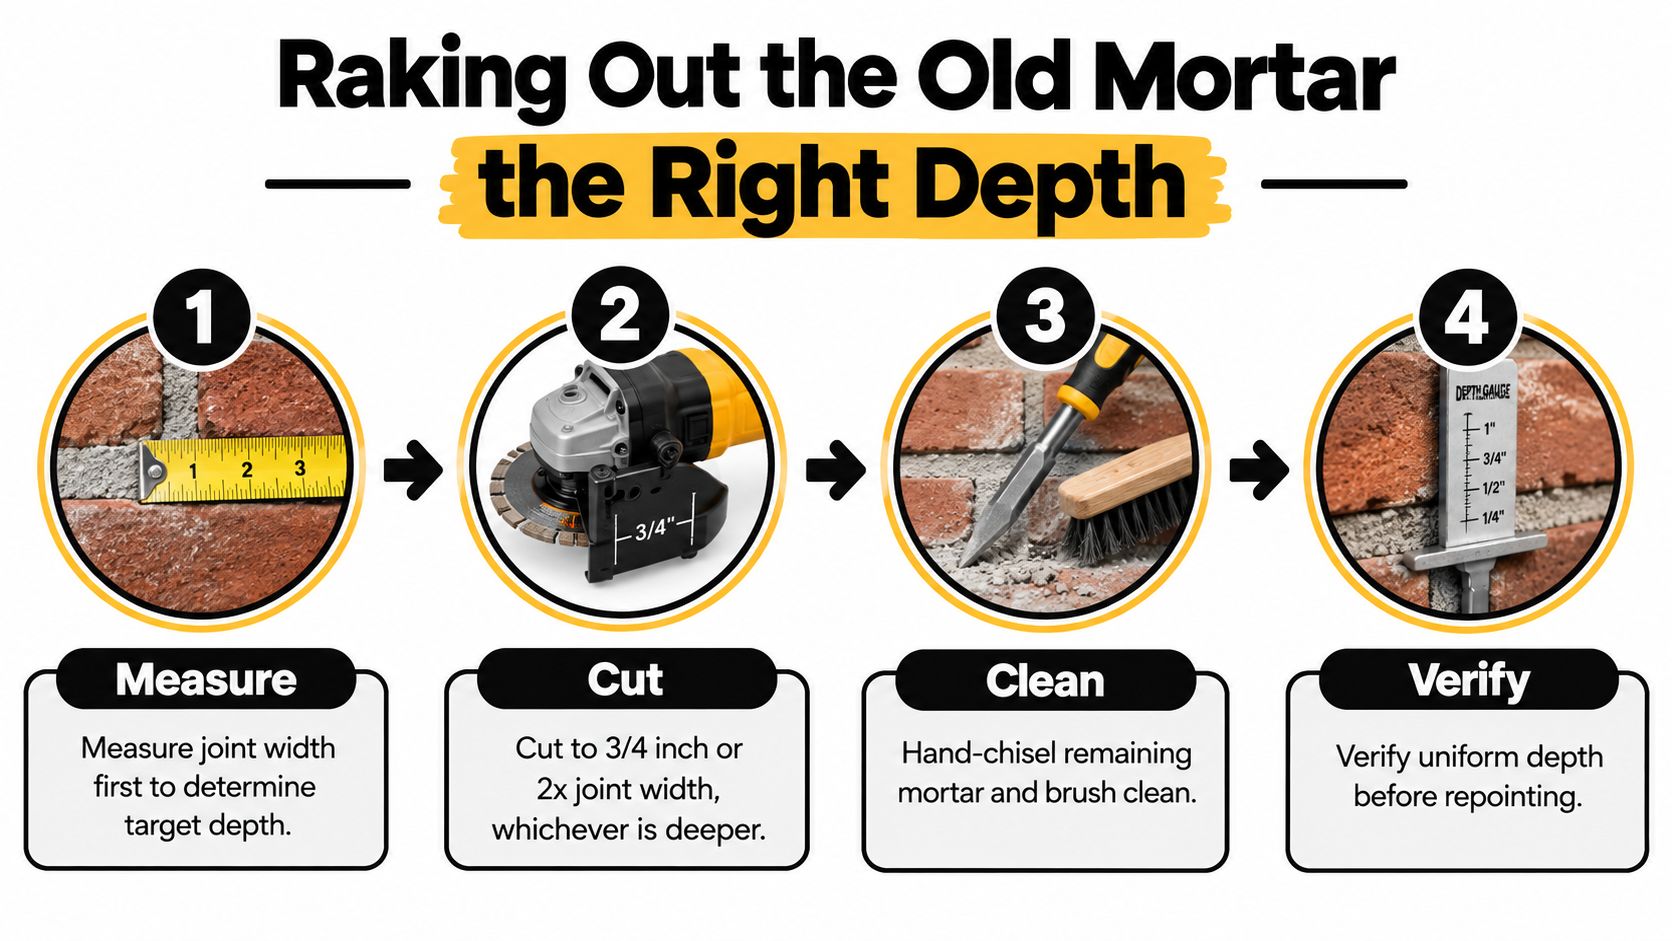
Depth decides whether the repair lasts or fails early. Most short-lived repointing jobs don't fail because the mortar bag was bad. They fail because the old joint wasn't opened deep enough.
Neutral preservation guidance recommends removing deteriorated mortar to about 2 to 2.5 times the joint width, which is often roughly 20 to 25 mm, or about 3/4 to 1 inch, before packing the new mortar back in stages, as outlined in the NSW heritage mortar methods guide.
Match the method to the wall
Soft lime joints on older brick should usually be hand-raked with a plugging chisel or mortar rake. You get better feel, less vibration, and far less chance of knocking off the brick edge.
Harder Portland cement joints often require a grinder. The blade width needs to fit the joint. Too wide, and you scar the brick. Too narrow, and you waste time making repeated passes.
What proper raking looks like
Think in proportion first, inches second. If the joint is narrow, depth should still follow width. For many residential walls, that lands around a practical minimum near 5/8 inch, but the better rule is still the width-based one.
Here's the sequence that works:
- Score the center of the joint first if you're using a grinder.
- Keep the blade off the brick arrises. Let the tool remove mortar, not reshape masonry.
- Hand-chisel corners and stubborn pockets after the main cut.
- Brush and vacuum the joint clean so fresh mortar bonds to masonry instead of dust.
A skimmed repair at the face is not repointing. It's a cosmetic patch waiting to pop out.
Shallow cuts fail because new mortar needs enough body to lock into the joint and resist weathering. If the back of the old joint is still loose or dusty, the new mortar bonds to weakness rather than sound material.
When to stop cutting
Three warning signs should stop a homeowner fast:
- Hollow-sounding brick faces
- Cracked or loose units
- Mortar that keeps crumbling deep into the wall instead of reaching a firm interface
Those conditions suggest the problem goes beyond the outer joint. At that point, cutting deeper can create more damage than repair.
Choosing a Mortar Mix That Matches the Wall
A lot of repointing jobs are set up to fail before the first joint is filled. The wrong mortar does that.
After the joints are raked out, the next decision is diagnostic, not cosmetic. The wall has already told you part of the story through the depth you could cut, how the old mortar broke out, and whether the brick edges stayed sound or started to chip. Use that information. A soft, powdery joint in an older wall usually calls for a very different repair mortar than a hard, dense joint in a newer veneer.
The basic rule is simple. The replacement mortar should usually be softer and more vapor-permeable than the brick, and close to the original mortar in strength and behavior. If the new mix is harder than the masonry around it, moisture and movement stop wearing out the joint first and start damaging the brick face instead.
Masonry references discussing ASTM C270 classifications show a wide range of mortar strengths, with repair mortars for older work often selected more carefully than bagged structural mixes sold for general use, as summarized in this masonry repair overview on historic and modern mortar matching.
Mortar Mix Comparison for Brick Repointing
| Mortar Type | Compressive Strength | Vapor Permeability | Best For | Watch Out For |
|---|---|---|---|---|
| Type K | About 75 psi | High | Very delicate restoration work | Too soft for many modern walls |
| Type O | About 350 psi | Higher than stronger cement mixes | Historic or soft masonry | Can be understrength for harder, newer work |
| Type N | Around 750 psi | Moderate | Many modern above-grade walls | May still be too hard for older brick |
| Type S | About 1,800 psi | Lower | Heavier-duty modern masonry conditions | Often too hard for historic brick |
| Type M | About 2,500 psi | Lower | Very high compressive demand | Wrong choice for most repointing |
| Lime-based repair mortar | Qualitatively more forgiving and permeable | High | Older walls, especially where moisture release matters | Requires proper curing and matching |
The wall decides, not the store shelf
On many pre-1919 brick walls, lime-rich mortar is the safer match, as noted earlier. Those bricks were often fired softer and built to work with a mortar that releases moisture instead of trapping it. Packing those joints with a hard Portland-heavy mix can turn a mortar repair into a brick replacement project.
That is why I do not choose mortar by label alone. I look at the age of the house, the hardness of the brick, the exposure of the wall, and what came out of the joint. If the old mortar crumbles in your hand and the brick face scratches relatively easily, a modern high-strength mix is usually the wrong direction.
Sand matters almost as much as binder choice. You can get the strength roughly right and still end up with a bad repair if the sand is too fine, too yellow, too white, or too uniform for the wall. The joint will read differently from ten feet away, and texture mismatch often makes a patch stand out more than slight color variation.
Premixed mortar from the home center can work on some newer homes with hard brick and standard Type N joints. It is a gamble on older walls. If you do not know what the original mortar was, send a sample to a testing lab or at least bring in a mason who works on historic brick. That costs less than replacing spalled faces later.
Generic mortar is convenient. Compatibility keeps the wall intact.
Packing and Tooling the New Joints
Most first-time repointing jobs go wrong after the cutting is done. The joints are open, the wall looks ready, and then the installer tries to fill the whole depth in one push. That leaves voids behind the face and weakens the repair.
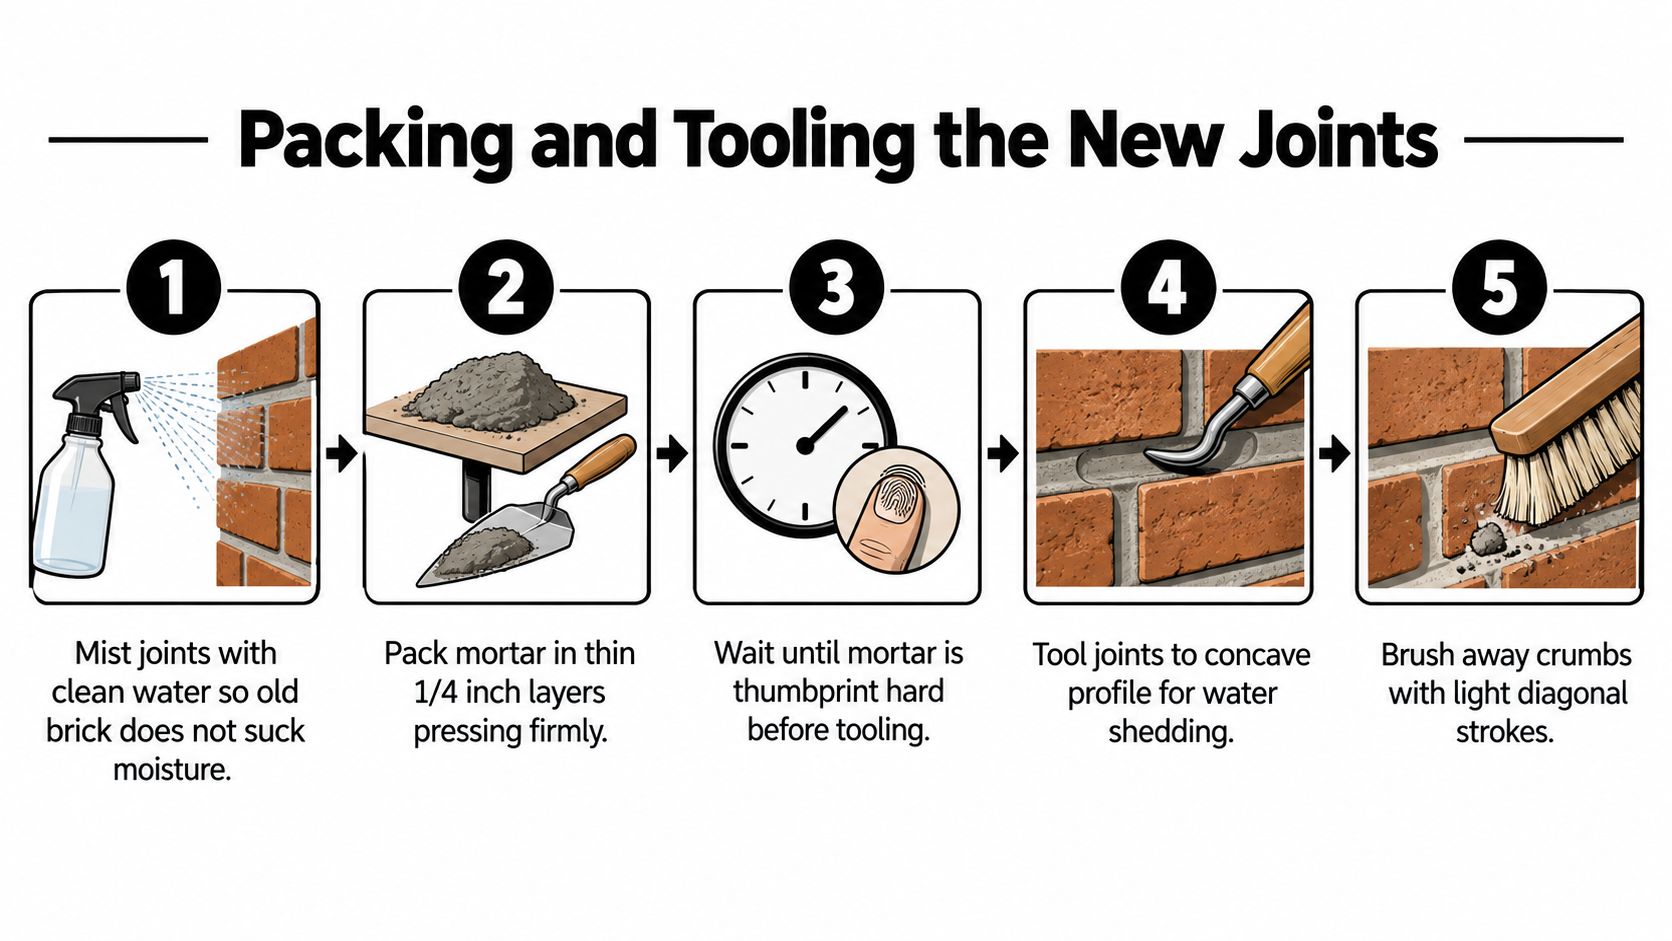
Before any mortar goes in, lightly dampen the wall. Expert guidance advises wetting masonry before repointing to prevent rapid suction and staining, because dry brick can pull water out of fresh mortar too fast and weaken the bond, as explained in GSA guidance for preparing lime mortar for repointing.
Pack in lifts, not one deep load
A stiff, dryish mix works better than soupy mortar for repointing. You want it workable, but not wet enough to slump.
For a deeper joint, fill it in stages. A common rhythm is two passes for a roughly 5/8-inch-deep joint, pressing the first lift firmly into the back and corners before adding the second. Each layer should compact against sound material, not float over air pockets.
Use this workflow:
- Mist the joint first: Damp, not dripping.
- Load the back of the joint: Use a pointing trowel and press hard.
- Let the first lift firm up: Wait until it resists your thumb instead of smearing.
- Add the next lift: Pack it flush to the face.
- Strike off excess: Keep the wall neat as you go.
Tooling matters just as much as filling. Match the original profile. Concave joints are common on residential work because they shed water well. Historic facades may call for V-joint, flush, weathered, or struck tooling depending on the original finish.
A good visual reference helps if you haven't done this before.
Watch the timing
Tool too early and you drag mortar out of the joint. Tool too late and the surface tears instead of compressing cleanly.
The right moment is usually when a thumb leaves a slight print without pulling material away. At that point, the jointer densifies the surface and sharpens the profile. After tooling, brush lightly across the joints with a soft brush on a diagonal to remove crumbs without gouging the fresh work.
If the mortar turns slick and glossy, it has probably been overworked. That often means too much water at the surface and a weaker finish. For examples of what properly finished masonry work looks like in the field, it helps to review completed repair projects before tackling a visible facade.
Curing Fresh Mortar Without Letting It Fail
A lot of repointing jobs fail after the joints are filled, not while they are being filled. The wall looked repaired, then the mortar dried too fast, shrank away from the brick, or got caught by a cold night before it had enough set to hold together.
Curing starts with a judgment call. The mortar type, the weather, and how absorbent the existing brick is all change the plan. Lime-rich mortar needs a slower, damper cure. A harder cement mix still needs protection, but it usually does not need the same long wet period.
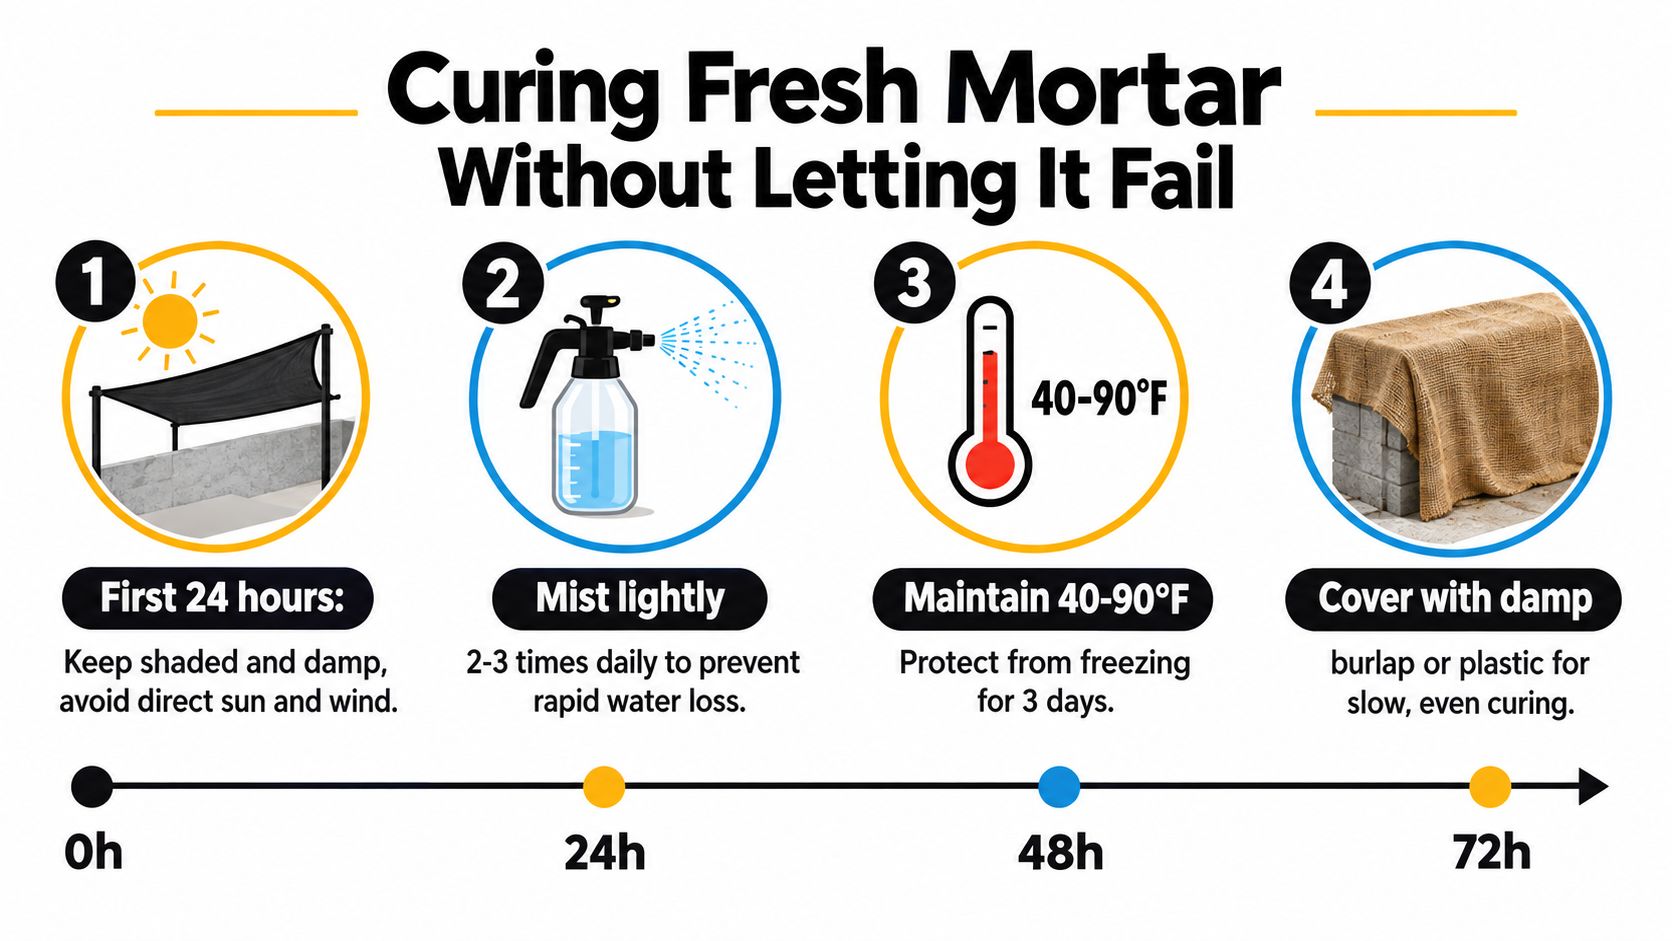
What ruins fresh joints is simple. Sun pulls moisture out of the face before the joint cures through. Wind speeds that up. Heavy rain can pit or wash the surface. Freeze-thaw damage can break the bond before the mortar gains strength. The National Park Service advises protecting and controlling the cure of fresh repointing mortar for exactly that reason in its Preservation Brief on repointing historic masonry.
A practical cure routine looks like this:
- Mist lightly as needed: Keep the joints from drying out, especially during the first few days. Damp is the goal, not saturation.
- Cover the work: Burlap or another breathable cover helps slow evaporation and shields the wall from direct sun and wind.
- Watch the forecast: Skip repointing if freezing temperatures are expected, or if the wall will sit in intense heat and full sun all day.
- Leave the wall alone: Do not wash, seal, or paint fresh joints until the mortar has cured out properly.
Three to seven days of damp curing is a good working range for many repointing jobs, with the longer end making more sense for lime mortar, dry weather, and porous old brick.
One field check helps. Rub the joint with your finger after it has had time to firm up. If it still powders easily or feels chalky at the surface, it is drying badly or the mix was wrong for the wall. That is usually a warning sign, not something to ignore and cover later.
When to Call a Masonry Contractor Instead
A lot of articles make repointing sound like a universal weekend project. It isn't. Some brick repairs are straightforward. Others carry enough structural, material, and access risk that hiring a contractor costs less than fixing a bad repair later.
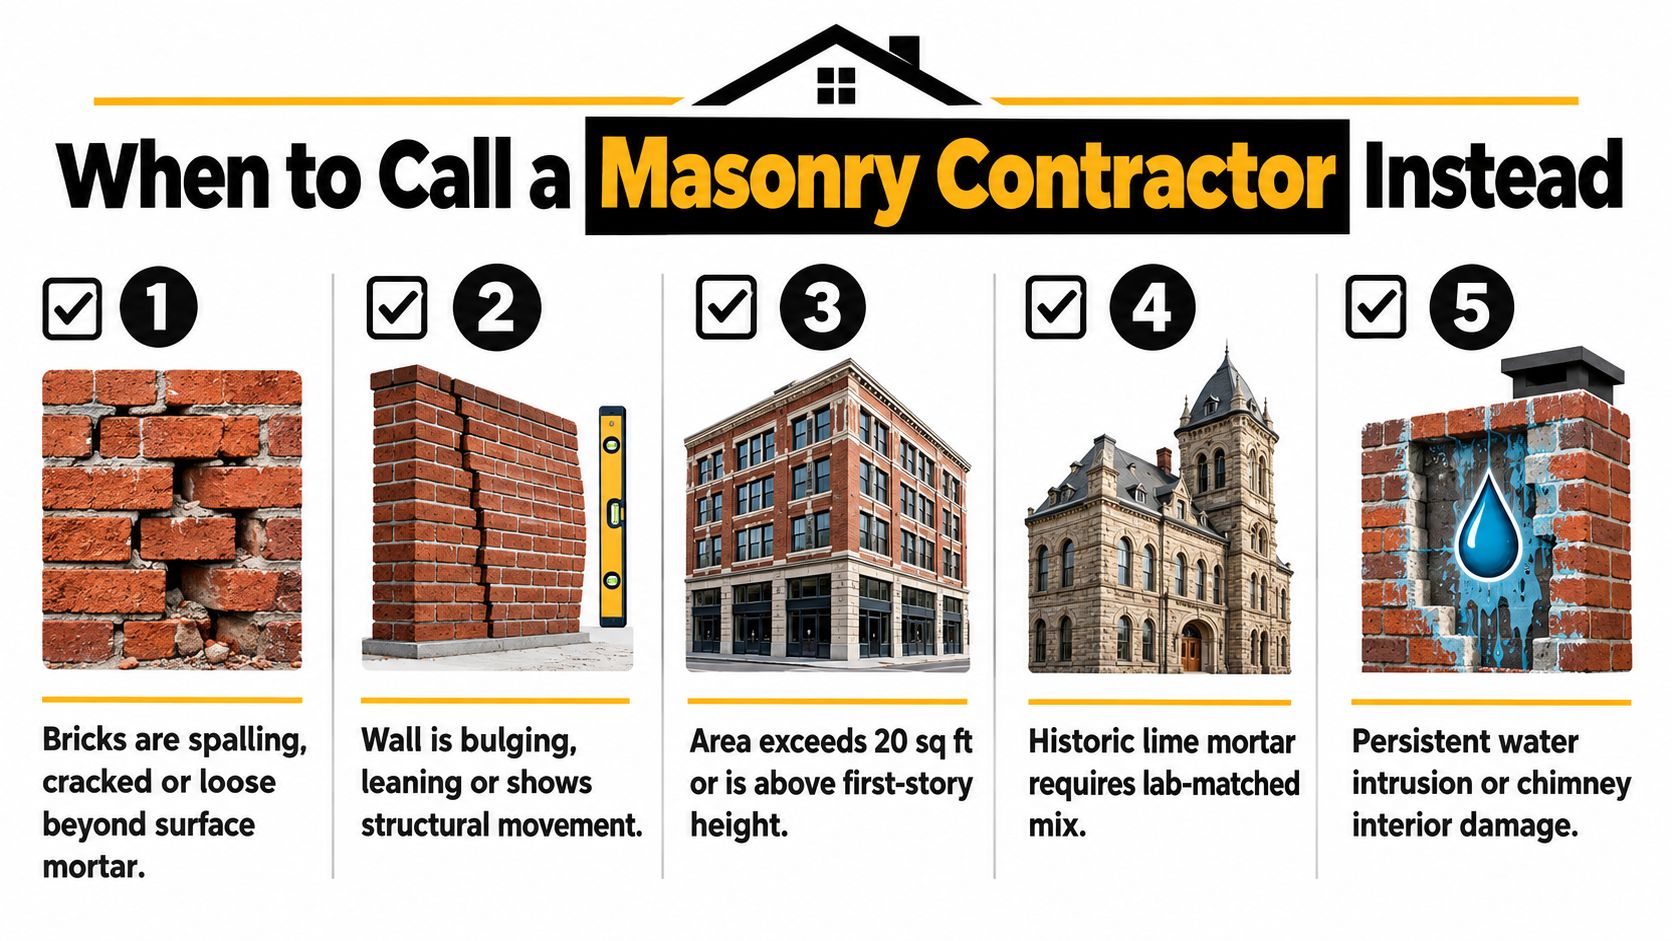
If the wall is above first-story height, you're already dealing with access equipment, falling debris, and the need to keep your cuts uniform while standing on scaffold. That changes the job completely. The same goes for chimneys, parapets, and any wall with active water entry.
Jobs that deserve a pro from the start
Some conditions should end the DIY debate.
- Structural movement: Stair-step cracking with displacement, leaning walls, or cracks running through bricks instead of only through mortar.
- Active moisture behind the wall: Repointing over trapped water usually leads to repeat failure.
- Historic masonry: Older brick often needs mortar analysis, not shelf selection.
- Widespread distress: If damage is spread broadly across the wall, consistency becomes hard to maintain by hand.
- Loose or broken units: Brick replacement may need to happen before any joint work.
Lowe's consumer guidance also notes a split between traditional repointing depths and shallower modern repair products. It points out that traditional removal often goes to about 2 to 2.5 times the joint width, while some repair products are intended for shallow-joint use up to about 1/2 inch and may carry full cure windows of 5 to 7 days, which is a good reminder that not every tube or patch product is a substitute for full repointing, as described in Lowe's mortar repair guidance.
A final pre-job sanity check
Run through this before you cut anything:
- Confirm the joints are failed. Don't confuse dirt, staining, or minor surface cracks with true mortar loss.
- Identify the existing mortar type. Older walls may need lime-based repair.
- Choose the removal method. Hand tools for softer masonry, grinder for harder joints and larger areas.
- Plan the joint depth. Size it to the joint width, not to guesswork.
- Stage mortar, water, and protection. Don't mix on the fly without a curing plan.
- Pick the right weather window. Keep the work within the 40°F to 90°F range used for safe curing conditions.
- Know your stop signs. Loose brick, deep hidden voids, and movement cracks mean it's time to call in a masonry contractor through a service focused on residential concrete and masonry repair.
Bad repointing often costs more to undo than careful repointing would have cost in the first place. That's especially true when hard modern cement gets forced into joints that were meant to breathe and move with lime mortar. If you're not sure whether the wall needs repair, reconstruction, or just moisture correction, the smart move is to diagnose first and cut second.
Atlanta Concrete Solutions handles masonry repair work that goes beyond surface patching, including brick replacement, tuckpointing, custom patching, and color-matched repair where failing mortar is only part of the problem. If you're dealing with damaged joints, spalling brick, or a wall that needs a proper assessment before anyone starts grinding, visit Atlanta Concrete Solutions to review services and request help with the repair.